All,
Okay, this is part two of the fight for Rhein-Main Airbase. We left off with a very small force from Team Whiskey (two infantry platoons from Kilo Company, two TOW sections, and a couple SF teams) trying to keep the Soviet armored horde from overrunning the airbase, and things weren't going so well, particularly given the fact the Soviets just shot down our air support...
Looking west to east at the US left, Soviet riflemen of Mech 2 set about rallying some faltering BMPs, while others move up and fire on a 1st Platoon rifle team (center), which had just knocked out a BMP with their LAWs, and SF Tm1 (bottom right). The former became 'men down,' the latter pinned.
Then the Soviets set about rallying themselves while more rifle teams moved up, with one taking another shot at the SF Team, no effect.
The Soviet rifles were good, but the damaged BMP (center right) only got up to pinned, while the other fell back and hunkered (far left, red bead).
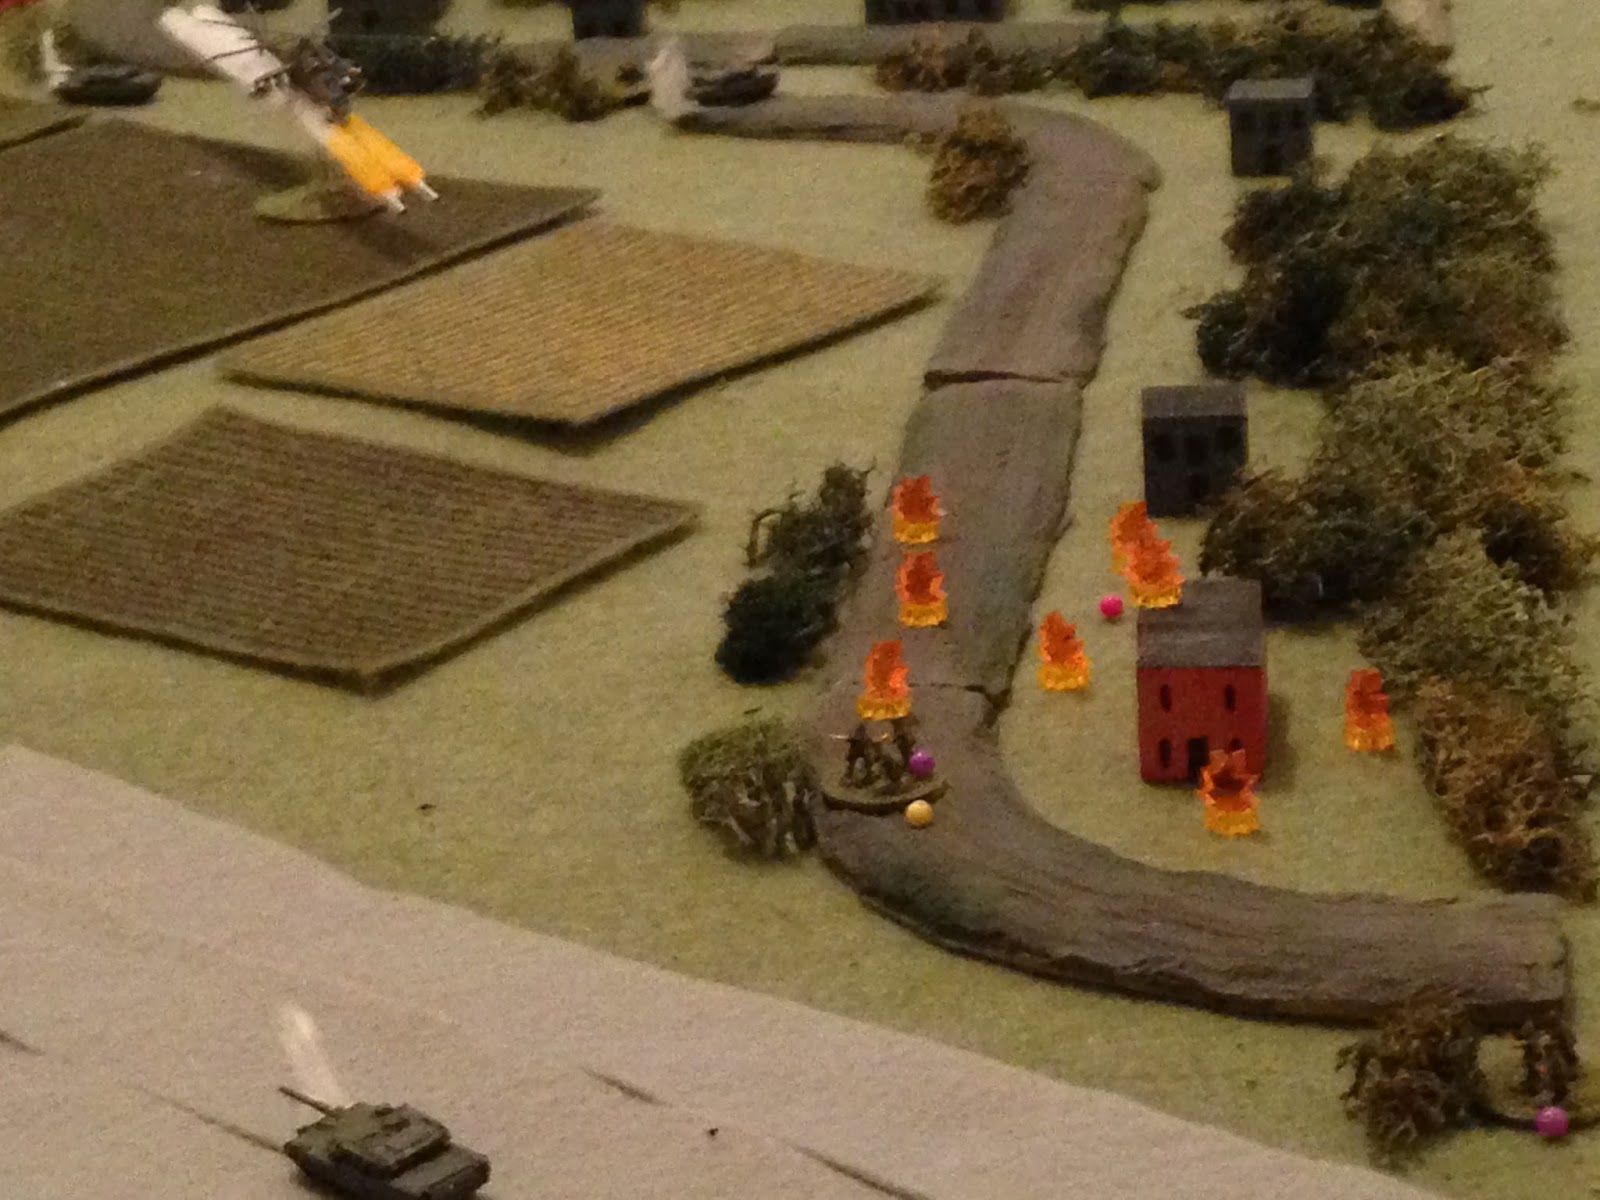
Looking east to west, with Soviet Mech 3 just visible at bottom right, TOW 2 fires on the flank of a BMP of Mech 1, with SF Tm 2 nearby (atop orange building at bottom center left).
The target BMP is knocked out, while a nearby BMP is pinned.
TOW2 then falls back (bottom right, from bush at center right).
The battalion net crackles to life, and Captain Bronshstein's RTO says "Sir, you're gonna want to hear this." "I'm a little busy, how 'bout the Reader's Digest version?" "Sir, cavalry is on the way!"
And with that, three M1 Abrams of Lt Roberts' tank platoon came roaring up the flightline to stem the onslaught.
Vehicle Three (V3, bottom center left) pulls up short and fires on a BMP, while Roberts and V2 move forward, where another BMP snap fires its 30mm gun on Lt Roberts' tank.
Lt Roberts' tank is pinned by the deluge of 30mm rounds bouncing off it (left, yellow bead), while V3's round (bottom left) totally misses its target (top right). The enemy BMP launches a Spandrel ATGM in return, though the missile skips off, pinning V3.
V2 rolls forward past Roberts' tank and fires.
And it's also a TOTAL MISS!!! The BMP, having already fired and pinned Roberts' tank, now cuts loose again with his 30mm gun.
And, at point blank range, the 30mm rounds rip V2 (center right, with Lt Roberts' pinned tank at bottom left) wide open.
Hmmm.... Not what I was expecting. Three US tanks come on. One gets pinned before firing a shot, two fire and totally miss their targets, then one gets pinned and one gets destroyed by return fire. I've had better...
At center right, the enemy CO's BTR50 moves up and rallies the BMP pinned when TOW2 (off camera to top right) destroyed the BMP just above him.
And then the BMPs of Mech 1 push ahead and swarm Lt Roberts' two remaining tanks, both of which are pinned.
Apparently the firing dice have gone totally cold, because the Soviets miss both Roberts' tank and V3, which auto-rallies both and they get to return fire.
Roberts' 105mm HEAT round immobilizes the BMP at left, and the crew bails, while V3's round immobilizes the BMP at bottom center, but the crew stays.
The Soviet tanks push forward behind Mech 1's BMPs.
And they open fire on Lt Roberts' tanks.
Lt Roberts' tank (center) is missed and returns fire. V3 (bottom left) is hit and immobilized, but the crew remains in the vehicle (with Sgt Bajers' men visible with purple beads, and one of TOW1's teams with blue bead). V3 is hit again but not penetrated (that is, the vehicle was hit and received immobilizing damage again, and the crew once again decided to stay).
Roberts' round strikes just short, forcing a T-72 to fall back (top left, red bead). One more T-72 fired at Roberts and pinned his tank again.
On the US left, you can see the pink bead at center right marking the position for Soviet artillery. Captain Bronshtein moved over (bottom center right) and rallied SF Tm 1 (on gray building at bottom center). A rifle team is at far left, dealing with heavy casualties, while Lt Candersen and his other rifle team is at right, one hunkering and the other dealing with heavy casualties too (red and white beads, respectively).
Capt Bronshtein moves to Lt Candersen and the hunkering team. Candersen's team is good, but the rifle team only gets up to pinned. Wanting to get back in fighting shape, they try to self rally.
But they fail and fall fall back, where they are gunned down by a BMP of Mech 1 that's actually gotten behind them (they are at far right, retreating from far left).
Lt Candersen and his team rush forward (bottom left, from top right) to try to rally the 'men down' rifle team. But they've taken too many casualties and melt away.
Perfect: I try to rally two teams, and they are both out of the fight...
Looking southeast to northwest at the US right, the US Tank Company Commander, Captain Lemmey, leads his tank and V4 from Lt Roberts' platoon onto the battlefield. Mech 1 BMPs and Soviet tanks are spread across the top, with TOW2 and SF Tm2 at right.
Both tanks rumble forward, with Capt Lemmey firing on a BMP of Mech 3 (far right), while V4 fires on the hunkering T-72 at top center (the one Lt Roberts drove back).
Lemmey's gunner fires, knocks out a BMP, traverses, fires again, and knocks out another BMP! The BMPs were still carrying infantry, so two enemy rifle teams are knocked out, and another BMP was forced to fall back and hunker (far left, red bead, with the two BMPs at top right the ones that just got knocked out).
V4's gunner is not quite as efficient: the round misses (far right explosion), but forces the hunkering tank to fall back again (bottom left, red bead).
In the US center, TOW1 reloads (blue beads at bottom, with Sgt Bajers' platoon nearby and Lt Robert's tanks at left).
With Capt Lemmey's providing overwatch, SF Tm 2 sneaks forward (center right).
While on the US left, SF Tm1 falls back and, having already used their LAWs, charges into close combat with the BMP that just gunned down one of 1st Platoon's rifle teams (center, from top left, with Capt Bronshtein at top left).
The SF team is able to knock out the BMP (bottom left). They then sneak into the building at left center.
Looking north to south, the Soviet CO (bottom left) marks Capt Lemmey's tanks for the Hind (top left, with Mech 1 infantry spread across the photo from left to right).
And Soviet arty finally begins to fall on the US left, bracketing Capt Bronshtein's command team, with Lt Candersen at top left and SF Tm1 at right).
Bronshtein's team is men down (white bead at left), while SF Tm1 falls back (red bead at bottom right).
Nearby, two of Soviet Mech 2's BMPs self rally (far left red bead, center yellow bead) while two more push forward (center right).
The damaged BMP rallies and moves off camera to right, but the hunkering BMP fails again, falling back to top left (from red bead at left center).
Lt Candersen react fires with a LAW.
With Candersen't team at bottom right, the target BMP (explosion) is knocked out, while the BMP behind him falls back to hunker (top left), and the BMP behind him is pinned (top center, left bead).
Looking west to east at Soviet Mech 3, Mech 3's riflemen push forward, rallying a BMP (top left).
And then, looking north to south, Mech 3's two remaining BMPs move up and kick out their infantry. Captain Lemmey's tank is just visible at top left,
Looking west to east, the infantry of Soviet Mech 1 advance behind their BMPs and the Soviet tanks. One of the teams stops off to rally the tank hunkering from near misses by Lt Roberts and V4 (top left).
And here comes the Flying Tank, near Mech 3.
He acquires and launches a Spandrel at V4.
Another look at the Hind launching a Spandrel at V4, which totally misses!
And that's a look at the battlefield at the end of Turn 4. Nothin' but blood, guts, and spittin' ass, with the Soviets being chopped down fairly well, but the US almost whittled down to nonexistence. So far the Soviets are down fifteen vehicles (14 KO and one immobilized) out of their 32, so, in order to win, they really can't afford to lose any more.
Turn 5 starts with the Hind activating again, and this time he acquires both Capt Lemmey's tank and V4. Missiles are launched...
My dear Lemmey (top left) becomes a crispy critter, while V4 is only pinned by a near miss.
While in the center, the Soviet T-72s push forward. Lt Roberts' gunner snap fires.
His aim is true, and one T-72 becomes a burning hulk, but two more move up and fire on Roberts' vehicle and V3.
Both M1s are hit and immobilized, and both crews bail out. Chicken@#$%s!!!
Perhaps I didn't make it clear that I needed you to stay in your tanks until you die?
Looking west to east at the center (with Roberts' burning tanks at right/far right), the rest of the Soviet tanks advance (center). 2nd Mech Plt and TOW1 is at top right, Capt Bronshtein is the white bead at bottom center left, and Lt Candersen is at bottom left.
On the US right, with Capt Lemmey's tank burning at top left, TOW2 falls back and rallies V4. This means TOW2 will need another turn to reload. I don't think it will matter...
A BMP of Mech 3 (center left) launches a Spandrel at V4, while another BMP moves forward (center, between jetliner and treeline).
The freshly rallied V4 is knocked out, and TOW2 takes heavy casualties.
The BMP that just killed V4 moves up (bottom center, on flightline, from next to the Hind).
On the US left, the infantry of Mech 2 swarm Lt Candersen's command team, while two teams try to rally their BMPs back into fighting shape.
The hunkering BMP is good (center), but the damaged BMP falls back (far left, from top right).
All those dice aimed at Lt Candersen and all they could come up with was a 'fall back.'
So Candersen's team retreats and hunkers (bottom right, with Capt Bronshein above them).
The two teams of TOW1, having reloaded last turn, move atop the buildings at bottom right and cut loose.
They pin a BMP of Mech 1 (bottom left), and knock out the Soviet ZSU-23/4 (top center).
Not great shooting, and certainly knocking out the ZSU would have come in handy BEFORE it shot down the A-10...
On the US right, SF Tm2 begins moving left, stalking the BMPs of Soviet Mech 3 (center left and far left). But the Mech 3 commander spots them and react fires.
The fire is ineffective, and SF Tm2 launches its LAWs at the nearest BMP.
The target BMP is knocked out (center right), while his partner is sent to hunker at top right (next to a T-72).
On the US left, Lt Candersen (top left), Capt Bronshtein (top center left), and SF Tm1 (bottom left) all successfully self rally.
The Soviet CO (off camera to top) marks TOW1's positions for artillery (pink bead at bottom center right).
While the infantry of Mech 1 and the CO's BTR50 move forward. They successfully rally the BMPs at top left and bottom center.
And then, thanks to lucky cards and a great activation roll, the Soviet arty falls on the US center.
Somehow Sgt Bajers' riflemen weren't hit, but one TOW team is pinned (yellow bead), while the other is forced to fall back off the map. Hell, they're the lucky ones ;)
On the US left, a BMP of Mech 2 falls back to rally his compatriot (bottom left), but only gets him up to pinned, while the other BMP advances (center right) and fires on Capt Bronshtein's command team.
Gunning the US onsite commander and his men down...
Looking north to south at the US left, the infantry of Mech 3 move forward. All that's left on that side is SF Tm2 (top center) and one team of TOW2 (off camera to top center), and they're men down.
In the center, Soviet Mech 1 is down to two BMPs. The immobilized one at top left self rallies, while the other pushes forward onto the flightline, still laying smoke.
Using some form of black magic, the BMP spots the dug-in infantry of 2nd Plt. The 30mm gun rattles and a rifle team is put out of the fight...
And that's the end of Turn 5.
Turn 6 starts with Soviet arty again raining down on the US center, but somehow no one is hit!
But then the Hind adds a bushel of 57mm rockets to the destruction in the US center.
The TOW team is knocked out, while Sgt Bajers' command team is pinned.
The immobilized BMP of Mech 1 (top left) fires on Sgt Bajers' team, while Bajers' other rifle team (bottom right) react fires on the other Mech 1 BMP as it moves forward.
The BMP becomes a bonfire (sooooo close to getting off the board), while Bajers' team is forced to fall back (center, red bead).
But then the Soviet tanks come crashing down the flightline, and the US force has no more anti-tank weapons.
BMPs fall in behind the tanks, while infantry fans out to both flanks.
The US survivors on the left prepare to E&E out of the area back to friendly lines (that's Lt Candersen and SF Tm1 at bottom left, Sgt Bajers and a rifle team at bottom right).
The US survivors on the right do the same (bottom right is a team from TOW1 and SF Tm2).
Well, that's the definition of a Pyrrhic victory, right? I 'won' the game by knocking out more Soviet vehicles than they were able to exit off the south edge of the map, but I did so at the cost of pretty much my entire force. It was another tough fight, but that's what I expect from NATO vs WarPac games, and it was a lot of fun. I wish I could have done better; the A-10 didn't do much before being shot down, having TOW2 get one team eliminated right off the bat sucked, the US tanks were rather underwhelming, and the Soviets, once again, had some great spotting rolls to sniff out US infantry intent on ambushing Soviet armor. Its' funny how many times the Soviets have made a 33% chance roll to sniff out an ambush throughout the campaign. Let's move on to casualties.
US
Capt Bronshtein is KIA, gunned down by a BMP.
Capt Lemmey was turned into a S'more by the Hind.
Lt Roberts, Lt Candersen, and Sgt Bajers are all MIA. Their forces were all destroyed in the fight, and the three are probably somewhere in the German countryside trying to avoid Soviet patrols and get back to friendly lines.
2 x TOW teams were KO
3 x Rifle teams were KO
1 x Command team was KO
5 x M1 Abrams were KO
1 x M577 was KO
1 x A-10 Thunderbolt II was KO
Soviet
3 x Rifle team were KO
15 x BMP were KO
1 x T-72 was KO
1 x ZSU-23/4 was KO
So, the elements of Team Whiskey were able to put tremendously high casualties on their foes, but not enough to hold the position. The Soviets ran through them, easily taking Rhein-Main airbase, throwing area NATO forces into a headlong retreat for the Theodor-Heuss-Brücke, the last remaining bridge across the Rhine. Team Whiskey is now down to its commanding officer, LtCol Lacy, a single tank platoon under Lt Travers, India Company under Captain Phillips, which is down to two platoons (under Capt Sighe and Lt Ensmith), and a few attachments from Weapons Company. They are streaming towards the bridge, hoping to beat the Soviets there.
V/R,
Jack


Awesome as always.
ReplyDeleteThanks Nick, I appreciate it!
DeleteV/R,
Jack
Edge of the seat stuff. Great AARs, really enjoying them, especially the added details. Great looking game, hope you are enjoying playing them as much as I am reading the AARs.
ReplyDeleteCheers, Andy
Andy,
DeleteHey man, how are you? Thanks for the kind words, glad you're enjoying the batreps. Nowhere near as big as your last Cold War outing ;)
And my apologies: not only were you drafted into Team Whiskey, but I really screwed your name around. I'm not sure why I did it as you use your name on the internet (I try to protect folks' privacy if they're using a 'nom de internet'), but I screwed your Whiskey name all around: your representative to WWIII is Lt Candersen, which was supposed to be a 'mixed-twist-up' of Andy Canham.
V/R,
Jack
Ouch. I suspect that Pyrhic victory means Whiskey took the hit but everyone else got out, unless the Soviets want to push unsupported tanks into a large BUA! It's like a victory, but...
ReplyDeleteSo, Team Whiskey is now a somewhat bAttered Company or thereabouts?!
TP,
Delete"...everyone else got out..." Heck, we like to think so, but things aren't looking so hot, and I'm not sure anyone is going to make it out ;)
Team Whiskey is down to two Mech Platoons, a Tank Platoon, and a few Weapons Company attachments. Rough times...
V/R,
Jack
Well, maybe none of the rest of Whisky get out, but I'm sure other units and the civvies did; possibly with Soviet tanks over looking the Rhine bridge when it went up, but hey. Close only counts with nukes and mortars, right?!
DeleteTP,
DeleteOh, stop trying to make me feel better about Team Whiskey's 'noble sacrifice' ;)
"Close only counts with nukes and mortars, right?!"
I have a feeling we're about to find out...
V/R,
Jack
Another great AAR Jack! Luckily this was only part of Team Whiskey so you would only lose a part, although you have been losing parts the whole way through :-( and so are down to nearly nothing. I see you have just posting the last AAR and will have to find time on the weekend to read it. See you on the other side of these 10 epic games!
ReplyDeleteThanks, Shaun! And yeah, losing only a 'part' at a time has resulted in me losing most of my parts...
ReplyDeleteV/R,
Jack