All,
Fresh off a French victory, the tables are turned, with the Allies fighting to hold a pair of fortified hamlets against the French onslaught, trying to buy time for their forces to regroup and reorganize. The French force arrayed against them is powerful indeed, but time is not on their side, and the battle-space too narrow for the entire weight of the French hammer to be brought to bear at once. The British and their Dutch allies settle in to receive the finest France has to offer. The scenario is "Fortified Defense," with the Brits and Dutch trying to hold at least one village (of two) for 15 turns. Both sides start with six units, but at any point in the game the French commander can remove all current units on the board and start with six fresh ones, the idea being the first wave has broken itself and falls back, and the second wave comes in to continue the fight. No sweat, right?

Overview of map, north is up. The British will start anywhere on the map north of bottom edge of the right-hand forest, with infantry brigades in the two fortified hamlets: at left is Hugemont, at center top-right is La Hay Suisse. Fifteen turns for two waves of Frenchmen to come on the bottom of the table, move up, and evict the Brits and Dutch from both villages. Keep in mind that all hits on the infantry units in the villages will be halved, making them difficult to remove.
The opposing forces, with French on top and British/Dutch on the bottom. The French have three infantry, one skirmisher, and two cavalry (no artillery). The British have three infantry, two artillery, and one cavalry. That really sucks; the boy's got two arty batteries to sit back and pound me with...
For the French, General Dadie has committed the Guard: the Old Guard, the Middle Guard, and the Young Guard are the three infantry brigades; they are supported by a the 2nd Legere, the Grenadiers a Cheval (Guard Heavy Cavalry) and the Polish Lancers (Guard Light Cavalry). These are all Guard in name only, being treated as any other units.
For the British, General Nickolls has the 2nd Brigade of Foot, the King's German Legion, the Dutch 1st Infantry Brigade, the Dutch Foot Artillery Battery, the Royal Horse Artillery Battery, and a brigade of British Dragoons.
The initial dispositions of the British and Dutch allies. At far left, in Hugemont, is the KGL brigade, at far right, in La Haye Suisse, is the 2nd Foote, Between them is the Dutch 1st Infantry, with the Dutch and RHA batteries at top center left, and the British General and Dragoons at top right.
And here come them French!
At bottom center right, the 2nd Legere move up towards the wood. They are followed (from right to left) by the Old Guard, Middle Guard, and Young Guard. The Dutch battery (top left center) fires on the Young Guard (bottom center), but can't find the range as the Horse Grenadiers (bottom right) and Lanceers (bottom center) come on. The RHA battery (top center) then fires on the Young Guard, causing a couple casualties, as General Dadie moves to support them.
Turn 2 begins with the Dutch Battery (top left) again firing on the Young Guard, getting four hits (bottom left). The Legere move up into the wood (far right), while the Old Guard and Middle Guard (center) continue to press forward. The RHA battery takes the Young Guard under fire and attains several hits, bringing their total to 10. The Dutch infantry are a bit antsy (center top, just left of La Haye Suisse) and inch forward a bit.
The British Dragoons (top left) inch forward near La Haye Suisse while the French General rallies three hits off the Young Guard (bottom center), and the Young Guard pushes forward as the British General moves to the Dutch infantry (far left).
The French Horse Grenadiers (Grendadier a Cheval, top right) move between the Old and Middle Guard in order to get into the fight, while the Lancers swing to the left (bottom center).
And Turn 3 begins with the French Horse Grenadiers crashing into the Dutch 1st Infantry, landing a devastating ten hits!
The Horse Grenadiers (far right) recoil from the still standing Dutch (center-top), and the RHA battery (top left) continues its laser-like focus on the Young Guard (center right), again firing on them and getting a couple hits.
Perhaps the Allies would have been better served with their General rallying hits off the Dutch infantry, rather than firing the Royal Horse Artillery? The Lancers charge the Dutch 1st Infantry Brigade and shatter it! However, General Nickolls is okay.
The British General falls back behind La Haye Suisse (center), while the 2nd Foot (in the town) fire on the Lancers (bottom left), getting six hits. The Legere push forward (far right), finally in range, as the French General rallies more hits off the Young Guard (just off camera to bottom).
At far right, the Old Guard move up (Legere are above them in the woods, Horse Grenadiers are just below them). The Dutch Battery (top left) once again fires on the Young Guard (bottom right), taking their total hits to 11. The KGL look on helplessly in Hugemont (bottom left).
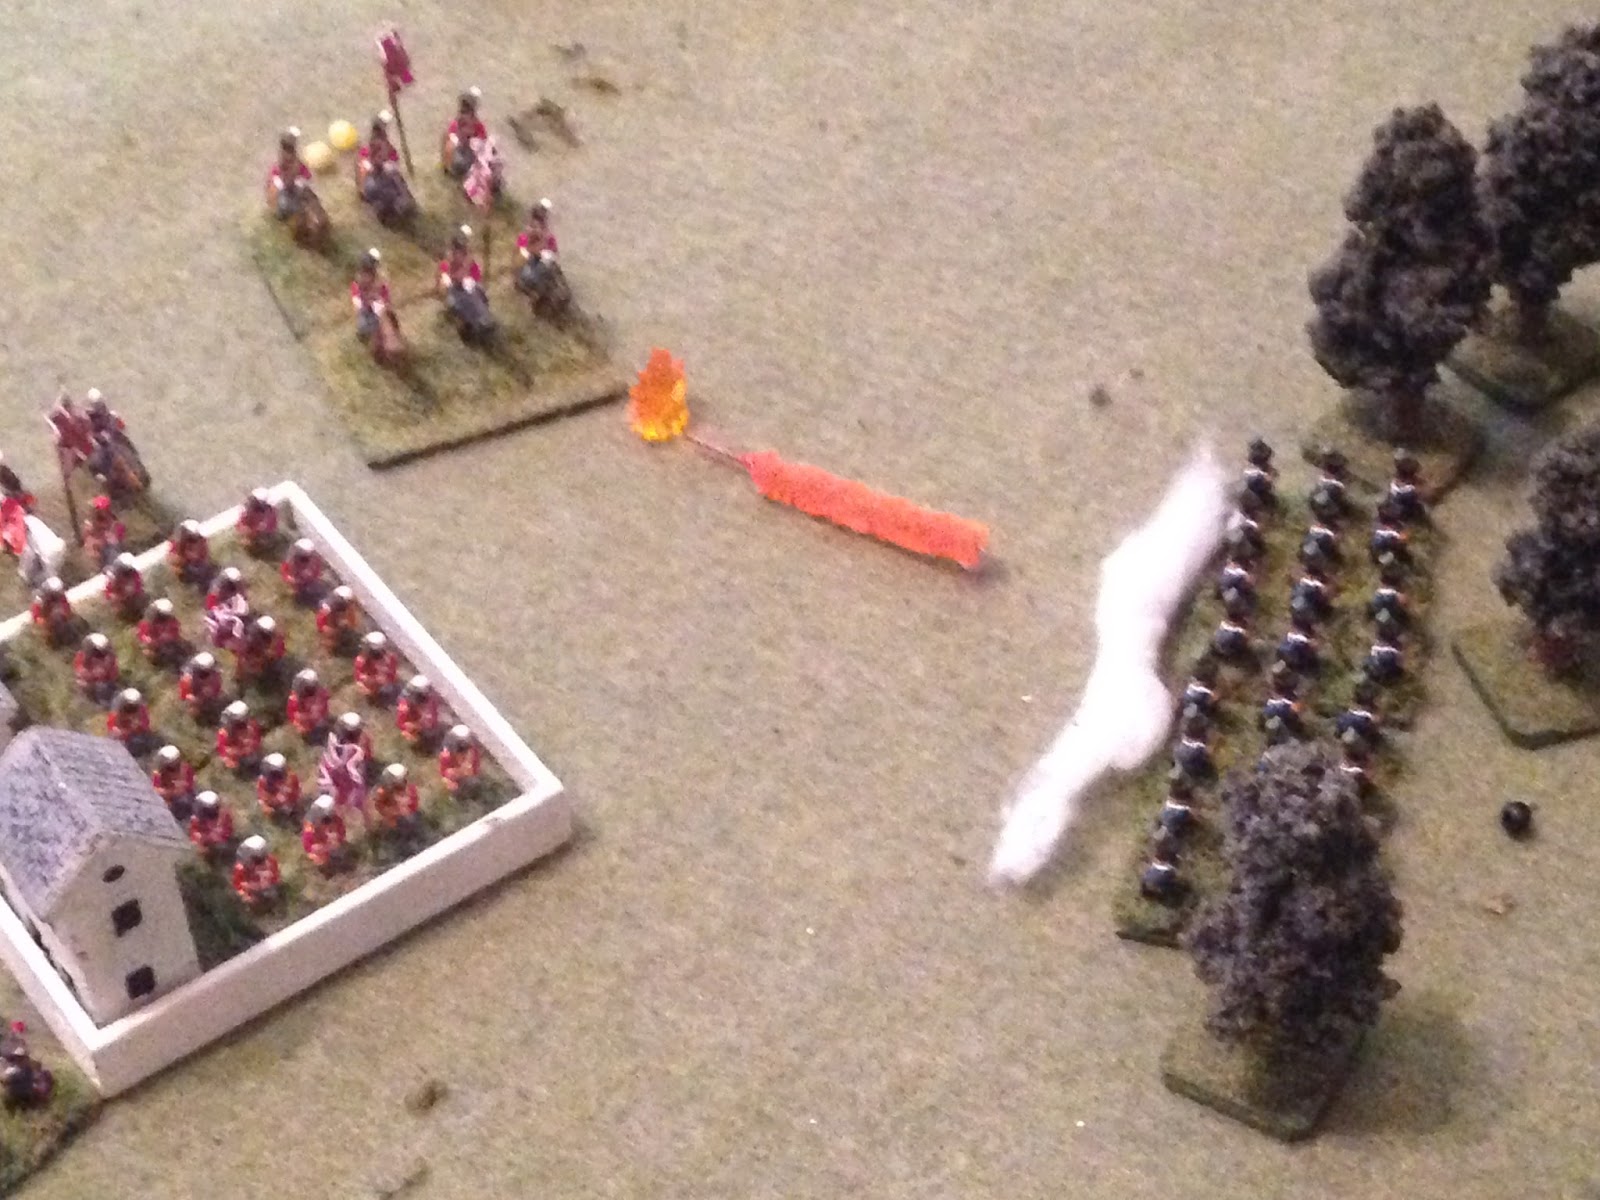
And then, rather sneakily, the Boy General slips his Dragoons through the gap between the woods and La Haye Suisse, charging them into the Old Guard and doing serious damage (10 hits)!
At top left you can see the Dragoons have fallen back through the gap, while the KGL (bottom center) weren't so helpless after all: they fire on the Polish Lancers (center), getting three hits (9 total).
The Middle Guard (center) and Young Guard (left, with Lancers just above them) push forward on La Haye Suisse. The French are pressing forward, but it's taking forever and they are taking heavy casualties...
Thus ends Turn 3.
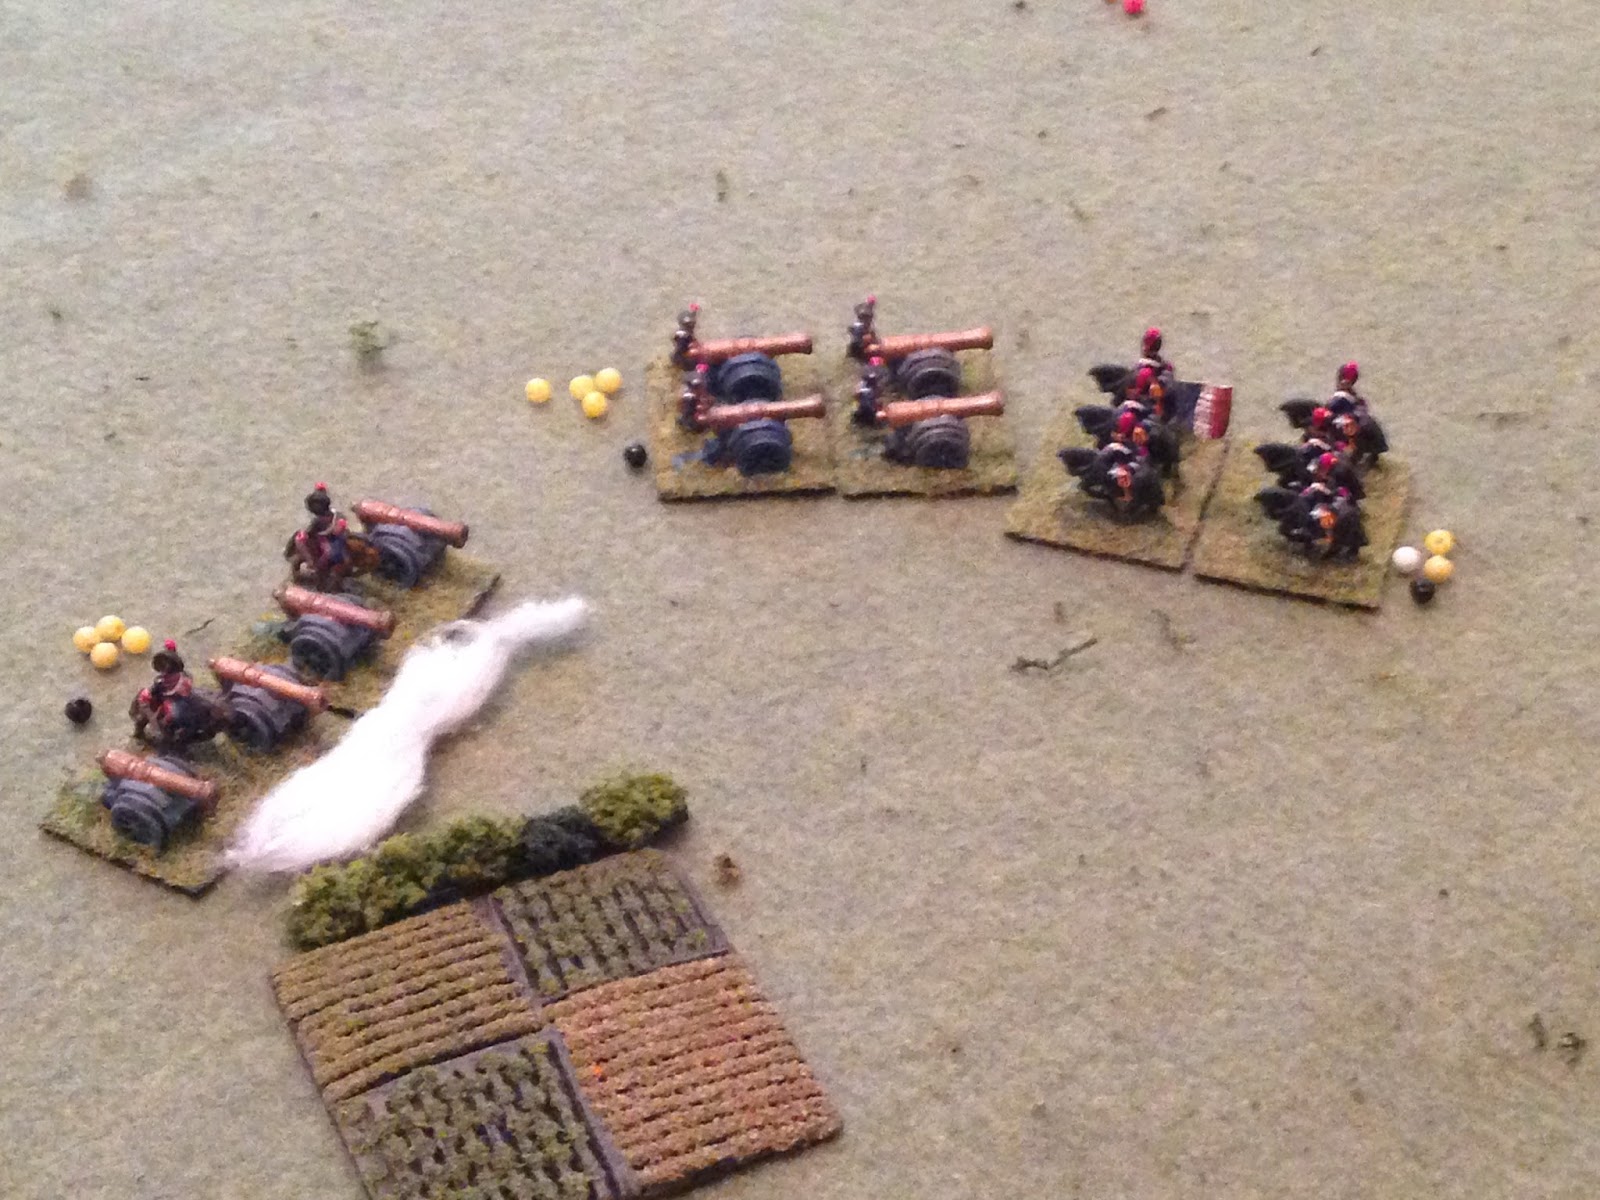
Splitting between the two fortified villages, the Lancers charge the British Royal Horse Artillery, with the Dutch Battery looking on. But the Lancers only manage four hits...
The Lancers (bottom left) recoil from the Allied artillery (off camera to left top), while the Old Guard charges into melee with the British 2nd Foot in La Haye Suisse (center), scoring a respectable four hits.
The Young Guard (left), led by General Dadie, charge into melee as well, scoring two hits (six total on the British 2nd Foot). But the stubborn Brits lash out, and the Old Guard (bottom center) are routed!!!
What!!!???
The Legere (right) fire on the British Dragoons from the safety of the wood, scoring a measly two hits...
And the Grenadiers a Cheval follow up, slicing past La Haye Suisse and crashing into the Dragoons (top left), inflicting heavy casualties (9 hits, 11 total).
The Horse Grenadiers fall back (off camera to top right), while the RHA (top center left) fires canister into the Lancers (top center right), but the Brit artillerists are suffering and manage only a few hits (13 total on the Lancers). But then the KGL (bottom center) reach out with some long range musketry to finish off the Polish Light Cavalry!!!
And the British follow this with their cavalry returning the charge, the Dragoons slamming into the French Horse Grenadiers (center), putting nine hits on them!
The British Dragoons (top right) fall back (from the Horse Grenadiers at bottom center), while the Middle Guard (center) charge into melee with the British 2nd Foot, filling the line between the Young Guard (left) and 2nd Legere (right) vacated when the Old Guard routed. The Middle Guard put four hits on the British infantry (10 total), while the French General pulls 5 hits from the Young Guard (left, 6 total).
But then the Dutch Battery (bottom left) fires on them and puts one more hit on the Young Guard (center top), while the British General (top center) rallies the 2nd Foot, removing a whopping 6 hits from them (leaving them at 4 total).
I'm never gonna dig them Brits out of there...
Turn 5 begins with the French Horse Grenadiers (top center) riding down the British Dragoons, sending them fleeing from the battlefield.
But then the Royal Horse Artillery (bottom left, with Dutch Battery just below them) delivers devastating fire into the flank of the Young Guard (top center), routing them. General Dadie is unharmed.
The French General moves to support the Middle Guard (bottom right), as the Dutch Battery (top left) fires and puts several hits on them. The Middle Guard then moves back into melee with the British 2nd Brigade of Foot, which sees both sides take modest casualties, followed by both Generals rallying them off.
The French Legere fire on the Brits in La Haye Suisse, getting only one hit, which ends Turn 5.
The RHA Battery (top left) fires on the Middle Guard (bottom center right), inflicting two hits on them, while the Legere (far right) deliver a harmless volley into the sturdy walls of La Haye Suisse. The Middle Guard regroups and shoves back into the village, inflicting five hits on the British 2nd Foot (9 total).
The Dutch Battery (top center left, with RHA Battery at top left) moves nearer La Haye Suisse, while the 2nd Foot fires a musket volley into the flanks of the French Horse Grenadiers (center right), taking them to 12 hits total.
On their last legs, the Grenadiers a Cheval (top right) charge the Dutch guns, getting four hits on them.
The Horse Grenadiers (top center) fall back, horses blown, or nearly so, staring into the guns of the Dutch. Who will be first to regroup and reorganize?
At bottom right, both Generals rally hits off their infantry brigades at La Haye Suisse.
Turn 7 begins with the French heavy cavalry charging again, inflicting tremendous damage on the Dutch artillery! But it's not enough, ending with a total of 12 hits, just three shy of elimination...
The French cavalry recoil (top right), and the Dutch gunners fire off one last blast of canister, eliminating the Grenadiers a Cheval.
The Royal Horse Artillery Battery (top left) fires at the Middle Guard (bottom right), but scores no hits. The antagonists at La Haye Suisse once again lock horns, followed by their Generals rallying off hits, leaving the French Middle Guard with 5 and the British 2nd Brigade of Foot with 3 hits.
At top right, I forgot to remove the Horse Grenadiers...
And they're still there. The Legere, tired of watching their musket balls bounce harmlessly off the walls of La Haye Suisse, dash forward (center, from bottom right), looking to go toe-to toe with the Allied artillery.
And Turn 8 starts with the Legere (right) firing on the Dutch Battery, but getting causing no casualties(!!!). The Dutch artillery returns fire with canister, causing moderate casualties (4 hits).
But then the RHA Battery (bottom left) packs up, moves up, unlimbers, and delivers a devastating volley of canister at point blank range into the flank of the Middle Guard, eliminating them and knocking General Dadie from his horse!
The French fall back to re-group...
The second wave consists of the French 1st Ligne, 2nd Ligne, and 3rd Ligne, the 1st Legere, the 1st Dragoons, and the 2nd Cuirassiers.
Turn 9 begins with (from left to right) the 1st, 2nd, and 3rd Ligne Brigades storming ahead on the far left, near Hugemont. The 1st KGL fires on the 1st Ligne, scoring two hits.
The 1st Legere (bottom center) comes on to the right of the Line Brigades, and then the Dragoons and Cuirassiers come on to the right of them. The Royal Horse Artillery moves up and pours canister into the Cuirassiers, scoring 10 hits!!!
For goodness sake. Off camera to bottom left, General Dadie, his left sleeve hanging empty, moves to support 1st Ligne.
The Dutch Battery (top center) fires on 1st Ligne (bottom left), scoring a couple hits (4 total).
Turn 10 starts with the Cuirassiers running down the British Royal Horse Artillery.
Only to be caught in a crossfire: the KGL (bottom left), 2nd Foot (top right), and Dutch Battery (top center) all fires on the Cuirassiers, but manage only two more hits (12 total).
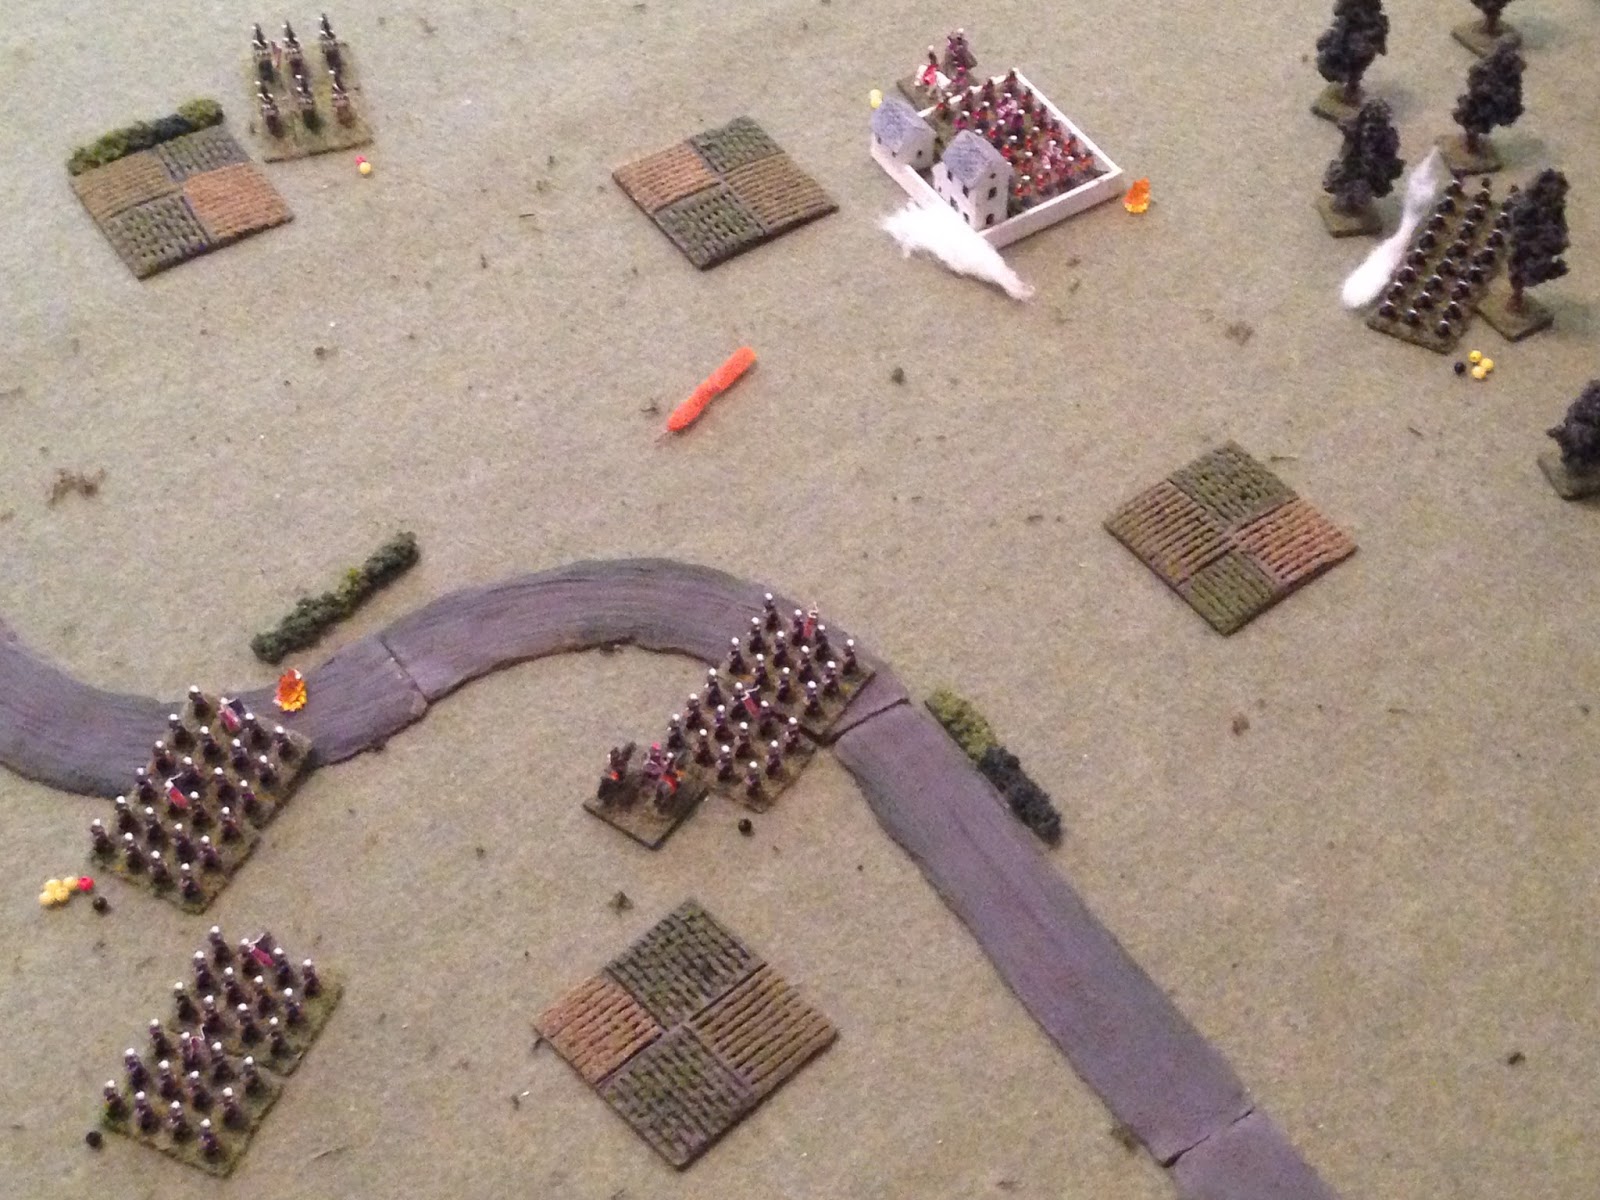
The French General (bottom left) rallies the hits off 1st Ligne), and all the French infantry brigades press forward on Hugemont. The Legere (bottom right) move right to get near the wood adjacent La Haye Suisse (top right). In the center, the Dragoons push past the Cuirassiers, moving to a trot as they near the Dutch Battery (top center).
Turn 11 begins with the Dutch Battery firing canister (top left) and the 2nd Foot volleying on the French Dragooons (bottom center left), but the two only manage a total of six hits...
And they easily run down the guns of the Dutch.
There are no remaining targets on the board for the French cavalry, they can't charge the fortified villages. It's all down to the two villages now...
Hugemont under seige: all three French infantry brigades attack the King's German Legion Brigade, totaling eight hits, while the 3rd Ligne (top center) receives five hits.
The Cuirassiers (bottom right) fall back as the Legere (top center right) move into the wood near La Haye Suisse.
Turn 12 sees Hugemont fall as the 1st and 3rd Ligne push the KGL out; one down, one to go!
Back on the right, the British 2nd Brigade of Foot still sits in La Haye Suisse, and they fire on the French Legere, scoring three hits.
The French General leads the 2nd Ligne (bottom left) away from Hugemont and towards La Haye Suisse. The Legere (top right) fire and score one hit on the British 2nd Foot.
Turn 13 sees the Legere fire again, scoring two more hits on the 2nd Foot.
The French infantry (bottom left) move on La Haye Suisse; the British General rallies only one hit off the 2nd Foot (2 total), and they fire on the 3rd Ligne (bottom far left), getting four more hits (9 total).
Turn 14: the French Legere (top right) and 3rd Ligne (bottom left) both fire on La Haye Suisse, but manage only two hits (four total).
And then the 1st Ligne (bottom center left, with 3rd Ligne just visible by the smoke from their volley, at far left) moves nearer the village, and General Dadie leads 2nd Ligne into melee with the British 2nd Foot (far right), scoring three hits (7 total).
The 2nd Foot fights back, putting four hits on the French 2nd Ligne. And then both Generals rally their troops; in the overall scheme of things, what the French General did is irrelevant. But what the Boy General did pretty much secured victory. With but one turn left in the game, General Nickolls rallied six hits off his 2nd Brigade of Foot, leaving them with one.
This means the 1st, 2nd, and 3rd Ligne, as well as the Legere, need to score a total of 14 hits to eliminate them, despite the fact all hits are halved due to the Brits being in the cover of the fortified village. Put another way, I need to roll four D6 and end up with 28, and that is not possible (at least on my D6s); I can't win, but we play the turn out. The math is actually a bit convoluted, but if I roll sixes on all four rolls, I'll still end up one hit short.
The Legere (top right) fire and score no hits; 3rd Ligne (bottom left) fires and scores two hits. The French General leads the 2nd Ligne into the fray once again, scoring four more hits (7 total).
The British 2nd Foot (top right) fires on the French 3rd Ligne (bottom left), scoring three more hits (12 total), as the British General rallies one more hit off them (six total).
And the last gasp is the charge of the 1st Ligne (bottom left). They go in hard and fast, and score a respectable four hits, but this leaves the British 2nd Foot with a total of ten hits on the last action of the last turn, five hits short of elimination... The British 2nd Brigade of Foot is awarded Battle Honors for its defiant stand at La Haye Suisse.
Wow, what a fight! So damn close; come to think of it, this is the first game that time has actually played a part in. Of course I was just on the wrong side of it. The boy did very well, whereas me, I can think of quite a few tactical mistakes I made. I'm not sure if they'd have made a difference, but what stands out is 1) getting surprised when the boy slipped his Dragoons between the wood and La Haye Suisse and whacked the hell out of the Old Guard, which saw them knocked out not long thereafter, as well as them chewing up my Grenadiers a Cheval; and 2) getting my Lancers too far out to the left, where the KGL was able to whack the hell out of them with musket volleys. Those two issues weakened my cavalry to the point I couldn't finish off the Allied artillery in the first wave, and the Allied artillery and Dragoons beat up my 1st wave infantry to the point I couldn't take La Haye Suisse in the 1st wave, which I feel like I should have been able to do. And if I did that, Hugemont would have easily fallen to the second wave.
Another thing is, I suppose I should have just used the Legere to screen off the enemy cavalry and infantry; they were nearly useless against the fortified villages (they already fire at -2, and then you halve that). I'm getting tired of the boy kickin' my ass...
V/R,
Jack