Well, here's the lineup for Fulda Gap. Coming up, ten games of WWIII-gaming goodness.
Team Whiskey, AKA the fictional "4th Squadron, 11th Armored Cavalry Regiment," which looks like a 'normal' Mech-heavy battalion task force.
Commanding Officer: LtCol Lacy, Received the Medal of Honor (F9)
Executive Officer: XXXX
Charlie Company: XXXX
2nd Tank Platoon: 1Lt Travers
India Company: Captain Phillips (M-577), Received BS/V (F1), Received SS (F5)
1st Mechanized Platoon: Capt Sighe (formerly S-6, platoon reconstituted for F3)
-Platoon wiped out (F4), Platoon reconstituted from 3rd Sqdn, 11th ACR (F5-6)
-Sgt Stone, 1st Mech Plt, India Co, received SS/V (F4)
2nd Mechanized Platoon: 1Lt Ensmith , Received SS/V, Squad Leader received posthumous DSC, heavy casualties (F1)
Elements of Weapons Company:
-1 x TOW ATGM, All four gunners and their assistants received the Bronze Star with 'V' (F1).
-1 x .M-60 MMG
Casualties:
1Lt Eirserbe -Received BS/V (F1); -POW, platoon wiped out (F1)
2Lt Teigner -Received BS/V (F2); -KIA, platoon wiped out (F2)
1Lt Webster - WIA, platoon wiped out (F3)
2Lt Tinman - WIA, platoon wiped out (F3)
1Lt Macot (formerly S-4, platoon reconstituted for F3) - KIA, Received BS/V (F5)
Capt Keepers -MIA (F6)
2Lt Sorenson -Received BS/V, KIA (F6)
1Lt Ditteaux -Awarded Purple Heart, platoon wiped out, POW (F6)
1Lt Rownnan (from 3rd Sqdn, F5-6) -Received DSC, PH, KIA (F6)
Major Kavscott-Received BS/V (F7), KIA (F7)
1Lt Dillon -Received Purple Heart (F1), MIA (F7)2nd Lt LaManchew-Received BS/V (F7), KIA (F7)
C Co, 1st Tank Platoon: -one tank lost (F1); -platoon eliminated (F7)
C Co, 4th Tank Platoon: -Two tanks and PC lost (F6); combined with 3rd Tk Plt (F8)
I Co, 3rd Mechanized Platoon: transferred to K Co (F8)
K Co, 3rd Mechanized Platoon: wiped out (F3), Platoon reconstituted from 3rd Sqdn, 11th ACR (F5-6), wiped out (F7)
Wpns Co, 4 x 81mm mortar, Spiked tubes and swam Main River, MIA (F7)
Captain Bronshtein (incorporated when 1st Squadron, 11th ACR disbanded, F8), received the Silver Star and Purple Heart (F9), KIA (F9)
Captain Lemmey, KIA (F9)
1Lt Roberts, Received BS/V, Purple Heart (F4); MIA (F9)
1Lt Candersen (from 1st Sqdn, 11th ACR, F8), MIA (F9)
Sgt Bajers, received BS/V (F3), took over 3rd Mech Plt (F6), transferred to K Co (F8), received Distinguished Service Cross and Purple Heart (F9), MIA (F9)
C Co, 3rd Tank Platoon: Two tanks lost (F4); Received two tanks from disbanded 4th Tk Plt (F8); Platoon destroyed (F9)
Kilo Company: eliminated (F9)
K Co, 1st Mechanized Platoon: -wiped out (F6), platoon reconstituted from 1st Sqdn, 11th ACR (F8); wiped out (F9)
K Co, 2nd Mechanized Platoon: -wiped out (F3), Platoon reconstituted from 3rd Sqdn, 11th ACR (F5-6), wiped out (F6), transferred from I Co (F8); wiped out (F9)
Monday, August 31, 2015
Sunday, August 30, 2015
6mm Forces for Fulda Gap 1986
All,
Okay, Cuba Libre is wrapped up, and while I've got big plans for future Cuban Liberation Expeditionary Force actions, an opportunity came up that I just couldn't pass up. Mr. Ben Lacy contacted me and let me know he was working on a new Cold War Gone Hot, Fulda Gap scenario book. If you're not familiar, Ben puts out skirmish and company-level rules, along with a slew of scenario books, under Britton Publishers. The scenario books are fantastic, right up my alley. I own about a dozen of them, and if I was independently wealthy I would not only own all of them, but I would play through them as well. I already have plans to use several of his Normandy books for my Kampgruppe Klink campaigns, as well as some other Normandy books for my All American campaigns. I also have several Pacific campaign books I'm looking to use, as well as some modern SOF stuff. I highly recommend them, they are great products for us wargamers.
In any case, Ben contacted me about Fulda Gap and begged me to playtest the scenarios for him. Okay, that's not true; he contacted me, and I begged him to allow me to playtest them, he graciously accepted my offer, and so I set out to put together all the forces I'd need to play out all ten scenarios. I'm really excited about this campaign, and I want to do it right. I'd intended on starting the war this weekend, but with wrapping up Cuba Libre and real life (in the form of one of my kid's birthday, school starting, and baseball practice starting up) I fell behind, and so I won't get started with the actual fights until next weekend.
But I've got the forces finished up, and that's what you see here. The setting is that the Soviet Union has decided to invade Western Europe, and the opening shots come where everyone expected, Fulda Gap. The book is set up so that you can play the scenarios in whatever time frame you wish, from the beginning of the Cold War right up to the end. I thought that was a pretty cool idea, as each gamer has his own, personal idea of what would be coolest, whether it be the 50s, 60s, 70s, or 80s. While the first scenario officially starts with the exploits of the US 11th Armored Cavalry Regiment, because of the heavy casualties and rapidly changing situation on the ground, I would argue that you could actually use the book for whatever NATO nation's forces you want, be it US, West German, UK, or otherwise.
Being a child of the 80's, growing up with various movies and books (World War III, Team Yankee, Red Storm Rising, The Third World War, The Day After, etc...) threatening our (US) death at the hands of the Red hordes, I chose to go with US forces in the year 1986. As always, I will form a fictional battlegroup (4th Troop, 11th ACR) with characters as platoon and company leaders, to take into battle.
 The whole shebang, with Soviets on top and US on the bottom. The forces are in 6mm, with 95% being GHQ, with a few CinC and another manufacturer who is now defunct and whose name I can't recall (I bought them second hand).
 A head-on shot of both forces. The scale is one model equals one vehicle, fireteam, or weapons team, and the NATO forces are seriously outnumbered in each scenario, with the mission objective usually being to simply slow the enemy down. And I'm not sure I'll be able to do even that! ;)
 The Soviet Force: four command stands with vehicles, 16 T-72s, 18 BMPs (the models are BMP1s, but I'll treat as BMP2s so that the Soviet AFVs have the ability to kill NATO tanks/AFVs at close range with their chain gun, which the BMP1's low-velocity 73mm gun does not possess), 18 rifle teams, four SA-9s, four SA-24s, one ZSU-23/4, five AT5 Spandrels, four MGs, two Spetznaz teams, four mortars, a MiG-23, and an Mi-24 Hind-D.
 The command and air defense vehicles.
 The Soviet tank company (reinforced). I know they should be T-64s, but I have T-72s, plus Harold Coyle and Tom Clancy told me they'd be using T-72s!
 The command and rifle stands. I used GHQ NVA for the Soviet infantry; I have plenty of Soviet infantry lying about, needing to be painted and based, but these were ready to go and so they'll do.
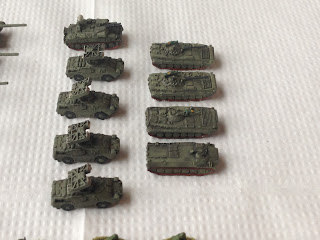
 The Soviet BMPs, two companies worth.
 Soviet supporting weapons: SAMs, mortars, ATGMs, MGs, and two SOF teams.
 Soviet air support. Damn that Hind is a beast!
On to the Yanks.
 US Command stands, command vehicles, and five M-1 Abrams. The US battalion task force (Troop) will have a company of tanks, but will never have more than five on the table at a time, against as many as 18 Soviet tanks in a game!!! I've got my work cut out for me... Oh, at bottom right the US has its sole air defense vehicle, an M-163 Vulcan. Each command stand also has Stingers.
 The US Bradley Fighting Vehicles. I painted up 20 of them, then realized I miscounted... I only need 18 of them, but I need four M-113s, which I'm hurriedly working on finishing (of course I need them for the very first scenario).
 US LMG teams below the Abrams and Bradleys.
 A close up of some US ATGM teams. These are actually from GHQ Ultramodern US, a Javelin with a laser designator, but they're standing in for TOWs.
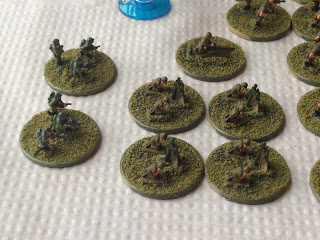
 Center, top center are the US rifle teams. I used GHQ Vietnam-era US infantry for these. Again, they were already completed, so I couldn't resist. They're surrounded by various support teams of LMGs, MMGs, HMGs, mortars, and two SOF teams.
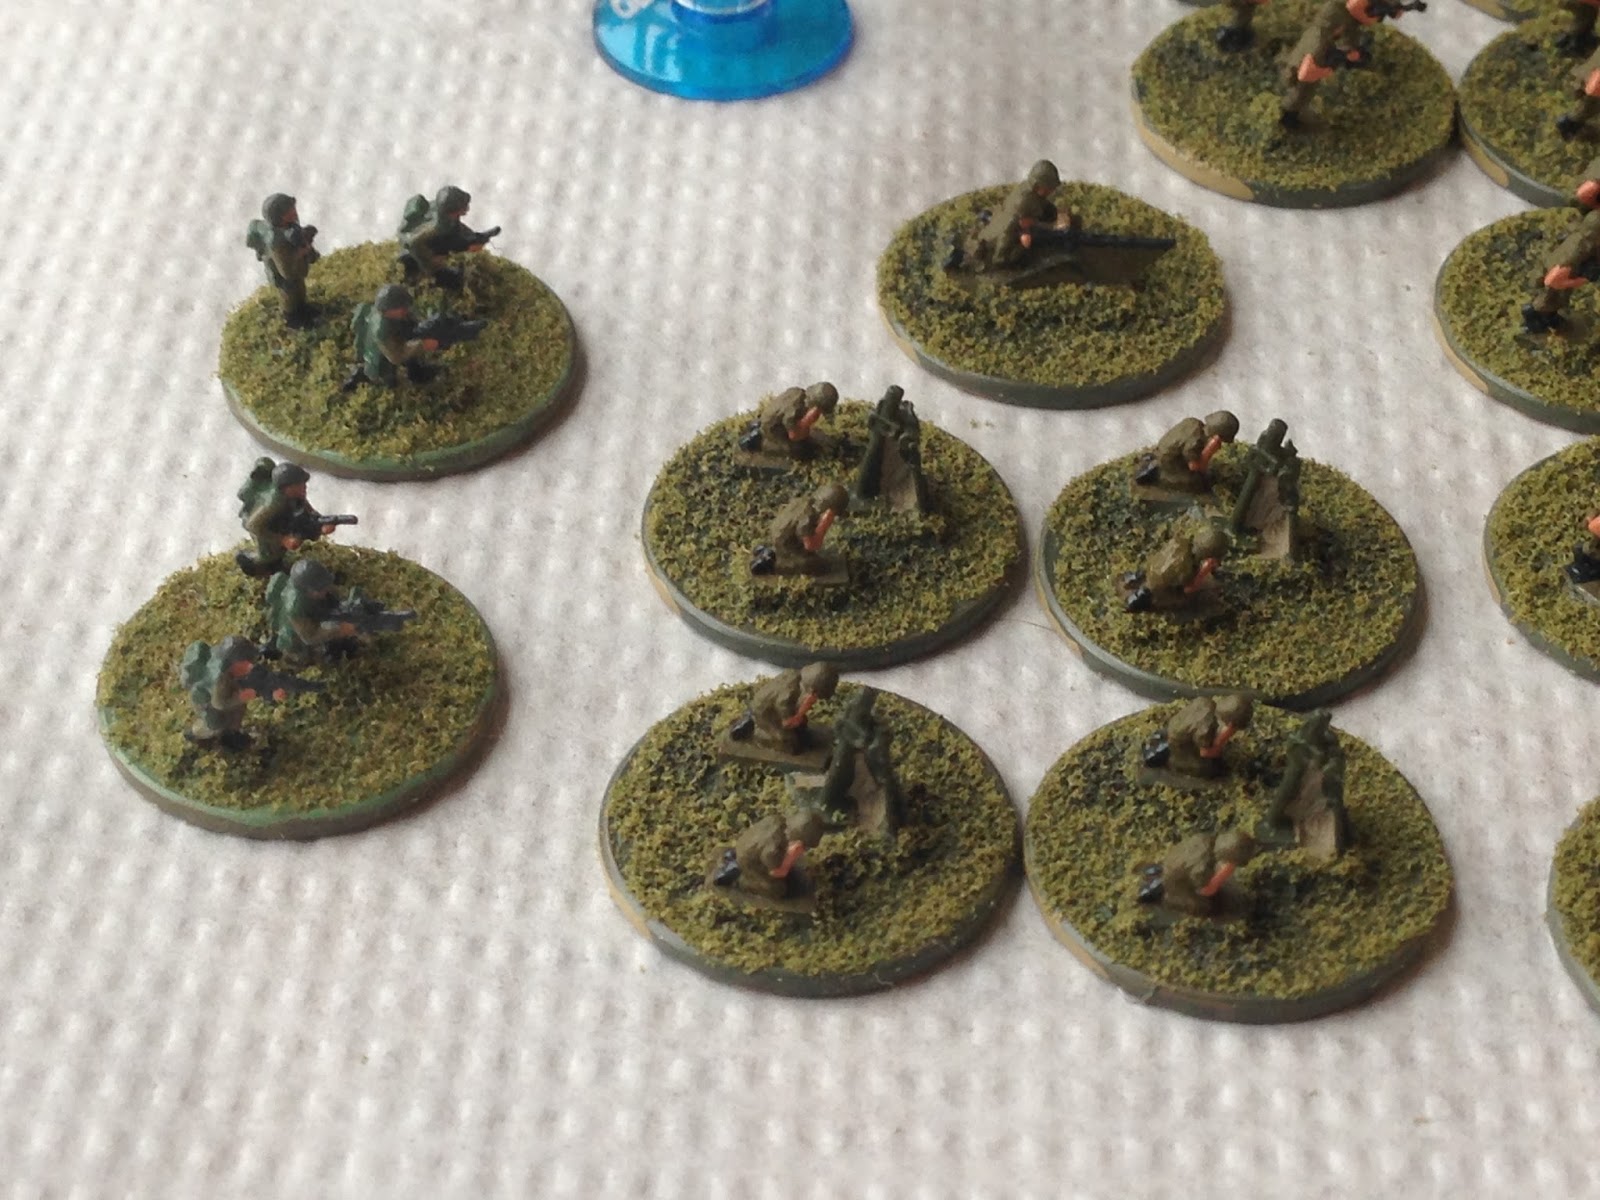
 The SOF teams (far left), along with the mortars and a .50 cal HMG.
 The US A-10 swoops in low over some infantry. I tried to do a European 1 camo pattern on it, and I'm pretty happy with how it turned out. I also tried to do a shark's mouth, it looks better from arm's length than up close.
 The US Apache, with disc rotors. This reminds me that I need to reach out to GHQ and order some brass rotors. Looking lean and mean nonetheless.
 Another shot of the A-10, just 'cause I love it. Not bad.
Now for some bonus material...
 The first scenario is "Lariat Advance," in which the Soviets come crashing through the West German border into 11th ACR. This is a look at the table, which is 5' x 4', looking south to north. The US will be defending the southern portion against the Soviets, who enter with a massive force from the northern board edge. They're goal is to exit as many vehicles as possible off the southern board edge.
There are small villages at top left and top center, and a sizable town at bottom center. There are a few small rises, but no geographically significant elevations. The rises (one level) are at bottom left, bottom right, top right, the village at top center, and the open area to the left of that village. I don't think the scenario book called for any rises, so I didn't throw in any significant hills, but I wanted the table to reflect the rolling terrain. The rises are difficult to ascertain as I actually put the hills UNDER the terrain mat; moving up in the world. The table's still ugly though...
 Another look at the table, this time from west to east. The Soviets will come in from the left, looking to exit on the right (at far right you can see the Soviet forces lined up for photos). I set the table up last night, and had to hit the garage to find some more trees. Luckily there were some lying around.
What you're going to see in a second is that 1) the Soviets have a huge force, and 2) the US has a pretty small force, so this is going to get real interesting real fast. I need to go upstairs and place the US defenders. As in real life, the Soviets are going to make heavy use of preparatory bombardments, and the US is going to make heavy use of minefields. As a solo player, you can see this poses some real game problems, i.e., the need to randomize the prep fires and minefields so that they are not too powerful, nor simply skirted by the player's knowledge.
My solution is to place the US defenders and their minefields, then draw up six separate attack plans (with differently plotted prep bombardments), then roll a dice to determine which one the Soviet side goes with. This will randomize the prep fires so I can't cheat as the US player and simply avoid them, and the Soviets will follow their planned routes of attack until (if) they run into US minefields.
If you've got a better, smoother, easier, and faster way of doing this, please let me know!
 The US force: two (TWO!!!) damn M-1 Abrams, four M3 Bradleys (there are four more in the pic, but that's when I realized four of the Brads are supposed to be M-113s), quite a bit of rifle teams, a handful of ATGMs, and a bunch of machine guns. There are also a random number of minefields, an Apache on station, and one airstrike by the A-10.
 And they face this mess: sixteen (16!!!) T-72s, eighteen (18!!!) BMPs, plus command, rifles, and a big, bad Hind. So it's pretty much 'die in place, take as many of them with you as possible' for my 4th Troop, 11th ACR fellas.
Stay tuned, the war starts this Saturday.
V/R,
Jack
Okay, Cuba Libre is wrapped up, and while I've got big plans for future Cuban Liberation Expeditionary Force actions, an opportunity came up that I just couldn't pass up. Mr. Ben Lacy contacted me and let me know he was working on a new Cold War Gone Hot, Fulda Gap scenario book. If you're not familiar, Ben puts out skirmish and company-level rules, along with a slew of scenario books, under Britton Publishers. The scenario books are fantastic, right up my alley. I own about a dozen of them, and if I was independently wealthy I would not only own all of them, but I would play through them as well. I already have plans to use several of his Normandy books for my Kampgruppe Klink campaigns, as well as some other Normandy books for my All American campaigns. I also have several Pacific campaign books I'm looking to use, as well as some modern SOF stuff. I highly recommend them, they are great products for us wargamers.
In any case, Ben contacted me about Fulda Gap and begged me to playtest the scenarios for him. Okay, that's not true; he contacted me, and I begged him to allow me to playtest them, he graciously accepted my offer, and so I set out to put together all the forces I'd need to play out all ten scenarios. I'm really excited about this campaign, and I want to do it right. I'd intended on starting the war this weekend, but with wrapping up Cuba Libre and real life (in the form of one of my kid's birthday, school starting, and baseball practice starting up) I fell behind, and so I won't get started with the actual fights until next weekend.
But I've got the forces finished up, and that's what you see here. The setting is that the Soviet Union has decided to invade Western Europe, and the opening shots come where everyone expected, Fulda Gap. The book is set up so that you can play the scenarios in whatever time frame you wish, from the beginning of the Cold War right up to the end. I thought that was a pretty cool idea, as each gamer has his own, personal idea of what would be coolest, whether it be the 50s, 60s, 70s, or 80s. While the first scenario officially starts with the exploits of the US 11th Armored Cavalry Regiment, because of the heavy casualties and rapidly changing situation on the ground, I would argue that you could actually use the book for whatever NATO nation's forces you want, be it US, West German, UK, or otherwise.
Being a child of the 80's, growing up with various movies and books (World War III, Team Yankee, Red Storm Rising, The Third World War, The Day After, etc...) threatening our (US) death at the hands of the Red hordes, I chose to go with US forces in the year 1986. As always, I will form a fictional battlegroup (4th Troop, 11th ACR) with characters as platoon and company leaders, to take into battle.


On to the Yanks.


Now for some bonus material...

There are small villages at top left and top center, and a sizable town at bottom center. There are a few small rises, but no geographically significant elevations. The rises (one level) are at bottom left, bottom right, top right, the village at top center, and the open area to the left of that village. I don't think the scenario book called for any rises, so I didn't throw in any significant hills, but I wanted the table to reflect the rolling terrain. The rises are difficult to ascertain as I actually put the hills UNDER the terrain mat; moving up in the world. The table's still ugly though...

What you're going to see in a second is that 1) the Soviets have a huge force, and 2) the US has a pretty small force, so this is going to get real interesting real fast. I need to go upstairs and place the US defenders. As in real life, the Soviets are going to make heavy use of preparatory bombardments, and the US is going to make heavy use of minefields. As a solo player, you can see this poses some real game problems, i.e., the need to randomize the prep fires and minefields so that they are not too powerful, nor simply skirted by the player's knowledge.
My solution is to place the US defenders and their minefields, then draw up six separate attack plans (with differently plotted prep bombardments), then roll a dice to determine which one the Soviet side goes with. This will randomize the prep fires so I can't cheat as the US player and simply avoid them, and the Soviets will follow their planned routes of attack until (if) they run into US minefields.
If you've got a better, smoother, easier, and faster way of doing this, please let me know!


Stay tuned, the war starts this Saturday.
V/R,
Jack
Sunday, August 23, 2015
Forces for Modern Middle East Part 4 - Rebel Minis Insurgents
All,
Here are the Rebel Minis' Modern Insurgents, another great set. They've got twenty figures in five different poses, all with Warsaw Pact-type weapons, heads covered with keffiyeh, and light gear. I painted them up in a variety of different camouflage and civilian gear, with plenty of color. I intend on using them for modern day conflicts in the Middle East and early 90's Somalia. I'm too cheap and lazy to buy more guys like this and paint them slightly different to be unique for Somalia or Afghanistan.
 The whole force of twenty men.
 First pose is a rifleman with AK-47. You can see the variety of clothing.
 The next guy is a light machine gunner carrying an RPK.
 Another rifleman with AK-47.
 The dreaded RPG-7.

Here are the Rebel Minis' Modern Insurgents, another great set. They've got twenty figures in five different poses, all with Warsaw Pact-type weapons, heads covered with keffiyeh, and light gear. I painted them up in a variety of different camouflage and civilian gear, with plenty of color. I intend on using them for modern day conflicts in the Middle East and early 90's Somalia. I'm too cheap and lazy to buy more guys like this and paint them slightly different to be unique for Somalia or Afghanistan.


And one more rifleman, with what looks to me to be an AK-74.
I imagine I'll be getting a lot of use out of these guys, and more to come.
V/R,
Jack
I imagine I'll be getting a lot of use out of these guys, and more to come.
V/R,
Jack
Wednesday, August 12, 2015
Forces for Modern Middle East Part 3 - Rebel Minis US Infantry
All,
Continuing my series of posts showcasing various manufacturer's modern 15mm offering, I hereby present Rebel Minis' Modern US Infantry. The figs are relatively cheap, well cast (clean), nice and chunky with plenty of gear, though detail on a few of the rifles is a little soft. Overall, excellent figures that I'm happy to have, and they painted up quick and easy.
I plan on using them as Rangers for Somalia in 1993, though this is not correct as all the M-16s have ACOGs on them; the figures look to be perfect for 2001 to maybe 2006 or 7, and so I painted them up in the Desert Tri-Color cammies; I think it turned out well, except all the troops look like they just left Cash Sales (for the uninitiated: they all look like they're wearing brand new uniforms, the colors are too crisp, no fading at all). I painted them as having Interceptor vests, but in Woodland camo as common in 2003, and as the Rangers' "RBA" in 1993, and black (as opposed to sand-colored) goggles.
On to the troops!
 The whole force, 21 troops, for something like 12 bucks. Not bad a-tall. Nice mix of weapons and poses too.
 First up, the SAW gunners. Now, the website calls them SAW gunners, but I've got to tell you, the weapons were pretty doggone long to be SAWs. The barrels made them look more like 240s to me, but that didn't match all that well with the rest of the weapon, or the box magazine. So I spent about five minutes with an X-acto knife doing a little surgery to cut the barrels and bipods shorter; I'm happy with how they turned out.
 Next up, four M-203 grenadiers. This is the pose that has the soft detail on the weapon: it's a good pose, just the M-16 is looking a little anemic.
 Four riflemen, with nice, solid rifles, good posing and gear. One of them has a bigger pack than the rest, and I'm not sure what that's about; my only guess is that maybe for Army guys, the guy with the big pack is the unit medic. Doesn't really work for Marines though, as our Corpsmen don't carry rifles.
 Three small unit leaders, urging their men forward. Good poses and gear, love the chunky M-16s with clearly discernible ACOGs.
 Two more leaders, which are again overall done very well, I'm just not as happy with the fact it's the same as the previous pose, but with the left arm crooked rather than straight. Not a big deal, just makes the two poses a little too 'samey.'
 Two more grenadiers, double timing. I like the pose, and I believe they were specially made for Ambush Alley games. The only issue, and again, it's a minor one, is these are the only two that don't have packs or goggles, and they're a tad bit slighter than the rest of the pack.

Continuing my series of posts showcasing various manufacturer's modern 15mm offering, I hereby present Rebel Minis' Modern US Infantry. The figs are relatively cheap, well cast (clean), nice and chunky with plenty of gear, though detail on a few of the rifles is a little soft. Overall, excellent figures that I'm happy to have, and they painted up quick and easy.
I plan on using them as Rangers for Somalia in 1993, though this is not correct as all the M-16s have ACOGs on them; the figures look to be perfect for 2001 to maybe 2006 or 7, and so I painted them up in the Desert Tri-Color cammies; I think it turned out well, except all the troops look like they just left Cash Sales (for the uninitiated: they all look like they're wearing brand new uniforms, the colors are too crisp, no fading at all). I painted them as having Interceptor vests, but in Woodland camo as common in 2003, and as the Rangers' "RBA" in 1993, and black (as opposed to sand-colored) goggles.
On to the troops!


Two Javelin ATGMs, which are very well done for the weapon and pose. In a push for earlier eras, I suppose I could just pretend their Dragons if need be?
Anyway, that's the whole group of them, and please forgive my nitpicking, they are excellent troops and I'm very glad I've got them, just need to get them on the table. One last thing to add; Mike at Rebel Minis has been a real pleasure to deal with; great communication, and very speedy. I think I had the lead in my hands five days after I placed my order.
More to follow.
V/R,
Jack
Monday, August 10, 2015
Forces for Modern Middle East Part 2 - Rebel Minis SWAT
All,
Here's a quick one for ya, some Rebel Minis SWAT figures I've painted up as shooters for the desert. They're wearing desert tan flight suits, Coyote Brown body armor and gear, green helmets with yellow spray-painted camouflage, and camo spray painted weapons. The post is just to show off the poses, and scheme not my humble painting skills ;)
 The whole 8-man team. I also have an 8-man team in green. I'm using these as Special Operations Direct Action shooters.
 The first two poses, both MP-5. The poses are close, but are indeed different, most notably in their foot placement. Once again (yes, you saw some of this in my Blackhawk Down Delta guys), great poses.
 Reverse. Great relief in the sculpts, and everything is big, so really easy to paint up.
 Two more guys, one without pack. That's the only thing I don't like about the SWAT pack, the guys with too-light gear.
 Reverse. How does that color look for Coyote Brown?
 Two shooters with M-4s. In reality they have very large flashlights attached to the bottom of their weapons, but I painted them up as M-203 grenade launchers. If you look at them head on you can see the flashlights are off set, not centered.
 You can even see it some here, in the reverse photos.
 More M-4/203 shooters.

Here's a quick one for ya, some Rebel Minis SWAT figures I've painted up as shooters for the desert. They're wearing desert tan flight suits, Coyote Brown body armor and gear, green helmets with yellow spray-painted camouflage, and camo spray painted weapons. The post is just to show off the poses, and scheme not my humble painting skills ;)


That damn light gear! I suppose I could have tried to jimmy something together for gear, using Miliput/green stuff/something, but I'm really not very handy, and I'm always in a hurry, so I just painted'em up and based them. Now I need to get them on the table!
More to come. Lots more to come. I suppose I'll just publish this post, not showcase it on the forums; I feel a bit sheepish about posting it on the forums as you've already seen these poses, just in different uniforms.
V/R,
Jack
More to come. Lots more to come. I suppose I'll just publish this post, not showcase it on the forums; I feel a bit sheepish about posting it on the forums as you've already seen these poses, just in different uniforms.
V/R,
Jack
Sunday, August 9, 2015
Forces for Modern Middle East Part 1 - Rebel Minis Special Forces and SWAT
All,
I'm going to run a series of posts highlighting my new 15mm skirmish forces. There will be some commentary, but mostly I'm doing it just to catalog what I have, and show it for other gamers. Lord knows, whenever I'm pondering a new period/genre/scale, I spend countless hours scouring the internet for every picture I can find. So these posts are mostly here for all the kindred spirits out there who need to see lots of photos before they make the leap ;)
These are Rebel Minis, mostly modern US Special Forces, with some modern SWAT mixed in. I've painted them up as Delta shooters circa 1993 in desert tri-colors for Somalia.
 The whole group of 14 figures. There are actually four more Special Forces figures, but they have boonie covers ('hats') on and so I deemed them unfit for combat in Somalia, and painted them up for modern Africa.
 They're wearing desert tri-colors, though I only painted them two colors (desert yellow and leather brown), with black vests and gear, though I painted the hockey helmets and kneepads dark green just to get some color on them. The weapons are all M-4/16s with optics and foregrips; close enough to CAR-15s for me ;)
 Reverse.
 Two different poses with MP-5s.
 Reverse.
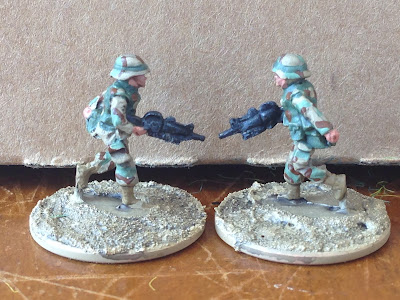
 Three poses: shotgun, M-4/16, and MP-5. I love the fact there are so many different poses in the Special Forces pack!
 Reverse. I think the vests and gear look fantastic.
 Three of the SWAT-types (three different poses) with M-4s. I'm aggravated the two on the left don't have packs, but I'll get over it. Again, lots of different poses.
 Reverse. I absolutely L-O-V-E the pose at far right. That is a shooter right there.
 Two poses with MP-5, guy on left sans pack. But the guy on the right is superb; the sculptor has the "duck-squat-shuffle, eyes-on-target" look down perfect.

I'm going to run a series of posts highlighting my new 15mm skirmish forces. There will be some commentary, but mostly I'm doing it just to catalog what I have, and show it for other gamers. Lord knows, whenever I'm pondering a new period/genre/scale, I spend countless hours scouring the internet for every picture I can find. So these posts are mostly here for all the kindred spirits out there who need to see lots of photos before they make the leap ;)
These are Rebel Minis, mostly modern US Special Forces, with some modern SWAT mixed in. I've painted them up as Delta shooters circa 1993 in desert tri-colors for Somalia.


Reverse.
They were quick and easy to paint up, and I just bought Ambush Alley's "Day of the Rangers" for scenario work, and I'm looking to get them on the table. I also got a PDF of their Operation Dark Star, so I'll look to play that out (I think it's four linked games).
V/r,
Jack
They were quick and easy to paint up, and I just bought Ambush Alley's "Day of the Rangers" for scenario work, and I'm looking to get them on the table. I also got a PDF of their Operation Dark Star, so I'll look to play that out (I think it's four linked games).
V/r,
Jack
Subscribe to:
Posts (Atom)