All,
JCSOG was on the go again this weekend, this time playtesting a set of rules from a fellow TMPer. In the still of the night a JCSOG team stole into a small town on the outskirts of Fes, Morocco, to deliver communications gear to a highly placed intelligence operative transiting the area. As the sun begins to rise over the eastern horizon, the JCSOG team is now exfiltrating the area on foot enroute to its helicopter landing zone.
The board, 3' x 2,' north is up. The village is to the left, which the JCSOG team will be departing, with the aim of getting off the map to the right (east), to their HLZ.
The JCSOG team, clockwise from left: Snapshot, Peso, Torch, Hammer, Thistle, Scorecard, and Derby.
The bad guys, two five-man patrols.
Initial set up: The JCSOG team is at left, with (from right to left) Torch, Peso, and Snapshot north of the road, Hammer (the team leader) on the road, and (right to left) Thistle, Scorecard, and Derby south of the road. Two Ir-Habein patrols have just arrived on table, one from the north and one from the south, both cutting off the JCSOG team's route to the HLZ.
Again, Torch, Peso, and Snapshot north of the road, Hammer on the road, and Thistle, Scorecard, and Derby south of the road. Civilians are scattered throughout the area.
The southern Ir-Hab patrol, just rounding the building.
The northern Ir-Hab patrol, just rounding the orchard.
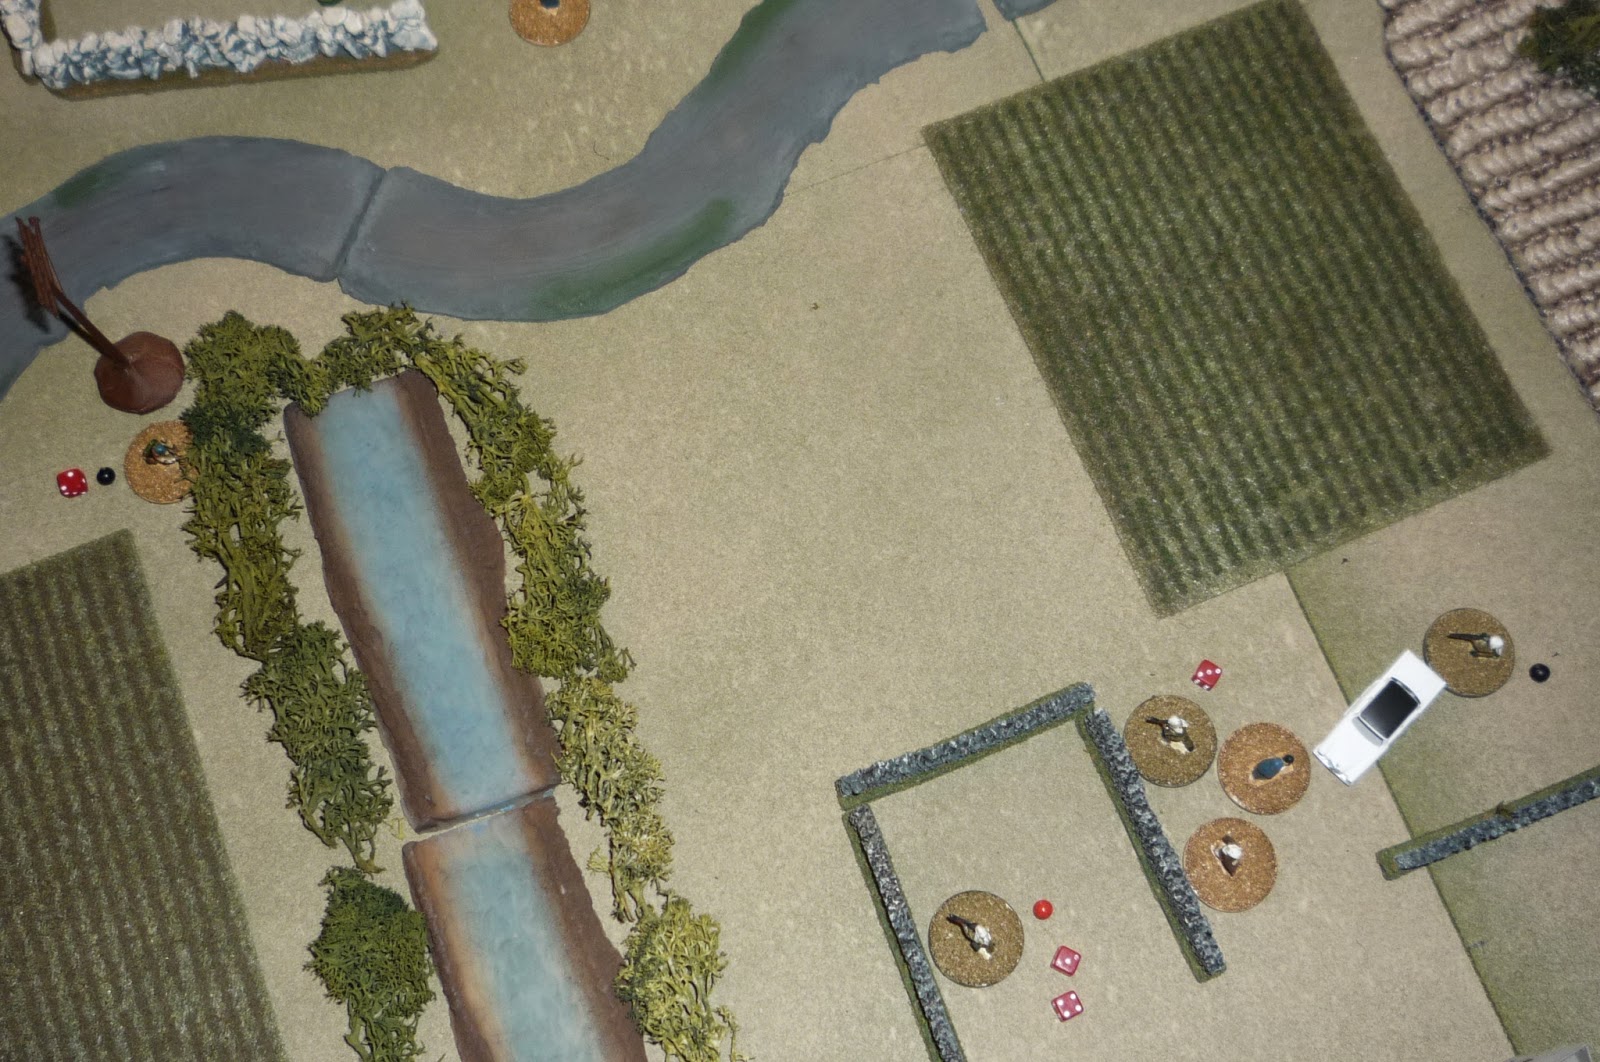
The game starts with all personnel unspotted and JCSOG activating first (higher 'Skills & Drills). The action starts with Torch (center left, behind bush) spotting the Tango (top center) on the road. He then radioed the squad and moved left behind the bush. Next, Thistle (center, behind bushes at canal) moved up to cover, spotted a Tango of the southern patrol (top right), then radioed the squad. The team leader decides to deploy for hasty ambush to the front, so Scorecard (center, there are two guys behind the bush, he's on the right, Hammer's on the left) moves right behind the bushes, spotted a 2nd Tango of the south patrol, and radios team, while Derby moves cautiously to the far right (behind wall). Snapshot (two guys behind wall at bottom left, Snapshot is left, Peso is right) moves left, tries but fails to spot a third Tango of the southern patrol, but Peso moved over and managed to make the spot. The team is set up pretty well to execute a devastating ambush on the unsuspecting Ir-Hab troops.
But, the Tango on the road (top right) looks to his right and, Hey! there's a special forces guy (Thistle) hiding in the bushes at the canal (left center)! The Tango fires and misses badly, but the shots warn the rest of the Ir-Hab members to the presence of the JCSOG team. The northern patrol LMG gunner moves up to the corner and opens up on Thistle, also missing, but adding more 'stress' to the beleaguered JCSOGer. A Tango from the southern patrol (bottom right) moves up and fires at Thistle, still missing but more stress, as does the southern patrol LMG gunner.
Back with the northern patrol, the team leader hops the wall and moves up into the orchard (center), while the remaining rifleman and RPG gunner move to their right (north) and into the northern canal.
At the southern patrol, one of the rifles hops the wall (at far right) and sprints left to the western wall, while the southern patrol team leader and RPG gunner hop the wall and enter the building (the team leader had been spotted but broke LOS and is again unspotted, represented by the violet beads).
Thistle (bottom left) manages to pass his morale test, and fires his grenade launcher at the two northern patrol Tangos. The round misses, but the 'scatter' roll is only one inch off, and both Tangos in the road receive light wounds (yellow bead). Thistle fires twice more, missing the first time, but the second puts a serious wound (red bead) on the northern patrol LMG gunner.
Torch (far left) moves up to the wall, spots the Tango in the orchard, and takes a shot, but misses.
Hammer (bottom left) takes two tries, but spots the Tango at the wall (center top), and takes a shot but misses.
Scorecard (he and Hammer are at top left) fires at the Tango just spotted by Hammer at the wall (center right), and hits (rolled a 20!), but it's another light wound. He then spends an action spotting the guys in the building bottom right (I only used one action, but they're right next to each other so I spotted them both). Derby (bottom left) fires at rifle grenade at the two Tangos in the building, direct hit! The leader goes down and the RPG gunner is seriously wounded.
Derby (center right) fires at the Tango behind the western wall (top center) and gets another serious injury. Derby then fired at the Tango behind him, but missed (that's Scorecard to Derby's left).
On the JCSOG left, Peso open up, firing another rifle grenade at the two Tangos in the road (bottom right), putting the LMG gunner out of the fight and seriously wounding the other (the dice represent stress). He then takes a shot at the Tango in the orchard (center left), missing, but giving him some more stress.
Snapshot (bottom left, with Peso to the right) moves left and goes on overwatch to counter the two Tangos in the north canal (top left).
The Tango rifleman in the canal moves up, spotted by Snapshot (far left) on overwatch, and takes Snapshot takes an overwatch shot but misses. Snapshot's firing makes it easy for the Tango to spot him, and the other Tango at the north canal, the RPG gunner, fires a rocket, but misses so badly it doesn't hit anyone.
The southern patrol LMG gunner (bottom right, at the white car) opens up on Thistle (center left behind canal bushes), missing.
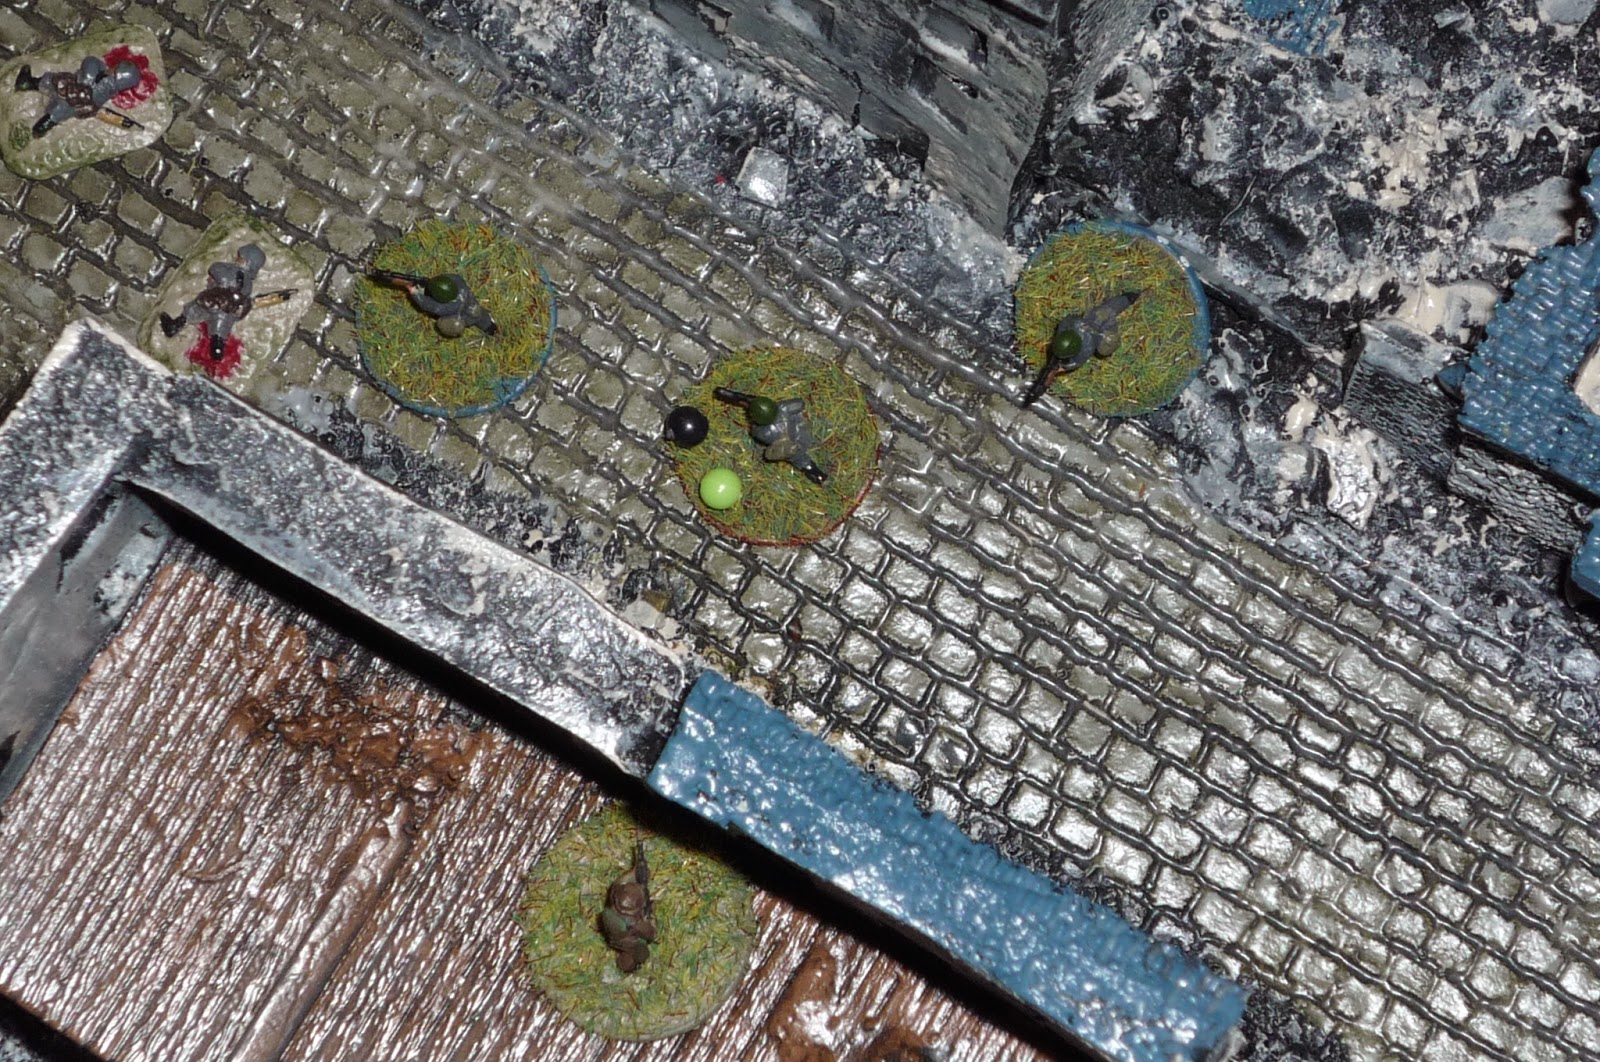
Several Tangos test morale and don't do well, but it doesn't really matter because they are seriously wounded and can't do anything but crawl away anyway (this pic is looking east, southern patrol at right, northern patrol at left).
There was an uninjured Tango at the wall at bottom center, near the white car. He's had a rough time, getting fired at a couple times and watching fellow bad guys get torn up by the JCSOGers. In the end he just couldn't take it anymore (failed morale test) and ran (top center).
Then a real pisser happened, and I may have screwed up the rules, but it felt right. Regarding the Tango in the orchard (bottom right), if you recall, Torch had previously moved up, spotted the Tango in the orchard, and taken a shot at him, but Torch was still technically unspotted. However, the Tango in the orchard needed needed to take a morale test, and he failed, but the result was drop prone and use all actions to fire. So he did, and he fired wildly in Torch's direction, but he rolled a 20 and Torch ended up with a light wound.
On the other side, Thistle (bottom left) tests morale but fails and drops prone. Torch (to left) passes his test and opens up on the Tango in the orchard, giving him a light wound.
On the JCSOG left, Snapshot (bottom left, with Peso next to him) fires three times at the Tangos at the north canal, missing all three times... Peso moves over next to him and fires a rifle grenade at the RPG gunner, nailing him but only getting a light wound. Peso fires his rifle and puts a serious wound on the RPG gunner
Hammer moves up next to Thistle and Scorecard at the south canal, firing at twice at the Tango at the white car, putting a light wound on him, then Scorecard finishes the job, putting him down.
Derby (bottom center, with Thistle/Hammer/Scorecard at top left) hops the wall and moves up to the canal, then fires at the Tango in the orchard, but missed. If you look at the Tango at center right, the violet bead means he's unspotted, the red means seriously wounded, and the green means he's prone. Yellow is light wound, black is acted, pink is fired, aqua is saved action, and purple is ran.
The four seriously wounded Tangos all crawl 2" backwards. The guy at top left is healthy but failed at this morale test and ran, practically vaulting the north canal (bottom left) and stepping right in the middle of the RPG gunner's back on his race to leave town. With that the only semi-healthy (lightly wounded) guy left was the Tango in the orchard, and he decided to join his companions.
With that, the JCSOGers made their way to the HLZ for extraction. Another successful mission, but the JCSOGers can't help but wonder if their run-in with the Ir-Habein terrorists was a coincidence, or were they aware of JCSOG's presence?
V/R,
Jack
Showing posts with label JCSOG. Show all posts
Sunday, April 27, 2014
Sunday, April 13, 2014
FURTIVE ARCHER, Gorazde, Bosnia-Herzegovina
All,
Following on from the successful, if bloody, op in Malaysia, Halfstep provided information stating OTW had acquired WMD, apparently a nerve agent, and was storing it in the bombed-out outskirts of Gorazda, Bosnia-Herzegovina. The world wants to be sure, so there will be no airstrike, JCSOG is being sent in.
Situation: OTW is storing a cache of chemical weapons for use in a near-term terrorist attack in an undisclosed European capital. JCSOG is ordered to destroy the cache.
Mission: Airborne ISR assets have ascertained the location of the OTW chemical weapons cache based on Halfstep's debrief. The cache is two separate sites located nearby, likely meaning the chemical munitions are a binary agent. Two teams will infiltrate on foot, locate and secure the two cache sites. Once the sites are secured two vehicles (Range Rovers) containing two pax (driver and demolition expert) and explosives to destroy the cache will race to the site, rig it for destruction, then exfil, followed by the two foot-teams collapsing back to a nearby HLZ for evacuation.
Situation: OTW is storing a cache of chemical weapons for use in a near-term terrorist attack in an undisclosed European capital. JCSOG is ordered to destroy the cache.
Mission: Airborne ISR assets have ascertained the location of the OTW chemical weapons cache based on Halfstep's debrief. The cache is two separate sites located nearby, likely meaning the chemical munitions are a binary agent. Two teams will infiltrate on foot, locate and secure the two cache sites. Once the sites are secured two vehicles (Range Rovers) containing two pax (driver and demolition expert) and explosives to destroy the cache will race to the site, rig it for destruction, then exfil, followed by the two foot-teams collapsing back to a nearby HLZ for evacuation.
Overview of board, the same 3' x 2' from last time. North is 'up,' with JCSOG entering on the west edge, the two caches at roughly board center, and the bad guy board edge on the east side, with three hotspots. HS1 is at top right (NE), 2 is at far right (E), and 3 is at bottom right (SE).
The two caches, each with two sentries on table. All other hostiles will enter via hotspots.
The good guys; Honcho (platoon commander) up front, followed by Tm2 (left to right, Mace, Lancer, Tumbler, and Dragon) and then Tm3 (Corkscrew, Foghorn, Ballpark, and Transit). The two Range Rovers carrying the explosives are in the rear. Each vehicle has an assigned driver, a demolitions expert (Blaster and Detcord, respectively), and enough gear to ensure the destruction of the two caches.
Tm2 on the right (SW) side, moving up towards cache 1. Honcho is at top left.
Part of Tm3 moving up on left (NW) side. Corkscrew is at left, Foghorn at right, and Honcho is at top center.
Tm3's Ballpark and Transit moving up on the far left, with enemy in sight at top left. At about this time is when the bad guy at top left spotted Ballpark and Transit and fired some alerting shots.
Transit (bottom right) moves up and fires at the Oscar at the cache, puts a pin on him. The other Oscar at this cache (cache 2) moves up and fires at Transit, to no effect, followed by two more Oscars coming on board there at HS1. Ballpark (top right), on second floor, opens fire and puts two Oscars down (bottom left).
On right, Mace (bottom left) moves up but can't get a shot off, while Lancer (far left) double times up to get a look but can't shoot either. The bad guy (center) on the second floor snap fires at both of them, to no effect, while the guy standing on the cache puts a pin on Lancer. An Oscar comes on at HS3, moves up at the double time (bottom right).
Foghorn moves up and takes a shot at the Oscar upstairs of cache 1 and puts him down.
Another Oscar comes on at HS3 (center), while Tumbler moves up (bottom left, with Mace to his left rear).
An Oscar comes on in the center, and Honcho moves up in the center but doesn't have a shot. Corkscrew (center, with Transit to his left, Ballpark to his left rear, and Foghorn to his right) moves up, just around the corner from cache 2.
On the right, Dragon moves up next to Lancer (both bottom left, Lancer has the green pin bead, and Mace is at far right), while three Oscars come on at HS2 in the center. The few shots the JCSOG guys have been able to take haven't had much affect. When you're really outnumbered you really need to make your shots count...
Bad guys rush the center, which is manned only by Honcho. He's quickly put down without even firing a shot...
While Oscars in the southeast (center left at the cache, center right behind the wall, and bottom right in the building) are all able to open up and put pins on Mace and Tumbler.
On the left (this photo is taken looking at Tm3 from behind the bad guys, pretty much looking out from HS1), Transit (in the rubbled building at right) opens up and hits... nothing. The RPG gunner at bottom left slams a rocket into the rubbled building, luckily only getting a pin on Transit.
Oscar at bottom left moves up and takes a shot at Transit (top center), misses, while Ballpark is able to put one whole-whopping pin on the Oscar RPG gunner at HS1... We need to get these boys out to the range.
A very quick and violent firefight breaks out at cache 1. Lancer holds tight but opens fire through the doorway he's manning and puts the Oscar at cache 1 out of the fight, while Mace fires at another Oscar, misses, but still sprints up to cache 1, wanting to get it secured so the vehicles can come up and rig the damned thing to blow. But the bad guy Mace just missed moves up and fires a long burst into Mace, putting him out of the fight. So now the platoon commander and the team leader for Tm2 are down...
The bad guys have managed to get quite a few guys on in the center, and since they have pretty good position on their left, the guys in the center decide to head right to lock down cache 2, as Tm3 was getting pretty close.
But Foghorn is Johnny on the spot and moves up to the corner, puts one down and puts a pin on the other.
The damned RPG fires again at Transit in the rubbled building, putting a second pin on him (seriously degrading his combat capability), but Corkscrew pops around a corner of his own, right onto cache 2, and puts another Oscar down. Another bad guy comes on at HS1.
Lancer (at bottom left, you can just see the yellow bead) opens up through the doorway again, puts another Oscar down, then Dragon (just to right of Lancer, near cache; you can see WIA Honcho at top left and WIA Mace at cache) rushes through the doorway firing, and puts down two Oscars.
This is quickly followed by Tumbler rushing up to secure cache 1, calling on the V1 to come deliver it's explosives, which it does, while several more bad guys come aboard at HS3. V2 is trying to get to cache 2 (which Corkscrew, Tm3's leader, just secured), but it's taking its sweet time.
This is a good time for a lock-on: this is top down looking sort of west to east. The big group at bottom right is cache 1, from bottom to top is Lancer, Dragon, then Tumbler actually on the cache, with V1 having just pulled up. At the center near the 'T' intersection is Foghorn, while to his left (out of sight on the other side of that same building) is Corkscrew, on cache 2. The rubbled building just to the left is where Transit is pinned down, while further back and to the left is the building where Ballpark is set up on the 2nd floor.
The Oscar at bottom right came charging out around the corner of the building and took a shot at Tumbler (top left), putting a pin on him. Tumbler quickly spun and put him out of his misery. Blaster pops out of V1 and starts rigging cache 1 for demolition.
Back on the left, Foghorn is peering around his corner and figures hell with it. He pops the remaining guy at the intersection, moves up to cache 2 to cover Corkscrew (far left), and goes on overwatch (white bead).
Another photo looking back at Tm3 from HS1. Several bad guys move up, taking Ballpark and Transit under wildly inaccurate fire. Transit lays low in the rubbled house, managing to pull one of his pins off, while Ballpark gets it on, putting two Oscars down. V2 manages to get to cache 2, currently secured by Corkscrew and Foghorn, but several bad guys make a play to get up there and disrupt the setting of the explosives.
So Corkscrew charges ahead, but only manages to put one Oscar down...
On the right, Lancer pulls a pin off himself while covering Blaster and Tumbler on the objective (cache 1). More bad guys come on and move up (mostly at bottom right), so Dragon (center left) moves over and takes them under fire, to no effect. More bad guys come on table...
Dragon (far left, white bead) pops one Oscar then goes on overwatch, and the bad guys just keep coming. Dragon pops another one. Two more replace that bad guy... Blaster is finished rigging cache 1, so he grabs Mace (WIA) and throws him in the Range Rover.
A bad guy pops in, so Lancer moves up and puts him down, so another one shows up; V1's driver says hell with it and leaves town carrying Blaster and Mace's wounded body. Tumbler spots a group of bad guys in the street, pulls the pin on a hand grenade, tosses, gets a couple pins.
Back on the left side, Corkscrew (the wounded guy in green, pretty much dead center) pops an Oscar, but another moves up and returns the fire. For those keeping score, we now have three men down: the Plt Cmdr and both team leaders, and only one of them has been evacuated.
Another bad guy moves up, and Transit puts two of them down. Meanwhile, Ballpark comes down from the second story and pops onto cache 2.
One of the bad guys in the center moves up and pops right, opens up on Foghorn, who's sitting on the south edge of cache 2. The bad guy opens up with an LMG, putting two pins on Foghorn. Foghorn's return fire manages only a pin (the green bead on the bad guy is one pin, the yellow bead on Foghorn is two pins; a red bead is three pins and makes a guy utterly useless).
More bad guys arrive: two at HS1 (NE), one at HS2 (center).
Detcord hops out of V2 and manages to wire cache 2 at warp speed, which is certainly needed.
Remember when I mentioned a red bead means a guy is useless? Well, the bad guys in the street opened up on Foghorn again, putting that all important third pin on him. JCSOG guys generally get three (potential) actions per activation, with each pin removing a potential activation. If you have activations left you can use them to unpin yourself. If not, only a leader can pull pins off you. And all my leaders are down...
Meanwhile, Detcord (top center) hops the wall, runs to the right, grabs Corkscrew (WIA), and drags him back to the wall, while another Oscar pop into the street (bottom center). This feels kind of like "Zulu" with the non-stop bad guys.
Back on the right, Tumbler fires and puts an Oscar down, while Dragon sprints to the second story near cache 1 and drops a frag on the the three bad guys below. Two go down, while one is untouched.
On the left, the situation is getting critical as the bad guys are simply swarming towards cache 2. Transit (top left) opens up and puts two down, while Ballpark (center left) rushes to Detcord, grabs Corkscrew over the wall, and throws him in V2.
Lancer, seeing V2 getting ready to depart, sprints left, grabs Honcho (the first casualty), and drags him to the north side of the street (bottom left). To his right we have Foghorn, who's pretty much hors de combat, we've got Ballpark next to him, and Detcord still in the street.
One bad guy comes on at HS1, and three more at HS2 (center).
Speaking of Detcord, he hops the wall, grabs Foghorn and get both of them into V2. Dragon, on second floor in center, fires and puts three guys down, whle V2 pulls around to Lancer and Honcho (top left). But, just as things seem to be shaping up, another bad guy pops up in the center and makes a helluva shot, which drops Dragon up on the second floor...
On the left, more bad guys are moving up, and Tm3 is not looking so well. As a matter of fact, Tm3 is only Transit (top left), who just received his second pin, and Ballpark (bottom center), as Corkscrew and Foghorn were both evac'ed in V2. You can see the bad guy horde continuing to come (top right).
More bad guys come on table as Tumbler rushed upstairs, grabs Dragon, and drags him back downstairs (bottom center, just across the street from Lancer/Honcho and V2). Lancer throws Honcho in V2, runs across to Tumbler, grabs Dragon, and throws him in V2.
Ballpark and Transit are mowing them down on the left, but they keep coming. Time to think about getting out of dodge...
Three more bad guys come on at HS3, moving left towards cache 1.
A couple bad guys move up the street in the center, and Lancer pops one while Tumbler piles into V2. Lancer follows suit, and the vehicle squeals tires getting the hell out of there.
Three bad guys manage to get to cache 1, just as...
Ka-Boooooom!!! Okay, I know it's cheesy, but hey.
While Ballpark and Transit finally get their stuff in gear on the left, detonating cache 2 and booking for the LZ.
Another success, but again bloody, with Honcho, Mace, Corkscrew, and Dragon going down, and Foghorn kinda losing his marbles and having to be evac'ed as well. The enemy lost 33 men.
V/R,
Jack
The two caches, each with two sentries on table. All other hostiles will enter via hotspots.
The good guys; Honcho (platoon commander) up front, followed by Tm2 (left to right, Mace, Lancer, Tumbler, and Dragon) and then Tm3 (Corkscrew, Foghorn, Ballpark, and Transit). The two Range Rovers carrying the explosives are in the rear. Each vehicle has an assigned driver, a demolitions expert (Blaster and Detcord, respectively), and enough gear to ensure the destruction of the two caches.
Tm2 on the right (SW) side, moving up towards cache 1. Honcho is at top left.
Part of Tm3 moving up on left (NW) side. Corkscrew is at left, Foghorn at right, and Honcho is at top center.
Tm3's Ballpark and Transit moving up on the far left, with enemy in sight at top left. At about this time is when the bad guy at top left spotted Ballpark and Transit and fired some alerting shots.
Transit (bottom right) moves up and fires at the Oscar at the cache, puts a pin on him. The other Oscar at this cache (cache 2) moves up and fires at Transit, to no effect, followed by two more Oscars coming on board there at HS1. Ballpark (top right), on second floor, opens fire and puts two Oscars down (bottom left).
On right, Mace (bottom left) moves up but can't get a shot off, while Lancer (far left) double times up to get a look but can't shoot either. The bad guy (center) on the second floor snap fires at both of them, to no effect, while the guy standing on the cache puts a pin on Lancer. An Oscar comes on at HS3, moves up at the double time (bottom right).
Foghorn moves up and takes a shot at the Oscar upstairs of cache 1 and puts him down.
Another Oscar comes on at HS3 (center), while Tumbler moves up (bottom left, with Mace to his left rear).
An Oscar comes on in the center, and Honcho moves up in the center but doesn't have a shot. Corkscrew (center, with Transit to his left, Ballpark to his left rear, and Foghorn to his right) moves up, just around the corner from cache 2.
On the right, Dragon moves up next to Lancer (both bottom left, Lancer has the green pin bead, and Mace is at far right), while three Oscars come on at HS2 in the center. The few shots the JCSOG guys have been able to take haven't had much affect. When you're really outnumbered you really need to make your shots count...
Bad guys rush the center, which is manned only by Honcho. He's quickly put down without even firing a shot...
While Oscars in the southeast (center left at the cache, center right behind the wall, and bottom right in the building) are all able to open up and put pins on Mace and Tumbler.
On the left (this photo is taken looking at Tm3 from behind the bad guys, pretty much looking out from HS1), Transit (in the rubbled building at right) opens up and hits... nothing. The RPG gunner at bottom left slams a rocket into the rubbled building, luckily only getting a pin on Transit.
Oscar at bottom left moves up and takes a shot at Transit (top center), misses, while Ballpark is able to put one whole-whopping pin on the Oscar RPG gunner at HS1... We need to get these boys out to the range.
A very quick and violent firefight breaks out at cache 1. Lancer holds tight but opens fire through the doorway he's manning and puts the Oscar at cache 1 out of the fight, while Mace fires at another Oscar, misses, but still sprints up to cache 1, wanting to get it secured so the vehicles can come up and rig the damned thing to blow. But the bad guy Mace just missed moves up and fires a long burst into Mace, putting him out of the fight. So now the platoon commander and the team leader for Tm2 are down...
The bad guys have managed to get quite a few guys on in the center, and since they have pretty good position on their left, the guys in the center decide to head right to lock down cache 2, as Tm3 was getting pretty close.
But Foghorn is Johnny on the spot and moves up to the corner, puts one down and puts a pin on the other.
The damned RPG fires again at Transit in the rubbled building, putting a second pin on him (seriously degrading his combat capability), but Corkscrew pops around a corner of his own, right onto cache 2, and puts another Oscar down. Another bad guy comes on at HS1.
Lancer (at bottom left, you can just see the yellow bead) opens up through the doorway again, puts another Oscar down, then Dragon (just to right of Lancer, near cache; you can see WIA Honcho at top left and WIA Mace at cache) rushes through the doorway firing, and puts down two Oscars.
This is quickly followed by Tumbler rushing up to secure cache 1, calling on the V1 to come deliver it's explosives, which it does, while several more bad guys come aboard at HS3. V2 is trying to get to cache 2 (which Corkscrew, Tm3's leader, just secured), but it's taking its sweet time.
This is a good time for a lock-on: this is top down looking sort of west to east. The big group at bottom right is cache 1, from bottom to top is Lancer, Dragon, then Tumbler actually on the cache, with V1 having just pulled up. At the center near the 'T' intersection is Foghorn, while to his left (out of sight on the other side of that same building) is Corkscrew, on cache 2. The rubbled building just to the left is where Transit is pinned down, while further back and to the left is the building where Ballpark is set up on the 2nd floor.
The Oscar at bottom right came charging out around the corner of the building and took a shot at Tumbler (top left), putting a pin on him. Tumbler quickly spun and put him out of his misery. Blaster pops out of V1 and starts rigging cache 1 for demolition.
Back on the left, Foghorn is peering around his corner and figures hell with it. He pops the remaining guy at the intersection, moves up to cache 2 to cover Corkscrew (far left), and goes on overwatch (white bead).
Another photo looking back at Tm3 from HS1. Several bad guys move up, taking Ballpark and Transit under wildly inaccurate fire. Transit lays low in the rubbled house, managing to pull one of his pins off, while Ballpark gets it on, putting two Oscars down. V2 manages to get to cache 2, currently secured by Corkscrew and Foghorn, but several bad guys make a play to get up there and disrupt the setting of the explosives.
So Corkscrew charges ahead, but only manages to put one Oscar down...
On the right, Lancer pulls a pin off himself while covering Blaster and Tumbler on the objective (cache 1). More bad guys come on and move up (mostly at bottom right), so Dragon (center left) moves over and takes them under fire, to no effect. More bad guys come on table...
Dragon (far left, white bead) pops one Oscar then goes on overwatch, and the bad guys just keep coming. Dragon pops another one. Two more replace that bad guy... Blaster is finished rigging cache 1, so he grabs Mace (WIA) and throws him in the Range Rover.
A bad guy pops in, so Lancer moves up and puts him down, so another one shows up; V1's driver says hell with it and leaves town carrying Blaster and Mace's wounded body. Tumbler spots a group of bad guys in the street, pulls the pin on a hand grenade, tosses, gets a couple pins.
Back on the left side, Corkscrew (the wounded guy in green, pretty much dead center) pops an Oscar, but another moves up and returns the fire. For those keeping score, we now have three men down: the Plt Cmdr and both team leaders, and only one of them has been evacuated.
Another bad guy moves up, and Transit puts two of them down. Meanwhile, Ballpark comes down from the second story and pops onto cache 2.
One of the bad guys in the center moves up and pops right, opens up on Foghorn, who's sitting on the south edge of cache 2. The bad guy opens up with an LMG, putting two pins on Foghorn. Foghorn's return fire manages only a pin (the green bead on the bad guy is one pin, the yellow bead on Foghorn is two pins; a red bead is three pins and makes a guy utterly useless).
More bad guys arrive: two at HS1 (NE), one at HS2 (center).
Detcord hops out of V2 and manages to wire cache 2 at warp speed, which is certainly needed.
Remember when I mentioned a red bead means a guy is useless? Well, the bad guys in the street opened up on Foghorn again, putting that all important third pin on him. JCSOG guys generally get three (potential) actions per activation, with each pin removing a potential activation. If you have activations left you can use them to unpin yourself. If not, only a leader can pull pins off you. And all my leaders are down...
Meanwhile, Detcord (top center) hops the wall, runs to the right, grabs Corkscrew (WIA), and drags him back to the wall, while another Oscar pop into the street (bottom center). This feels kind of like "Zulu" with the non-stop bad guys.
Back on the right, Tumbler fires and puts an Oscar down, while Dragon sprints to the second story near cache 1 and drops a frag on the the three bad guys below. Two go down, while one is untouched.
On the left, the situation is getting critical as the bad guys are simply swarming towards cache 2. Transit (top left) opens up and puts two down, while Ballpark (center left) rushes to Detcord, grabs Corkscrew over the wall, and throws him in V2.
Lancer, seeing V2 getting ready to depart, sprints left, grabs Honcho (the first casualty), and drags him to the north side of the street (bottom left). To his right we have Foghorn, who's pretty much hors de combat, we've got Ballpark next to him, and Detcord still in the street.
One bad guy comes on at HS1, and three more at HS2 (center).
Speaking of Detcord, he hops the wall, grabs Foghorn and get both of them into V2. Dragon, on second floor in center, fires and puts three guys down, whle V2 pulls around to Lancer and Honcho (top left). But, just as things seem to be shaping up, another bad guy pops up in the center and makes a helluva shot, which drops Dragon up on the second floor...
On the left, more bad guys are moving up, and Tm3 is not looking so well. As a matter of fact, Tm3 is only Transit (top left), who just received his second pin, and Ballpark (bottom center), as Corkscrew and Foghorn were both evac'ed in V2. You can see the bad guy horde continuing to come (top right).
More bad guys come on table as Tumbler rushed upstairs, grabs Dragon, and drags him back downstairs (bottom center, just across the street from Lancer/Honcho and V2). Lancer throws Honcho in V2, runs across to Tumbler, grabs Dragon, and throws him in V2.
Ballpark and Transit are mowing them down on the left, but they keep coming. Time to think about getting out of dodge...
Three more bad guys come on at HS3, moving left towards cache 1.
A couple bad guys move up the street in the center, and Lancer pops one while Tumbler piles into V2. Lancer follows suit, and the vehicle squeals tires getting the hell out of there.
Three bad guys manage to get to cache 1, just as...
Ka-Boooooom!!! Okay, I know it's cheesy, but hey.
While Ballpark and Transit finally get their stuff in gear on the left, detonating cache 2 and booking for the LZ.
Another success, but again bloody, with Honcho, Mace, Corkscrew, and Dragon going down, and Foghorn kinda losing his marbles and having to be evac'ed as well. The enemy lost 33 men.
V/R,
Jack
Subscribe to:
Posts (Atom)