All,
Afternoon, 11 April 1941
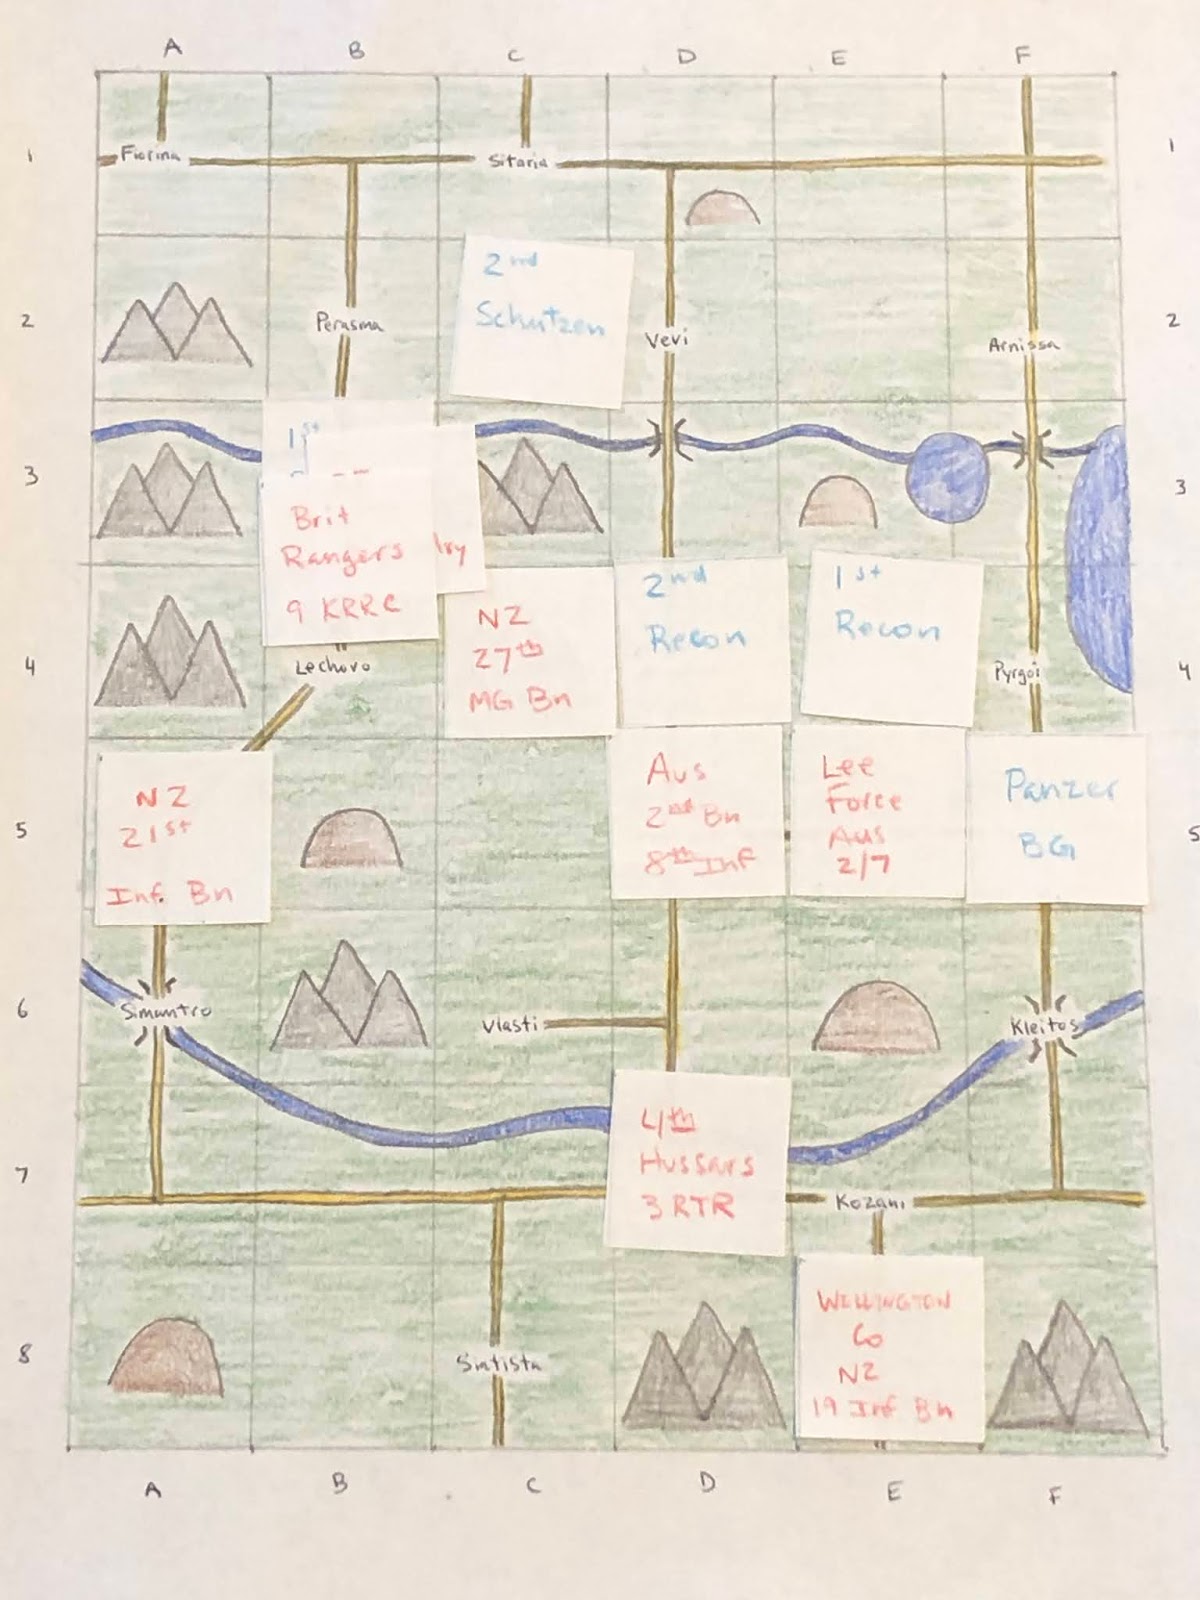
Here we are, continuing Kampfgruppe Klink's campaign in Greece. The first battle saw Captain Freitag's 1st Schutzen Battlegroup take a key mountain crossroads manned by members of the British Royal Engineers supported by Armored Cavalry from New Zealand. The fight saw the Germans infantry nearly eliminate the Commonwealth battlegroup, which fell back in disarray. Captain Freitag pressed his advantage, immediately pursuing south down, where it ran into defensive positions manned by the remnants of the New Zealand 21st Infantry Battalion. 1st Schutzen then evicted the NZ 21st Inf Bn from its positions, forcing them to fall back. The third fight saw 1st Lt Ginter's 2nd Schutzen moving secure a crossing over the D3 bridge, forcing the 27th MG Battalion back. Now we have Major Bohm's 2nd Recce Battlegroup pressing forward against remnants of the Australian 2nd Battalion, 8th Infantry Regiment.

Overview, north is left. The Germans will be entering from the north and attacking south, where the Commonwealth forces will be defending, able to emplace anywhere from their baseline up to the left edge of the hill at top center to the treeline at bottom center. The road is improved (at least in terms of 1941 Greece), there is a small hamlet consisting of three stone buildings at far right, a few patches of trees scattered about, but the dominant terrain feature is the hilltops dotting the countryside (clockwise from left): Hill 512 (bottom left), Hill 100 (top left), Hill 56 (top center right), Hill 327 (bottom right), and Hill 102 (center bottom).
I'm playing with very simple terrain so that I can lay it down and scrape it up as quickly as possible, to get in a lot of games as quickly as possible.
I'm playing solo using Too Fat Lardies' Chain of Command, modified a bit. I've bumped it up a level (using multi-based stands, not individual troops), I simplified fire and melee combat, and morale (5Core concepts, as always), as well as movement (I like dicing for movement, but it significantly slows things down for me). I changed the CoC Dice so that it represents indirect supporting fires from Higher HQ, and I did away with the Patrol Phase. I love the Patrol Phase, but it doesn't work for me playing solo, so what I do is designate an attacker and a defender; both sides start completely off table, using their Command Dice to deploy on table (as normal), but where it differs is that I basically give the defender a deployment area of half the table, and he can deploy anywhere in that area, even dug in, so long as it's at least 6" from any attacker.
If you're now wondering, then, why do I still call these rules "Chain of Command," it's because the entire game revolves around the use of Chain of Command's brilliant activation system (command roll/Command Dice), the use of leaders' command initiative, and the 'Force Morale' concept of declining Command Dice and morale to breaking. To me, that's the heart of the system, and it makes for a fun game.

The opposing forces, with Germans on the left and Commonwealth on the right.
I'm playing these games in 10mm using figures from Pendraken and Minifigs UK, roads from Fat Frank, hills from Warzone, buildings from Crescent Root, rivers from Wargamers Terrain, and trees from Gunner at Signifer.

Battlegroup Bohm (AKA, 2nd Recce): consists of the CO stand (far left), one motorcycle rifle platoons (a Platoon Commander and four rifle squads), a weapons platoon (Platoon Commander, two 7.5cm Infantry Guns, and Pak-36 anti-tank guns), a platoon of two armored cars, and a platoon of three tanks (two Panzer IIs and one Pz I).
Major Bohm (veteran of Poland, France, and now Greece, a former tanker seeing his first action as the KG Executive Officer)
1st Motorcycle Platoon - Officer Cadet Distler
1st Motorcycle Squad - SSgt Dorn
2nd Motorcycle Squad - Sgt Wilhelm (Iron Cross 2nd Class)
3rd Motorcycle Squad - Cpl Visner (IC2)
4th Motorcycle Squad - Cpl Wallon
Weapons Platoon - Sgt Kallenbach (IC2)
IG1 - Cpl Kallmeyer
IG2 - LCpl Nans
PaK1 - LCpl Saucen
PaK2 - LCpl Gerdt
IG1 - Cpl Kallmeyer
IG2 - LCpl Nans
PaK1 - LCpl Saucen
PaK2 - LCpl Gerdt
Armored Reconnaissance Platoon - N/A
4th Armored Reconnaissance Vehicle - Cpl Fasbender
5th Armored Reconnaissance Vehicle - Cpl Edst (IC2)
1st Panzer Platoon - Officer Cadet Kleiber
Vehicle Four - Cpl Leno
Vehicle Five - Cpl Stegan

The Commonwealth force: Australian 2nd Battalion, 8th Infantry Regiment
Commanding Officer: Major Hogan
1 x Carrier Platoon (Platoon Commander, 3 x Rifle Section, 1 x 2" Mortar, 1 x Boyes anti-tank rifle, 6 x Universal Carrier)
1 x Rifle Platoon (Platoon Commander, 3 x Rifle Section, 1 x 2" Mortar, 1 x Boyes anti-tank rifle)
1 x Weapons Platoon (Platoon Commander, 2 x Vickers MGs, 2 x 3" mortars)
Anti-Tank Platoon (Platoon Commander, 2 x 2-pdr ATG)

*The thinking wit shooting the armored cars up the road is that the defenders can only deploy in their half of the table, more than 6" away from any enemy forces, so I'm looking to cut the table in half and severly limit their options. We'll see how it goes...


*Making it so the Australians cannot deploy there!


*I'm noticing a big problem with the Recce battlegroups: while sort of heavily armed (at least for their size), they only have one rifle platoon, so not much staying power. The Aussies are focusing most of their firepower there as they figure the Germans can't take and hold the village with no infantry...


*Yeah, a little weird only bringing one gun, but that's what happens when you roll a 1, you get to activate one team/squad/vehicle. And in terms of its placement, the German blitz really screwed up the Aussie deployment options.


*Good grief, the Aussies have gotten three phases in a row.


*Apparently I missed a photograph: one Bren Carrier is knocked out, another suppressed, the ATR Team is knocked out, and a Rifle Section is suppressed.


*Damn, I missed another picture: the last remaining Rifle Section and the 2" mortar team surrender, allowing three Carriers to be captured as well.


Man, that was pretty damn rough. Like I said, there's not much 'oomph' to the battlegroup with only one rifle platoon, and the armored cars and Panzer I and IIs don't accomplish all that much, either. Hell, I kinda missed having the MGs and mortars of the infantry battlegroups; the mortars and the infantry guns are pretty much the same, but those PaKs are useless against infantry. I really got lucky, on two accounts: first, I think my strategy of shooting the armored cars up the road as quickly as possible was a great idea, it really limited the Australian deployment options, and second, it represented a threat that had to be dealt with, which kept their Weapons Platoon (well, at least the MGs) busy and led to their Carrier Platoon being committed, then exposing itself to finish them off. They pretty much had to do that if they wanted to get rid of the armored cars in any reasonable amount of time; it was going to take all day using machine guns and anti-tank rifles. So they ran out to take out the armored cars, which then allowed me to use the PaKs, Infantry Guns, and tanks to slaughter them.
Casualties:
German losses: 30 casualties, 1 Panzer I and two Sdfkz 222s knocked out. The Panzer I is out of action permanently, but both armored cars are back in the fight.
Commonwealth losses: 35 casualties, 20 captured
Characters:
Cpl Stegan, seeing his first combat, was KIA
Cpl Fasbender was lightly wounded and is back in action
Awards:
None
Next up, Captain Freitag's 1st Schutzen is defending the B3 bridge from the Brit Rangers/9KRRC and Royal Engineers/New Zealand Cavalry battlegroups.
V/R,
Jack
Another exciting and rousing battle, Jack! Your battle reports are well documented and the action is easy to follow. For RECCE operation, this was a very bloody affair. I enjoy seeing your early war ToE.
ReplyDeleteJonathan,
DeleteThanks man, I'm glad you liked it and I'm glad you're enjoying the campaign.
Regarding the TO&E/OOB, I usually make a post showing the whole kampfgruppe, and update it after each fight so that you guys can see it, but the problem is that I've already played all ten of these fights and the OOB I have shows the end, and I didn't want to spoil it for you guys by posting before the campaign is finished.
Regarding being bloody for a recce op, yeah, definitely. From my standpoint, I'd probably classify the two Recce Battlegroups as more as 'cavalry' then 'reconnaissance,' being lightly equipped but with a lot of firepower (relatively speaking) and very mobile, so they're definitely expected to fight to accomplish Kampfgruppe Klink objectives, rather than perform any sort of intelligence collection mission.
V/R,
Jack
Great campaign, really enjoying the narrative.
ReplyDeleteCheers, Andy
Thanks Andy, glad to hear it!
DeleteV/R,
Jack
A most enjoyable game report with supporting narrative. I suspect writing up the game reports takes up as much time, if not more, than playing the games themselves.
ReplyDeleteThank you, Peter, much appreciated! And yes, you're absolutely right regarding the time spend on the battle reports.
ReplyDeleteV/R,
Jack
Hello Jack
ReplyDeleteI think the Aussies were hard done by with the rule of being able to restrict their deployment :-) Yes, I know in real life you could make some sort of justification on why it happened. Theys were robbed of victory! :-) Or at least less casualties.
Anyway, great report and the Carrier Platoon really did cop it in the game.
Oh, and you probably won't get conflicted in the Klink games as I do not think they will ever go up against US Marines...
Hey buddy, hope all is well.
ReplyDeleteRestricting deployment is a part of the way Chain of Command works, and I kinda like it, gives me even more of a reason to go and overextend myself ;)
The "Charge of the Carrier Platoon" was lots of fun for me, even though it didn't work. High risk, high reward is where it's at ;)
Indeed, and the main reason is because it wouldn't even be a close fight. If the Army could beat the Germans in less than a year, I figure the Marine coulda been in Berlin by their birthday (10 November) ;)
V/R,
Jack