All,
It is 4 March 1952, and war has broken out between Hakuna and Matata. Both sides have been on high alert for the past two weeks, and this morning the two-sides' aerial Dawn Patrol clashed. While neither side scored a kill, real bullets were indeed used and three aircraft (two Hakuna, one Matata) returned to base badly shot up and trailing smoke. Both aerial patrols immediately radioed back to their respective headquarters that the other side had crossed the border AND initiated hostilities with gunfire, and so the dogs of war were let loose. Immediately the ground forces of each side were set in motion, with the first clash, a meeting engagement, occurring between Hakuna's 7th Tank Battalion and Matata's Umpulu Brigade.
The opposing forces, with Hakuna at top and Matata at bottom. As Matata one the aerial fight, they receive ground attack aircraft in support. Here's what we've got:
Hakuna
CO: Colonel Gumbia, 7th Tank Battalion
-Command stand
Captain Hakara's Company A, 7th Tk Bn
-nine Sherman Firelies
A platoon from Captain Raza's 77th Anti-Tank Company (led by him personally)
-three M-36 Jacksons
A platoon from Captain Garomi's 45th Reconnaissance Company (led by him personally)
-three Jeeps with 106mm recoiless rifles
An anti-aircraft artillery (AAA) detachment
-one 40mm Bofors and prime mover
Matata
CO: Brigadier Adewale, Umpulu Brigade
Two platoons of Captain Banaka's Company A, 21st Tank Battalion
Two platoons of Captain Tuka's Company B, 21st Tank Battalion
-twelve T-34/85s
One platoon of Captain Danjani's Company J, 44th Mechanized Infantry Battalion (led by him personally)
-four trucks, three rifle and one heavy weapons squads
One platoon of Captain Ocho's 17th Anti-Tank Company (led by him personally)
-three SU-100s
One section of Major Gabo's 901st Ground Attack Squadron (led by his Deputy)
-Captain Insha and Lieutenant Osuna piloting two Il-2 Sturmoviks
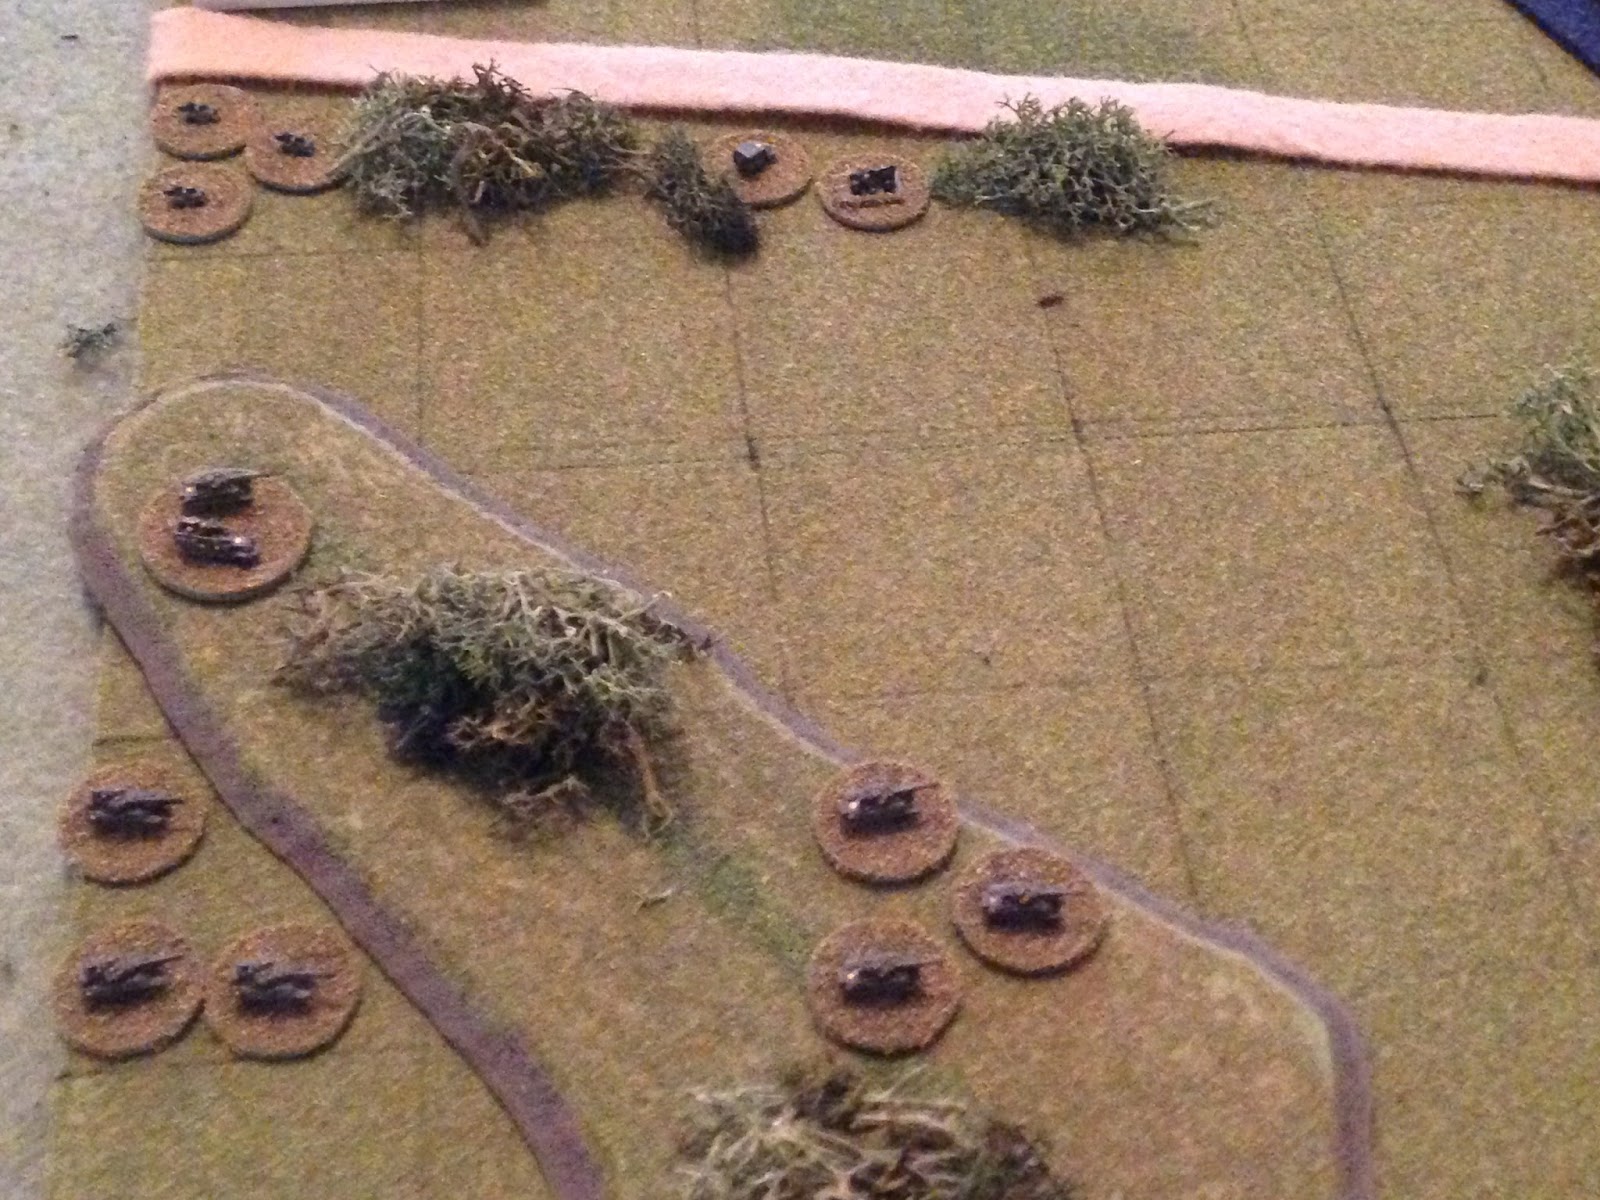
Overview of map, north is up. Hakuna is on the left (west) and Matata on the right (east), with the Mashandane River, which serves as the border between the two countries, running north-south. There are several stands of trees, two dirt roads which are bridged over the Mashandane, several hills, and cultivated fields dot the landscape of small towns, villages, and farms.
The two sides deployed along their respective table edges.
A look west to east from behind the Hakuna lines: at far left is Capt Hakara's 1st Platoon, then (to right) Capt Garomi's Recon Plt, the AAA Det, Col Gumbia (the CO), Capt Raza's M-36 Tank Destroyers, then Capt Hakara's 2nd and 4rd Platoons of Shermans.
Looking east to west, at bottom left you see: Capt Banaka's two T-34 platoons, Capt Ocho's Tank Destroyer platoon, Brigadier Adewale (CO), Capt Tuka's two T-34 platoons, and at far right we have Capt Danjani's motorized platoon. The two Sturmoviks start off table, and can only be used for three airstrikes (each).
The boy (controlling Matata) wins initiative, and it's time to go!
His motorized platoon sits tight at top right, while everyone else moves up. No Hakuna forces (left) are visible yet. But the Matata Air Force has birds of prey overhead.
And, with the Hakuna air defense detachment still moving up, they pounce on the 3rd Tk Plt. One Sherman is suppressed and one is hit, with the crew out of action while they check their vehicle over.
In the center, the Hakuna AA Det moves up and gets its 40mm Bofors ready for action (top center), while 2nd Tk Plt moves up the hill (bottom center).
And they fire on the enemy 2nd Tk Plt (top center).
Marksmanship is a hallmark of the Hakuna military, and here we see it in action. Three tanks fired, one enemy tank is knocked out and another is hit; the crew is figuring out if they're still in the fight or not.
Colonel Gumbia moves to 3rd Tk Plt and rallies them; the suppressed vehicle (red bead) is back in action, but the crew is still figuring out the other tank (white bead).
The two good Fireflies of 3rd Plt move up (bottom right, from bottom left).
Where they (top left) draw fire from the Matata 1st Plt under Capt Banaka (bottom right).
Another 3rd Plt Firefly is hit and checked by the crew (bottom left, white bead), while the other tank returns fire, pinning a T-34 of 2nd Plt (top center).
Following up 3rd Plt, Capt Raza moves his M-36 tank destroyers up in support (bottom left). They fire on the Matata 1st Tank Plt...
Knocking out one T-34 and hitting the other two (targets at bottom right)!
Marksmanship, eh.
Back in the Hakuna center, Captain Garomi has his Recon Jeeps take up position in the town. The AA is at bottom right, and Capt Hakara's 1st Tk Plt is at top left.
Despite moving into the town (top left), they draw fire from T-34s of Captain Tuka's 4th Tk Plt (bottom right).
One Jeep is suppressed (red bead at bottom left), but the other two return fire with their recoiless rifles.
Both miss. Guess the Recon guys didn't get the memo regarding marksmanship...
Capt Hakara then leads the Fireflies of 1st Tk Plt forward (top center left), and they fire on Capt Tuka's 4th Tk Plt (far right).
The 17-pounders of the Fireflies suppress two T-34s and knock out a third!
In the Matata center (right), Capt Ocho leads his SU-100s forward. They pull through the trees and take up positions at the river bank. But Capt Raza's M-36s (left) spot them and fire...
Two of the Soviet-made tank destroyers are knocked out and the third hit!!!
Seeing the armored attack stalling under incredibly accurate anti-tank fire, Capt Insha of the Matata Air Force leads his section of two Stormaviks back over enemy lines...
The Matata attack aircraft roll in (right) on Capt Hakara's 1st Plt), but the Hakuna AA gun (bottom left) opens fire, sending out a steady stream of 40mm tracers...
Damaging Capt Insha's aircraft and driving off his wingman, Lt Osuna!!!
Marksmanship!!!
The Matata CO, Brigadier Adewale, moves up to support his devastated armored columns, pulling up next to Capt Banaka's 2nd Tk Plt (center).
But Murphy is on the battlefield and nothing is going Matata's way: the pinned T-34 (yellow bead) stays pinned, and the the other crew surveys their T-34 and decides it's out of action.
But the pinned T-34 of the Matata 2nd Tk Plt opens fire on Hakuna's 3rd Tk Plt (bottom left), pinning a Firefly (next to the white bead annotating a tank that's been hit).
Quite recklessly, Brigadier Adewale gets on his radio and screams at Capt Tuka to get his as-yet untouched 4th Tk Plt into the @#$%ing fight! The T-34s roll straight up the highway, and had just reached the bridge when the Fireflies of Capt Hakara's 1st Tk Plt opened fire on them...
Two T-34s were hit (white beads) and one pinned (yellow bead).
Marksmanship!
But perhaps there is some method to his madness? Brigadier Adewale knows his Motorized Infantry must get very close to Hakuna tanks to be effective; so with T-34s smoldering on the bridge (bottom center left) and behind them (bottom center right), Captain Danjani's Motorized Platoon darts up the right flank (top center) looking to close the distance with Captain Hakara's 1st Tk Plt (top left).
Capt Garomi's Recon Plt (bottom left) gets into the fight again: their pinned Jeep tries to rally but stays pinned, while the other two Jeeps fire their recoilless rifles at T-34s of 4th Tk Plt stuck on the bridge...
Killing one.
Hakuna's CO, Colonel Gumbia, again tries to rally a Firefly of 3rd Tk Plt (bottom left), but the crew says it's a kill...
The other two Fireflies of 3rd Plt (far right) try to self rally.
The pinned tank stays pinned (bottom right), while the crew of the hit tank says it, too, is out of action!
Dammit, I just lost two tanks on rally attempts! That's two 6's and a 1 on three rolls...
The Fireflies of Capt Hakara's 2nd Plt (bottom left, with the tank destroyers at bottom center and 3rd Plt at bottom right) open fire on the Matata 1st Tank Platoon (top right)...
Getting a kill.
Matata Air Force Lt Osuna has again rolled his Sturmavik in on Capt Hakara's 1st Tank Platoon, and again the Bofors spits tracers into the sky...
And the second enemy ground attack aircraft is damaged and returns to base!!!
Marksmanship!
But on the Matata far right, Capt Danjani's trucks roll forward towards the Hakuna 1st Tank Plt...
And kick their infantry out (we remove the trucks after they make their drop off, though troops can remount later if they like. You certainly don't want to have enemy tanks catch your infantry mounted).
In the Matata center, Brigadier Adewale moves to 3rd Tk Platoon to rally them. One T-34 is good, but the other turns tail and runs off the map.
Scared of my marksmanship!
The pinned T-34 of Capt Banaka's 2nd Tk Plt again fires on the Hakuna 3rd Tank Platoon (which is now down to a single Firefly, bottom left), hitting it.
In the Matata center, Capt Ocho's lone surviving SU-100 (far left) and the last T-34 of 1st Plt try to rally. Both are in good shape, back in the fight.
Meaning the boy general has successfully turned three armored platoons on his left flank into one ;)
In the center, T-34s of Capt Tuka's 4th Plt (bottom center right) go to work; the tank that's been hit (white bead) successfully self rallies, while the pinned tank (yellow bead) fires on a Firefly of Capt Hakara's 1st Plt...
A Firefly is hit (white bead at top left), while the last T-34 of Capt Tuka's 3rd Plt moves up (center) and fires, missing.
On the Hakuna side, Capt Raza's M-36 Jackson's fire their 90mm guns at the last SU-100 (top right)
Knocking it out (far left). Brigadier Adewale, the overall Matata commander, takes a look around at his depleted force. The radio net crackles; their artillery is finally in place. "Perfect, I have a use for you..."
Brigadier Adewale (bottom center) orders his artillery to fire a smoke barrage...
To cover the withdrawal of his force! Hakuna, outnumbered and without air support, has turned back the forces of Matata at the Mashandane River! Hakuna lost two tanks, while Matata lost a total of nine (this is including tank destroyers).
It was a fun fight, but I actually felt bad for the little guy. While his move in the center to push a T-34 platoon up the road and onto the bridge was a bit rash, it came after I'd already devastated the other three T-34 platoons and the SU-100 platoon, and damaged one of his aircraft. I'm not sure what happened, my dice were just incredible. Think about the lone AA gun: two attack runs by the Sturmoviks, two opportunities to fire, using 1K 1S each time. The first attack I damaged one plane and drove off the other; the second attack I damaged the remaining plane. Incredible, and my anti-tank fire wasn't far behind.
The weekend is here, should be getting in the next set of fights.
V/R,
Jack


Again, great post Jack, thanks for sharing! The set-up and mini's look good and I think the little guy did a great job again - a chip off the old block? :)
ReplyDeleteThanks, glad you liked it! I do like the setup myself; not beautiful, but good enough, very functional, and quick setup/takedown. While I like the single-based look and could see doing it for other games, I've now essentially evolved to 5Core Brigade Commander and wish I'd have multi-based them for this project.
ReplyDeleteThe boy is doing great tactics wise, just his dice were cold, and even more, my dice were on fire. I'm sure it will swing back around.
V/R,
Jack
Well there you go ... I've multi-based a bunch of 1/600 for 5C BC and now I'm reading your posts, I was thinking of re-basing them as singles!
DeleteThey work great as singles, and I wouldn't mind if I was playing lower level, but I want quick, violent games, so there's too many individuals on the ground, need to treat them as platoons.
DeleteBut that's just me; it works out mechanics-wise, just more work moving each tank individually.
V/R,
Jack