All,
German Assault on Karpunevka
It's 0630 on 7 July 1943 in western Russia, where the I Battalion, Panzer Grenadier Regiment 101, 18th Panzer Division is carrying out an assault on Soviet defensive positions in and around the village of Snava (which is also a Soviet supply depot) held by elements of the 2nd Battalion, 676th Rifle Regiment, 15th Rifle Division. This is part of the German offensive to eliminate the Kursk salient, specifically on the northern shoulder of the bulge, as German forces push towards Ponyri.
I am playing this game because I have the good fortune of being buddies with Steve of the "Sound Officer's Call" blog (https://soundofficerscall.blogspot.com/2019/10/firestorm-ponyri-station-campaign-first.html), and he is running a "Firestorm Ponyri" campaign. He is playing some games with his local buddies, but was unable to play all of the games himself; rather than simply 'dice off' for results of campaign fights they were unable to play on the table top, Steve asked if anyone in the blogosphere wanted to help, so here I am.
It's been a little bit of an issue that I literally just sold off a bunch of German late war gear, so I'm a bit understrength, but Steve is working with me to make sure the fights I get match up with the forces I have. This is the first fight I've played, and I hope it wasn't too much a pain for him, I certainly want to keep going! First, I love to play games; second, it's been way too long since I've played any Eastern Front games (maybe eight years or so?); and lastly, I'm a solo gamer that still craves some comradery, so whenever I can help another wargamer out, I'm always quick to jump at it.

Overview, north is up. There are a couple primitive roads, mostly running north-south, with a couple patches of heavy wood in the west (left), a large, man-made pond in the south (center bottom right), and the village of Snava in the east (right). Other than that it's flat terrain covered in crop fields broken up by a few stands of trees, with over grown brush flanking them. The brush provides limited concealment, but no cover, and does not block line of sight. The buildings of Snava are stout stone structures, offering good cover.
The orders of battle:
Germans
Battalion Commander
1st Company (three rifle platoons of three rifle squads)
2nd Company (three rifle platoons of three rifle squads)
3rd Company (three rifle platoons of three rifle squads)
Schwere Company (MG platoon of four MG-42s, mortar platoon of four 8.0cm tubes, infantry gun platoon of two 7.5cm guns, and an anti-tank platoon of two PaK-38 5.0cm guns)
Panzer Platoon (five Pz IIIJ with long 50mm)
Battery of 10.5cm Artillery (off table)
Flight of Ju-87 Stuka dive bombers (off table)
Soviet
Battalion Commander
1st Company (three rifle platoons of three rifle squads)
2nd Rifle Company (three platoons of three rifle squads)
Anti-Tank Rifle Platoon (3 x PTRS-41s)
Anti-Tank Platoon (4 x 45mm ATGs)
Field Gun Platoon (3 x 76.2mm "crash-boom" guns)
MG Platoon (4 x Maxim .30-cal MGs)
Mortar Platoon (3 x 82mm mortars)
Tank Platoon (three T-34/76s)
I'm playing in 10mm (figures, vehicles, and gear a mix of Pendraken and Minifigs UK) based at one stand=one squad, weapon, or vehicle. I'm playing this game using Too Fat Lardies' "I Ain't Been Shot Mum" rules, simplified a bit in terms of combat, morale, and movement.
And again, this time with troops present. The Germans are attacking from the north (top); at top left is their 2nd Company, and at top center right is 1st Company, with their Schwere Company spread between them. The Soviets are dug-in to four strongpoints:
1) Strongpoint Marta (in woods at left center), where they have 1st Platoon, 1st Company (platoon commander, three rifle squads, a Maxim .30-cal MG, and a 45mm anti-tank gun)
2) Strongpoint Katarina (in stand of woods at bottom center), where they have 2nd Platoon (1st Company, same as 1st Plt)
3) Strongpoint Masha (top right), where they have 3rd Platoon, 1st Company (same as 1st Plt)
4) the village of Nava (right), where they have 1st Platoon, 2nd Company (same as 1st Plt, 1st Co), a platoon of three 76.2mm 'crash booms,' and just in front of them, a platoon of anti-tank rifles dug-in in an ambush position
The Soviets have a platoon of 82mm mortar platoon of a PC and three tubes.
The German Panzer Platoon will start off table but come on as soon as possible following the initial strikes by supporting fires. The Germans are holding their 3rd Company and AT Platoon off table, in reserve. The Soviets are holding 2nd Platoon, 2nd Company, and their T-34 platoon carrying 3rd Platoon, 2nd Company, off table in reserve.
On the Soviet left flank is 1st Platoon, 1st Company, manning Strongpoint Marta.
In the Soviet center is 2nd Platoon, 1st Company, manning Strongpoint Katarina.
On the Soviet center-right, occupying the village of Snava, is 1st Platoon, 2nd Company, the Field Gun Platoon (3 x 76.2mm guns), and the Soviet ATR Platoon (bottom left).
And on the Soviet right flank (with Snava just visible at far left) is 3rd Platoon, 1st Company, manning Strongpoint Masha. This would be the scene of some incredibly intense close combat that would ultimately decide the fight here at Karpunevka.
And the Soviet 82mm Mortar Platoon in the southeast (bottom right, looking northwest).
The German far right flank, where 2nd Company has crept up to the line of departure, with half of the Schwere Company in direct support (far left, two MG-42s, two 80mm mortars, and a 7.5cm Infantry Gun).
In the German center, the German CO and the other half of the Schwere Company, supporting 1st Company's (just visible at top left) attack.
And the German far left, where 1st Company is prepared to cross the LOD, looking straight into the teeth of Strongpoint Masha (top center, with Snava at top right).
A buzz is heard in the distance, and all eyes turn skyward as a flight of Ju-87s streaks in...
And drops its bombs on Strongpoint Marta, knocking out the Soviet machine gun team, putting casualties on two rifle squads and the 45mm ATG crew, and suppressing the PC and last rifle squad!
And then sky is filled with the sound of runaway locomotives...
Followed by German 150mm HE shells slamming into Strongpoint Masha, knocking outa rifle squad, putting casualties on two others, then suppressing the PC, the 45mm ATG, the MG team, and an adjacent 76.2mm Field Gun!
Attack!!!
On the German left, the 1st Company (far left) looks on as they're Schwere Company attachments (mortars, MGs, and infantry gun, bottom left) open fire on Strongpoint Masha (top center)...
And the 1st Platoon and 2nd Platoons jump off into the attack, firing as they go.
The combined fire keeps Masha's defenders suppressed, even forcing the ATG crew and MG team to fall back out of the bunker!
On the German right, 2nd Company's Schwere attachments (far left) open fire on Strongpoint Marta (top right) as the 2nd Company attack jumps off (2nd Platoon moved up, center bottom, from bottom left).
But Masha's defenders (top center right) call in mortars (bottom right) on the German 1st Company (top left), knocking out a Nazi squad!
And that fire is joined from the south, where Strongpoint Katarina's machine gun team (in bunker at bottom left, firing past the ATR Platoon at center top, with Snava at top right) lays into the German 1st Company's flank (top center, approaching Strongpoint Masha, top right), knocking out another German squad while pinning a third!
On the Soviet left, Strongpoint Marta continues rallying back into fighting shape, though a rifle squad loses its bottle and fall back (bottom left, from trench)! Other riflemen open fire on the German 2nd Company (top right), to no effect.
Back on the German left, the German Commander (bottom left) pushes 3rd Platoon up to maintain the momentum of 1st Company's faltering attack (top left, where 1st and 2nd Platoons are taking fire and pinned down), as their Schwere Company attachments (bottom center left) continue pounding Masha (top center).
The German 3rd Platoon leader pushes his lead squad up to the road (bottom center left, from bottom right), looking to get into Masha's abandoned bunker (you can see the Soviet ATG crew and MG team suppressed behind it at top left).
In Snava, the valiant platoon commander of the 'Crash-Boom' platoon sprints right to rally his suppressed #3 gun (far right, from left)...
But he takes a stray round (casualty figure at far left) and goes down, which is enough to convince the gun crew to haul ass (bottom right, with red bead) !
But the Soviets are able to rally a tremendous amount of firepower to counter the Germans 1st Company's assault, as the remainder of the Soviet Field Gun Platoon (the two gun emplacements at bottom right) open fire on the German 1st Company's Schwere Company attachments (top left), suppressing an MG team.
Strongpoint Katarina's bunker (bottom left) continues pounding German 1st Company's (top right) flank.
And the Soviet 1st Platoon, 2nd Company (in Snava, bottom left), opens fire on the poor German infantry caught in the open (top right).
All told at this point, the German 1st Company has two squads out of action, one 'men down,' one suppressed, and one PC and one squad pinned!
And then, as the German 1st Company's 2nd Platoon Commander stands up to rally his men, he is hit in the chest and goes down (casualty figure above the squad with white bead). So 2nd Plt, 1st Co is now leaderless and down to two beat up squads!
On the German right, 2nd Company continues its rather cautious advance on Strongpoint Marta (top right).
In Snava, the Soviet CO moves up and rallies the 'crash-boom' crew that had abandoned its gun (right, gun at center left), then signals for part of his reserve, the foot-mobile 2nd Platoon, 2nd Company, to move up and reinforce Masha (top center), which, despite the withering crossfire from the mutually supporting Soviet defensive positions, is still under tremendous pressure.
With the defenders of Strongpoint Masha (bottom right) suppressed, the Soviet riflemen and machine gunners in Snava (bottom left/center left) continue to pour fire into the German 1st Company (top center/right)...
Which forces the German 2nd Platoon to break and run (top right, from far left)! The supporting fire allows the Soviet Platoon Commander in Masha to work on rallying his men...
But the remaining German platoon commanders of 1st Company are aggressive combat veterans, and so they keep pushing: the 1st Platoon Commander leads one of his rifle squads forward (center left), so near Masha's bunker they can smell the borscht cooking!
The Soviet Platoon Commander (far left) has got his MG team (center right bottom) rallied, and now it's literally a race to see who gets into the bunker first! The Soviet Lieutenant begins to rush to the MG team to usher them back into the bunker...
But the German infantry gun attached to 1st Company (bottom left) keeps banging away at Masha (top right, with 1st Company at top left)...
Pinning him down (top left)!
Soviet mortars continue to fall on 1st Company (top left), but mostly the German assault troops have moved out of the kill zone, so only one squad is suppressed (red bead), as Soviet reserves begin to arrive at Masha.
Well, not exactly; concerned about German infantry (top right) nearing Masha's bunker, the Soviet Commander is forced to commit his 2nd Plt, 2nd Co, into the fight piecemeal, as they arrive. The 2nd Platoon's commander and 1st Squad arrive and move up (behind trees, at left bottom, coming from off table to bottom center left).
On the German right, the German Commander has ordered his Anti-Tank Platoon up, so they arrive in the northwest (far left), behind 2nd Company.
Which is only receiving sporadic fire from Strongpoint Marta (top right) causing it to advance ever so slowly, in fits and starts...
German Schwere Company (bottom left) continues pounding Strongpoint Masha (top center), knocking out a Soviet rifle squad...
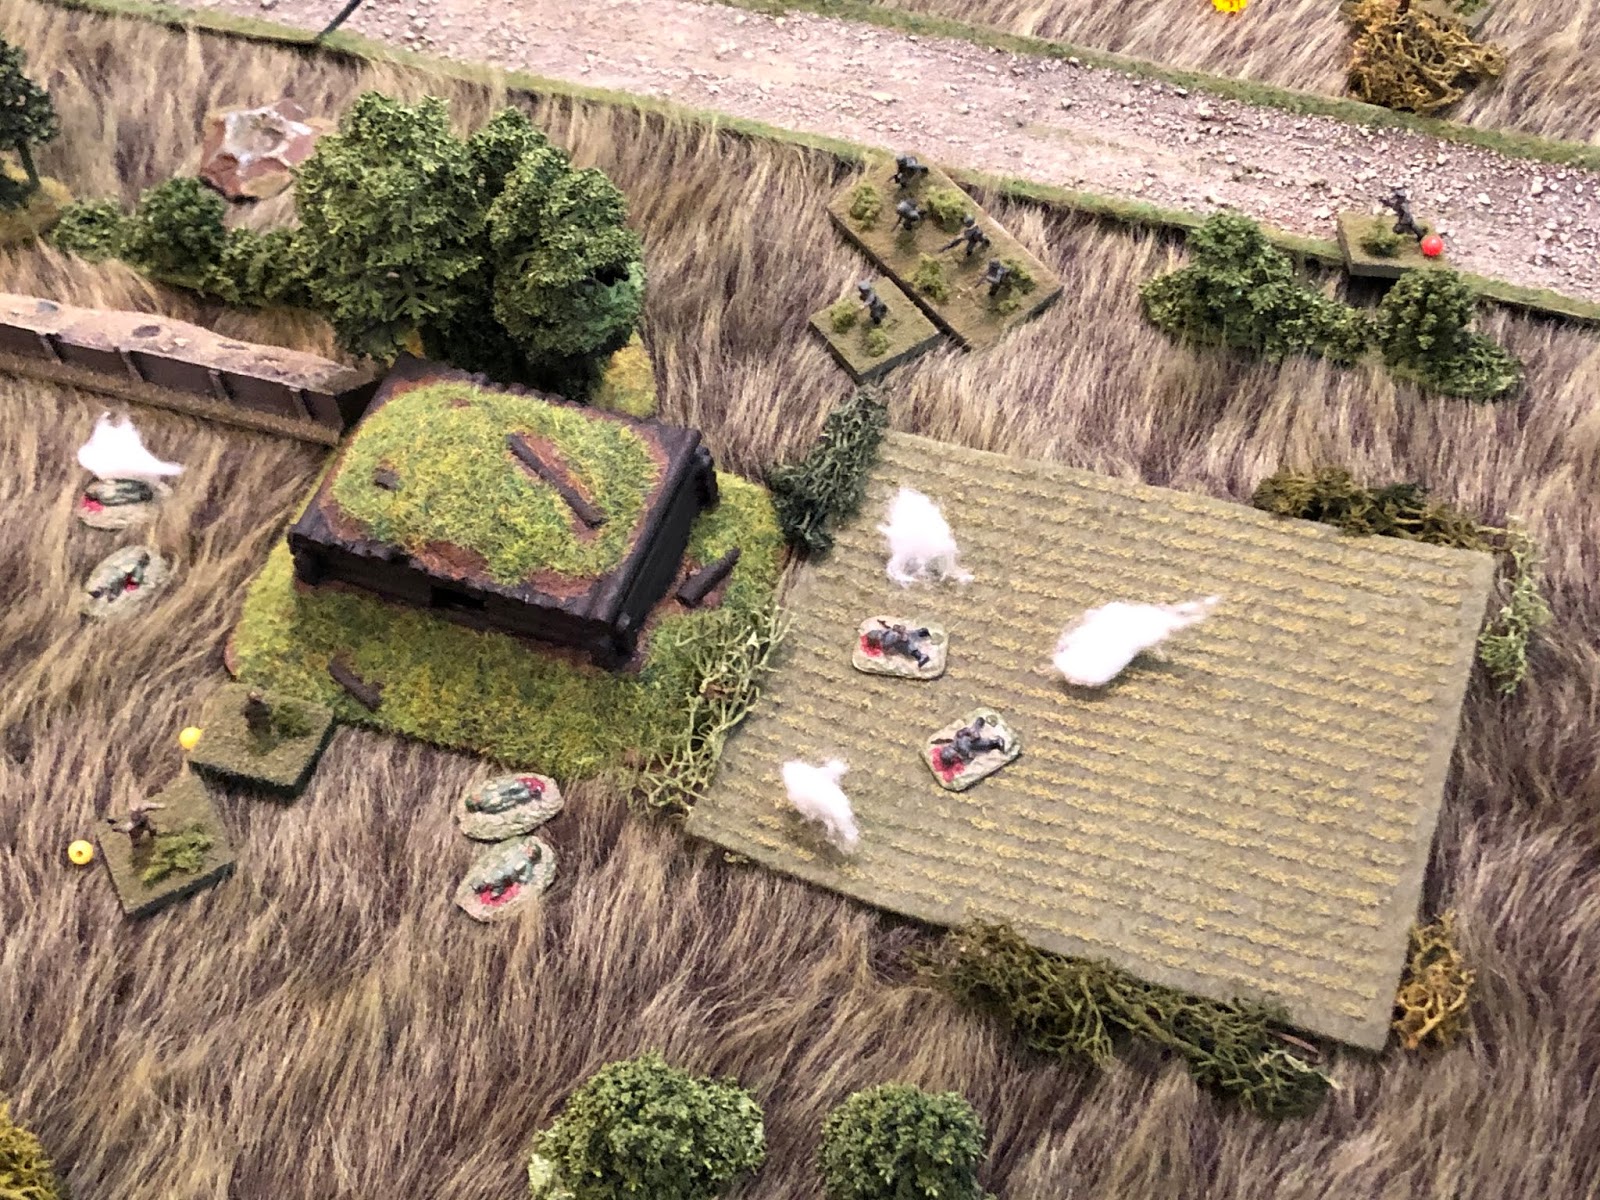
As the 1st Company's 3rd Platoon Commander grabs a squad and charges up to the bunker, into close combat with the Soviet MG team (bottom center, from top right, with 1st Platoon's PC and a squad at top center)!
They quickly overrun the Soviet machine gunners and move on the pinned anti-tank gun crew, which is joined by their Lieutenant!
And the Soviets stand their ground (bottom left), throwing the Germans back in disarray (far right, suppressed)!
German mortars (bottom left) in support of 1st Company (fighting for their lives at top left) turn their tubes on Snava and begin raining 80mm HE rounds on it, knocking out 76mm gun #2, suppressing #1 and a rifle squad, and pinning the 45mm ATG crew!
While German mortars in support of 2nd Company (mortars at bottom left, 2nd Company at bottom center, moving slowly towards Strongpoint Marta (far right), seek to relieve some of the pressure being placed on 1st Company (top left), so they fire on Strongpoint Katarina (top right), whose machine gun has been punishing them...
Placing smoke directly on target!
The Soviet mortars (bottom right) adjust fire and continue dropping rounds on the German 1st Company (top center left), danger close...
The rounds knock out the recently thrown back squad from the German 3rd Platoon (center) and force their PC to fall back to the road (top right, with 1st Platoon PC and one squad at top center). The Soviet PC at Masha (far left) exhorts the ATG crew to get back in the bunker and re-man their gun...
But he mysteriously takes a round and goes down (bottom right), which is enough to convince the ATG crew (far right) and the least remaining rifle squad (top left)...
To get outta Dodge (right top, from left, with PC and 1st Squad from 2nd Plt, 2nd Co below them)!
But now the fire on Snava (top right) from the German Schwere Company...
Is beginning to tell, as Snava's MG team (center, in house) is knocked out! Snava now has all three 76mm guns out of action (one KO, one suppressed, and one had its crew run off, and though they were rallied, they still haven't been able to return to their gun), its 45mm ATG suppressed, and its MG team knocked out.
And on the German right, despite the incredibly slow advance of 2nd Company (bottom right), the Schwere Company's (bottom left) fire on Strongpoint Marta (top right)...
Is having a deleterious effect, with every unit still in action looking a bit roughed up.
With more units beginning to fall back.
The German 2nd Company is making slight progress towards Marta (top right) as their 3rd Platoon moves through the woods and begins popping out the other side (top right end of woods at bottom center).
On the Soviet right, the 2nd Plt, 2nd Co, PC grabs his lead squad and rushes towards the abandoned bunker (center top, from bottom center).
Right back where we started,.
While further left, in Snava, the Soviet CO finally coaxes the crew of 76mm gun #3 back up to their weapon.
Schwere Company fire (bottom left) in support of 2nd Company (right) on Strongpoint Marta (top right)...
Has become overwhelming, and empties it of Soviet troops! "Comrade, I hope the Lieutenant doesn't realize we all ran away from our position!" Soviet Lieutenant: "Shut up, Ivanenko, you're so stupid!" "Stupid, eh? What are you doing back here, Lieutenant?"
The Germans begin committing their infantry reserves: 1st Platoon, 3rd Company, arrives (center top, the three stands in a row facing towards bottom) in support of the beleaguered 1st Company. The 1st Company's 3rd Platoon leader, suppressed on the road (red bead at center top right, with 1st Platoon's PC and a squad below him) stands up to rally the troops!
And is promptly laid back down, permanently (center top right)!
Things are looking up for the Germans as their platoon of Panzer Mk IIIs arrive in the center!
The immediately push south (Strongpoint Marta is at top right)...
While on the German right, riflemen are finally almost into Marta (top right).
But the defenders are all hanging out, out back! The Soviets are all suppressed at bottom center, the Marta trench is in the trees at center/center right, German 2nd Company is at center/top left, German tanks at top right).
German 150mm artillery shells crash down on Snava, further roughing up the defenders.
Over at Strongpoint Masha, the remaining two squads of the Soviet 2nd Plt, 2nd Co, arrive (left, with their PC and 1st Squad near the bunker, top right)...
The remains of 1st Company creeps right, towards Masha's bunker...
The last remaining officer, 1st Platoon's commander, and one squad get into the bunker and open fire on the Soviet reserve platoon trying to get into the bunker!
As the rest of 1st Company (center) attempts to isolate the objective (the bunker, far left) by fire.
But the German 1st Plt PC and squad getting into the bunker (top left) is enough to convince the Soviet PC and squad to fall back and regroup with the rest of their platoon (bottom right)!
German Schwere Company (bottom left) continues to pound Snava (top right), wracking up more casualties and keeping the 76mm Field Guns out of the fight.
As the smoke on Strongpoint Katarina lifts...
The German tanks push east...
And two of them (bottom left) begin pounding on Katarina (top right), knocking out a rifle squad and suppressing another, as well as the Soviet MG team.
The remaining German tanks turn their guns on Snava...
Knocking out 76mm Gun #3 (center, Gun #2 knocked out at bottom left) and suppressing the Soviet CO (just right of Gun #3)!
Gun #1 fires on Panzer #4...
A near miss shakes up the crew (yellow bead).
The German CO immediately moves over (far right, from bottom left) and rallies the crew.
As the German ATG Platoon moves up
(still limbered, center left, from bottom left). The German 2nd Company continues advancing at its glacial pace (bottom)...
And the Germans finally have infantry in Strongpoint Marta!
And over on the left, German infantry (in bunker, center, and at their top right) are keeping Soviet infantry reserves (top left) at bay in Strongpoint Masha.
So far the Soviet Anti-Tank Rifle Platoon (bottom center) hasn't had much to do; despite the arrival (finally) of German tanks (top center), they're still not close enough for the ATRs to do harm, so the Soviet gunners lie there patiently, baking, waiting for the German steel beasts to come a bit closer.
On the Soviet right, German small arms fire has driven off one of the Soviet reserve squads!
Their Lieutenant curses his cowardly comrades, but orders his 2nd Squad (bottom right) to lay down a base of fire as his 3rd Squad moves to envelop (far left).
But the Germans continue to attempt to reinforce, moving troops towards the all important bunker (just visible at far right). The Soviet Platoon Commander knows he must do something before the Germans are able to marshal their strength on the objective...
So he lets out a 'Hurrah!' and charges, leading his 3rd Squad into close combat with a German squad on the other side of the trench!
The marauding Soviets quickly knock out the squad, then turn and advance down the trench, into the bunker, where grenades, spades, and trench knives are wielded...
But the Germans mow them down in the trench!!!
Seeing their Lieutenant and comrades mowed down at the bunker (top right), the last remaining squad of 2nd Platoon, 2nd Company, flees the battlefield (bottom left)!
But, just in time, just like the cavalry in the old-timey Westerns, the last of the Soviet reserves arrive: 3rd Platoon, 2nd Company, riding on T-34s!!!
The Soviet reserve has come on directly behind Snava (far right), with Strongpoint Masha at top right and Strongpoint Katarina at bottom left).
The three T-34s immediately push on Masha, closing directly on the bunker...
And begin blasting it with their 76mm guns at point bank range...
Killing the German Platoon Commander and his squad!
And with that, the last two remaining squads of 1st Company head for the hills (top right, bunker at bottom left), three squads of 1st Platoon, 3rd Company between them)!
One of the Soviet tanks spots a Panzer III (top right) and fires...
Immobilizing the German tank!
Over at Strongpoint Marta, on the Soviet left, the leader of 1st Platoon, 1st Company, manages to rally all three of his rifle squads, though it's cost him precious time, time that probably will allow the Germans to get enough troops into the trench (top, where the Germans already have one rifle squad, top left), which will make it very, very difficult to dislodge them.
On the German left, 1st Platoon, 3rd Company gets ever so near to the bunker at Strongpoint Masha, though they've got to be careful, what with three T-34s and a platoon of Soviet infantry on the other side....
German artillery continues to pound Snava, but there's not much left. Hell, the Soviets don't have much left on the table worthy of a fire mission, but for the T-34 platoon, though it's recent arrival meant it couldn't yet be targeted. A rifle squad is knocked out, the last remaining 76mm gun (#1) is 'men down,' the PC is pinned, and the 45mm ATG crew falls back, abandoning the gun.
The German 2nd Company keeps pushing towards Strongpoint Marta (top right), but they're so slow, and still only have one squad in the trench.
Back on the Soviet right at Strongpoint Masha, T-34s continue firing on German tanks, ineffectively.
The German Schwere Company (bottom left and top left) packs up its MG and infantry guns on their trucks, preparing to displace forward.
The German 3rd Company's 2nd Platoon comes on (top left) behind their 1st Platoon, pushing hard on Strongpoint Masha's bunker (right, with two T-34s below it).
And the Soviet tank riders dismount on Masha...
Just as the German Stukas arrive for a second pass!
The birds of prey dive on Strongpoint Masha...
The Soviet PC's T-34 is knocked out (far right) and the other two tanks are suppressed, as are two of three Soviet rifle squads!
The big question is, can the German 3rd Company take advantage of this?
Aware of the threat to Strongpoint Marta (top left), the Soviet Mortar Platoon (bottom right) cranks their tubes over and begin dropping rounds in that direction...
Putting the squad in the trench 'men down,' suppressing their Platoon Commander, then pinning two nearby squads and another PC!
Down at Strongpoint Katarina, where the Soviet MG team in the bunker has a great enfilade shot on the German 3rd Company trying to get into Strongpoint Masha's bunker (and contributed significantly to the German 1st Company's route while trying to do so), but they're suppressed. The Soviet PC moves over and rallies them successfully!
But the German mortars immediately rain down and suppress them again!
With Soviet tanks spotted in vicinty of Strongpoint Masha (off camera to top right), the German ATG Plt PC moves one of his guns up (center right top, from bottom left), looking to get them into the fight.
While the German Panzer Platoon Commander pushes his tank forward (center top, from center)...
Before lurching to a halt and firing on a Soviet T-34 at Masha...
The 50mm armor piercing round skips harmlessly off the T-34's mantlet (top center), as the Soviet 3rd Platoon, 2nd Company, PC begins getting his men back into fighting shape after the Stuka attack.
On the German right there is some success as they finally get more men into the trench at Strongpoint Marta!
The Soviet 1st Platoon, 1st Company commander decides he cannot wait any longer, so he grabs a squad and leads them through the dense forest, into close combat in the trench!
But the veteran Landser are hardly surprised by marauding Russians appearing suddenly out of the forest, and the Communists are mowed down in their tracks!
The German PC an a squad dash ahead, looking to catch the Soviets off guard, and they pop through the other side (center, from the trench at top center), running square into the remaining two squads of the Soviet 1st Platoon, 1st Company...
Who promptly drop their weapons and surrender to the Germans!
Strongpoint Katarina's MG team finally gets back into action and lays into 3rd Company, suppressing several squads, which is furthered when the Soviet Mortar Platoon gets in on the action as well, pounding the hapless German infantrymen and suppressing some more of them!
German mortars (bottom left) begin pounding Strongpoint Masha (top center)...
And it's deadly, knocking out a Soviet rifle squad and suppressing the other two, freshly rallied, squads! The Soviet Platoon Commander can only manage to rally one of his squads, but it's all come down to this...
He (far right) grabs 2nd Squad and leads them around the bunker, into close combat against a German 1st Platoon, 3rd Company, that has been beat up by Strongpoint Katarina's MG team and the Mortar Platoon (all the red beads are suppressions)! The enraged Soviets easily knock the German squad and PC out, then turn on the next squad (top right), and knock them out too, completing the destruction of the German 1st Platoon, 3rd Company!
They rush into the street, braving fire from their own machine guns and mortars...
Where they crash into the lead squad of the German 2nd Platoon, 3rd Company!
The Soviets knock out the lead squad (far right) in brutal, hand to hand combat, sending the remaining two squads fleeing for the hills (top left)!
The spent Soviet heroes then fall back to the relative safety of the bunker at Strongpoint Masha, having saved their comrades, saved the defensive position, and saved Snava!
The German Panzers continue to advance and fire, knocking out a second T-34...
The push south and fire on Strongpoint Katarina...
They even push east and fire on Strongpoint Masha, but their 50mm guns aren't much use against fortified defenses, and the bigger issue is, with two of their three rifle companies seen off by Soviet tenacity, the Germans don't really have the infantry support left to continue and seize Snava. The German CO yells at the 2nd Company's commander to get his ass in gear; they've only now taken Strongpoint Marta, who knows how long it will take them to move on Katarina, then Snava. But it must be done...
But as 2nd Company is re-forming on Strongpoint Marta (top left), the Soviet Mortar Platoon again goes into action...
And the results are devastating, knocking out one squad, putting two more 'men down,' suppressing two PCs and a rifle squad, and pinning two rifle squads.
The boys just don't have it in them, so the CO orders a withdrawal.
But they were already leaving (top left, from bottom right).
On the south side of the Marta wood, the 2nd Platoon, 2nd Company PC and his lead squad are flabbergasted. They shoot the Soviet prisoners...
Then fall back to collect the casualties left by their comrades fleeing...
Well, that was a helluva fight! I really thought the Germans were going to pull it off after the Stuka strike on the Soviet tank platoon at Masha, but that damn MG team at Katarina and those damned mortars compromised 3rd Company's strength so bad that they were turned into a virtual house of cards, just waiting for a PC and squad from 3rd Platoon, 2nd Soviet Rifle Company to come up and blow them over. I'm really loving how "I Ain't Been Shot Mum" is working out for these games, it's been a lot of fun. I'd complain about how long they're taking, but, then again, it's kinda my fault: IABSM is designed to play reinforced company-sized games, but I'm playing battalion-sized games, so I really can't blame the rules.
I actually played two fights in Kursk this weekend, so stay tuned for the Soviet counterattack at Kastenwald!
V/R,
Jack


Jack,
ReplyDeleteWow, another nerve rattling battle! I really thought the Germans were going to take Snava. I could feel Ivan breaking! The Soviet heavy weapons really made a big difference on the field and German valor and leadership could only do so much. General Model will have to live without Karpunevka for this turn!
Steve,
DeleteYeah, it was about as close as you can get, I thought the Germans had it in the bag, but the Soviet one PC/one squad counterattack rolled up the German infantry reserve and that was that. Gotta wonder if Model will ever get to live with Karpunevka, knowing how many Soviet tanks are on the way!
V/R,
Jack
Nice report. A tough infantry scrap, but looks like it was a lot of fun. Not tried IABSM, will have to give them a go.
ReplyDeleteCheers, Andy
Thanks Andy, indeed it was! IABSM's activation mechanics are pretty slick, definitely throw plenty of friction into the game.
DeleteV/R,
Jack
Superb sir!
ReplyDeleteThe more of your commentaries I read, the more I want to give IABSM a go again. It always seems somehow incomplete when I read it, but I get a greater sense of it from your posts.
Thanks Darren, I appreciate it, I need to head over to your blog and read about the Soviet triumph there this weekend. I had a hard time with IABSM, they really built friction into every step of the process, and it's a bit too much for me, so I streamlined things and it works pretty well now (for me).
DeleteV/R,
Jack
I second that. If only i could figure out just how to play IABSM...
ReplyDeleteI dunno man, you seem to do pretty well playing wargames as it is! ;)
DeleteThe mods I made are on my Blackhawkhet blog, I'll have to find the link.
V/R,
Jack
Steve and Darren, check it out:
Deletehttps://blackhawkhet.blogspot.com/2017/12/i-aint-been-shot-mum-rules-tweaks.html
Awesome battle, Jack! I plan to revisit this battle account as bedtime reading tonight.
ReplyDeleteThanks Jonathan, but no blogger wants to hear they're batreps put people to sleep! ;)
DeleteV/R,
Jack
Not at all! It is the only time I have to block out other distractions and focus on your work.
DeleteOh, I'm just kidding with you Jonathan, no worries!
DeleteV/R,
Jack
Cracking, well done to all those Heroes of the Motherland! All they need now is the Western Allies to get in the fight :D
ReplyDeleteThanks TP, I appreciate it. Western Allies? One thing at a time! Though I have already put a bug in Steve's ear that we need to do this again, for Caen.
DeleteV/R,
Jack
You Caen do it, if you put your back into it?
DeleteI certainly hope so, and hope it's not totally dependent upon my back...
DeleteV/R,
Jack
Maybe put someone else's back into it ;)
DeleteYou're a good man to volunteer, much appreciated! ;)
DeleteV/R,
Jack
That's hopeful, I don't have time to play my OWN games :D
DeleteNow all I need is a whole bunch of new figures, and...
Nathan
I know whatcha mean! But what are you talking about, needing a whole bunch new figures? I'm trying to remember, didn't you used to post batreps over on the old BKC site?
DeleteV/R,
Jack
Hello Jack
ReplyDeleteAbout 3 weeks too late - I had to find the time to be able to read this and do justice. A very tough fight. I was with you, I thought the Germans were going to be able to do it after the pre-battle Soviet battering. But it was so hard to did those Soviets out! And losing squads bit by bit and just not having enough to push them out enough. And when there was a slim possibility, the Soviet Reserves come on.
An most enjoyable report.
Well, take your time Shaun, and please keep pretending you have better things to do than read my batreps! ;) Yeah man, this was an epic fight, I was exhausted ;)
DeleteAs you said, the Soviet defenses whittled them down, and just when the Germans were on the cusp of victory, the Soviet reserves arrived, blunting the attack. I was very satisfied, it was fun and felt right.
V/R,
Jack