Ambush at Abbeville, #6
1000 28 May 1940
Following the fighting in and around Flavion, KG Klink was briefly pulled out of the line to rest, refit, perform maintenance on their weapons, machines, and equipment, and bring in a few replacements. They were actually parked outside the Dunkirk perimeter when they were called back to action; further south, German forces had forced a crossing on the Somme. At 0600 27 on May, the Allies counterattacked the German bridgehead, striking the German 57th Infantry Division southwest of Abbeville, in an attempt to reach the encircled Allied troops at Dunkirk.
Unbeknownst to the Germans, the French French 4e DCr (or 4th Division Cuirassee, 4th Armored Division) arrived in the battle area that evening. The French force, heavily armed with Char B1, Somua S-35, and Hotchkiss light tanks, immediately set about reorganizing, preparing to attack on the morning of 28 May.
But KG Klink moved all through the night in order to reach the battle area. arriving at approximately 0500 on 28 May. The plan was for KG Klink to counterattack down the Blangy-Abbevile Road, hoping to flank the French 2e DLC (2nd Cavalry Division), maybe even cut all the way across and in behind the British 51st Highland Division, cutting off the British 1st Armored Division. With that, KG Klink set off, passing through the German 217th Infantry Regiment, launching its attack down the Blangy-Abbeville Road. KG Klink passed through Villers sur Mareuil, then Huppy, and were moving towards St Maxent en Vimeu, when they encountered trouble near the three (fictional) villages, Dujour, Deture, and Toujour, on the River Bleu.
The first fight saw Colonel Klink lead the 1st Grenadier Platoon, supported by Stugs, in the attack on Dujours. Repulsed, they were reinforced by the 4th Grenadier Platoon and drove the French force back onto Hill 44.
The second fight saw 1st Lt Tausch, lead his 3rd Grenadier Platoon into the assault on Hill 34. The attack stalled in several locations, but the Lieutenant's skillful leadership maneuvered his troops until they were able to unhinge the enemy's defensive line.
The third fight saw the Reconnaissance Company Commander, 1Lt Wehner, seize the bridge at Deture after some very heavy street fighting.
The fourth fight saw Colonel Klink go down in a blaze of glory atop Hill 44, the remainder of his Stugs and 1st Grenadier Platoon chewed to pieces, though still able to force the French off the hilltop.
The fifth fight saw Major Schultz, the Kampfgruppe Executive Officer, lead the assault into the French village of Toujour. The attached panzer platoon was roughly handled, and the infantry didn't fair much better, with Major Schultz wounded while leading a close assault to secure the village. However, no sooner was the village taken then strong enemy forces appeared, forcing not only the 4th Grenadier Platoon to fall back from Toujour, but also the Reconnaissance Company to abandon the bridge at Deture.
The sixth fight sees Captain Bohm, the Panzer Company Commander, lead his 3rd and 4th Panzer Platoons into battle against the French counterattack.
The overall area of operations, and that stupid north-seeking arrow at top right is incorrect, north is to far left... The three villages are, from left to right: Dujour, Deture, and Toujour, and the hills are, from left to right: Hill 34, Hill 44, and Hill 54. The River Bleu runs east-west down the center of the table.
My intent is to play a series of battles on a 6' x 4' layout, using small pieces, maybe 2' x 2' with 10mm troops. I've gone back to my old standby, Ivan's "5Core Company Command."
The German force:
CO: Captain Bohm (Iron Cross 2nd Class), acting Kampfgruppe Commander
-3rd Panzer Platoon Leader: Sgt Fittzbaum
V2: Cpl Otjen
V3: Cpl Krisnal
V4: Cpl Geiger
-4th Panzer Platoon Leader: SSgt Mangold
V2: Cpl Rausch
V3: Sgt Graebner (Iron Cross 1st and 2nd Class)
V4: Sgt Kupp
V5: Cpl Progen
2 x S35 Medium Tanks
3 x Char B1 Heavy Tanks (absolute monsters!)
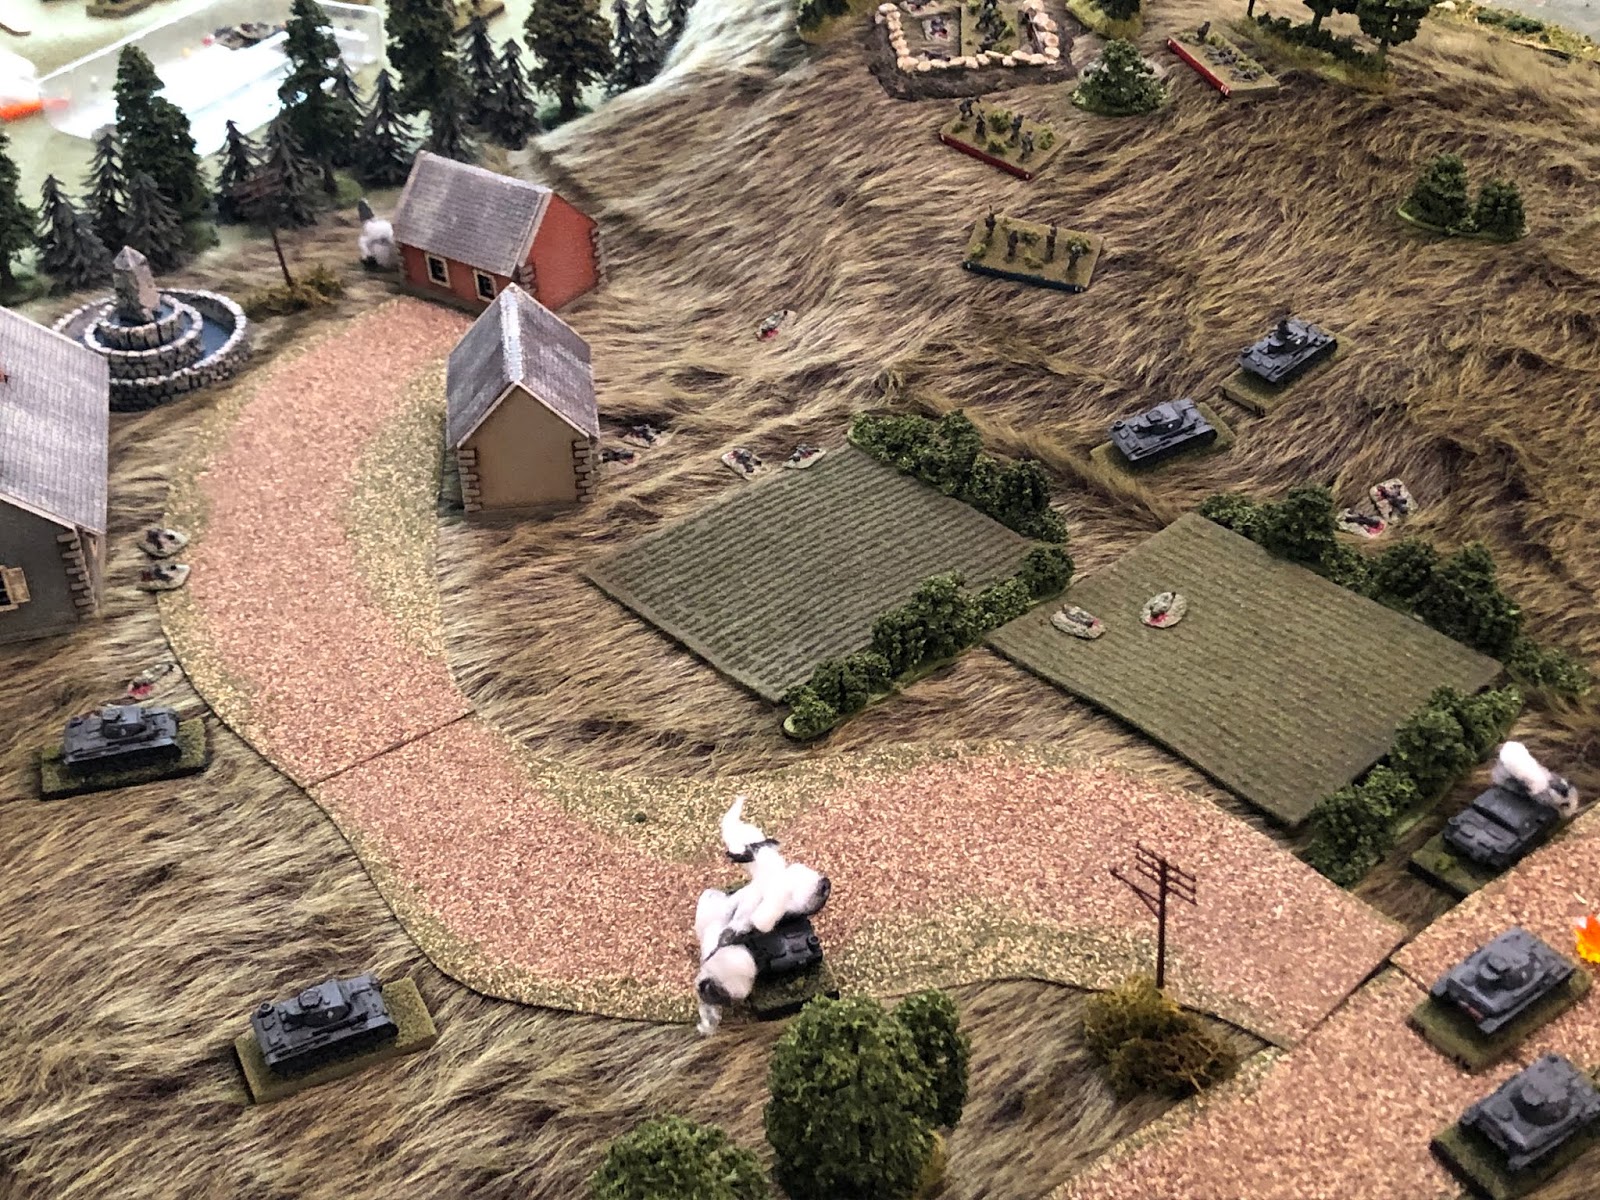
My interpretation of the operational area, with the villages Dujour (top left), Deture (center), and Toujour (far right) and hills 34 (bottom center left), 44 (top center left), and 54 (bottom center right, with the River Bleu running east-west (top to bottom) at center.
The German starting positions. 3rd Platoon its Panzer IIIs off road in the east (top left), while 4th Platoon has its Panzer IVs moving south (right) on the road. Captain Bohm is just off the road below them.
Captain Bohm, the senior officer left in KG Klink at this point, stops briefly to confer with Lt Wehner, the acting Kampfgruppe Commander (normally the Reconnaissance Company Commander). Lt Wehner orients the Captain to the terrain and updates him on the friendly and enemy tactical situation and location, but before he leaves, Captain Bohm asks Lt Wehner to remain as the overall tactical commander for KG Klink as he (Capt Bohm) wishes to direct and participate in the upcoming armored battle. "Those French heavy tanks are truly monsters, and it's going to take every gun we've got to stop them."
"Good luck, Sir!" wished Lt Wehner, as Captain Bohm's Panzer IV raced off to the south.
The French dispositions: Charb B1s on the road, H39s at bottom, and S35s at top.
In the southwest, Somua 1 moves up and cuts right (top left) as Somua 2 (center top) cautiously trails.
In the southern center, Char B1 1 dashes ahead (top left) as 2 and 3 move straight up the Blangy-Abbeville Road, accompanied by their Commander (center).
H39/1 and -2 dash ahead, on the northern flank of Deture (left), as H39/3 (bottom left)...
Moves up the slope of Hill 54 into a hull down position to take get a better view.
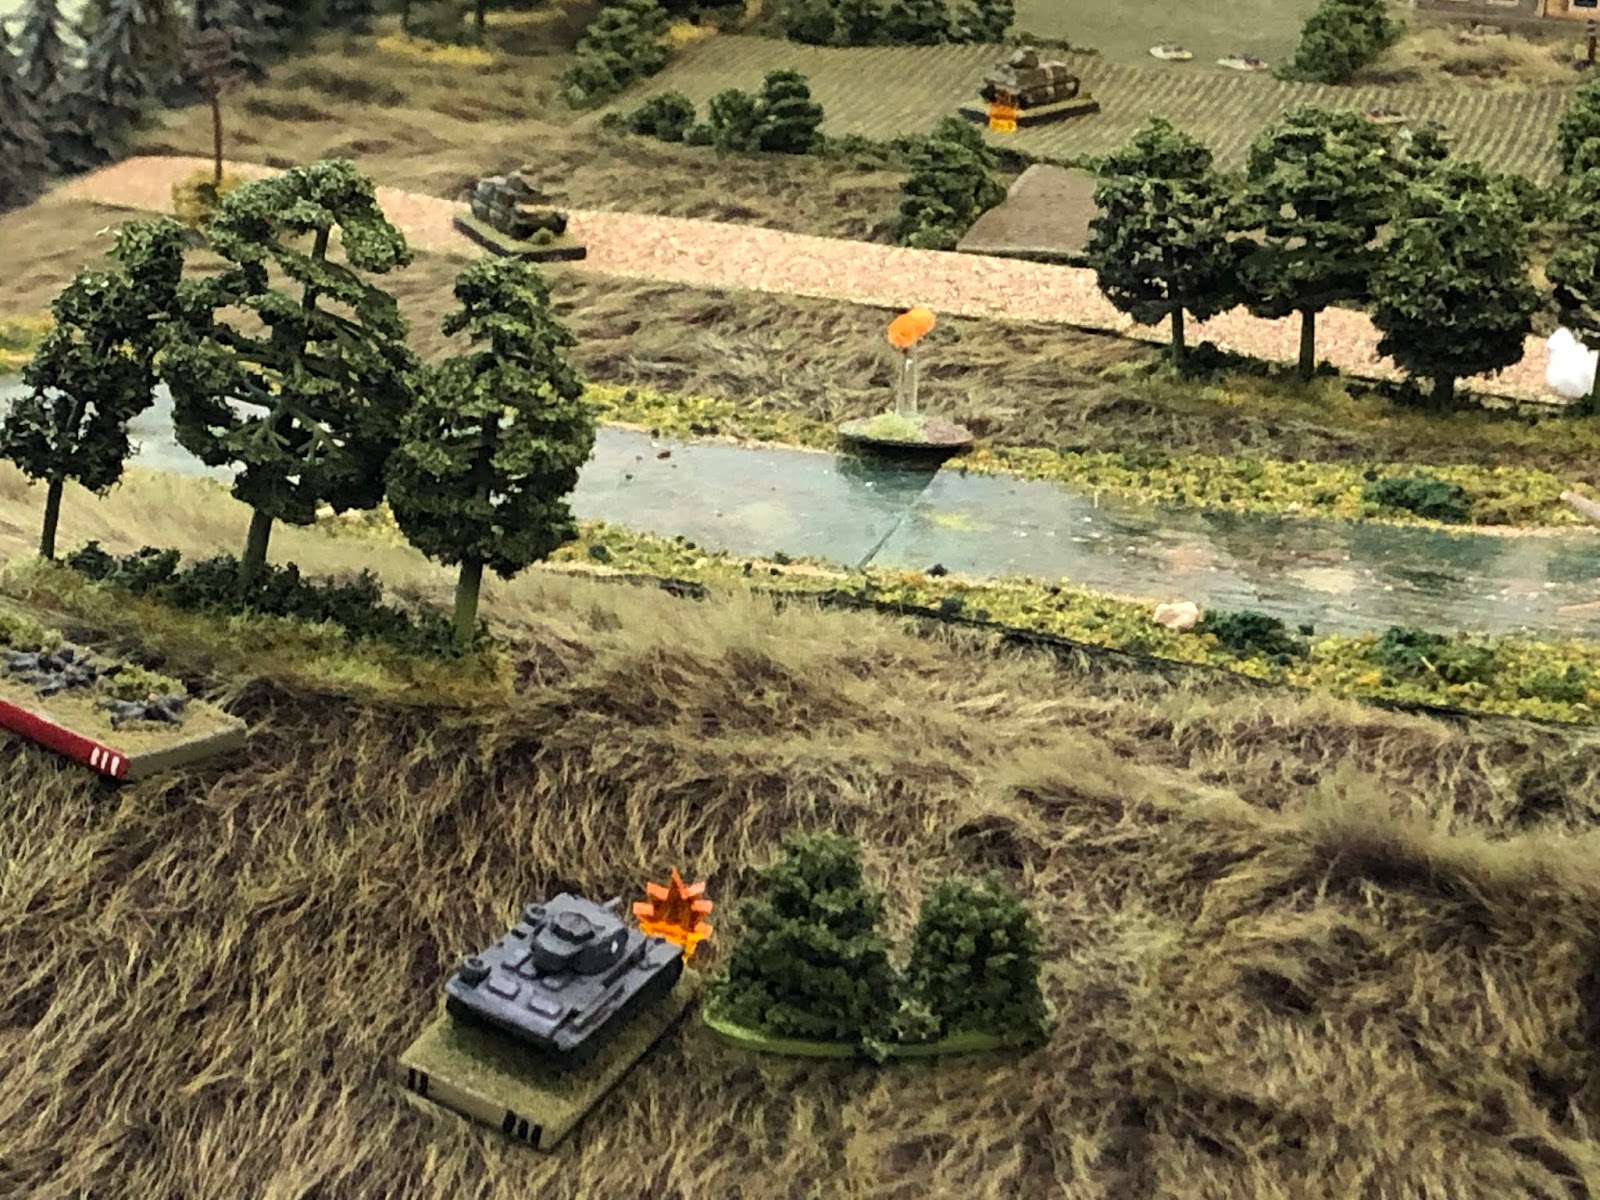
But moving up onto Hill 54 (top right) was a mistake: Sgt Fittzbaum, the 3rd Panzer Platoon Commander (bottom center, with tank commander figure), spots the French light tank. "Gunner, enemy tank hull down on Hill 54, 12 o'clock, 400 meters, armor piercing, fire!"
"On the way!"
The 37mm solid shot pierces the thin French armor and catches the tank on fire, so the shell-shocked crewmen of H39/3 bail out of their stricken tank!
First blood to the Germans!
In the German center, SSgt Mangold and Cpl Rausch push their Panzer IVs up near Deture, sheltering in a copse of trees (top right).
Sgt Graebner,* the Company's true Panzer Hero, pushes his Panzer IV up the road (right, from center left).
*The true Panzer Hero, holder of the Iron Cross 1st and 2nd Class, that I forgot about and failed to give any type of positive modifier to during this game.
Char B1/1 (bottom right), taking cover in Deture, spots Sgt Graebner's tank coming up the road (top left) and fires...
The 47mm anti-tank round screeches past and Sgt Graebner orders his driver to halt, slews his turret onto target (top center right), and orders his gunner to fire. The 75mm low-velocity rounds strikes squarely on the front glacis of the French heavy tank, harmlessly dashing itself to bits, though it's enough to ring the bells of the French tank crew, suppressing them.
*The Germans do not possess a weapon (right now, they have 47mm high-velocity armed Panzerjaeger Is later) that can penetrate the French Char B1's armor from the front. They can penetrate from the sides, if they get close enough, but right now they're only hope is to suppress the crews with accurate fire, maybe even force them to fall back.
Sgt Kupp maneuvers his Pz IV up next to Sgt Graebner's (top right).
Where he (bottom left) takes a shot at Char B1/1 (top right), but he misses.
Captain Bohm (bottom left) looks on as Cpl Progen maneuvers his Pz IV up between Sgt Kupp's and the farm house (right), unable to acquire a target.
Sgt Fittzbaum and Cpl Otjen maneuver their Pz IIIs up the slope of Hill 44, looking to get into hull down positions with great fields of fire (right top, from bottom left, with 4th Platoon Panzers at bottom right).
And Cpl Krisnel and Cpl Geiger follow (center, from bottom left). You can see the remnants of 1st Grenadier Platoon, 4th Grenadier Platoon, and 2nd Motorcycle Platoon organizing their defense of Hill 44 (top center right).
Somua/2 moves up, near Somua/1...
And then Somua/1 pushes up to the road, the pivots north, looking defilade on the bridge (off camera to left). He spots movement...
It's Cpl Rausch's Panzer IV (top left, with SSgt Mangold's Pz IV actually in the trees)! The French tank commander orders his gunner to fire...
Cpl Rausch and his crew abandon their immobilized tank (SSgt Mangold's vehicle visible in front of them).
The French Commander moves up to the outskirts of Deture, looking to rally the crew of Char B1/1, which he does.
Char B1/1 (center top) scans for targets as Char B1/3 pushes left (far left, from center, with Char B1/2 at bottom right).
Char B1/1 (bottom center) sights in and fires again on Sgt Graebner's Pz IV (top left, on road). The German tank is hit and immobilized, but Sgt Graebner and his heroes continue to man their vehicle!
As Char B1/2 moves up the road (center, from far right).
Sgt Kupp (bottom center, between Cpl Progen's vehicle moving into the grass and Sgt Graebner's immobilized vehicle -with white bead- on the road) spots the oncoming Char B1 and fires...
Again his gunner totally misses the target (bottom center). The French tank commander orders his gunner to return fire.
The 75mm high explosive round knocks Sgt Kupp's turret out of its trace, and one of the vehicle's tracks off, so they bail out. The explosion is fierce enough that it pins Cpl Progen's crew (red bead)!
On the French left, H39/2 (bottom center) spots SSgt Mangold's Pz IV in the trees (top left) and fires...
The round tosses up earth onto the German tank commander (bottom left), and he orders his crew to return fire on the Frenchman (top right, where the orange explosion is, with H39/1 just left of him).
The round strikes immediately before the French tank, pinning the crew, as H39/1 moves up (left)...
And fires on SSgt Mangold's tank (top left)!
The 37mm round skips off the sturdy Panzer IV (just off camera in the trees to right) as Sgt Fittzbaum's Pz III (bottom left) returns fire on H39/1 (top center right). The German round ricochets off, too, pinning the French crew.
Further back, Cpl Krisnel's Pz III (bottom center, with Sgt Fittzbaum and Cpl Otjen's vehicles moving up the slope at left) spots Char B1/2 moving up the road (top center) and fires. The round explodes harmlessly on the frontal armor of the French beast, but the crew are pinned.
Sgt Fittzbaum's gunner (center bottom) fires on H/39/1 again, and again it bounces!
Sgt Fittzbaum (bottom left) looks on as Cpl Otjen pushes his Pz III up into position atop Hill 44 (center top)...
But Somua/2 (bottom center) spots the German tank (top center) and fires...
Cpl Otjen gasps as the French round passes near enough for him to feel the heat from hit! His gunner returns fire, but the round ricochets off the heavily armored Somua (top center, with Somua/1 at top left), though the French crew is pinned.
*Oh yeah, the Germans can't penetrate the Somuas from the front, either. They are doing a good job of getting lots of shots in though, pinning and suppressing the French crews, to allow them to maneuver.
Cpl Geiger pushes his Pz III up Hill 44 (center top, from bottom left), near Sgt Fittzbaum and Cpl Otjen's vehicles.
Captain Bohm moves his tank up (right) to shelter Cpl Progen's vehicle and help the crew rally, and they're back in the fight.
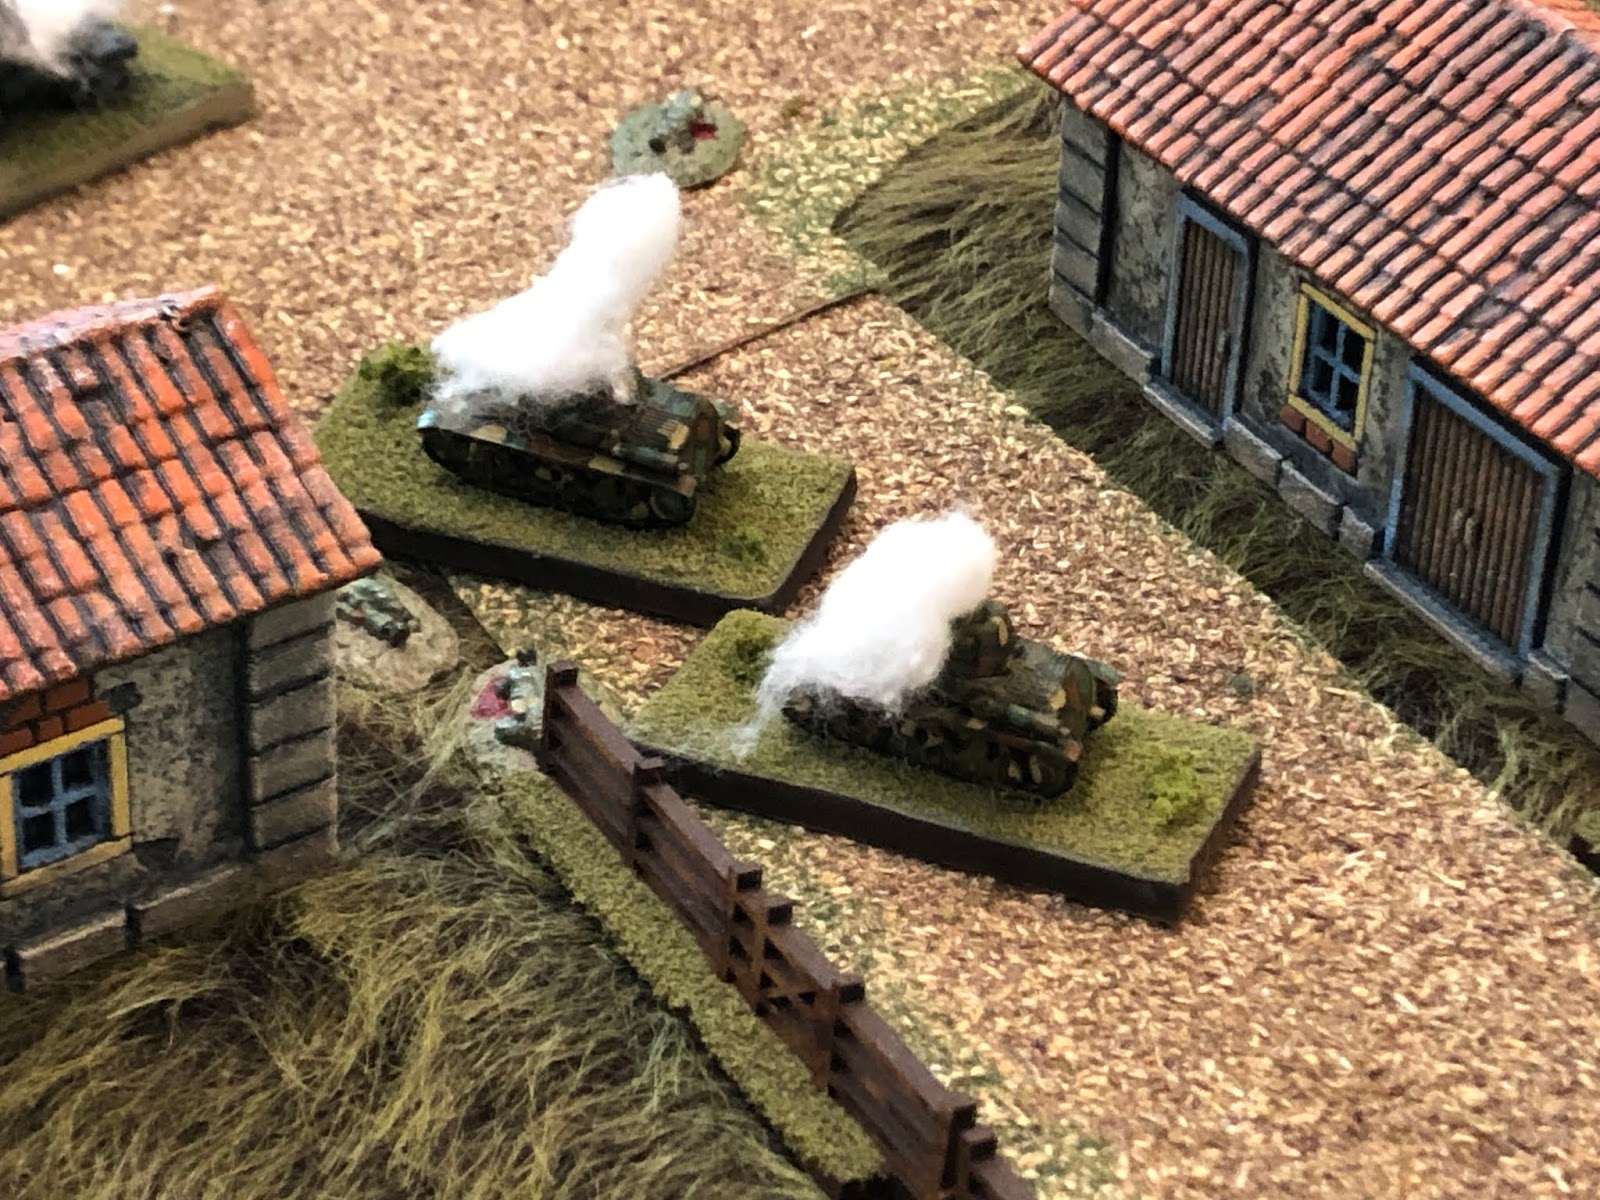
On the French right, their blood is up and the two Somuas push up to the river (right, from center right)...
They spot SSgt Mangold's tank in the trees...
And pump rounds into its flank until smoke billows from it. SSgt Mangold and his crew bail out, nothing worse than some scrapes and scratches, quite luckily.
*The move up into the trees was a good one, but the French H39s were able to blunt their push until the Somuas could move into excellent flanking positions. Perhaps if the Panzer IIIs of Sgt Fittbaum's platoon could have better countered the French light tanks, or if the rest of SSgt Mangold's platoon has been less preoccupied with the Char B1s. I dunno, they'd probably just have been shot up by the Char B1s though...
The French Commander moves over and rallies the crew of Char B1/2...
They're still a bit shaken (pinned, bottom right), though they do begin firing again, this time at Cpl Krisnel's Pz IV (top left)...
The turret takes a hit, the 47mm round knocking out the optics and physically damaging the main gun, so the crew bails out.
Atop Hill 44 (center left), Cpl Otjen returns fire with their 37mm gun. They pump several rounds into the front glacis of Char B1/2, suppressing the crew (top right)!
As Char B1/3 pushes all the way up to the bridge (center top left, from center bottom).
On the French left, the two light tanks, with crews shaken up by German fire, push into the center, looking to shelter and rally in the village of Deture (center, the two tanks with yellow beads, Char B1/3 just visible from behind the building at far left).
With his command falling apart under the weight of the French attack, Captain Bohm spurs his driver to throttle it, and the Panzer IV darts ahead, up to the deadly copse of trees cradling the corpses of SSgt Mangold and Cpl Rausch's tanks (top right, from bottom left).
Back on the road, Cpl Progen's Pz IV (bottom right) sights in on Char B1/1 (top left) and fires. Once again the round disintegrates on the heavy tank's frontal armor, but the crew is suppressed.
Cpl Progen's vehicle then follows the Company Commander (center right).
On the German left, Cpl Geiger maneuvers his Pz III over and up, into position on Hill 44 (top left, from center right, with Cpl Otjen's vehicle at bottom right).
Cpl Geiger now finds himself in a great flanking position on the French Somuas! His gunner pumps round after round into the exposed flank of Somua/1...
Until it bursts into flames and its crew bails out. The fire also pins the crew of Somua/2.
Sgt Fittzbaum begins working his Pz III into position atop Hill 44 as well, between Cpl Geiger's (top left) and Cpl Otjen's (right).
But the gig is up, the French are alert to the danger posed by Hill 4 (top eft). Char B1/3 (bottom center) spots the German platoon leader and fires...
Sgt Fittzbaum's Pz III goes up in flames, and his crew drags his badly wounded body out of the wreckage. Sgt Fittzbaum is badly wounded enough that he would be recuperating for the next six months. The fire also suppresses Cpl Otjen's crew, convincing the tank commander...
That he needs to re-think the battle plan. Cpl Otjen's tank falls back, off the line (bottom left, from right).
They were suppressed by the Char B1's fire, then tried to rally but failed and fell back.
Cpl Krisnel's begins picking his way forward (center, from bottom center, a bit wary after seeing Sgt Fittzbaum's tank explode (top center) and Cpl Otjen's fall back (far left).
They get far enough up the slope (bottom left) to get a look at Char B1/3 (top right); the gunner fires, but the round ricochets off the frontal armor.
On the French far right, Somua/2 doesn't know exactly where they threat is (Cpl Geiger's vehicle at top right), but it's sheltering behind the burning Somua/1. The French tank commander rallies his crew.
As the French Commander moves into the road to rally Char B1/2...
But the crew is not at all happy with their current station in life and turns and runs (top right, from bottom left), as the French CO lets out an unmitigated stream of curses!!!
The French CO then moves to Char B1/1 (top left) and rallies that crew as Char B1/3 (far left) is scanning for targets.
They (bottom center) ultimately settle on Cpl Krisnel's Pz III (top left), who just fired on them and missed. The French commander fires the 47mm gun; it misses, but hits close enough to stun (suppress) Cpl Krisnel and his crew.
Spurred on by their CO, Char B1/1 moves up onto the bridge over the River Bleu!
The French light tanks (bottom right) both rally successfully.
Over on Hill 34, which was seized earlier by Lt Tausch and 3rd Grenadier Platoon, Sgt Oberlander enlists the assistance of some nearby Landser to push his 75mm Infantry Gun into position to support the Panzers.
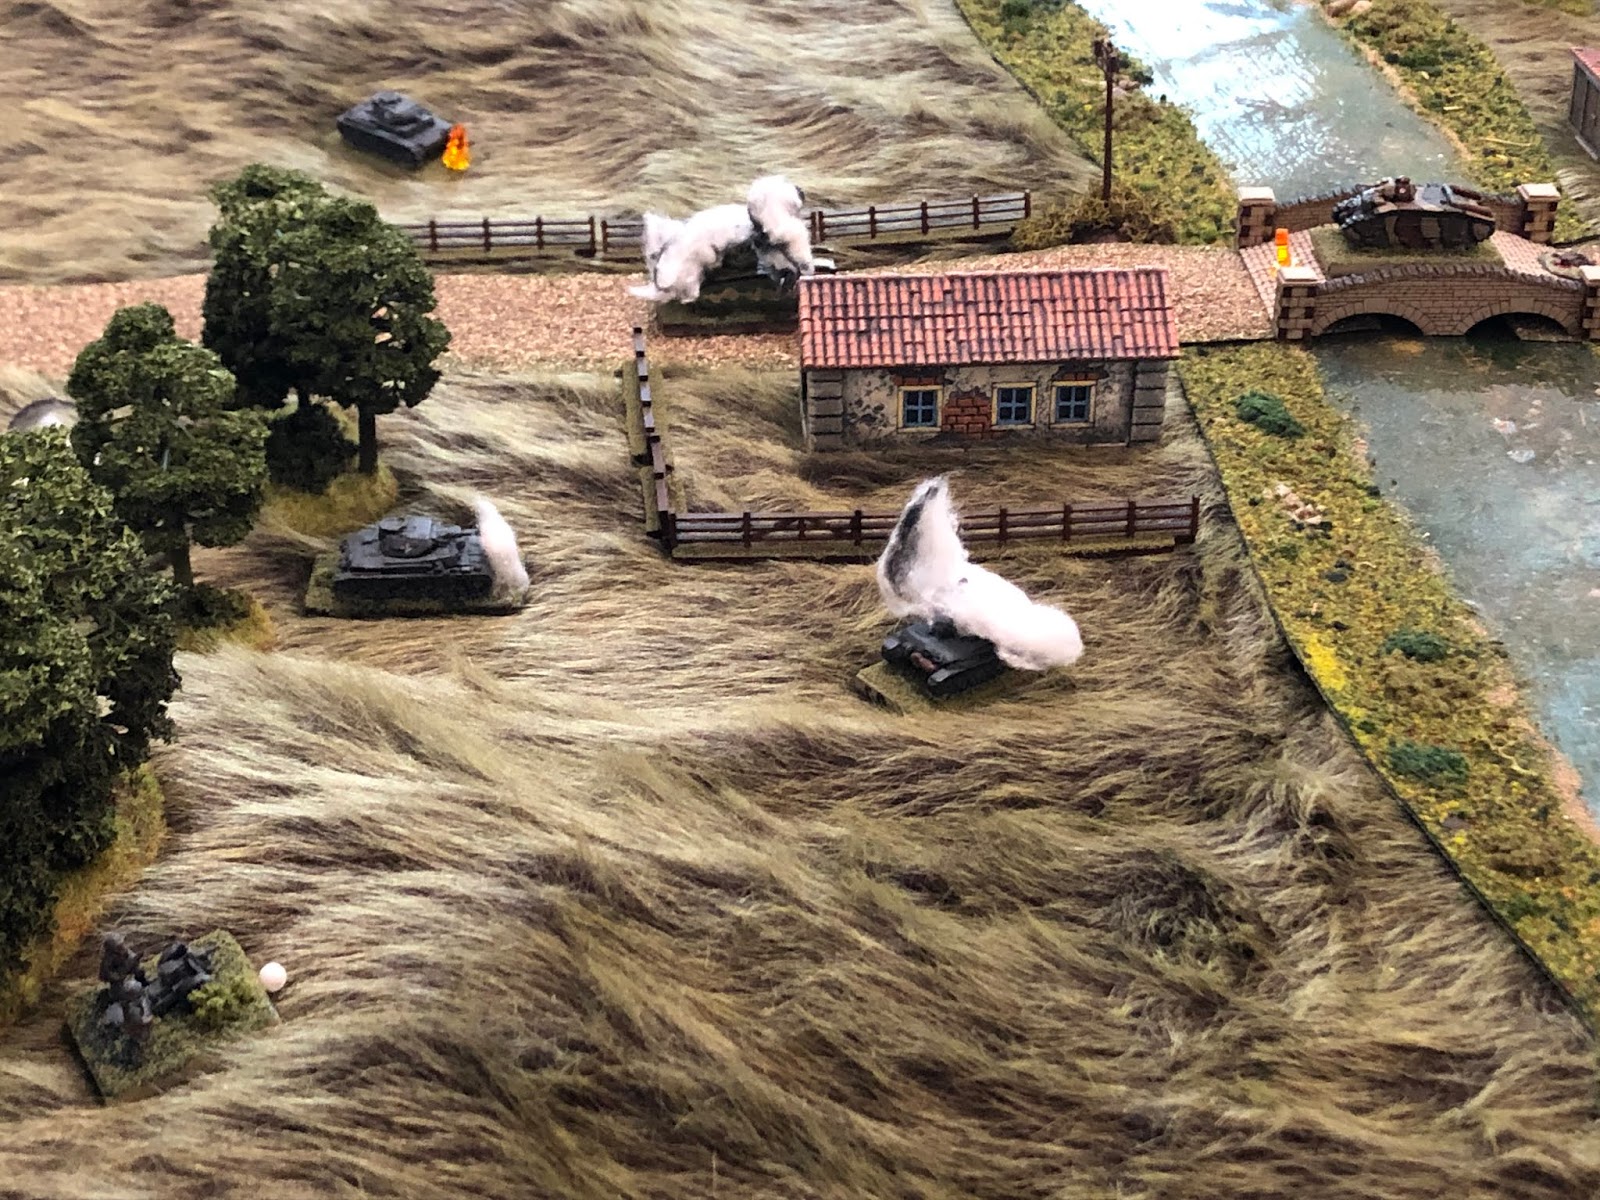
While down on the northern outskirts of Deture, Captain Bohm (bottom left) looks on as Cpl Progen maneuvers his Pz IV up through the trees (center, from bottom left).
But Char B1/3 (bottom left, with Char B1/1 on the bridge, center) spots him (top center) and fires, nearly at point-blank range!
The German tank is suppressed and the crew bails out...
As Captain Bohm pushes his tank up to the bridge (far right, from far left).
In a very aggressive move, Captain Bohm is seeking to knock out Char B1/1 on the bridge, perhaps halting the French counterattack by simply blocking the bridge. The German's 75mm cannon roars, hitting the French heavy tank in the flank, but it DID NOT penetrate, only managing to suppress the crew!!!
On the German left, Cpl Otjen (bottom left) and Cpl Krisnel (bottom center right) both manage to rally their crews back into action, as Cpl Geiger (top left)...
Frustrated by his inability to get after Somua/2 (top left, behind the burning Somua/1), leaves his sheltered position and pushes his vehicle downhill (center, from right)!
What Cpl Geiger (top center left) didn't realize is that the French H39s are now in the village of Deture (bottom center), where H39/1, the French light tank platoon commander, is able to take a shot at the Pz III's flank. The round finds its mark, but does not penetrate, pinning Cpl Geiger and his crew!
*That is absolutely incredible: I'm about to rush down the hill and get a great shot on Somua/2's rear, and this dinky little French light tank, from across the board, fires with 0K 1S and stops me!!!???
The commander of Somua/2 (bottom center) knows there are threats up above him (top right) and hears firing to his left (the H39s are off camera to left), but doesn't know exactly what is going on, so he sits tight, doing his best to scan the battlefield for threats through all the black smoke from disabled vehicles.
But in the center, Captain Bohm (top left) is in big trouble: he missed his kill on Char B1/1 (on bridge, at right), and Char B1/3 (bottom center left) has him dead to rights. The French vehicle commander rotates the turret and fires his 47mm gun...
Cracking the Panzer IV wide open. Captain Bohm is badly wounded, but his crew manages to pull him out. He'll be convalescing for the next 90 days or so.
And with the destruction of Captain Bohm's tank (left bottom), Char B1/1 moves up the road (left, from the bridge), looking to drive the Germans from the field of battle.
Freshly rallied, Cpl Krisnel's tank (bottom left) spots the German heavy tank moving up the road (top right) and fires the rounds strike the French tank, but disintegrate like hail against a stone wall, pinning the French crew.
While in the French rear (top right), Char B1/2 manages to get his crew settled down and back in the fight.
Meanwhile, the French light tank Platoon Commander, H39/1 (bottom center, with H39/2 behind him) continues pumping rounds into the flank of Cpl Geiger's Pz III (top center)...
Until it is finally knocked out. The German Corporal and his crew bail out.
But atop Hill 34 (bottom left), Sgt Oberlander and his crew get the 75mm Infantry Gun into action: they line up and fire on the French light tanks (top right)...
They pour fire downhill until the French light tank Platoon Commander's vehicle is burning, and his subordinate's crew is suppressed (red bead)!!!
*There's no way the 7.5cm Infanterie Gun could harm the Char B1s or Somuas, but H39s, especially firing down onto them, why not?
Sgt Oberlander and his crew continue pumping rounds out as fast as they can load...
Until the next thing you know, H39/2 is burning, too!!!
But Char B1/3, in the village (center bottom, just right of the two burning H39s) has spotted Sgt Oberlander's Infantry Gun (top center left) and opens fire with its 75mm gun, suppressing the gun crew and causing some casualties.
*I hadn't planned on using the German Infantry Gun on Hill 34, or any other of the German forces on the board, but times are getting hard. Pity the Germans don't have any anti-tank guns on the table; having said that, they'd only be 37mm PaK-36s anyway...
Like I said, times are hard, and the German Panzertruppen realize this; it's now or never, something must be done to stop the French onslaught of heavy tanks. With Somua/2 (top left) not having shot owing to the slope of Hill 44, Char B1/3 (top right) busy firing on Sgt Oberlander's gun crew, Char B1/2's crew having just rallied (off camera to top center right), and Char B1/1's crew pinned (far right, unable to react fire), Cpl Krisnel orders his driver forward at all speed, looking to get to point blank range on Char B1/1's flank.
Cpl Krisnel's gunner was firing even before the driver screeched to a halt; the plucky little Panzer pumps round after round into the flank of Char B1/1, until its armor begins to spall and buckle...
37mm armor-piercing rounds finally begin penetrating the French behemoth, until the tank catches fire and the crew bails out!
Further left, Cpl Otjen pushes his Pz III to the far left German flank, unnoticed (far left, from center right).
From the French rear, Char B1/2 finally gets moving back north up the road, looking to get back into the fight (top right, with bridge just off camera at bottom left).
Char B1/3 moves up onto the bridge, undaunted, as his CO looks on (top right).
Despite having just destroyed a Char B1 (burning at far right), Cpl Krisnel is, of course, now absolutely terrified. He spots Char B1/3 lumbering up the bridge and orders his gunner to fire...
But the French heavy tank shakes off the ineffective German fire. The Char B1 lurches to a halt on the bridge and returns fire...
But somehow Char B1/3's (far left) shot totally misses Cpl Krisnel's Pz III (top center)!!! Somua/2 moves up to help, looking to get a shot lined up (center bottom, from far right)...
But Cpl Otjen (bottom right) is finally able to spot the other Somua (top center), and immediately orders his gunner to open fire! Despite having a flank shot at relatively close range, the rounds don't penetrate the French medium tank, though the crew is suppressed.
The French Commander sees Somua/2 (far right, red bead) in dire straits, and dashes right to assist (center right, from left), but he can't quite make it there...
Atop Hill 34, Sgt Oberlander (bottom left, with Char B1/3 on bridge at top right and Cpl Krisnel's Pz III at top left) is finally able to rally his crew back into action.
Cpl Otjen's tank (bottom right) resumes firing on Somua/2 (top left) but still can't penetrate.
*Now that's just plain bad dice rolling...
Aware of how precarious his position is, Cpl Krisnel has his driver gun the engine to get out of Dodge! The panzer shoots across the road and hides behind a nearby building (center right top, from bottom left), out of sight of the French monster on the bridge. With any luck, the Frenchman will continue pushing north (bottom) and Cpl Krisnel can come out and get a shot on the French tank's rear.
The French CO moves up to Somua/2 and rallies the crew...
Which immediately pivots and begins firing on Cpl Otjen's Pz III (top right)...
The French rounds fail to find their mark, while Cpl Otjen's gunner, now facing the enemy's frontal armor, finds his but can't penetrate, suppressing the French crew.
As hoped for, Char B1/3 pushes ahead, up next to the burning Char B1/1.
*I rolled to see what the French tank would do, and that was it. The line of thinking is that, under heavy (but non-penetrating) fire, the French tank commander lost track of Cpl Krisnel's vehicle (far left) when it took off to its hiding position and, needing to press home the attack, and confident his comrades in Char B1/2 (off camera to far right, but coming up the road) had them covered, he proceeded to do so.
And he does: Char B1/2 pushes north up the road (center, from bottom right, with Char B1/3 across the bridge at top left, Cpl Krisnel hiding behind the house there, too, further left).
But now the good Corporal realizes he's in a vice, and as much as he wants to whip his vehicle around to get on Char B1/3's tail, he knows he's got to do something about Char B1/2 (top center left), so he orders his gunner (bottom center) to open fire. The rounds bounce off the French tank's armor...
Sgt Oberlander (bottom left, atop Hill 34) immediately recognizes Cpl Krisnel's (center left) predicament and attempts to help: the 75mm Infantry Gun begins pumping shells out at Char B1/2 (top right)...
The rounds explode harmlessly on and around the French heavy tank (bottom center), which immediately returns fire on the German field piece (top left)...
Knocking the gun out, with Sgt Oberlander the only member of the gun crew to survive, unscratched...
Cpl Krisnel pushes his panzer up (top right)...
And around, into position on Char B1/3's tail! They halt and begin firing their 37mm gun as fast as they can reload it!
But, even at this range, the rounds are bouncing! Cpl Krisnel cries out in vain, "Why are we not penetrating???" His gunner responds: "Sorry, Corporal, we are out of armor-piercing rounds!" "What!!!???" The French tank pivots and fires, and Corporal Krisnel's tank explodes, killing all inside...
*That's all a joke, of course, they just straight up missed, terrible dice rolling...
The last remaining German tank in the fight, Cpl Otjen's, is furious, desperate, and scared, all at the same time. Frustrated by his inability to penetrate Somua/2's armor (top center), he, just like Cpl Geiger before him, pushes his tank downhill (center, from far left) to close the distance.
Because the French tank's crew is suppressed, they don't even see the German panzer as it pulls up on the opposite bank of the river and begins firing.
Somua/2 is dead, and the French CO...
Falls back, not wanting to become Cpl Otjen's (top right) next victim.
But, lest Cpl Otjen (top right) feel too good about his situation, Char B1/2 pulls right, off the road and straight at him (far right, from bottom left, with Char B1/3 at top left).
*At this point, I considered having German infantry come down from Hills 44 (top right) and 34 (off camera to top left) to try and knock out Char B1/3, but I figured it was too much open ground and would take too long (too many moves) to get there to reasonably expect the French tankers to just sit there, oblivious.
The French supply more pressure: with Char B1/2 closing at right (far right), Char B1/3 cuts right and advances (bottom left) on Cpl Otjen's tank (top left).
Cpl Otjen is frantic, unsure of what to do with two beasts closing on him. Backing out of trouble, up hill, was out of the question, the engine couldn't handle it. Sitting tight and shooting it out against too Char B1s was similarly out of the question. The only chance is to make a run for it! Cpl Otjen pushes his tank right (center bottom, from far left), attempting to outrun Char B1/2's (top center) line of sight/fire, and get past Char B1/3 (far right).
The French crew, shocked at the German turning and running straight at them, nevertheless sight in and fire...
But they rushed the shot and it zoomed straight past! The German tank crew collectively lets out a sigh, then returns fire, slamming a 37mm solid shot into the French behemoth...
Smoke pours out of the French tank's hull as it is immobilized, but the crew stays with the stricken vehicle.
The French commander frantically tries to rally the commander and crew of Char B1/2...
But they panic and fall back (bottom left, from top right)!!!
While the crew of Char B1/3, with Cpl Otjen's Pz II bearing down on them, rallies to the fight!
But before the French crew (bottom right) can act, Cpl Otjen kicks his driver, he firewalls the throttle, and with a lurch, the Panzer III is up and over the slope of Hill 34 (top right), safely out of the French tank's line of sight, pushing north to the rear (top left)!
The French commander, furious, marches over to the cowering Char B1/2 and calls the tank commander down. The French commander had to scream two more times to get the trembling Sergeant to come down; the French commander was so incensed that he immediately drew his service pistol and shot the man, then turned to the gunner, who's head was poking out of the vehicle, and ordered him to follow.
The French commander then led Char B1/2 across the bridge (top left), aiming to assist the immobilized Char B1/3 ( top right).
Char B1/2 (bottom left) posted security as everyone else, the French commander included, dismounted and began working to repair the immobilized tank.
The French (bottom right) were getting very nervous as German infantry began appearing atop Hill 34 (top left), and German mortars had just begun to fall...
When the French commander led both his tanks back south across the bridge over the River Bleu.
Well, that was an(other) ass-whooper. The Germans were once again successful, once again by the skin of their teeth, stopping the French from entirely over-running KG Klink and advancing all the way up the road to Abbeville! While the Germans had quite a few tanks on the battlefield, it wasn't much more than the French (10 vs 8), and while the French had three tinder boxes, the rest were veritable monsters, so I'm right proud of how the German tankers accounted themselves. The only thing to complain about is all the German tankers bailing out of their verdammt tanks! But maybe that saved them; for all the German tanks knocked out, in terms of tank commanders they got off pretty light: one KIA and two WIA (though one of the wounded was the Panzer Company Commander, Capt Bohm).
Germans: ~25 KIA/WIA, three Panzer IIIs and six Panzer IVs destroyed
French: ~25 KIA/WIA, three H39s, two Somuas, and one Char B1 destroyed
Of the named characters, three were hit:
Captain Bohm, Panzer Company Commander, WIA, out for 90 days
Sgt Fittzbaum, 3rd Panzer Platoon Commander, WIA, out for 150 days
Corporal Krisnel, 3rd Vehicle Commander, 3rd Panzer Platoon, KIA
Sgt Oberlander was decorated for ordering his gun crew to shove their weapon forward into action, where they were taken under fire by French tanks but managed to knock out two tanks!
South, in Toujour, the French tankers are regrouping, grabbing a quick bite to eat as their two remaining Char B1s are refueled and rearmed, intent on continuing their attack north as soon as possible. Kampfgruppe Klink is hanging on by a thread, with nothing left on the battlefield to stop the two French tanks, but an unlikely hero is on the way, and is currently marshalling forces (in the form of the remaining Panzer Platoon and the Panzerjaeger Platoon) to strike back at the French.


Wow, that was full of action! Having the rules now means that it makes a load more sense to me what is going on. Really looking forward to the next game:)
ReplyDeleteSteve,
DeleteThanks buddy, glad you liked it, it was a tremendous amount of fun, though rough on the troop roster ;)
Next (and last) game will be up on Wednesday or Thursday, then it's on to other things for a bit. I've already played two more dogfights (USN vs IJN, Battle of Coral Sea) and two platoon Vietnam, platoon-level actions, just have to find time to write them up!
Planning some 6mm WWII stuff this coming weekend.
V/R,
Jack
Great report Jack! i assume it is actually not too bad when it doesn't go quite the way you expect. While the unexpected happened, it is not catastrophic and you can still pull a narrative thread out of it to get to the next game. It would have been worse if the French had made the breakthrough; the then again something would have happened to stop them :-) It is always good when things don't quite go as planned though!
ReplyDeleteShaun,
DeleteThanks buddy, I appreciate it! To be quite honest, I actually expected the French to roll over the Germans, figured the three Char Bs would be too much for them. And yes, of course, Stukas would have descended on them like a pack of mad dogs to halt the French until reinforcements could be brought up.
I'm generally not too nonplussed when things don't go my way, it's actually kind of refreshing, but I'm not overall happy with my handling of this mini-campaign. I was so focused on getting through the Fall of France that I kind of forced the action a couple times, and I wish I'd have slowed down and enjoyed the process a bit more, so I'm trying to 'resolve to be more resolute' in that area in the future. Don't just push to get through as many fights as possible, let the battle results take the campaign where it wants to go.
Thanks again, hope you're playing and posting some more soon!
V/R,
Jack
I know what you mean on being focused on getting through it rather than just enjoying the games themselves. I didn't play my Ancients rules for over a year because the next battle in the chronological list was Asculum and I felt I was being forced to play it. Luckily I am over that now.
DeleteI am sort of playing. I have plans, have pushed a few figures but not finished another game yet. I never did play that many games in a year. I do have plans for a WW2 campaign and a Ancients campaign but the former is several months away and have two standalone games I want to play prior to the campaign. So my gaming mojo is back and only time is the constraint!
Shaun,
DeleteYeah, need to slow it down a bit. Another symptom of having too many projects going on! Well, 'sort of playing' is better than not playing at all, and yes, I recall that you've always been a bit of a slacker when it comes to being a wargamer (I'm sure it carries over into real life as well), but I was hoping to peer pressure you into being a bit more aggressive ;)
Ride that mojo!
V/R,
Jack
Nearly everyone is a slacker compared to you output. But what I meant by "sort of" is I do a move here and there on a game when I have time. I have not been able to do this for the last 2-3 years (I know you and many other can't spread out a game like this either) for some mind-blocking reason. Somehow with my mojo returning I am once again able to slowly progress a game by spending 5-15 minutes at a time, sometimes with days between them!
DeleteAww, shucks, stop it, you're embarrassing me ;)
DeleteInteresting, and you're right, I can't do that, I've got to be able to sit down and knock it all out. But I'm glad you can, and I look forward to reaping the fruits of your wargaming labor(s) ;)
V/R,
Jack