All,
Well, I got a game in, but it's not what you or I expected. Yes, I'm a wargaming butterfly: I'm supposed to be finishing up the dogfighting rules, I'm supposed to be playing 6mm moderns for 5Core Brigade Commander, I'm supposed to be playing KG Klink for 5Core Company Command, I thought I might try some Napoleonic stuff, I've still got a mountain of lead I can't see the top of, and I go and do this... But ya know what? It was fun.
Another reason I did this was because someone on TMP (Sasquatch on the Cold War board) said he was getting into Cold War/Modern stuff and was looking for a 1:1 ruleset, and The Commissar mentioned Company Command and linked to my old KG Klink batreps. I figured the least I could do was play a Cold War/Modern game and post it. Not to mention, I've been dying to get my modern USMC on the table.
So, what do we have? Well, it's roundabouts 1985 and the balloon has gone up in Europe; the 1st Battalion, 6th Marine Regiment, 2nd Marine Division (whom I have a passing acquaintance with) is the air alert battalion and immediately departs for Norway, NATO's northern flank. As they land, gear is already being off-loaded from the Maritime Pre-Positioned Ships for battalion to fall in on. They hit the marshaling areas on the run, and patrols are immediately sent out. In this case, an attachment from 2nd LAI (Light Armored Infantry Battalion, which is what they were called before they became Light Armored Reconnaissance, or LAR) spots Soviet forces moving in on the village of Smellysardinso (fictional). A call for reinforcements goes out, and Marines are immediately dispatched from Alpha and Weapons Companies. But the Soviets are aggressive and push across the ford, arriving in the ville just as the Marine reinforcements arrive. A quick, sharp fight ensues; the Marines are victorious (of course), the Soviets recoil (fall back to have an artillery regiment flatten the entire grid square).
What follows is the account of the Battle of Smellysardinso.
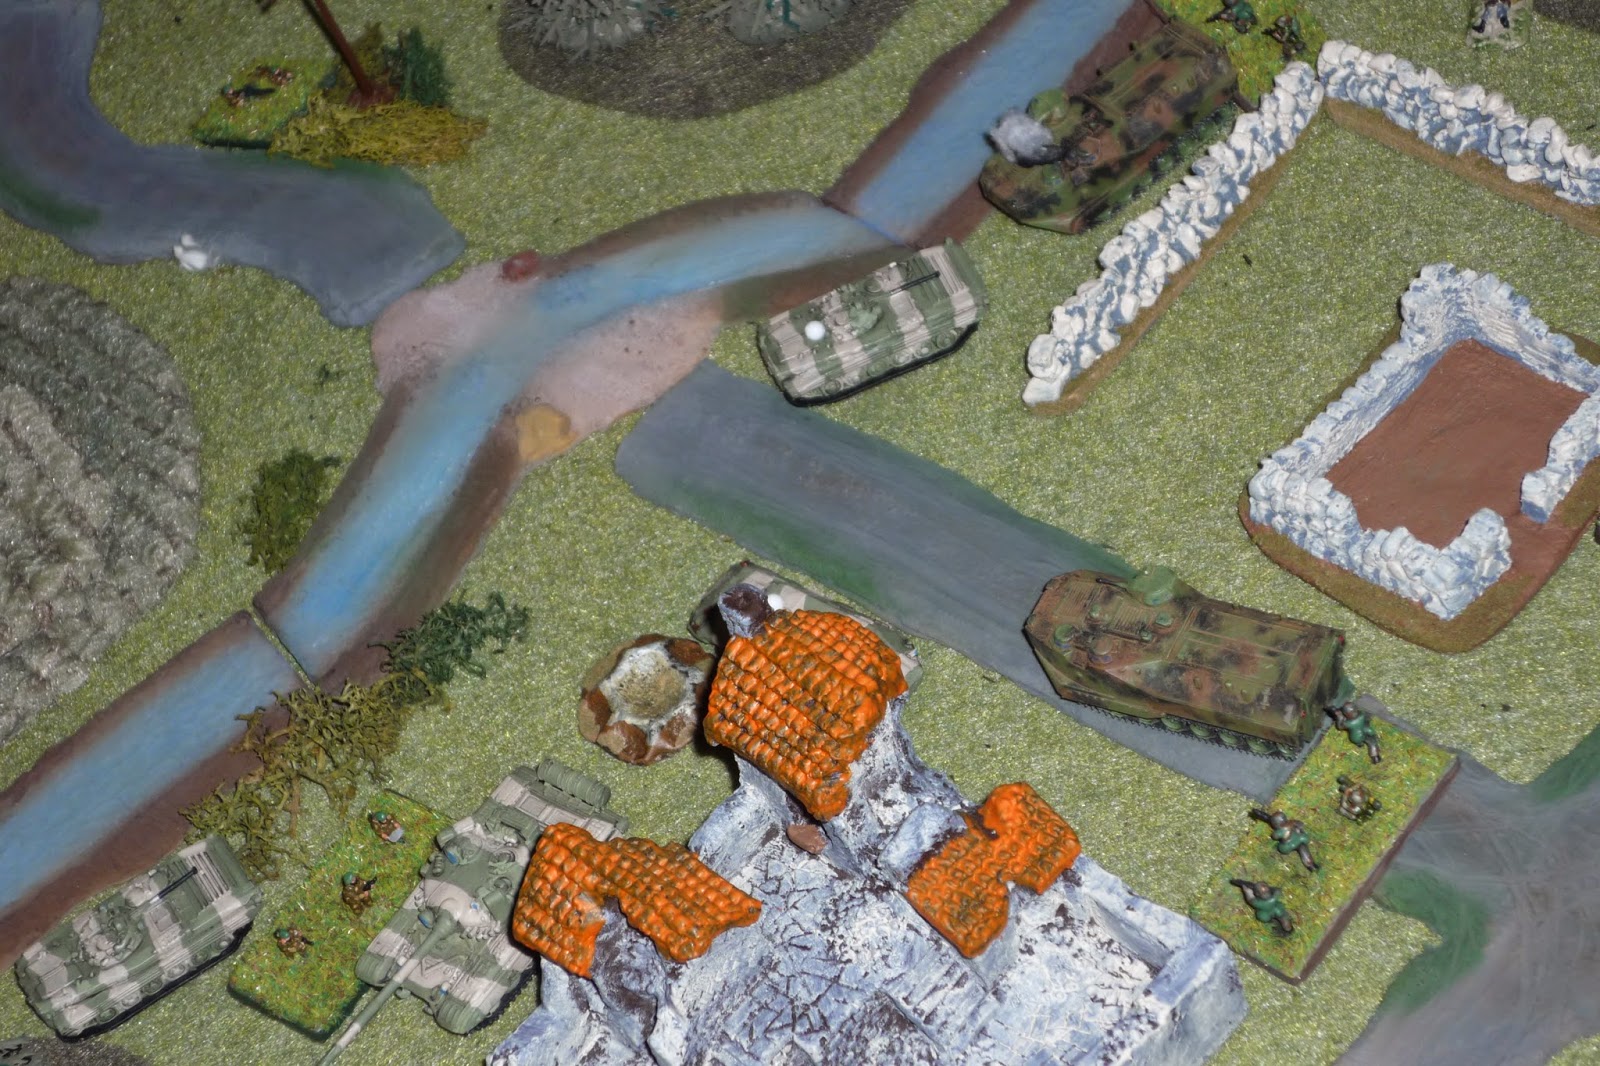
The opposing forces, Soviets on the left, US Marines on the right.
The Marines: these are pretty much all Minifigs. Command stand at top left, two Amtracs (plastics from Takara). Each carries two fireteams, then one has a SMAW and the other a TOW. Then there's an LAV carrying a fireteam of scouts and an MG team. Lastly we have a Combined Anti-Armor Team, or CAAT, of two HMMWVs. One has a TOW, and the other is a gun truck (with a .50 cal to suppress the tank while the TOW is in flight). The LAV and HMMWVs are Minifigs.
I love playing campaigns, hate 'one-off' games, as the toys are just pieces, no personality. I'll be using such dramatic identifiers as "Team 3," "the MG team," and "Track 2."
The Soviets have two T-72s (plastics from Takara), two BMP-2s (Minfigs), each carrying two fireteams. Lastly, they have a BTR (Minfigs) carrying the Command stand (which has some Pendraken Falklands Brits in berets on it), an 82mm mortar (which is a Pendraken WWII Geman FJ team), and an HMG (which is actually a .50 cal from Pendraken's Falklands Brits as well).
The only things I'm doing different from 'normal' 5Core Company Command is that I'm letting the Soviet mortar fire 'for free' each turn that it is deployed, in good shape, and not moving, and each infantry stand is a fireteam, rather than a squad.
Overview, north is up. The Soviets are in the top right, looking to cross the Gusto River at a ford just above the village. The LAV is in the village at center left, the CAAT is at far left, just entering the table, and the two Amtracs are at bottom center, just entering the table. So far all infantry are mounted.
The village is looking a bit bombed out because the Soviets had an arty regiment pound it prior to their advance. Luckily for the Marines, no one was there at the time, the LAV actually coming over to take a look-see as a result of the barrage.
The LAV, having spotted the Soviets (top right), came down the hill to take shelter in the ville (bottom left) to await reinforcements.
The CAAT is almost there (LAV at top right).
The two Amtracs, who've just been radioed by the LAV and told to get off the road as the Soviets are pushing through the ford for the village.
The Soviets, pushing for the ford, with T-72-2 in hull-down on overwatch atop the hill, while T-72-1 and BMP-1 head up the road.
I give a 'straight up' roll, and the Soviets are victorious, so they shall lead off the game with the first activation. Of course they roll a firefight, but nobody can see anything so it gets converted to a scurry.
But the Soviets are rather timid, pushing Tank-1 and BMP-1 through the ford, while Tank-2, BMP-2, and the BTR hold back. None of the Yanks can see anything, so there are no response moves.
But then the US rolls a scurry anyway. The LAV immediately kicks out the MG team...
Then pulls around and kicks out the Scout fireteam (bottom left, Sovs at top right).
The CAAT moves up on the ridgeline.
Track 1 moves up and kicks out its passengers, Teams 1 and 2, and the SMAW (Scouts at bottom left).
Track 2 (far right) moves up and kicks out the TOW team (far right, in the trees on the hill) and the CO (between the two tracks). Teams 3 and 4 stay in Track 2.
Then the Soviets roll a scurry! So while the Marines have dashed forward and are settling in to their fields fire, the Soviets get to move. But they are again a bit timid, and this would be their downfall.
Tank 1 and BMP 1 shelter from the two US TOWs (one on each flank) behind some houses, and BMP 1 disgorges its infantry squad (Soviet Teams 1 and 2).
The BTR kicks out the mortar and HMG team...
Then the BTR and BMP 2 move up, but BMP 2 only makes it to the ford.
In response, the MG (center, in street) and the Scouts (center top, in house) dash across the street, looking to keep the enemy infantry in place, and get closer to Tank 1 to hit it with an AT-4, respectively.
The gun truck (far left) moves left into hull down, also looking to keep an eye on Soviet aspirations towards this flank.
While Team 1, the SMAW, and Team 2 all move left (Scouts and MG at top left), while the LAV moves right and takes up hull down with a view down main street.
Track 2 (top right) moves up and kicks out Teams 3 and 4.
The Soviets roll up a 'normal' activation, so the stuff is about to hit the fan...
And it does, starting with Tank 1 (top right, behind house) firing its 125mm gun and demolishing the TOW truck (bottom left) before it got a single shot off...
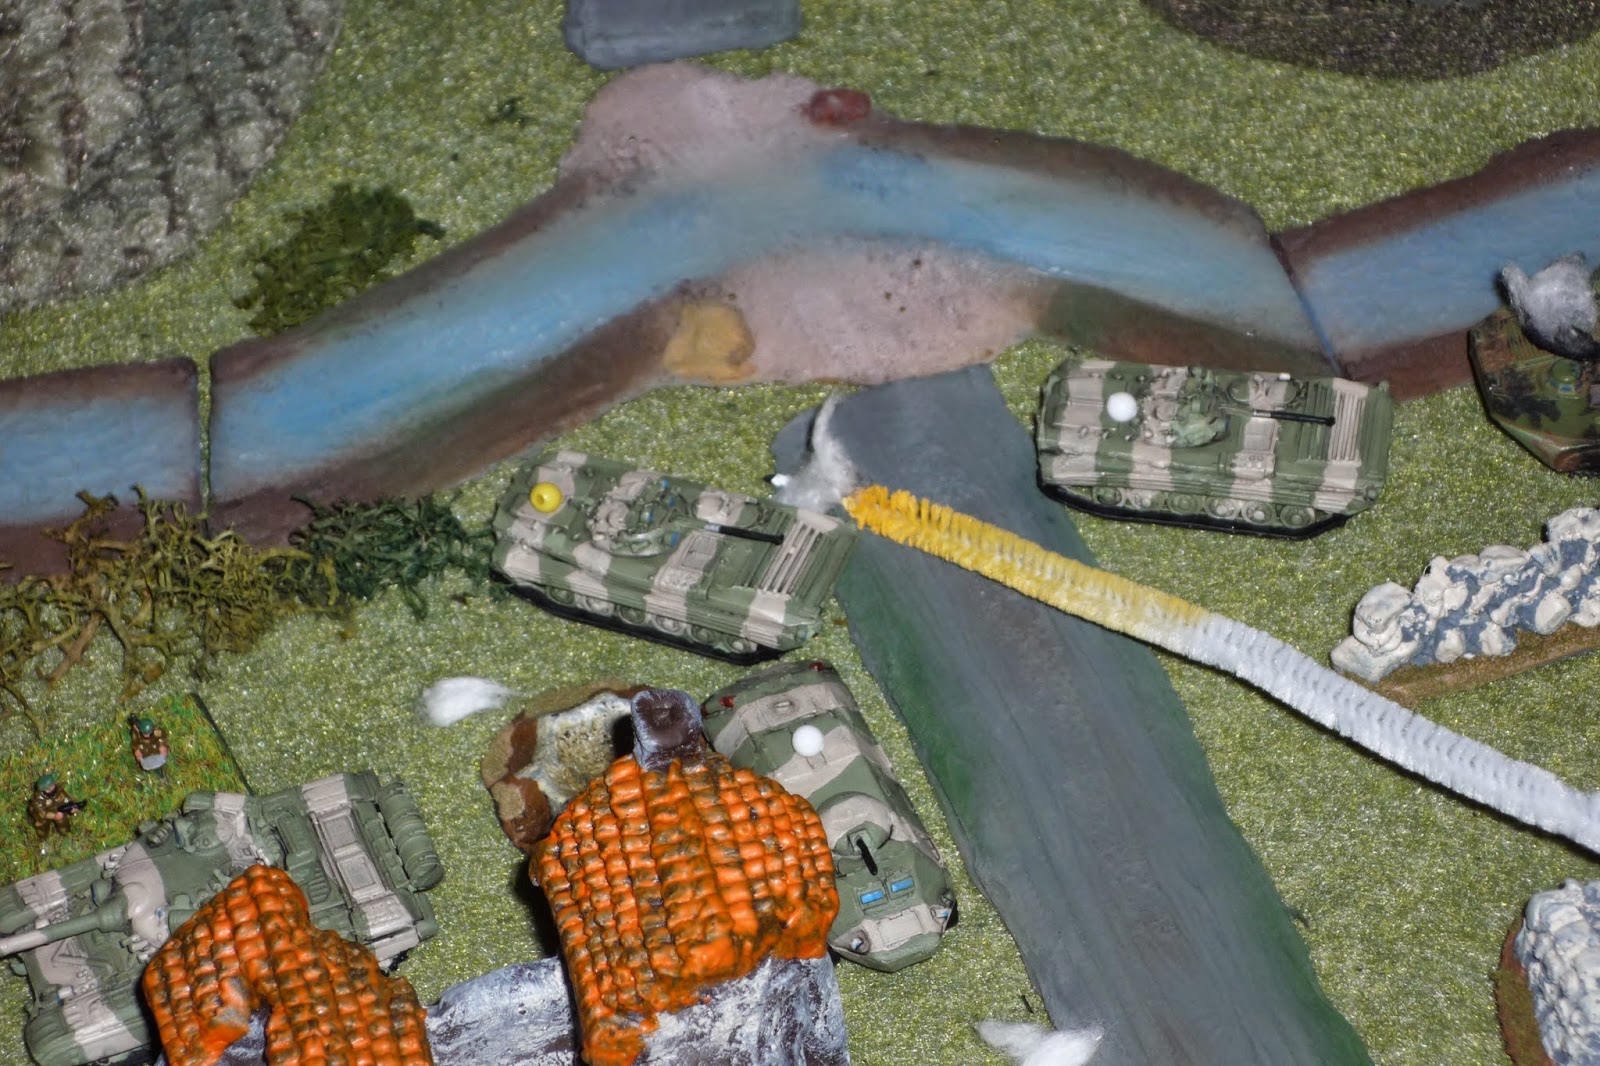
Looking to take out the other TOW, Tank 2 (top left, hull down on hill) fires on the TOW team (bottom right, in treeline), but misses!
The TOW team fires off a missile in response. Sorry, I just had to get that on the table ;)
The shot misses, but it does force Tank 2 (top right) to fall back out of LOS and hunker (can't do anything until rallied).
BMP 2, in the ford, needs to get to cover, so dashes forward (top center, just right of the road). But the Marine LAV (bottom left) is perfectly positioned and opens up with its 25mm chain gun, damaging the vehicle. The crew stays in the vehicle while the infantry squad (Soviet Teams 3 and 4, at wall) hop out. That's 2nd Squad (Teams 3 and 4) at bottom right.
The enemy mortar (top left) fires on 2nd Squad (right), pinning Team 3 and Track 2 (yellow beads).
The Marines roll a normal activation.
The gun truck rolls forward (bottom left) and engages the Soviet 1st Squad, who are both forced to fall back (they were in the treeline at center, where the white puffs are, but fell back to the river). This was done to help the Scouts (far right, in house) get close to Tank 1 (just behind house) without drawing react fire from the Soviet infantry. Tank 1 can see the gun truck, but does not react, just in case the Scouts do rush up to take their shot...
Which is exactly what the gallant Marines do.
And in gallant fashion the Scouts are gunned down by Tank 1's machine guns in reaction fire (a 6 on 1D6! Casualty figure barely visible in the house, due to my poor camera)...
Then the SMAW team pops up (bottom center) and fires a rocket at the enemy BTR, but misses...
The BTR responds with its 14.5mm HMG, and the SMAW falls back and hunkers (bottom left center, with red bead; they were at the white puff at center, next to the telephone pole).
Well, that turn sucked... Soviets roll another normal activation.
The want to get some movement on their left flank, and so the mortar pounds 2nd Squad again, but manages only to pin Team 4. So, both 2nd Squad teams (yes, I'm aware USMC squads have three fireteams, but for my purposes, one fireteam from both squads has a weapon attached: SMAW for 1st Squad, TOW for 2nd Squad, so I'm only referring to the two 'normal' fireteams as "Teams," and the heavy weapons by the weapon's name).
The Soviet 2nd Squad (left, at wall), is getting impatient: "damn those cross-eyed mortar men! We're going anyway!" Bad idea...
Soviet Team 4 moves up (center right, just entering treeline), close to USMC Team 3, who is pinned, bu still able to snap fire.
Which they do, and it's the Americans' turn get a '6' on 1D6, putting the Soviet team out of the fight.
The Soviet BTR (far right) then takes a shot at the LAV (far left); the rounds ineffectual, and the LAV returns fire...
Which damages the BTR and causes Team 3 to fall back behind BMP 2 and hunker (red bead, white beads are damaged vehicles).
The Soviet CO moves back and rallies Team 2, who moves over and helps Team 1 rally.
Then the US rolls another scurry; not the best thing that could have happened, but at least I'll get to try to rally some guys that I otherwise wouldn't have.
On the far left flank, the gun truck (bottom left) falls back to get out of the LOS of Tank 1 (top right), but still keep an eye out for Soviet infantry. The MG team moves back into the house at bottom right.
The LAV moves over and tries to help the SMAW team rally, but they leg it further to the rear (bottom center, with red bead)...
The CO moves over and rallies Track 2 and Team 4, but Team 3 is still a little shaky after their close range firefight (despite winning it), and they fall back (far right, with red bead). Since the CO rallied them they still have their activation...
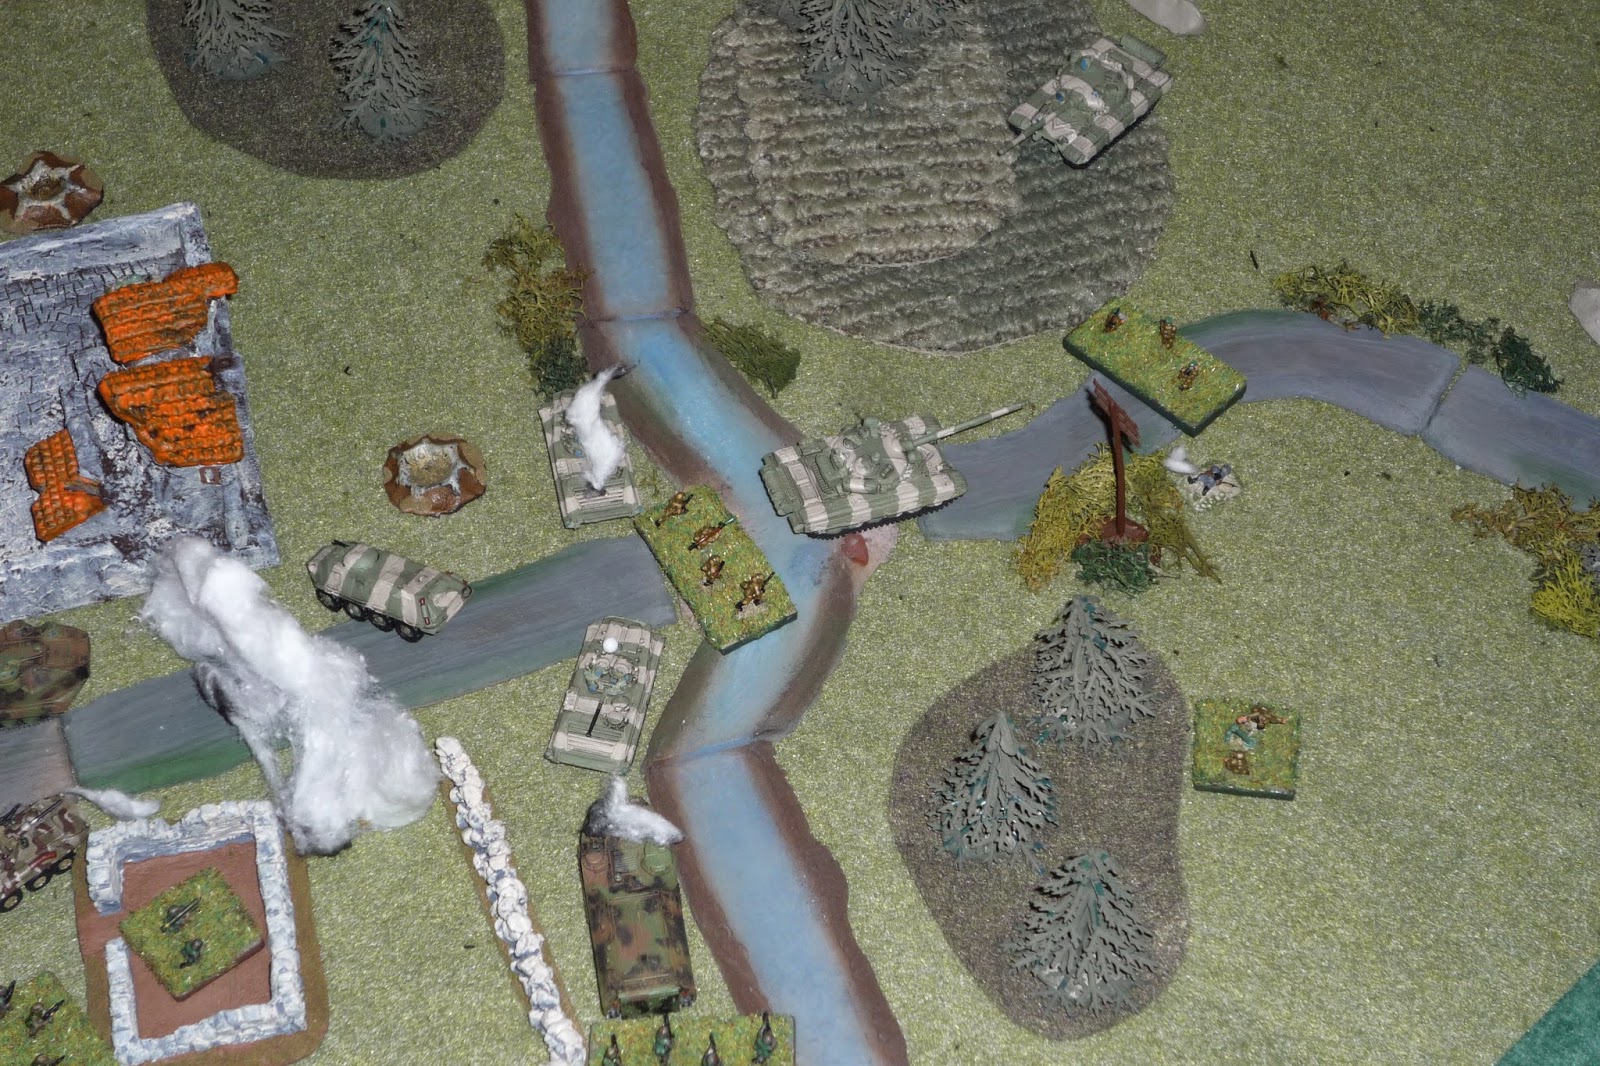
So Track 2 and Team 4 move up to the ford, capturing the hunkering Soviet Team 3 and the shaken crew of the damaged BMP 2!
Then Track 1 leads Teams 1 and 2 right up the middle (left), and they capture the damaged BTR's crew.
The Soviets still on the south side of the river re-position, with Tank 1 moving up, BMP 1 travsersing to face the Yanks on the road (off camera to right), and the Soviet 1st Squad moving up into the treeline with their CO. Off camera, Tank 2 finally is able to rally itself.
The HMG (far right, behind telephone pole, with mortar at bottom center) falls back out of the trees to put some space between him and the Yankees.
Then the Soviets roll a normal activation.
Tank 1 starts it off, moving up and looking to get the Soviets some breathing space on their right flank. But the LAV is sitting there, hull down, waiting...
The 25mm rounds pound the T-72, not penetrating, but roughing up vision ports, sights, aerials, and overall making enough of a racket that it drives Tank 1 to fall back behind the house and hunker. However,the Soviet CO quickly moves to the tank and gets it back in fighting shape...
Then the Soviet HMG, which just fell back (far left), opens up on Track 2, and the 12.7mm rounds rip through the thin flank armor of the AAV. Track 2 is out of the fight, and Team 4 is pinned.
The Soviet mortar targets the TOW team, hoping to eliminate them or force them back so that Tank 2 can move up unmolested, but the barrage is ineffectual.
The US rolls a normal activation.
The gun truck (bottom right) moves up and targets the Soviet 1st Squad, who'd just rallied themselves from his last bit of .50 cal marauding. Soviet Team 1 goes 'man down,' while Team 2 is pinned.
Track 1, seeking to avenge its brother, opens fire on the Soviet HMG (top center left), but misses...
Then Team 1 rushes up to the BTR and takes a shot with an AT-4 at Tank 1's rear, AND MISSES!!!
Not pictured, the US CO moves back and rallies the SMAW team. The Soviets roll a normal activation.
The damned Soviet HMG (bottom right) opens up again, straight down main street, getting 'man down' on Team 1 (center, with white bead) and forcing Track 1 (top left) to fall back and hunker...
The mortar targets the TOW team, and misses again!
Meanwhile, BMP 1 moves up and captures Team 1...
With a target in sight, and still in good shape since the mortar can't seem to hit anything, the TOW team launches a missile at BMP 1...
Which @#$%ing MISSES!!! The BMP is pinned, but the Soviet CO immediately moves over and rallies them...
The US rolls a normal activation.
The freshly rallied SMAW team dashes up and hops in the LAV, while the CO moves up to Track 1 and rallies them.
The LAV moves up, kicks out the SMAW team (in rubbled house at bottom left, just in front of Team 2), then engages BMP 1, missing...
Track 1 (far left, across street from LAV) moves up and cuts loose with its .50 cal at the Soviet HMG (bottom right)...
Killing the HMG and getting 'man down' on the Soviet mortar! Phew! It's been a long time since I rolled a damn '6' for the Marines...
Then the Soviets roll a firefight, which kinda sucks for them as their CO cannot move back and rally the mortar. The mortar has to use its activation to rally itself, and thus cannot fire.
Then BMP 1 (far right) fires its 30mm gun at the LAV (far left), missing, and the LAV's return fire chews up the lightly armored BMP, putting it out of the fight, and pinning Tank 1 (yellow bead).
The Soviet 1st Squad tries to rally; the pinned Team 2 is able to rally, but Team 1, who was 'man down,' rolls a very unlucky 6 and is out of the fight.
At that point the Soviet CO fired a red star cluster, and their mortar team (right center) behind kicking out smoke rounds to obscure the Soviet withdrawal. Tank 1 and Team 1 followed their CO out of the battle zone, while Tank 2 (top right) stood overwatch.
A thoroughly enjoyable fight, which could have easily gone either way (and was really looking like it was going to be the Russkies coming out on top), in about an hour and a half. I know some folks are going to have issues with the Soviets inability to really get their tanks into the fight. This was a little bit due to their being a little timid at the very start, a little more to do with that timidity having led them to have a T-72, BMP, and BTR basically hide behind a building.
But mostly the inability to make best use of their armor was down to the terrain; with the closeness of the terrain and the choke-point of the ford, there was really no way this wasn't going to devolve into a bloody brawl in the village. As a matter of fact, from the Marines' standpoint (in real life), that was kind of the point: being that the Corps is not known for its vast amounts of armor and mechanization, the goal was always to use Marine air to strike Soviet columns on the move, then have Marine infantry engage them at the chokepoints. For all the talk of 'stand-off' with TOWs, everyone knew that, due to the Soviet's overwhelming artillery and long range direct fire capability (tank main guns), you'd have to 'reverse-slope' it in the defense; not a true reverse slope as the fight wasn't on a hill, but you were going to have to be in the back-half of the village, let the Russkies into the front half, then get at them with Dragons and AT-4s, fighting street to street.
So, a fun game was had. I also got quite a bit done on the troops for KG Klink in France; they're painted and based, just need to flock them (for some reason I haven't been dull coating lately). The invasion of France is on schedule for next weekend, stay tuned.
V/R,
Jack


Did you roll aggression for them or did they just end up being kind of timid as a result of how the game unfolded?
ReplyDeleteQuite the vehicle brawl you had at the end there too. Nice!
I just used my 'regular' course of action rolls.
ReplyDeleteV/R,
Jack
Loved the report. Very entertaining. Did you have to make any adjustments for using fire teams instead of squads?
ReplyDeleteThanks David, glad you liked it!
DeleteI didn't make any adjustments for playing team-level, just kept right on going. I'm a pretty simple man ;) To be honest, the biggest reason for me going team-level was to keep the amount of transports down.
On a side note, I just ordered Shipwreck, with quite a bit of my motivation being your Indonesian-Malaysian campaign.
V/R,
Jack
Ah similar!. I'm wanting fire teams because I'll only need half the figures for the same game. I'm looking at 5 core for my fictitious African games I think I'll will end up using its command and control. Pleased the Indon-Malay campaign inspired you! Shipwreck is a great set of rules!
DeleteI can't find it now, but I know at least one player that used the 5core turn sequence with another set of rules for firing and movement.
DeleteSo you wouldn't be the first :)
Hi Ivan. I enjoy the sprit of your games. I'm intending on using your Brush wars campaign rules for my Africans.
DeleteI actually went to differing firing and morale mechanisms with 5Core, but ended up going back, and it works great for me. What I love about the firing stuff is that it's infinitely variable based on what you want it to be, i.e., my German Panzers are getting 0K 1S on the front of Char Bs, and 1K 2S on the flank, and the Char Bs get 1K 1S on the front of the Panzers, and 2K 1S on their flanks.
ReplyDeleteI look forward to some African batreps, David, and can't wait for the Shipwreck rules.
V/R,
Jack
I kept getting lost when trying to learn the combat rules. But you inspired me to go through them and take notes. So I can give them a go.
DeleteThere's a "Least you need to know" PDF on the wargame vault for FiveCore. It's free, so you can grab it if you want.
ReplyDeleteIt's for the skirmish rules but it boils everything down to one page.
Otherwise, hit me up and I'll be happy to help you, as will Jack, no doubt.