All,
It's 1300 on 2 August 1986, and the Soviets have broken through the entire NATO front in numerous places, pouring armored columns through the giant gaps. This is true maneuver warfare, with Soviet formations seeking out gaps and NATO seeking to find and seal them. Battlefield reconnaissance takes on a role of huge import, with 11th Armored Cavalry Regiment (11th ACR) at the fore, with attached deep reconnaissance elements of 10th Special Forces Group (10th SFG) providing support.
An SF element of 10th SFG, comprising two SF fireteams, was inserted yesterday evening into the town of Bad Stulz and began reporting, but has missed its last two communications windows (didn't report in via radio). There's been a lot of Soviet electronic warfare jamming going on, so Brigade is optimistic the SF teams are still alive, just unable to communicate. From Team Whiskey's India Company, the sole remaining intact platoon, Lieutenant Teigner's 3rd Mechanized Platoon, is dispatched to find and recover the SF teams, in order to bring back their intelligence information. Failing that, 3rd Mech Plt must make contact the Soviet 8th Guards Tank Army and provide that information to the Brigade Intelligence Section.

The opposing forces, with Soviets on the left and US on the right. I know you can't see what they are, but you must be able to immediately noted that, once again, the Yanks are very outnumbered in quantity and capability.
The US force: these are actually two separate forces, the two 10th SFG teams at top left, then Lt Teigner's 3rd Mech Plt of the command section, four rifle teams, and five Bradleys. The Platoon Commander's (PC's) command section has a single Stinger surface to air missile (SAM). Keep that in mind...
The Soviet force: an infantry platoon of command section, two MGs, an Anti-Tank Guided Missile (ATGM, in this case an AT-5 Spandrel); a mechanized platoon of a command section, four rifle squads, and five BMPs; a tank platoon of four T-72s; a Spetznaz squad of two fireteams; and an Mi-24 Hind attack helicopter, which is also transporting the two Spetznaz teams.
From the Soviet perspective, they are actively and aggressively engaged in counter-reconnaissance, trying to keep NATO's prying eyes from locating their armored formations, and the electronic warfare (EW) jamming is actually being conducted in support of this effort. Soviet EW sections conducted signals intercepts and radio direction finding (RDF), which is how they became aware of the two US SF teams nearby. As they were preparing to dispatch forces to deal with the US SF teams, their signals intercept made them aware the US forces in the area had just sent additional forces (3rd Mech Plt) into the area as well. The Soviets don't know the size or composition of this new force, but absolutely want to keep them from linking up with the two SF teams, and ideally, both US forces would be destroyed entirely. The plan is for the two infantry platoons (one on foot, one in BMPs) to push into Bad Stulz from the north. Once contact with US forces has been made, and/or the infantry have pushed sufficiently into the urban area to help clear it of infantry anti-tank weapons, the tank platoon will dash into the town, straight down main street, as the Hind comes in and deposits the two Spetznaz teams on the southern end of the town to try to bottle the US forces in the center, preventing any escape.

A look at the table, from south to north from behind the US baseline, and you can actually see the Bradleys of 3rd Mech Plt spread across the bottom. The Soviet infantry platoons are scattered across the top of the map. To recap, the US force is charged with going in an finding the two SF teams, and getting at least one of them secured and off the map (back to their own baseline in the south), while the Soviets want to prevent this, and actually are looking to destroy the entire US force.
And here's the kicker: neither side knows where the two SF teams are! The Soviets aren't the only ones who have to push into Bad Stulz to find the SF teams, the US does too because of the EW jamming is preventing link-up via VHF/HF comms (I'm guessing Bradleys can go HF? For sure Brigade HQ can).
So, the way I'm handling this peculiar situation is this: there are two SF teams in the center of the table, so I placed four 'blinds' (which are purple beads) spread across the center of the map, with both sides having to advance and 'spot' the SF teams (admittedly, I'll be making the spotting easier for the US 3rd Mech Plt as I assume the SF teams want to be found by friendly troops). Despite them being on blinds, I will allow the blinds to move south each turn, albeit very slowly as they are trying to remain unseen. So each turn the blinds are out there, I will move the them four inches towards the southern baseline, and once they are correctly spotted, I will remove the dummies and place the SF teams.
Which brings up activation: I am still using Ivan's excellent "5Core Company Command," but I am using cards to determine when each unit activates. So, at the start of the game there is a card for the SF blinds, a card for the US 3rd Mech Plt, a card for the Soviet foot infantry platoon, and a card for the Soviet mech infantry platoon. Once the tanks come on (Turn 2), they will have a card in the deck. once the Hind comes on (also Turn 2), it will have a card in the deck. And once the Spetznaz are off-loaded from the Hind, they will have a card in the deck.
Looking at the table from west to east: I don't have enough trees for what I needed, and there's a thick forest on the western edge of the map, so I just used lichen. Some may scoff, but I actually think it looks better than my regular trees! Which are still spread all over the map...
This is looking at the US 3rd Mech Plt spread across the south baseline, from southwest (bottom left) to southeast (top right). At bottom left is the first Bradley (B1), then B2, the Lt Teigner's PC Bradley, then B4 and B5. Each 'normal' Bradley has a rifle squad inside, which I'll refer to by their vehicle number, i.e., "B3 Rifle." The PC's Bradley, of course, has his command team.
This is looking west to east at the center of town. The red circles show the four 'blinds' representing the two SF teams. The southern baseline is to right, where 3rd Mech Plt's vehicles are off camera.
This is a photo looking north to south at the northeast corner of the board, where the enemy's Mech Inf Plt is loaded up and ready to head into Bad Stulz. The road running laterally at center is the general line of the SF Team blinds.
This is looking north to south at the northwestern corner, where the Foot Inf Plt is already in the outskirts of Bad Stulz, with the lateral road at center heading to top right is the general line of SF Team blinds.
With that, we're all set, so let's get it on! Hold on to your hats, 'cause this is a wild-ass ride! First out the gate is a US card...
Which is promptly used on the SF Team blinds. This is looking south to north (you can see the BMPs of the enemy's Mech Inf Plt at top center left). The SF guys see the enemy mounting up to come and get them, so here we see the left side of the line where two of the blinds fell back (purple and black beads at far left, at the edge of the field, and far right, behind the apartment buildings; I use black beads to show units that have already activated this turn).
And on the far right, where there's an SF blind at far left, atop an apartment building, and at bottom right, near some trees. At top you can see the enemy's Foot Inf Plt.
Then 3rd Mech Plt begins moving forward (I will say the US was pretty lucky with activation cards this game, even if their shooting dice were not nearly as hot as last game), looking south to north at B1 (bottom left) and B2 (bottom right). B1 tries to spot an SF Team blind (center left, with BMPs at top left)...
And SF Tm 1 is spotted and on the board.
In the center, the PC's Bradley (bottom left) and B3 (bottom center) move up. Neither is able to spot the remaining SF blinds.
On the far right, B3 (left) and B4 (bottom right move up, but can't see anything either. You can see see SF blinds at top center, on top of two-tiered gray apartment building, and at far right behind the trees.
Looking north to south at the Soviet Mech Plt...
They (bottom left) press forward, but can't see the on-table SF Tm 1 (top right).
Again looking north to south, this time at the Soviet left, where the Soviet Foot Inf Plt moves up (across the center of the photo). They try to spot but fail.
An MG team and their ATGM team (foreground) set up, looking straight down main street. They also try to spot, but fail.
One more Foot Inf Plt rifle team moves into position in an apartment building (center left)...
And he's got a pretty good look at an SF blind (top left, purple and black bead just below a clump of four tree stands)...
And the second SF Team is spotted by the enemy (top left, with Soviet rifle at bottom right).
Please keep in mind that SF Tm 1 is spotted by the US, but not the Soviets, while the opposite is true of SF Tm 2. I'm making extensive use of spotting rolls in these games.
And thus ends Turn 1.
And a Soviet card comes out, so they go right back to the Foot Inf Plt. The rifle team that spotted the SF team now fires on them (top left) but misses, as an MG team moves up next to them and sets up. The rest of the Soviet rifle squads move up (across center of photo from left to right).
The rear MG and ATGM go on overwatch as their Tank Platoon comes on...
And sprints up main street (center, from bottom center).
Looking north to south, the Soviet Mech Plt BMPs (bottom half, from left to right) move up, running into the Bradleys of 3rd Mech Plt (spread across the top of the photo, from left to right, with SF Tm 1 at far right, just above the end of the lower road). Contact!!!
B2 (at top right) does not see the BMP (bottom left, actually the enemy PC's vehicle), but the Soviet spots the Bradley and cuts loose with his 30mm cannon. He was too hasty laying the gun and the rounds miss...
B2 (bottom right) returns fire...
Knocking out the BMP and its command team!
On the far US left, B1 (bottom center) spots and gets the drop on an enemy BMP, letting go with its 25mm cannon...
The BMP receives a mobility kill, and the crew and rifle squad bails out (I don't have stands for vehicle crews, they are superfluous to these games). The enemy riflemen don't manage to spot SF Tm 1.
Since B1 react fired (top right, firing on the BMP from the pic above), it doesn't get to move to SF Tm 1, so SF Tm 1 sprints towards them, but doesn't make it (they are just below the Bradley, from the light green bead at center. Due to the sprint they are now spotted by the enemy Mech Plt.
On the US far left (but looking north to south), SF Tm 2 (top center, with B4 at top right) sprints (from explosion at bottom left) towards the US baseline. The SF Team sees the Bradley, but the Bradley still hasn't seen them yet. I suppose he's a bit preoccupied with all the gunfire to his left.
B4 (bottom center) moves up, finally spotting SF Tm 2 (just right of them).
B4 (bottom right) spots an enemy rifle team in the open (top left) and cuts loose with the 25mm gun, but misses!
In the US center (looking south to north, with B2 at far left)), Lt Teigner's vehicle (center) and B3 (far right) move up very cautiously. Neither has seen the enemy yet, but they know BMPs are in the area.
B2 and an enemy BMP spot each other, and B2 fires its chain gun...
Another mobility kill, with crew and rifle squad bailing out.
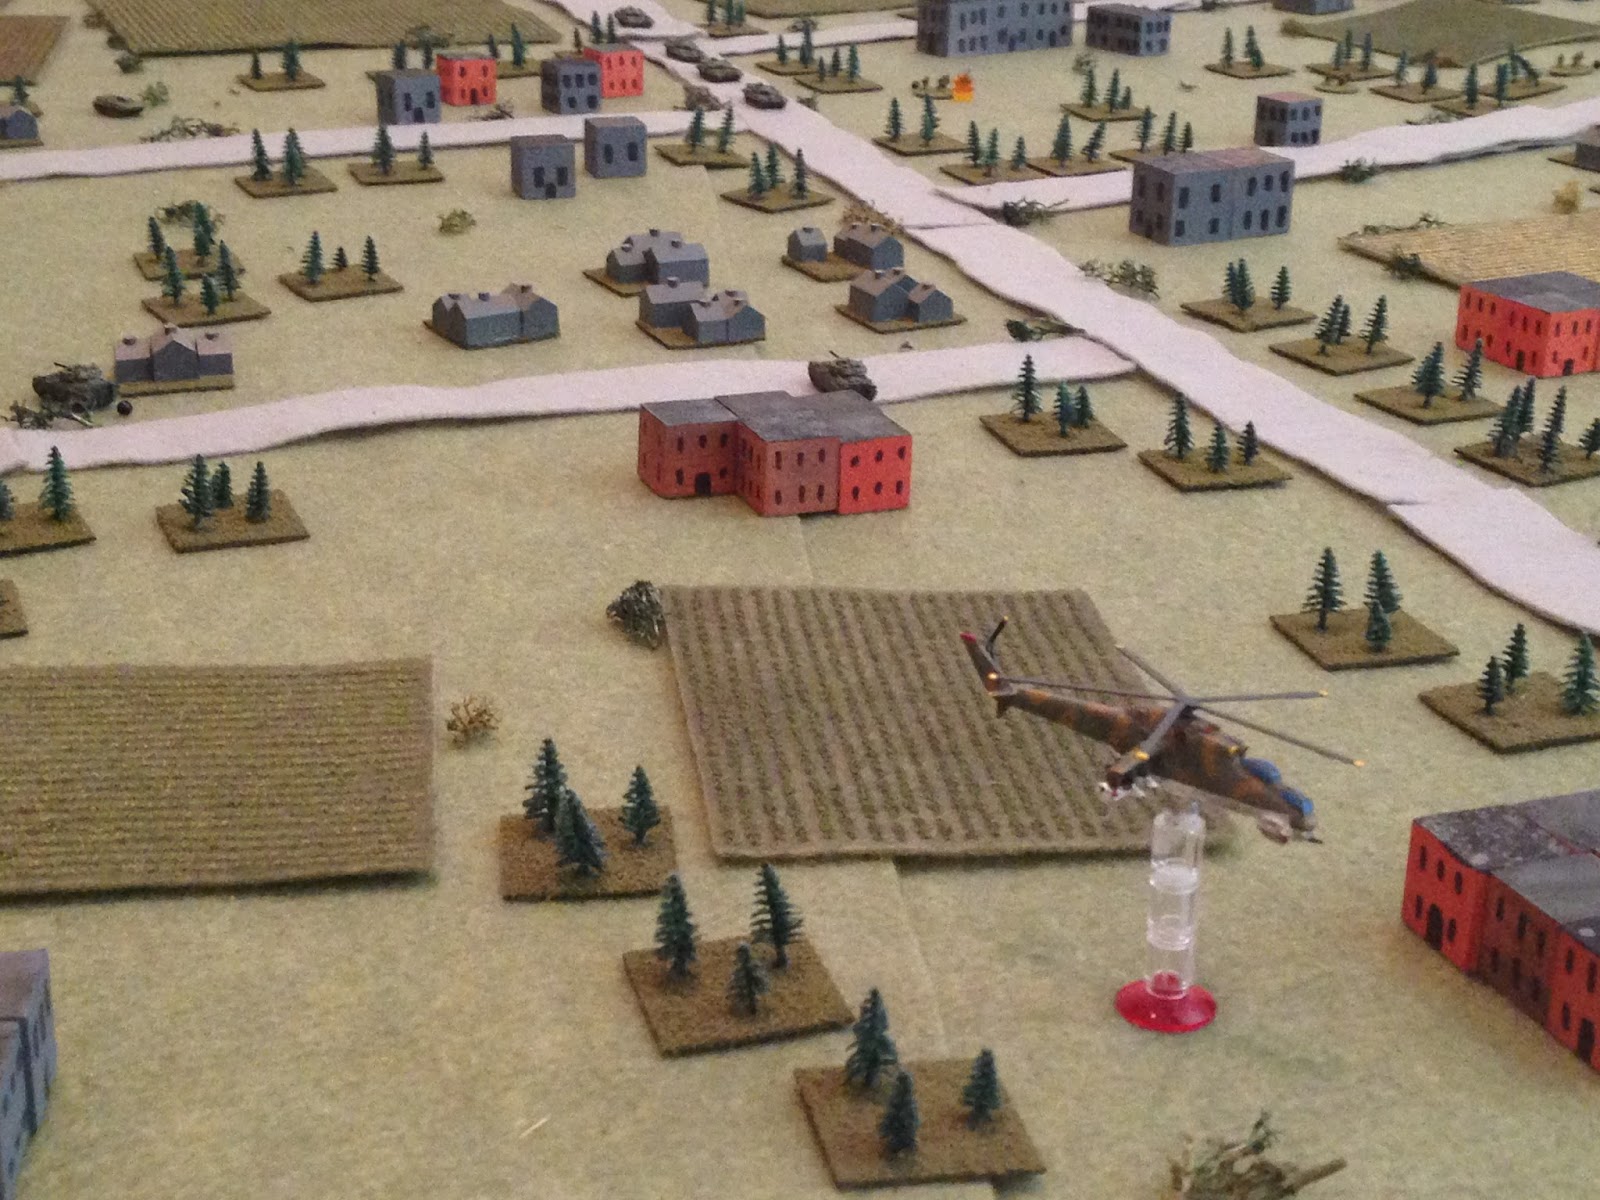
Then everyone hears 'whup-whup-whup' and looks skyward...
As the enemy attack helicopter swoops in (this is looking west to east, with Lt Teigner's vehicle at bottom right and B3 at top right).
Looking south to north, the Hind breaks into a hover in the center of the US baseline (the southern table edge, you can see Bradleys behind him!)...
Where he lands and kicks out the two Spetznaz teams.
That's the end of Turn 2. I'm thinking ahead and agonizing over whether the US should activate the Brads to go get the SF teams or deal with the enemy, as necessary, or activate the SF teams to come to the Bradleys while they maintain overwatch. Ultimately I decide I can do whatever I need to with the Bradleys as the SF teams are close enough to evac by foot if need be.
Turn 3 starts with the two Spetznaz teams (Tm 1 at bottom left and Tm 2 at far right in orange building) taking up observation positions. The Soviet Spetznaz get set up and look around; "Holy @#$$!!! There are Yankees everywhere! Spetznaz Tm 2 tries to call the Hind onto B4 (top right), but fails! Then Spetznaz Tm 1 tries to call the Hind in on B1 (off camera to left top), but they fail too!
Incredible! Their EW guys must not have turned off the jamming (i.e., great dice rolling!).
The Soviet Mech Inf Plt acts, sending a BMP forward (far left). B1 react fires (with SF Tm 1 right next to them), but misses!!!
The BMP returns fire, getting a mobility kill on the Bradley, with the crew and rifle squad bailing out.
Uh-oh. For a second there, I thought it was going to be a piece of cake for the US. I couldn't have been more wrong.
An enemy rifle team moves up (top left), and B1's rifle squad (bottom right) react fires...
Forcing them to fall back (red bead).
The first BMP, the one that knocked out B1, kicks its infantry out, so SF Tm 1 react fires...
Forcing them to fall back too (red bead).
A little further north, another enemy rifle team moves up and shelters behind an apartment building (far left), while another BMP moves up (top left), where Lt Teigner's Bradley (top right) lets go with its cannon, but misses!
The BMP returns fire with its cannon, seriously damaging the turret and putting its weapons systems (25mm gun and dual TOW launcher) out of action, but the crew stays in the Bradley.
**If you're wondering why the Bradleys and BMPs aren't exchanging missile fire, it's because they are inside the minimum range for the ATGMs.
Lt Teigner also takes this opportunity to dismount his command team (right next to his Bradley).
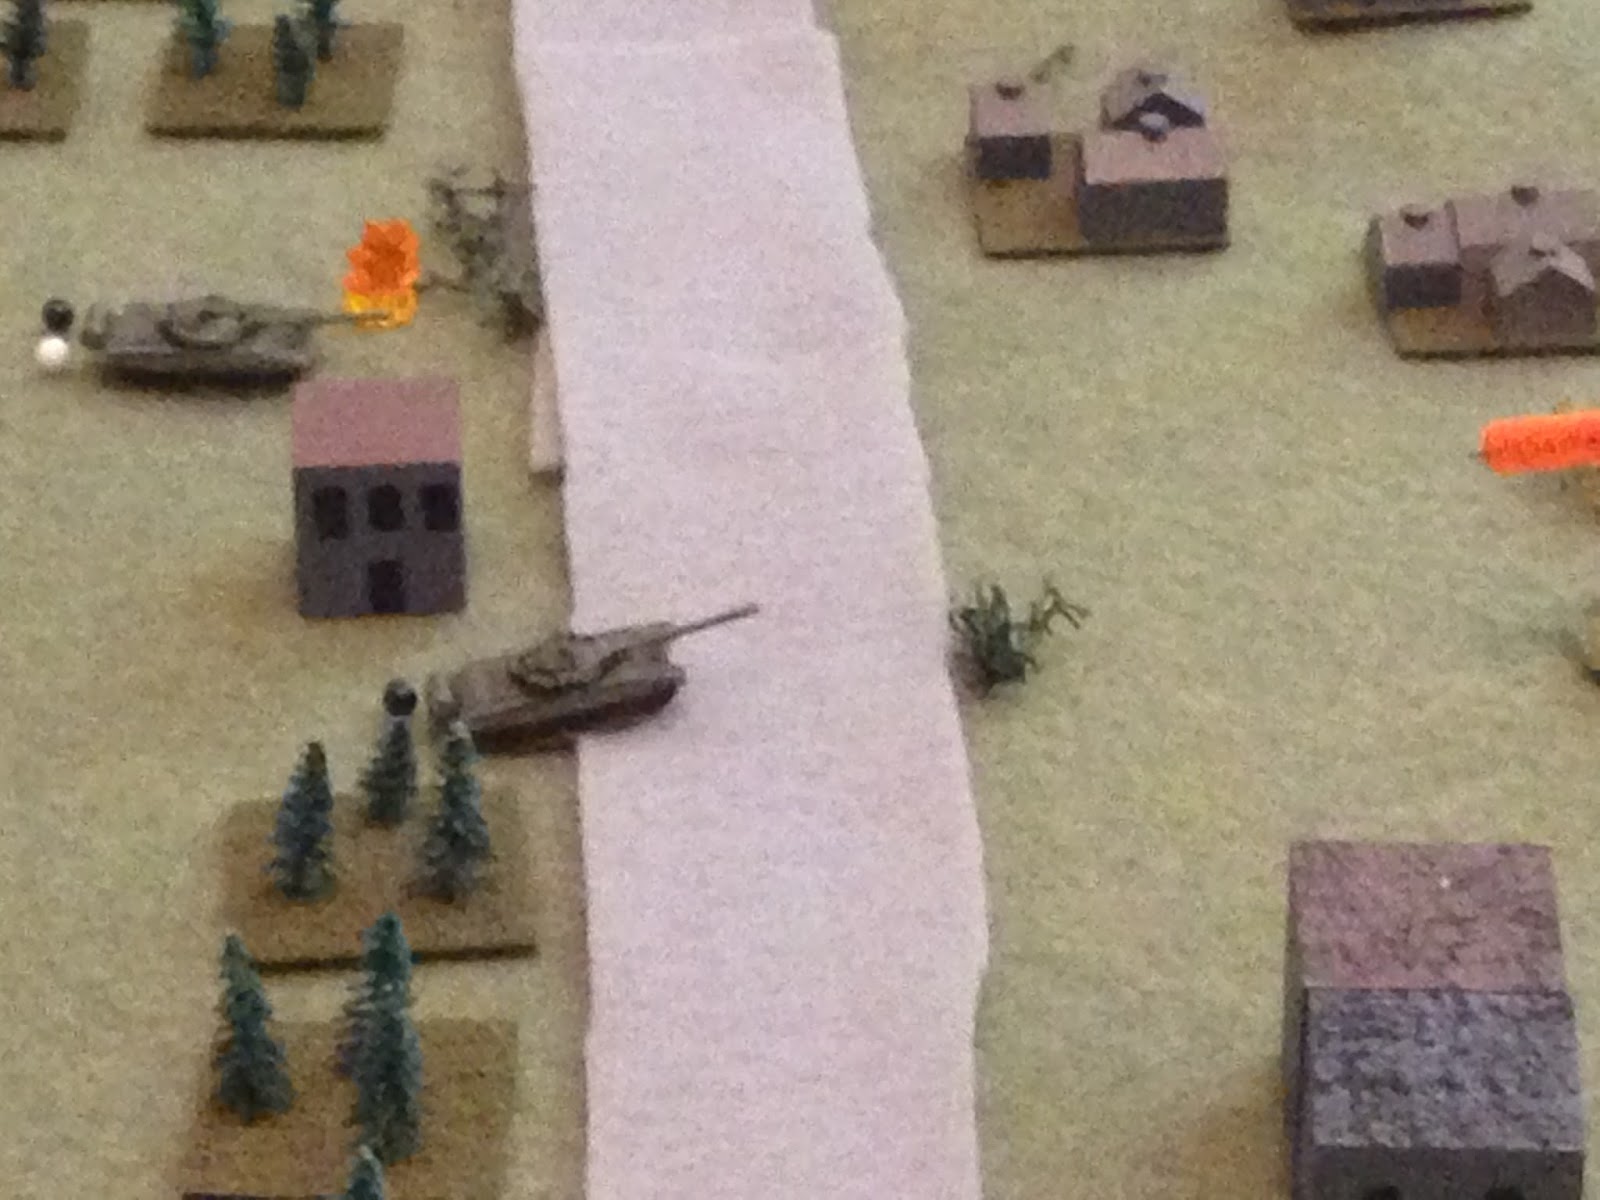
Looking west to east at main street in the center of the board, the Soviet tanks get moving, with two peeling left (west, at far left) to deal with B4 and SF Tm 2 (top right), while the other two T-72s push straight up the road (bottom left).
B4 spots the T-72s moving into his field of fire; there's barely room for it (minimum range), but they fire a TOW...
Another damn mobility kill, crew out. But the other T-72 returns fire...
And B4 is knocked out. Shrapnel from the explosion causes casualties on SF Tm 2 (white bead), but the B4 Rifle Squad is able to make it out okay.
On the US left (looking south to north), B2 (far right) kicks out its Rifle Squad then fires a TOW at the far left enemy BMP...
Which misses, but forces the vehicle to fall back (bottom left from far right).
Meanwhile, B2 Rifle (center, with B2 at far left and Lt Teigner and his damaged vehicle at bottom center) moves up and fires a LAW at the BMP that hit Teigner's vehicle...
This vehicle is also immobilized, but the crew stays in to fight! B2 Rifle is at bottom right, while an enemy rifle team is lurking at bottom left.
Still in the US center (and still looking south to north, at the enemy tanks on main street), B3 kicks out its rifle squad (bottom left)...
Then dashes across main street (the enemy ATGM and MG Team looking down the road for just this very situation both failed to spot, that is, they failed to engage during the brief time B3 was in the street)...
Then pulls into position between two buildings (center right, with main street running diagonally at left) and fires a TOW at a T-72...
Knocking it out (far right)!!! Simultaneously, B3 Rifle moves forward on main street (top left) and fires a LAW at the leading T-72...
The turret is severely damaged (center left, with B3 Rifle at bottom left and the T-72 that B3 just knocked out at far right) and the crew bails out, and the T-72 behind it is pinned!
On the far right (B3 is at bottom left, B4 burning at bottom center right), B4 Rifle sprints right, intent on getting to SF Tm 2 to rally them, but they draw react fire from an enemy MG in the apartment building at top center...
The gallant riflemen reach SF Tm 2, but they're still feeling roughed up and fail to rally...
On the Soviet left, their Foot Inf Plt continues to slog its way forward (spread across bottom half of pic, with B4 Rifle and SF Tm 2 at top left).
Looking north to south from the rear MG/ATGM position, that MG team (bottom right) opens up on B3 Rifle (just visible at top center, who just popped the T-72 with a LAW), and knocks them out...
The MG that react fired on B4 Rifle is on the apartment building at center left, and the burning B4 is barely visible at top left.
With B3 Rifle knocked out, the last Foot Inf Plt rifle squad moves up and rallies the pinned T-72 (bottom right, with B3 at top center and B4 Rifle and SF Tm 2 at top left).
On the far US right, SF Tm 2 rallies itself.
SF Tm 1 couldn't do anything because they had react fired earlier, so they have to sit tight. Both SF Teams are near the US baseline, and in good fighting shape, but we don't seem to be getting anywhere, getting too bogged down with fighting. Of course, the overwhelming Soviet numbers can do that to ya...
The Spetznaz teams have been unable to communicate targets to the Hind, but he decides he'd be safer in the air and so he lifts off, and, of all damn things, he's able to spot B3 (far right, with blue bead showing he's fired one of his two TOWs)!!! The attack helicopter readies an ATGM and begins rotating towards the Bradley...
When Lt Teigner hastily grabs the Stinger and launches the SAM at the Hind!
But the missile sails on by! How the hell did they miss!!! The Stinger (top right) didn't hit the enemy helo, but did force him to forgo his shot on B3 and take evasive action (bottom left, which is the northwestern corner of the board, with the enemy's Mech Inf Plt just to his right).
You know what really sucks? The US only had one Stinger missile. The Hind pretty much has free reign over the table now. Not that he knows that, but I am the US AND the Soviet commander ;) Having said that, please note that I didn't cheat for the US earlier; playing both sides, I knew the Soviets had a helo in support, so I could have very sneakily had Lt Teigner dismount his command team (with the Stinger) on Turn 1, but I didn't do it as I figured the US commander would have no way of knowing an enemy helo was inbound, especially in this comms restricted environment, until it showed up.
That's the end of Turn 3. I was supposed to get in, find the SF teams, and get out, but this thing has turned into an all-out brawl, with men and vehicles dropping like flies. It's only going to get worse...
Looking south to northeast, the Soviet Spetznaz Tm 2 (foreground) spots B3, SF Tm 2, and B4 Rifle, and calls up the Hind to vector him on target.
While Spetznaz Tm 1 moves left (center, from bottom right, with SF Tm 1 at top left).
But the Yanks get lucky with the next card draw, and so SF Tm 1 is able to fall back. This photo is of the US far left, looking west to east, with knocked out B1 and B1 Rifle at bottom left, which is where SF Tm 1 started, but now they are at bottom right, with the US baseline just off camera to right. B2 is at top left, and Soviet Spetznaz Tm 1 is at top right.
While on the far right, looking south to north, SF Tm 2 also falls back. They started at top right, next to B4 Rifle, and now they are at far right, with B3 at top center and knocked out B4 at top center right.
Forgive me, out Stars and Stripes Combat Correspondent is a little shaky today. You're looking north to southeast at the Hind coming in and making a north-south run on B4 Rifle and SF Tm 2. The helo launches a salvo of 57mm rockets...
Somehow B4 Rifle (top left) weathers the storm entirely unscathed, but SF Tm 2 is forced to fall back and hunker (bottom right). I actually don't have a problem with this, as falling back actually took them closer to the US baseline. The only problem is that I've got to get them rallied so they can then cross the finish line, and Spetznaz Tm 2 is not far off camera to left. The burning B4 is visible at top left.
Again looking at the US far right from south to north, I fall back B3 (blue and black bead at far right) and B4 Rifle to SF Tm 2 (red bead, with B4 Rifle the black bead at far right). But really this was a tactical error. Spetznaz Tm 2 (far left, atop orange building) is just going to keep calling in the Hind on them, and I just bunched them up together nicely for him...
Looking south to northwest at the far US left, It's time to go: B1 Rifle drops a thermite grenade in their Bradley (top left, burning), then falls back (center left, just left of big field and under the trees at far left, near SF Tm 1, who's just visible at far left above the last set of houses). B1 Rifle doesn't see Spetznaz Tm 1 at bottom right...
Looking south to north at the US center, B2 Rifle (center) falls back to B2 (far left) and loads up, while Lt Teigner and his command team (bottom right) load up in their damaged Bradley...
Then fall back straight to the south. But they're almost on top of Spetznaz Tm 1 (center right, atop orange building) and don't even know it! They've been too busy fighting the Soviet Mech Inf Plt (off camera to top left) and lost track of what the Hind did behind them.
Alerted by heavy radio traffic from the Spetznaz teams that the Americans are trying to leave the fight, the remaining enemy T-72 sprints up the road and turns left (west, bottom center), towards B2 and Lt Teigner's Bradley...
The T-72 (top right) spots Teigner's fleeing Bradley (center left), and fires...
The 125mm sabot round passes right through the Bradley's thin armor, then out the other side. Teigner's vehicle (top right, two white beads) has taken a second turret shot, and is still in operation! Lt Teigner dismounts the command team. But B2 (far left) is spooked by the explosion and the appearance of a T-72 on their flank, and falls back. Spetznaz Tm 1 is at far right, still unspotted as everyone is worrying about the T-72...
Looking north to south at the Soviet right, their Mech Inf Plt sets to rallying all their suppressed units (red beads), while the rifle teams that are okay move forward.
The BMP at bottom right is good, the rifle next to it gets up to pinned, the next rifle is good, but the crew of the immobilized BMP (top left, red and white beads) finally calls it a day and bails out.
A Soviet Mech Inf Plt rifle team moves up (bottom left), and Lt Teigner's command team react fires, but misses...
So the Soviet squad takes cover and returns fire, putting heavy casualties on the Command Team (white bead at bottom right).
Looking at the Soviet left from north to south, their Foot Inf Plt keeps pressing forward (across the bottom half of the pic, left to right, with B3, B4 Rifle, and SF Tm 2 at top left).
While their MG Team (bottom right) fires on B4 Rifle, but misses.
And that's the end of Turn 4. We're getting pretty beat up; the Hind is still running around, the Mech and Foot Infantry are pushing forward, and the Spetznaz are in our rear area, unnoticed. But both SF Teams are still in play, and we still have a couple Bradleys and rifle squads hanging on.
But Turn 5 starts with the Soviet Hind making another run at the US far right, loosing another salvo of rockets on B3, B4 Rifle, and SF Tm 2.
If you're wondering why the Hind went with rockets rather than its ATGM, the ATGM stands a better chance of knocking out the Bradley, but it likely won't affect the rifle squad and SF team. Going with rockets allows a small chance of knocking out the Brad, a pretty good chance of pinning or suppressing it, and a real good chance of knocking out the two infantry teams.
But the Hind's rockets only pin the Bradley and put heavy casualties on B4 Rifle, not even affecting SF Tm 2, who's hunkering in any case. But I was expecting much worse. To tell the truth, the Hind has had some very bad firing rolls. I expected he would have cleaned up the US far right by now.
On the US left, Spetznaz Tm 1 drops down from their perch (top right) to go after Lt Teigner's stricken Bradley and Command Team. SF Tm 1 is in a bind (bottom left); they really need to get off the damn board (they're very close, it's just off camera to bottom), but they want to help out their buddies. But firing now means they won't be able to move this turn. Hell with it, they cut loose with their small arms at the Spetznaz team in the open...
But they miss!!! So now they can't move, and the Spetznaz troops are climbing all over Teigner's Bradley, stuffing grenades into everywhere they can.
The Bradley succumbs to multiple internal explosions, then the Spetznaz team moves over to take out Lt Teigner's Command Team...
They easily put them out of action (at bottom right), then move into cover (top center, with B2 hunkering at top left, red bead).
**Alternate ending: Lt Teigner breaks and runs when the Spetznaz close, and is shot in the buttocks and captured ;)
Great move with react firing SF Tm 1; with Teigner's vehicle and command team gone, and B2 hunkering, they are in real jeopardy of getting whacked.
Looking south to northeast from the US center baseline, Spetznaz Tm 2 sprints right (on red roofed building at top center from bottom left building), getting nearer B3, B4 Rifle, and SF Tm 2 (top right). Good grief...
Back in the center, B2's rifle team pops out and fires at Spetznaz Tm 1, but misses...
And then on the far US left, B1 rifle (bottom left) takes a shot at nearby Soviet Mech Infantry (top right), but they miss too. B2 and B2 rifle are at bottom right,with Spetznaz Tm 1 just off camera to right.
Then, looking to get to B2 (bottom center, red bead), B1 Rifle sprints right. But the Soviet squad they just fired on shoots them up...
And they fall back and hunker where they started, now unable to do anything before they get rallies. SF Tm 1 is at bottom right. Off camera to right, B2 self rallies, which is great, but they can't do anything else, that took their activation.
Looking northwest to southeast at the US left, the Soviet Mech Inf Plt continues to push forward. There's two rifle squads at top center/top left), a rifle team that just rallied at bottom left, and a single BMP at bottom right, with B2 at top right (blue bead).
I missed one (top center), so I move him up. He's their far left flank; you can see the next closest at far left, with US B2 and B2 Rifle at far right.
The US SF teams activate; on the far left, Tm 1 can't do anything because they react fired, so we're looking at the far US right, where SF Tm 2 tries to self rally, but they fail and fall back. They are soooooo close to the US baseline, just off camera to bottom, with B3 and B4 Rifle at top right and Spetznaz Tm 2 at top left. If the Spetznaz can get to SF Tm 3 in close combat they are almost guaranteed to put them out.
I try to self rally B3 and B4 rifle; the Bradley recovers and is ready to fight, but B4 Rifle has taken too many casualties and simply melts away...
Looking south to north at the US far right, with B3 at bottom right and Spetznaz Tm 2 at bottom left, the Soviet Foot Inf Plt (all those rifle squads across the top half of the photo) continue to press home their attack. They're getting quite close, and that damn Hind is still there at top right.
Still looking south to north, with B3 at bottom right, a Soviet MG (top left) opens up on the Bradley to keep them buttoned up while their infantry keep moving.
Looking at the US center from south to north (B2 and B2 Rifle at far left, blue beads), the Soviet T-72 moves up (center right). But with B2 rallied and B3 rallied...
He's kind of squeezed if they can get their stuff together. This is looking at the US right, with B3 at bottom right, T-72 at top left.
Turn 5 is finished. I just need to get off the damn board!!! I'm so close, but they are on top of me.
Looking at the US center from south to north, a Soviet Mech Rifle squad circles in (far right) and fires on B2 Rifle, pinning them (yellow bead at top left).
And then the sole remaining enemy BMP moves up on the far left, firing and catching B2 in its weak rear armor (with B1 Rifle at far left, hunkering with red bead, and SF Tm 1 at bottom left)...
B2 receives a mobility kill (top left) and the crew abandons ship, while their rifle squad runs all the way to bottom right (red bead, with Spetznaz Tm 1 at top center). So much for squeezing the T-72...
Two Soviet Mech Rifle teams (top center, top right) move up then fire on B1 Rifle (far left, red bead), and they knock them out of the fight, leaving only SF Tm 1 in the US left (bottom left).
Then Spetznaz Tm 1 moves up to the knocked out B2; I'm again agonizing over whether to have SF Tm 1 (bottom left) react fire or not; I need them to protect themselves, but if they do, they won't be able to move again. So I decide to sit tight and weather the storm.
The Spetznaz fire and knock out SF Tm 1... Now it is absolutely imperative that I get SF Tm 2 (on the US far right) off the table, or the mission fails. I may lose the game on victory points either way, but I don't mind losing if I at least accomplish the mission.
And so, of course what's up next but, on the US far right (with B3 at top center), Spetznaz Tm 2 moves up. They want to get into close combat with SF Tm 2 (bottom right), but they are just out of range, so they pull up short and open fire with a ferocious fusillade of fire at point blank range, sure to put the US SF Team out of the fight and cause mission failure...
But they miss!!!! They miss, and so SF Tm 2 is rallied (that's for being Special Forces) and returns fire, and kill the Spetznaz team!!!
Now, the Soviets have three more cards in the deck; I've got one SF Team and one Bradley, but they don't activate together, they each activate on their own card. So five cards in the deck...
A US card comes out, and SF Tm 2, who just rallied and killed the Spetznaz team, strolls across the finish line! Mission success, even if I lose the game! I needed to get one SF team off the board, and I did. Exhilarating!
And the next card out of the deck is... a US card, and so B2 drops back and dashes across the finish line. There they pick up SF Tm 2 and return to Brigade headquarters.
Losses:
US
Four M3 Bradleys knocked out
Four Rifle Squads knocked out
One Platoon Commander command team knocked out
One Special Forces Team knocked out
A point a stand, looks like ten points for the Soviets. They would have gotten 11 for keeping both SF teams from exiting, but sorry Charlie.
Soviet
Three T-72s knocked out
Four BMPs knocked out
Four Rifle Squads knocked out
One Spetznaz Team knocked out
Looks like 12 points for the Yanks, plus five points for getting an SF Team off board, so I win the game 17-10. Awesome.
Wow, that was super intense, right up to the last minute. I can't believe I actually succeeded in getting the SF Team off board, but then, earlier in the game, it looked like it would be no sweat. All in all a great fight, took about 3 and a half hours. Once again superior American quality (in terms of C4ISR) and firepower helped to stave off massive Soviet quantitative advantage. The rules and the scenario worked like a champ.
Lt Teigner and his 3rd Mechanized Platoon, India Company, were pretty much wiped out (all but one M3 Bradley and its crew). The good Lieutenant received the Bronze Star with 'V' for leading a successful mission against overwhelming odds, putting up an aggressive, dogged fight which secured the SF Team and dealt the enemy severe casualties.
In the overall scheme of things, the Americans have now fixed the position of the enemy and are preparing a counterattack. I'm looking to get two more games in this weekend, so stay tuned.
V/R,
Jack


That must have been some bloody valuable information, to burn an entire mech platoon over! Mind, it didn't go great for the Soviets either - that's a lot of good Ural steel that needs replacing...
ReplyDeleteNow, repeat after me - rotor is to track as track is to boot. Except when your helo fails to put the boot in!
TP,
ReplyDeleteHey, we leave no man behind. We may have to leave a bunch of broken vehicles and bodies, but we're getting our (live) guys out! If these were Marines, we would have pulled everybody/everything out. And we would have sent more than a platoon ;)
But all joking aside, the way I look at scenarios is this: you're not the boss, you're the commander of the on-table elements. You don't get to make the 'war' decisions, you get to make the 'battle' decisions. So if the boss says take your platoon and go get those SF guys, you take your platoon and go get those SF guys.
It was a huge amount of fun, and to me that mission is not at all implausible: we've got two teams out there that we've lost contact with, go find them, and if you can't find them, got find the enemy (because that's what those two teams were doing).
Regarding 'rotor-track-boot,' I assume you're getting at the Hind attacking the SF Team, rather than going after the Bradleys, and when the Brad was with the SF Team, using rockets instead of ATGMs?
The reason it happened that way is because the mission of the Soviet commander was to stop the US recon elements from getting away, AND do his best to destroy the entire US force. Not much difference, but there was a priority. So, what I did (and what I always do in my solo games) is, I come up with two or three courses of action for the enemy commander, then I roll a dice to see which one he 'chooses.'
In this specific case, I limited to only two choices: 1) go after the US SF, or 2) go after the US Bradleys. I even weighted them dead even, 50-50. The dice came up SF. For the second Hind run, I did it again, but, admittedly, I weighted it a little more heavily towards hitting SF again because the first run didn't eliminate them.
Thanks for taking a look and commenting man.
V/R,
Jack
Actually, it was more in connection to numbers. One chopper is like one tank or one infantryman. Not a lot of use. The Russians believed in not pissing away resources - mass 'em up, and clobber the other guy!
DeleteIt's a quote from Brig. Richard Simkin's book on NATO theory referring to the Russian combined arms and force concentration focus. Don't piss your combat strength away separately, lock it together for maximum effectiveness and everything operates as part of a whole, covering each others weaknesses and accentuating their strengths. See also Soviet use of vertical envelopment in Afghanistan ("We are not afraid of the Russians, but we are afraid of their helicopters")..
The rockets were likely the best tactical choice at that stage - makes sense to me. But then, so would a second chopper (and one Spetznatz in each, I think. Even concentration of effort doesn't mean "all the special forces in one place all the time" :D).
I suspect it's just the kind of likely mission some poor sod will get - the McGuffin is more important than a generic mech platoon, so whilst we hope you get out, the mission is more important. And like you say - the Russians know that too.
Always interesting :)
TP,
DeleteWell, you're greatly underestimating a Marine infantryman, then ;)
No, I gotcha man, and I'm with you. But I'd say, rather than look at one specific piece of gear/capability, please look at it 'in toto'.
I'd say that sending two mechanized infantry platoons (one dismounted), a tank platoon, an ATGM, two machine guns, two SOF teams, and a Hind after two US SOF teams (they didn't initially know about the US Mech Plt) is pretty much the definition of overwhelming force.
And yeah, the mission always comes first. More to come, the table is set for scenario 3!
V/R,
Jack
Brilliant games - I'm enjoying the series and it has me itching to bring my current fantasy campaign to an end and dig up my 6mm armor. Bravo!
ReplyDeleteNicholas,
ReplyDeleteThanks for posting a comment and for the kind words, I appreciate it. The fight was great, with Moreno the way. Soon after I'm done the scenario book will be published, so dust your toys off!
V/R,
Jack
Once again I arrive late. The battle did seem to go to and fro, and for a moment or two I thought the US was definitely going to lose but there is nothing like games that swing back and forth on dice rolls at critical turning points!
ReplyDeleteNo sweat man, take your time ;)
DeleteYeah, the US really got roughed up, but pulled it out in the end.
V/R,
Jack