All,
It's 1000, 16 Sept 1939, and the KG is spread thin, manning a line of pickets attempting to identify the Poles' main axis of attack, and to contain it. The morning finds an outpost manned by 2nd Lt Klugmann's (wearer of the Iron Cross, 1st AND 2nd Class) 2nd Grenadier Platoon under attack; Major Schultz, the kampfgruppe's executive officer, assembles a hasty force and moves off smartly to relieve them.
The opposing forces: two relatively small forces, both with limited tan support, though the German force is split into an outpost force and a relief force.
The Germans: CO (Major Schultz, leading the relief column comprised of 2nd Lt Weider's 1st Motorcycle Platoon (his HQ section plus the squads of Sgt Sachs and Sgt Gradl), with Sgt Jurgens' Pz Mk IV and Sgt Pichler's Sdkfz 221 in support. The 'outpost force' is led by 2nd Lt Klugmann, with Sgt Aust and Sgt Haas' (wearer of the Iron Cross 2nd Class) squads and Cpl Osswald's 80mm mortar in support.
The Poles: CO, 7TP medium tank, and five rifle squads (four with anti-tank rifles).
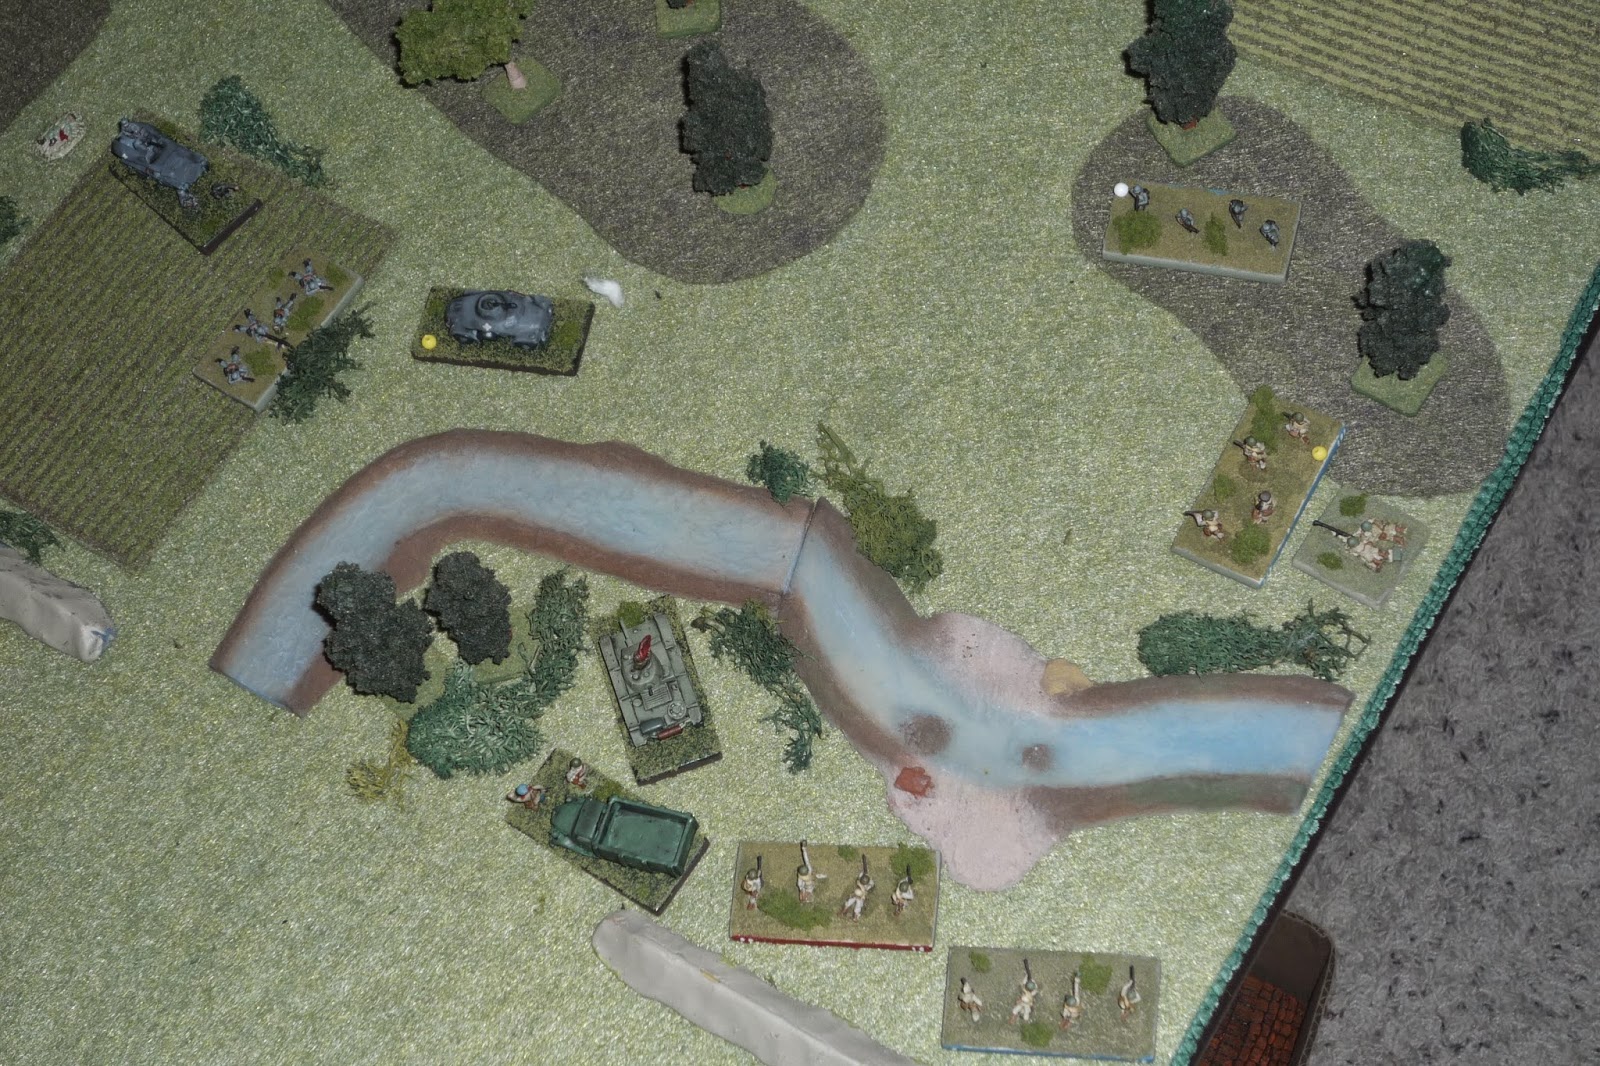
Overview, north is up. The German 2nd Plt outpost is in the top left (northwest) corner, with a Polish rifle platoon just south of them (at the wall). The German relief force has entered at bottom right, and the Poles have a tank and two rifle squads coming on board by crossing the ford at bottom left.
The German outpost: at left is Sgt Haas' squad (with Hero), center is Lt Klugmann's section (with hero), with Sgt Aust's squad at right and Cpl Osswald's mortar at rear.
The German relief force: Lt Weider's section, Sgt Pichler's armored car, Sgt Sachs' squad, Major Schultz' command element, Sgt Jurgens' Pz IV, and Sgt Gradl's squad.
The Poles opposite 2nd Plt's outpost, three rifle squads and their CO.
Polish reinforcements crossing the ford: 7TP medium tank and two rifle squads, both with ATRs.
And the fight is on. Cpl Osswald's mortar (top left) pins two rifle squads at the wall, while Lt Weider and Sgt Pichler's armored car move up in the southeast (off camera), on their way to link up with 2nd Plt.
The Polish CO rallies one rifle squad at the wall (top left, 2nd Plt outpost off camera to top left) while two rifle squads from the ford move up to link up with the Poles at the wall.
Then the Germans roll a firefight, which really sucks as I don't have much to shoot at or shoot with at this point, and I really need every turn to move up elements of the relief force...
Cpl Osswald's mortar (left) pins one enemy rifle squad (right), and the two sides exchange rifle fire to no effect (both sides are in heavy cover, so no kill dice are being rolled except by the mortar).
And then the worst thing possible: the Poles roll a scurry. This means I didn't get to move at all, but now the Poles will be able to move everyone, getting closer to my outpost troops without me being able to move my relief column (in the opponents scurry you get to move any of your units that can see enemy units move, but my relief force can't see anything because of the trees).
The Poles rally troops and move towards the German outpost (off camera to top). The Polish CO (center left in trees) tried to rally a pinned squad, but failed and they fell back off camera.
Then the Polish rifle squad at top left moved up to them and tried to rally them, but they failed again and fell back to center right. You see the enemy tank got through the ford and is moving towards the outpost.
And then the Germans rolled another firefight, so again the German relief force didn't get to move. I hate this game ;)
The suck continues, as Cpl Osswald's mortar (top) fires, and hits nothing, and 2nd Plt rifle fire manages only a pin. Then the damned Poles rolled a @#$%ing firefight!!! Lt Klugmann's squad gets pinned (yellow bead in building at top), but their return fire KOs the aggressive Polish rifle squad (casualty figure at center right). Cpl Osswald's mortar follows this by getting a pin (bottom center).
Then the Germans roll another firefight... This is a joke, right? Please understand that you roll 1D6 for orders, and a '1' is a scurry, 2-5 is normal, and a '6' is firefight. So I rolled another 6, then another 6 gives the Germans a random event, which is 'redeploy,' so, for the first time in several turns I'll actually get to move a German unit, and it's Lt Weider's motorcycle troops. The mortar does nothing, and rifle fire is exchanged, to no effect. Then the Poles roll a firefight, and I'm about ready to toss my dice out the window. No one can move, rifle fire is exchanged to no effect...

Finally a normal roll for the Germans, with another random event, again 'redeploy,' so I get to move four units instead of three. Lt Weider's motorcycle (top center) moves up and dismounts, with Sgt Pichler's armored car not far behind, and Sgt Sachs' motorcycle squad a ways back (far right, on road; the CO, Pz IV, and Sgt Gradl's motorcycle squad are still at the start line because of all these firefights). Cpl Osswald's mortar pins another Polish rifle squad.

Then the Poles roll a second scurry, which sucks with regards to me being able to move my relief force, but at least I'll get to move something, because when the Poles move up my outpost and Lt Weider's motorcycle squad will be eligible to move. One Polish squad rallies, but the enemy CO tries to rally another and fails, so they remain pinned. Then they try to rally themselves and fail, falling back (off camera to bottom). The tank moves up... Lt Klugmann rallies his squad, while Sgt Aust and Lt Weider's squads move up (center and bottom right). My line of thinking with being so aggressive with these two squads is that my tank is never going to arrive on scene, whilst the enemy's tank has, so I'll use two 2nd Plt squads and the mortar (atop the hill with the building) to keep fire on the enemy rifle squads while the other 2nd Plt squad and the one from 1st M/C Plt move up to try to get at the enemy tank.
A bold strategy, let's see how it works out then.
The Germans roll a 'normal' activation, and I'm thinking it's time to get a little crazy and get after the enemy tank. But then one of the more unlikely events foiled my plans: Cpl Osswald's mortar starts in on the enemy rifle squads (white puff at left top center), and I rolled two fall backs. So one enemy rifle squad falls back (center, red bead), but then I had to figure out what other unit would fall back: should it be the rifle squad at bottom left, or the tank, who was sitting near the white puff? So I figured 2-6 would be the rifle (I figured this would be more likely), and 1 would be the tank; of course I rolled a 1, meaning the enemy rifle at bottom left stayed, unaffected, while the enemy tank fell back, putting it out of reach of any close assaults by my two rifle squads...

So, instead of having Sgt Aust (center top, behind trees) and Lt Weider's (center right, in trees) go after the tank (which retreated off camera to bottom), I had Sgt Sachs' motorcycle squad (far right) move up and dismount, while Sgt Pichler's armored car (top center) moved up and pumped some 20mm rounds into an enemy rifle squad, eliminating them (far left, casualty figure on road).
Oh, and at this point I realized my CO, who gets a 'free' move every turn, hadn't moved yet this whole game. I moved him off his starting point in the southeast corner, heading up the road to try to get to the fighting. The tank and one motorcycle squad are still at the southeastern start point...
The Poles roll another firefight, but none of their units have LOS to any of my units, so it automatically converts to a scurry, so they'll get to try to rally and move while my tank still sits on his butt. The Polish CO tries to rally the tank, but fails, though they manage to rally themselves, while a rifle squad fails and falls back. Tail end Charlie sprints ahead to catch up, getting into the treeline at center.
I'm feeling a bit saucy at this point, really feeling the Poles are on their last legs, so the Germans maneuver aggressively. Rather than wait for their tank to come up, Lt Weider and Sgt Sachs form up their squads on the hill at right, while 2nd Plt moves up to the wall (center left), with the armored car between them.
Then the Germans roll ANOTHER FIREFIGHT (this is @#$%ing incredible), though I do get another random event (initiative), so one of my units may act normally, so I move my Pz IV up the road off his starting blocks.
Sgt Pichler's armored car puts another enemy rifle squad (casualty figure at far left) out of the fight, and causes an enemy rifle squad to fall back off the map. On the right, Lt Weider and Sgt Sachs' squads fire on the enemy squad at bottom center, getting 'man down' (white bead). The enemy tank reacts by firing on 2nd Platoon, but the grenadiers are stolid and unaffected. At this point I realize I hadn't used my mortar, and so it dropped smoke to allow my infantry to close the gap with the enemy tank.
It's almost game over, right? Spoiler alert: not even close...
Poles roll up a normal activation, then they have to decide if their tank should charge through the smoke or work around, and I roll up that they should work around. So the Polish tank backs up, pivots right, and moves up (dead center), firing at Lt Weider and Sgt Sachs' squads, but missing (top left). The Polish CO moves back and tries to rally his hunkering rifle squad (bottom right), but he fails and they fall back towards the ford. The 'man down' rifle squad (far left) manages to recover itself, which sucks as they'd have been a real easy target in close combat...
Then I roll snakeyes, which really pisses me off. After all this time I finally get to move everyone, plus I get another 'redeploy' random event, meaning I can move an extra team, but all my teams can already move...
At top center the CO leads Sgt Pz IV towards the fight, while Lt Weider and Sgt Sachs' squads hold tight on the hill waiting for them. Meanwhile, 2nd Plt and the armored car move forward toward the smoke, though Lt Klugmann and Sgt Haas' squads only get to the wall, while Sgt Aust's squad gets over it. At bottom right, Sgt Gradl's motorcycle squad has apparently been searching this entire time for a route through the forest, and finally popped through on its way to the fight.
The Poles roll a normal activation, and their rifle in the trees falls back to the CO (bottom left), while the Polish tank plows forward then hooks left around the hill, setting up a flank shot on Sgt Jurgens' Pz IV. I have a feeling this is about to suck...
The Polish tank fires, and Jurgen's vehicle is immobilized, but the crew stays with it. However, Lt Weider's squad is pinned (yellow bead), and then the Polish squad at bottom right fires, and Sgt Sachs' squad is eliminated.
Just a second ago, the enemy was down three of its five rifle squads and I had yet to lose a unit (and Lord knows I could have been even better off if my mortar rolls had been worth a crap). Now my only tank is immobilized, and the two motorcycle squads next to it have been KO'ed and pinned, respectively...
And then I roll another damned firefight for the Germans. This means the two 2nd Plt squads at the wall in the north can't get across the road, the squad and armored car in the north can't get into the fight, and the motorcycle squad in the southeast can't move up to flank the enemy.
So, my CO rallies Sgt Jurgens' tank, and it quickly rotates its turret and fires at the Polish tank. But my boys miss, and the enemy's aim is true, so their return fire knocks out Jurgens' tank... My mortar fires and causes the Polish rifle squad and CO to fall back (bottom left).
The Poles roll a scurry; their CO tries to rally the rifle squad but fails, though they rally themselves. The smoke has lifted in the west, and so the Polish tank swings back in that direction. Sgt Gradl's motorcycle squad (bottom center right) sees this and gives chase. Major Schultz tries to rally Lt Weider's squad, but fails, so they do it themselves (top right). Sgt Aust's squad and the armored car move up in the west (top left), and Major Schultz's group joins them. Off camera to top, Lt Klugmann and Sgt Haas' squads (the two Iron Cross holders) can't see anything and so they don't get to move...

Despite our momentary setbacks, Major Schultz orders his men to press the attack! Sgt Pichler's armored car moves forward and fires on the Polish tank; he can't hurt it with his 20mm gun, but he can pin it or force it back, and force it back he does (the tank was at the puff of smoke in the center, he fell back across the ford to bottom left, where he is hunkering, i.e., needing to rally before he can move or shoot). Continuing with our own particular brand of ballsiness, Sgt Gradl's squad (center right) charges ahead into the treeline; the enemy rifle squad (bottom right) snap fires and misses, and Gradl's boys put out a hot enough fire to pin the last remaining enemy rifle squad.
And then the BS hits the fan again: the Polish rolled a normal activation and a random event, and the random event is... TWO @#$%ing rifle squads as reinforcements!!!
The Polish reinforcements come aboard at bottom center, while their CO moves over and rallies their tank, who promptly fires at Sgt Pichler's armored car and pins them, while the enemy rifle at far right fires on Sgt Gradl's squad (in treeline, white bead) and gets a 'man down.' @#$%ing incredible; a couple turns ago I was an inch away from crushing these @#$holes with no casualties...
The CO, Major Schultz, darts to Sgt Gradl's squad and tried to recover them, but failed (of course, bottom center). Finally Cpl Osswald's mortar finally gets in gear, pinning one and knocking out the other Polish reinforcement squad (far left). Sgt Aust moves his squad up to the river (top center) and fired on the Poles at bottom center, but missed.
Poles roll a normal activation; their tank fires on Sgt Pichler's armored car again, missing again, and Pichler's men return fire, pinning the tank. I had to laugh for a moment when the Polish CO bravely crossed the ford under fire to try to rally the squad there, but failed and the ran off the map!!! The CO fell back across the river, where the last Polish rifle squad rallied itself.
The Germans also roll a normal activation, and Major Schultz manages to recover Sgt Gradl's motorcycle squad (center right).
Sgt Aust says to himself, "hey, my Lieutenant and my 2nd Squad peer both won the Iron Cross by leading charges, so what the hell." Sgt Aust promptly leads his squad into close combat against the enemy tank...
And is promptly gunned down by the tank's machine guns (snap fire, that's rolling a '6' on one D6)...
Then Sgt Pichler's armored car fires again on the tank, to no effect, and the tank returns fire, and Sgt Pichler's vehicle is destroyed!!!
The Polish CO and their last rifle squad charges across the ford (too far to get into close combat, but closing the distance). Sgt Gradl's squad snap fires, and misses (of course), while the Poles fire and get man down (again)...
The German CO, Major Schultz, decides to put it all on the line. He rallies Sgt Gradl's squad and leads them into close combat against the enemy rifle squad, supported by their commanding officer!
And WINS! All that remains of the Polish force is that damned tank. Major Schultz continues.
The Germans charge across the ford; the Polish tank fires its machine guns in snap fire, but misses, and the Germans close, climbing aboard the Polish tank to dismember the crew and destroy the tank.
But the Polish crew fights back ferociously, its commander brandishing a submachine gun, its driver and loader sprouting from their hatches with pistols, and they mow down the German squad and Commanding Officer.
However, the Polish tank commander has seen enough of battle for today, and leads his men from the field in their rickety steel beast...
Notes:
-Major Schultz (KG Executive Officer, Infantry Assault Badge, Wound Badge, Campaign), recommended for Iron Cross 2nd Class for leading close combat against enemy tank and destroyed rifle squad and enemy commander, F11.
-Sgt Gradl (3rd Squad, 1st Motorcycle Platoon, Infantry Assault Badge, Wound Badge, recommended for Iron Cross 2nd Class for leading close combat against enemy tank and destroyed rifle squad and enemy commander, F11.
-Sgt Pichler (V3, Armored Car Platoon), recommended for Iron Cross 2nd Class, for using his armored car to assault an enemy tank, driving it back and allowing other units of the kampgruppe to redeploy, before being destroyed, F11.
-Sgt Sachs (2nd Squad, 1st Motorcycle Platoon, Infantry Assault Badge, Wound Badge, Campaign, F11).
-Lost ~50 WIA/KIA, one Sdkfz 221 destroyed, and one Pz Mk IV destroyed.
-Caused ~60 WIA/KIA.
Holy monky@#$%, what a fight!!! That @#$% was bananas, that was the craziest fight I've ever had, and that includes the Medal of Honor fight Banaczak had in the "In Country" campaign. I was so close to having this sewn up rather bloodlessly, despite the poor activation rolls (repeated firefights), and then that damned Polish tank went ape@#$% on me. It's true that I was a bit... hasty. Okay, downright overanxious, overconfident, over whatever. But damn! What a fight, and I'm still right proud of Sgt, I mean, Major Schultz, and happy to bestow the Iron Cross on him. Once he recovers from his wounds...
V/R,
Jack


That was pretty brutal :-)
ReplyDeleteDidn't expect that last Polish tank to stick around but it did. I wonder if they'll make friends with the invincible machine gunners.
What a fight! I can see the screen play for the movie already. Lots of strange rolls going on...I think a few of those loaded dice must have slipped in to your regular stash. Random events are tied to the activation rolls? Haven't had time to read the rules yet but that was a good advertisement ...well did sound like you were getting pretty frustrated at times but I expect that just adds to the excitement
ReplyDeleteYou roll a separate die along with the activation die, for random events. It's a 1 in 6 chance.
DeleteIvan - I didn't think the machine gunners were invincible, they were just bullies, I couldn't even get a shot at them. The tank, it was pretty near invincible.
ReplyDeletePanda - Ivan handled the activation/random events rolls, and there was nothing strange. You'll note that I said this game was the first time I ever rolled a firefight when it was actually advantageous to me ;)
V/R,
Jack
I think the Poles should have won; The deserved it after the turnaround at the halfway mark :-) You should have thrown your dice away as you threatened and let the Poles have a decent chance.
ReplyDeleteGood grief Shaun, you can't run though here and make 100 comments at once!
ReplyDeleteI'm glad you like them buddy, looking forward to seeing yours as well.
And I did forget about getting back to Operation Jupiter, didn't I?
EDIT: Ah, ah, ah, just checked: "Stuff I want to get to/get back to/keep going (that I pretty much already have):" #11, Sir!
V/R,
Jack
You know, I checked twice and did not see it. I should go new school and use a search feature! I stand corrected. All the comments are at once as I had time this morning instead of vacuum cleaning the house. I got my priorities right, even if my wife may didn't on this instant :-)
DeleteVacuuming!!?? What's happened to you Aussie men???
ReplyDeleteV/R,
Jack
It is a new world out there Jack :-)
DeleteTurning into a bunch of Canadians!
ReplyDeleteNOTE: For all you Canadians, this is just a joke, I've got nothing against Canucks, I'm simply trying to denigrate War Panda (it's a long story) ;)
V/R,
Jack