All,
So lately I've also had a bit of paralysis by analysis, some frustration by the sheer size of the lead mountain, the veritable pile of projects started but in various stages of abandonment. This started me peering in and around the stack of unfinished business and giving serious consideration to selling off some stuff, both miniatures and rules. As I started building a pile of unused rulebooks, I came across my copy of Neil Thomas' One Hour Wargames (OHW). I threw it on the pile, took another look, then picked it back up and began thumbing through it.
After reading some reviews and then some battle reports online, I'd picked up OHW probably six months ago now. I was very interested in the concept of playing fast, ferocious battles on a small-ish table that was quick to set up and take down. If you're reading this you're probably aware I'm a big fan of campaigns; I can't even remember the last time I played a 'stand alone' game. The problem with campaigns is they're a lot of work administratively (I love filling out tables of organization with various characters and following their exploits, but it takes a lot of time to make and then keep up), and a campaign, by definition, has quite a few battles, which each take a long time to set up, play, take down, write up, post to the internet, and conduct the admin records. So I was very happy to have the rules and I very much looked forward to playing some games with OHW, fantasizing about Napoleonics, the American Revolution, and the American Civil War, in particular.
But I don't know what happened. The rule book got set aside and I kept chugging away with other games. But picking up the book from the 'rules to sell' pile, I gave it another look, then began pouring through various batreps on the internet, particularly Steven Whitesell's "Sound Officer's Call" blog, and this motivated me to give the rules another look and to actually get them on the table. Now, I'm a constant tinkerer, for better or worse never playing a set of rules as written. And these were no different: I like them, but I wanted a bit more randomization in the activation process, and I wanted a bit more period flavor for Napoleonics. So I sketched some changes out (the changes are at the bottom of this post), set out the forces and the table, grabbed the boy, and we got down to the business of liberating Europe from Bonaparte/fighting to keep the Revolution alive.
And so General Dadie and General Nickolls led their troops onto the field of battle. The setting is somewhere in Europe, with me commanding the French and the boy commanding the British-led Allies in a fictional campaign in maybe 1813 or so. I say 1813 or so because I want to be able to bring some Bavarians, Saxons, Italians, and Poles onto the field of battle, and he can bring some Dutch, Prussians, Austrians, and Russians, if we see fit. Our first game was purely French vs British; maybe it will stay that way, maybe not. That's the beauty of fictional campaigns ;)

The opposing forces, with Brits on bottom and French on top. The figures are 10mm plastic figures from the boardgame 'Risk,' some of which were painted up by me, but the vast majority came from 'Gunner' of Le Petite Armee. The command stands represent the Commanding General and his staff, while 'regular' stands represent brigades of infantry and cavalry, and artillery grand batteries. As usual, when you play at this level of abstraction it causes some... inconsistencies. But nothing the boy and I can't get past, and hopefully you can too. The OHW rules are abstract enough to not make a declaration of what each unit represents, I simply chose brigade-level stands as it made sense to me and fit what I wanted to do. But in the OHW rules there are units of skirmishers, for example, which would be equivalent to Rifles, Jaegers, Grenzers, Light Infantry, Legere, etc..., and it's kinda weird to have whole brigades of these running around the table as formed units. But we're doing it, and it works ;)
Also, I use some high profile units in the game, such as the French "Old Guard," but it's simply for fun and identification of the units, they have no special power in the rules, they are simply treated as any other infantry brigade.
In any case, the forces are as follows, from left to right, top to bottom:
French commander, General Dadie, the Old Guard (infantry), the 1st Ligne (infantry), the 2nd Ligne (infantry), the 1st Legere (skirmishers), the Young Guard (skirmishers), and a (grand) battery of Horse Artillery (again, forgive the abstraction, but I wanted to differentiate Foot and Horse artillery).
British commander, General Nickolls, the British Foot Guards (infantry), the 1st Brigade of Foot (infantry), the Highlander Brigade, the Rifle Brigade (95th and 60th brigaded together?) (skirmishers), the Union Brigade (Scots Greys and Blues) (cavalry), and a Dragoon Brigade (cavalry).
*Yes, I know I'm using regimental-style names for most of the brigades, but please cut me some slack, I don't feel like using names of commanders I haven't written up yet.
I put the type of unit in parentheses as OHW break down units into four distinct categories: infantry, skirmishers, artillery, and cavalry, and I wanted you to know how each unit was designated (i.e., my designating the Young Guard as skirmishers rather than infantry). Force composition is pretty cool and simple in OHW, you just consult a chart, roll a single D6, and it tells you how many of each unit type you get for the upcoming battle. Additionally, there is a battery of 30 different scenarios in the book, which you can also simply roll up with a D6 to decide which you're going to use. As this was our first go round we went with the very straight forward scenario one, which is a simple 'line up and go whack the other guy' type of fight.

And here we have the table set for battle (north is up, British in the east and French in the west), with French on the left and Brits on the right. Again, lately I've been trying to take more pride in, and put more work into making my tables look beautiful. But there is something refreshing about being able to set up the table in less than five minutes. Please note that the roads, stream, and crop fields have no effect on play in this scenario, I added them simply to make it look a little better.
Regarding plan of attack, I can't speak for the boy, but overall he's more aggressive in games, and when I added that to the fact he had two cavalry brigades to my one, and I had two relatively weak Light Brigades in my arsenal to his one, and I had an artillery unit in lieu of another infantry brigade, I figured I was better off going on the defensive. So I parked my Horse Arty on the hill (at far left), put the Old Guard next to them as a quasi-reserve, flanked it with my two brigades of Ligne infantry, then put the two Light Brigades on my flanks. The boy general just sort of clumped all his stuff together at top right; again, he's pretty aggressive, so I imagine it sort of like the start line of a race, where he just wants to sprint over and kick my ass ;)
Looking at General Nickolls' Corps, he's got (from left to right): the 1st Brigade of Foot, the Dragoons, the Highlanders, the Union Brigade, the Foot Guards, and the Rifles.
While I, General Dadie, have the 1st Legere, the Old Guard, the 2nd Ligne, the Horse Artillery, the 1st Ligne, and the Young Guard.
Let's get it on! We put the cards in the deck, shuffle, and pull the first, and with that the battle is joined!
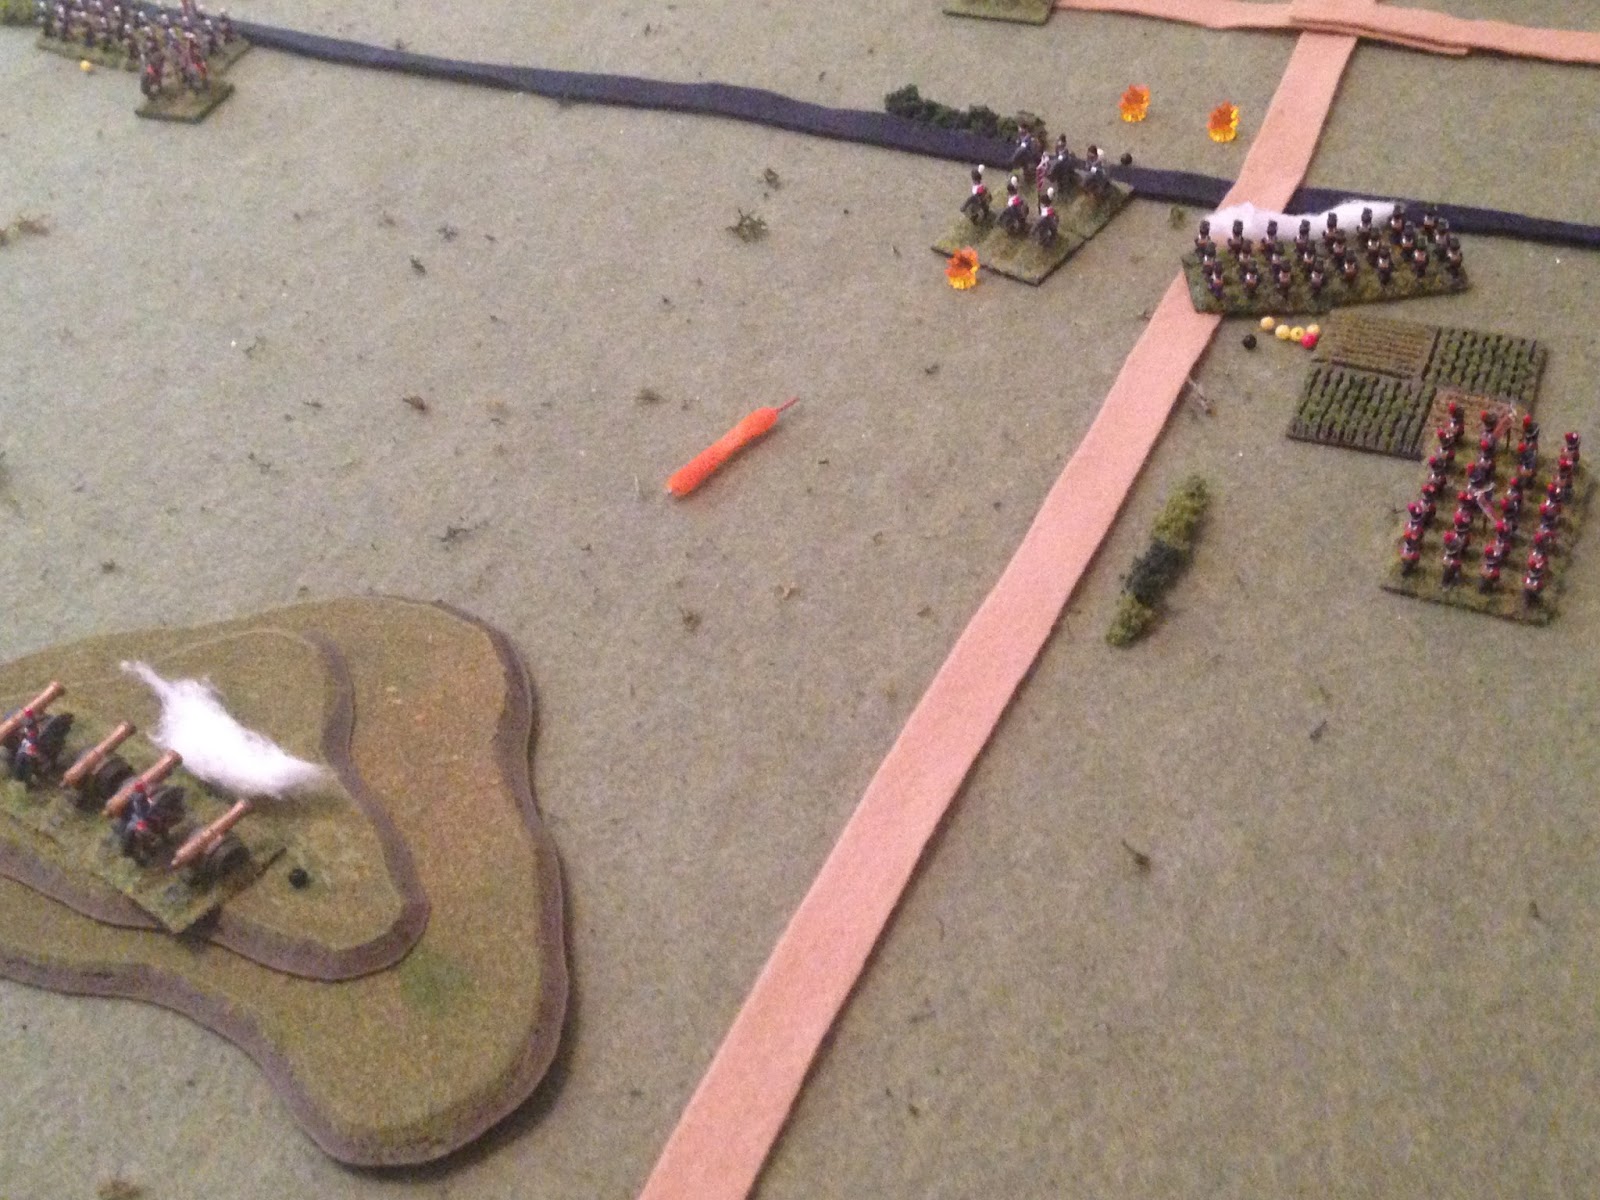
The battle officially begins with a cannonade from the French Grand Battery (atop hill at bottom left), but the cavalry of the Union Brigade (atop hill at top center, where explosion lies, which is simply to show which unit was targeted. The orange line also shows the direction of fire, while the white cotton puffs show the unit has just fired) are unfazed as the cannon balls sail over their heads.
Looking south to north, both sides commence a general advance, looking into musket range. The boy General wisely decides to screen his cavalry with infantry so as to avoid the French artillery.
This ends Turn 1.
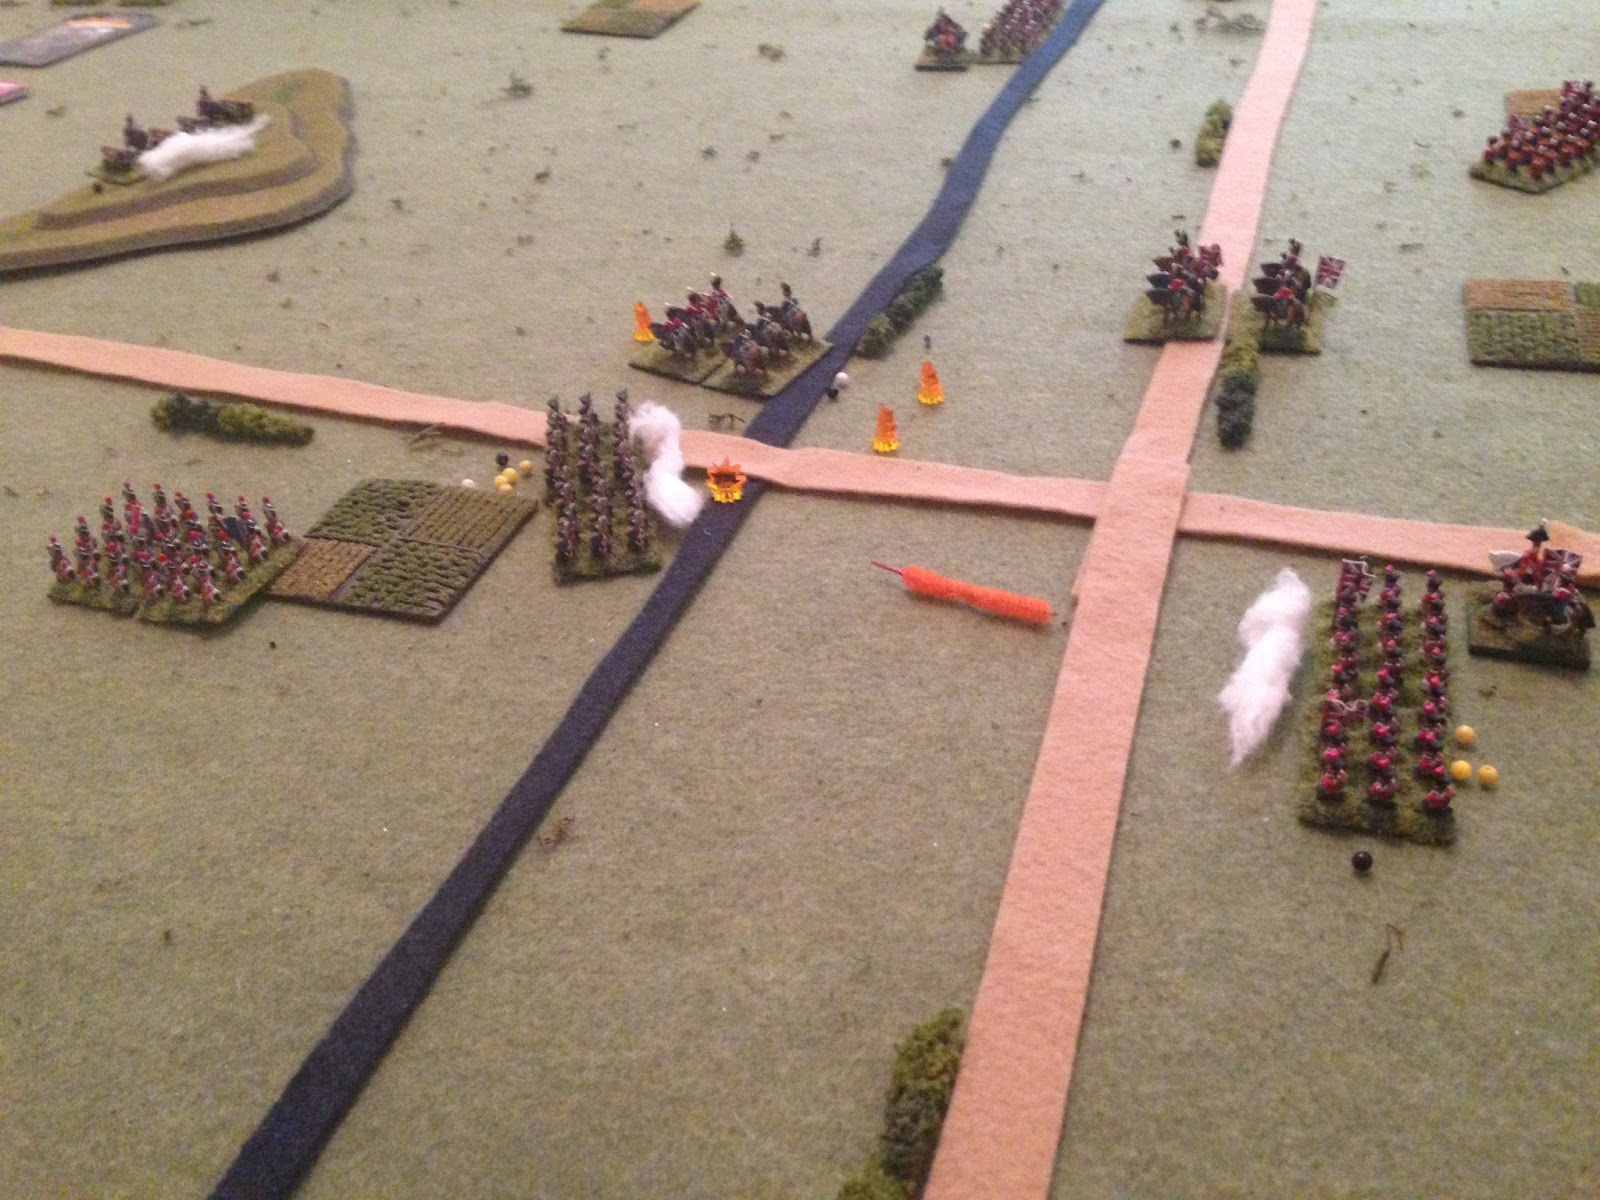
But action breaks out in the south, with the British Rifles (center right) firing at long range on the French Legere (bottom left), causing several casualties (3 hits), with the French 2nd Ligne (just above Legere) looking on.
The French 2nd Ligne (far left, with the three yellow beads at bottom left showing hits on the Legere) return the favor, firing on the British Rifles, also getting several hits. The British General moves to support the Rifles.
And then the Legere themselves cause several casualties among the British Rifles with their muskets.
The British Foot Guards (bottom center) then move to the left flank, careful to leave a gap for their supporting cavalry to move through, while the Highlanders (top center) move to the right of the Rifles
On the French left, the 1st Ligne (top center, with the Young Guard to their left, the artillery at bottom left, and the French General and 2nd Ligne at bottom center, and the Legere just visible at bottom right) move up to the stream, where the British Brigade of Foot looses a volley, again causing several casualties.
The British Dragoons (far right) move behind the Highlanders, while the French commander moves to his 1st Ligne (far left) to support them. The Young Guard (top left) pushes ahead.
The French artillery (bottom center) fires on the British Rifles, but casualties among the spread out troops are light (one hit).
The Union Brigade moves to shelter behind the British Foot Guards (far bottom right), with the Rifles just above them.
But then the French 2nd Ligne (bottom left) open a terrible fusillade on the British Rifles (top center, 6 hits!), and the Legere (bottom center) follow up with another, eliminating the British Rifles!
General Nickolls had previously attached himself to the British Rifles, in the hope of rallying them to help keep them in the fight (he never got to because French cards kept coming out); because he was with the Rifles when they were eliminated he was now in peril. The British troops looked on in great anticipation, but when the smoke cleared the great General Nickolls still stood atop his white horse (he passed his roll to see if the General would go down with the Rifles).
Nevertheless, score one for General Dadie ;)
Seeing opportunity on the far right, the French commander orders the Old Guard (bottom center) to move there (just below the Legere, with the 2nd Ligne to their left).
However, the French luck did not hold as the 1st Ligne (top center left) and the Young Guard (top left) both fired on the British Brigade of Foot (center right), causing negligible casualties (one hit). The Brigade of Foot and the Highlanders (bottom center, with Dragoons at bottom right) both returned fire on the 1st Ligne, causing several casualties (4 hits).
And then, back in the south, the British Foot Guards (center) opened a hellacious fire on the Legere (top center left), causing substantial casualties (6 hits).
But back in the north, the French General was able to rally the 1st Ligne back to full strength!
And with this, the boy General made his move: he moved his General to support the British Foot Guards (bottom center), keeping me from forming square, while he pushed both brigades of cavalry into the center (center right), threatening the 2nd Ligne (center top), the Legere (center left), and my grand battery atop the hill (top center), all at once. Furthermore, it made clear my mistake in moving my reserve (the Old Guard, far left) away from the hill to reinforce the right flank prematurely...
Unable to fire on the British cavalry due to their proximity to my own unit (the 2nd Ligne, at center), the French artillery (bottom left) fired on the British Foot Guards (center top right), causing several casualties.
The boy General made his play, sending the Dragoons into the French 2nd Ligne (far left), causing heavy casualties. Both they and the Legere (bottom center) are in dire straits regarding casualties, putting the right flank in jeopardy.
As they didn't eliminate the 2nd Ligne (far left), the British Dragoons were recalled (fell back 6 inches, center top, just above the Union Brigade cavalry). The French infantry countered, with both the 2nd Ligne and the Legere (center) firing on the Union Brigade in an attempt to stall their sure-to come charge, but they only caused light casualties. The Old Guard look on somewhat impotently (bottom left).
And it came: the Blues and Greys of the Union Brigade crash into the French 2nd Ligne Brigade, driving them from the field of battle (far left).
But with their compatriots having fled, the Grand Battery's (bottom left) line of fire is clear, and they pour canister into the Unfion Brigade, staggering them (8 hits!)
But the British Foot Guards counterpunch (far right), sending a volley into the French Legere (center) that leaves them teetering on the brink of extinction (one more hit and they will be eliminated). Old Guard is at far left, the Union Briagde just above the Legere.
The Old Guard (bottom left) then pivots and fires on the Union Brigade cavalry, but apparently they are overly concerned with hitting their brethren in the Legere (center), and so they manage only one hit...
Back in the north, the French 1st Ligne (far left) falls back towards the hill, but the British Foot (top right) and Highlanders (center right, with Dragoons at bottom center right) unleash volleys on the Young Guard (top center) which cause significant casualties. The French commander looks on in frustration (center top left) while, off camera to bottom center, the British General rallies all hits off the British Foot Guards.
At top center left, the Young Guard falls back near the French 1st Ligne. Crushed by indecision, the French commander ultimately decides to forgo supporting his left (northern) flank to head to the right (bottom center, where the Legere are in rough shape but the Old Guard are in good condition). However, because of the threat of the British cavalry in the center, the French commander cannot simply dash straight south to help the right flank, he has to go the long way round, ending the move atop the hill next to the Grand Battery (far left).
But this is followed up by the Union Brigade charging the already beat up Legere, eliminating them as the Old Guard (bottom left) looks on.
Then, with the Old Guard still looking on (far right), the French Grand Battery (bottom left) fired grapeshot into the hapless Union Brigade, eliminating them.
This was a hairy sequence as the turn ended with the French commander moving, and then each one of us wondering who would be able to activate first: if the French activated first their artillery was going to blast the Union Brigade to kingdom come, and if the British activated first the Union Brigade was going to charge the Legere and put them out of the fight. Fate favored the boy...
In the center, the French 1st Ligne (far left, with Young Guard just above them) volleyed on the British Dragoons (top center, with Highlanders to their left and British Foot Guards to their right), and then the Old Guard (bottom right) did as well, causing significant casualties (6 hits total).
The Brit Foot Guards (top right) then returned the favor on the Old Guard (bottom left), but rather ineffectually (1 hit), and then the Dragoons surged forward and crashed into the seasoned French troops. Caught out of square, the Dragoons caused tremendous casualties (9 hits, plus the 1 one from the Foot Guards, for a total of 10 on the Old Guard).
Looking from behind the British lines, with Foot Guards and General at bottom left: the Dragoons, unable to destroy the Old Guard (top left), were compelled to fall back (center left), where the Highlanders quickly moved up on their right. The British 1st Brigade of Foot (bottom right) also pushed forward.
The French General continues to move right (bottom left), but because he had to go around his guns (top left), he is unable to join the Old Guard (bottom right), where he is desperately needed to rally (remove some hits before they are eliminated).
Back on the French left (north), the Young Guard fires on the Brit Brigade of Foot, scoring a couple hits.
While on the right (south), the Old Guard (center) fires on the Dragoons, causing them so problems (the Dragoons now have 11 total hits. I really want to finish them off, but they are just out of canister range for my artillery, which is just off camera to left, and I'm not likely to finish them off with round shot).
But that point is moot as the boy General orders his beaten up, last remaining cavalry brigade to charge the Old Guard, and the elite French infantry are driven from the battlefield!!!
If you're not keeping track, things are not looking good for the French... The right flank is completely gone, with the Old Guard, 1st Legere, and 2nd Ligne all eliminated. While I stand a good chance of eliminating the Dragoons with my artillery (now that they are in canister range), it is still doubtful I can hold the hill with only the arty, Young Guard (skirmishers) and 1st Ligne, against hits three infantry units (Brigade of Foot, Highlanders, and Foot Guards).
As expected, the French Grand Battery (bottom left) mows down the British Dragoons (center right) with canister, making them combat ineffective, but the British Foot Guards (just above the Dragoons) push towards the hill.
A flurry of action: the Highlanders (top center right, with The Brigade of Foot above them and the Foot Guards below) fire on the French 1st Ligne (center left, with Legere above them), scoring a couple hits. The 1st Ligne and the Young Guard both return fire, scoring 4 hits on the Highlanders, so the British General moves to support them (he'd already cleared all hits off the Foot Guards). The Brit Brigade of Foot then fired on the Young Guard, obtaining a couple hits. Lastly, the French General, with his right flank totally gone, moved back to the hill (bottom left).
A quick game note: the boy understands full well that infantry are more important than skirmishers, so he decides to focus all fire on the French 1st Ligne (far left), ignoring the Young Guard just above them. I tell him that if he eliminates my line infantry the game is over, as all I'll have left is my commander, the artillery, and the Young Guard.
So both the Highlanders (bottom right) and Brigade of Foot concentrate their fire on the 1st Ligne, and the volleys rip huge holes in the French line (pushing them to 12 hits total, right on the edge).
General Dadie spurs his horse to great speed, arriving at the French 1st Ligne (center left), while they and the Grand Battery (bottom left) fire on the British Foot Guards (far right), causing a respectable amount of casualties (7 hits).
The Young Guard (top left) fires on the British Foot Guards (bottom right), scoring no hits, and the Brits return fire on the French 1st Ligne (far left), but they score only 1 hit!
I'm still in it; if I can just get my General to rally off a bunch of hits I'm good. The British General rallies 4 hits off the Highlanders (center right) as the turn ends. Come on French activation...
Negative. The Brits activate, and General Nickolls stands beside his beloved Highlanders (foreground) as they loose the volley that eliminates the French 1st Ligne and ends the French' hopes of victory on this day. General Dadie emerges from the smoke, hat gone, looking rather haggard as he orders the retreat. He and the Young Guard cover the retreat of the Grand Battery, then fall back to join them.
Wow, what a @#$% fight!!! Yes, the rules are simple, but they were quick (that was our very first game and took about an hour and a half, with me having to looks stuff up and explain it to a six year-old) and super tense. We really had a great time and look forward to playing it again; as a matter of fact, the table is set, ready to go, and we'll look to head upstairs either today or tomorrow to have another go.
As promised, here is what I did to change the rules:
-OHW is an "IGO-UGO, move-shoot-melee' game. I changed this: for activation, using a deck of playing cards, red for Brits and blue for French. Each player gets one card per unit (including General), seven per side in this case. At the start of each turn put the cards together and shuffle them; pull a card and that player gets to choose one unit to act, with each unit acting once per turn. Units may move, shoot, or charge (mostly), with Generals being able to attach (can move and attach) or rally (a separate action, so the General has to move and attach in one turn, then he can rally the next turn.
-If you can't tell, I added Generals. Generals can move 12", and they can attach (base contact) to infantry units only, and by doing this they can rally off hits (we used D6 in this game, but I think that's too much, we're probably going to bo with D3 in the future) and add +2 in close combat. If they are attached to a unit that is eliminated they roll a D6 and are eliminated on a 1 or 2. If they survive they can make a free 12" move to try to get to the cover of other friendly troops.
-Line infantry can charge, and when they make contact the two units are locked in combat until one is destroyed. Line units get D6 x2 casualties in melee, but they can't charge cavalry. Skirmishers still can't charge, but they do get to fight back in their turn at D6 -2.
-I split arty into Foot and Horse, with Horse being able to move and fire in a turn (the only unit that can). For force composition, when you get arty, roll a D6: 1-4 is Foot, 5-6 is Horse. I also added canister at short range, which is 12" and gets D6 x2 casualties.
-I split cavalry into Light and Heavy, with Light being D6 +2 against infantry and Heavy D6 +4. Vs cavalry is -2 and no change, respectively. For force composition, I actually have Lt Cav, Dragoons, and Hvy Cav, with Dragoons being treated as Hvy Cav. So for force composition I rolled a D6 with 1-2 being Light, 3-4 being Dragoons, and 5-6 being Heavy.
-We used the optional 'form square' rule, though I didn't actually exercise it as he'd gotten his infantry close enough to charge me if I did. Good 'combined arms tactics' by the boy...
-We also used two stands for each unit (but the commander), using column to show they moved and line for firing/charging. It has no impact on the game, purely aesthetic.
I hope you guys like this batrep as much as we enjoyed playing it.
V/R,
Jack


Nice report, interesting comments, thanks for posting.
ReplyDeleteThank you, it's my pleasure, welcome to the blog.
DeleteV/R,
Jack
Thanks for sharing :)
ReplyDeleteYour comment on brigades of skirmishers kinda keys in on a core aspect of the system: Sure, taken in isolation thats silly but in aggregate, the end result works and "feels" like it fits. Can't ask for more than that :)
Yeah man. I'm sure it's not for everyone, but the concept works, particularly if you're willing to put in another ten minutes to add a few things to make it more suitable to your own taste.
DeleteYou know, you play games, AND you have a blog. So you could actually be posting batreps, too. Unlike those barbarians, Blue-John and Rod ;)
V/R,
Jack
Wow - Napoleonics. Even if it not with the figures you wanted to use, you have managed to get a game (and I see in another post you have got another game in!) after all these years. I have no idea how Napoleonics plays out but will need to give it a go one day as I won some figure last year.
ReplyDeleteI have only played OHW with my daughter about 18 months ago (ancients). She and I had loads of fun, particularly her as she won and then proceeded to gloat! We keep meaning to play again but never seem to quite get there.
The game was a blast and we've played a couple more now, really enjoying these rules for Napoleonics and looking at them for other periods.
DeleteI'd love to see the Ancients batreps with your daughter, particularly given she treated you bad! ;)
V/R,
Jack
Here is the blog post of Dad Vs daughter from late 2014:
ReplyDeletehttp://shaun-wargaming-minis.blogspot.com.au/2014/11/ancient-game-with-8-yo-daughter-and-one.html
Dang it, I'd actually seen that one! I guess I just wasn't paying attention to the fact it was One Hour Wargames, despite the fact you put the book cover as the first picture ;)
DeleteI just finished the write-up for our second Napoleonic game, should be able to post it tomorrow evening.
V/R,
Jack
Nice batrep - would've made it easier to understand if the modifications were at the beginning, somehow I missed that.
ReplyDeleteI see that Line Infantry get D6 x2 casualties in melee - that "seems" very high for this game's mechanics, and all the melee factors are +2 or -2, so is that a typo?
I like the card sequence you use, and have used it myself. The only thing I don't like about it is that it doesn't allow a series of units to be planned and moved together - altho these plans didn't always succeed, they did sometimes, so I like having the option for that. I've been using a dice-off sequence, with the winner being permitted to act with one unit per each dice spot he wins by, so 6-3 allows the winner to act with 3 units.
My main problem with using the units as "brigades" is that the infantry range of 12" means that the infantry stand is not even a regiment, it is more like a few companies. To get the proper scaling, a brigade unit would have a range of just a few inches. Since it bugged me, I worked along those lines for my ACW corps level rules.
I did a summary of missing rules that are essential to smooth play. It helps adapt the rules for each period, for me, if the rules use consistent mechanics for these:
http://ecw40mmproject.blogspot.com/2017/05/whats-missing-in-one-hour-wargames-rules.html
This was my take on them, with some essential and optional rules added:
http://ecw40mmproject.blogspot.com/2016/04/neil-thomas-one-hour-wargames-horse.html
I'll be interested to reading the next accounts!