All,
It's 14 August 1993, and the Legion is in action in defense of Estonia's fledgling democracy once again. Major Louis-Louis was intent on having his battalion press home its efforts to find, fix, and destroy Colonel Sirel's headquarters, when those plans were scrubbed due to reports representing an imminent threat: sources loyal to the liberal government reported the Sirellists had established a Surface to Air Missile (SAM) north of the capital, with 2km of the International Airport. It would be a tragedy should this SAM bring down an airliner, and a disaster if it were to destroy one of the French C-130s bringing in men and supplies. Currently public opinion was rather disinterested in the French intervention in Estonia, but Ffom Louis-Louis' standpoint, an incident such as this would be comparable to the Beirut Barracks bombing. "Orderly! Send Captain LaPieux's Sous-Groupement a Warning Order, standby to move in 1 hour. And send for the Captain please, I wish to brief him personally."

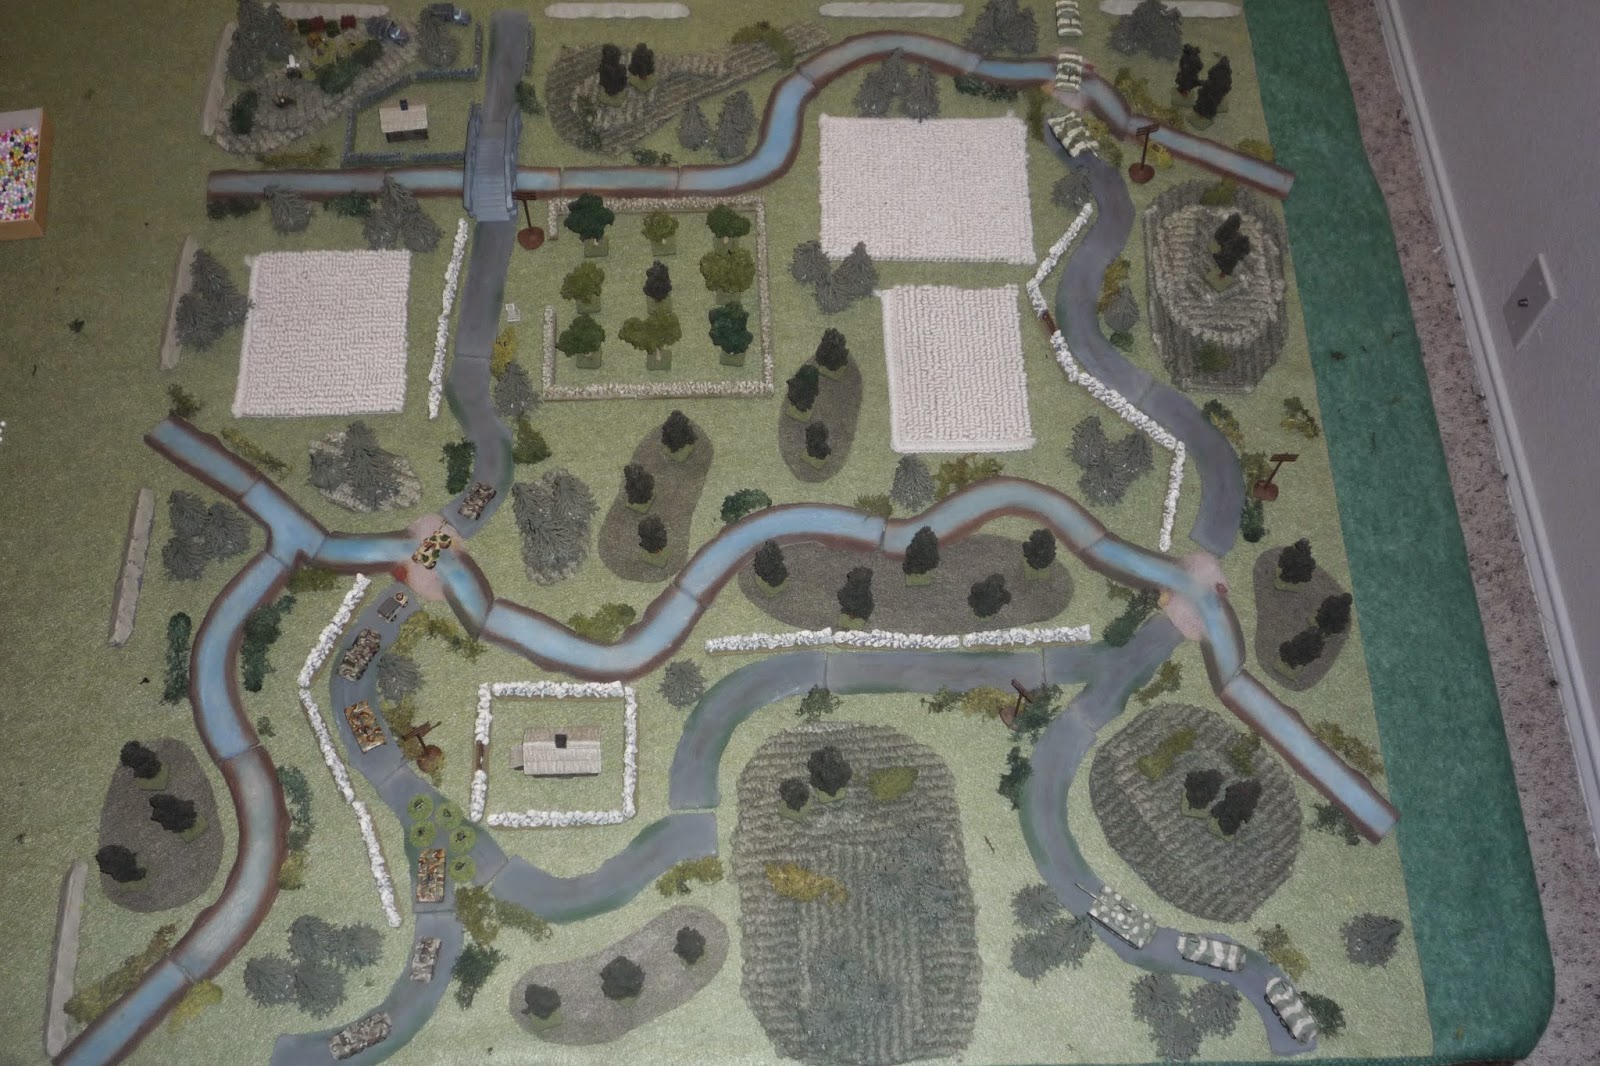
North of Talinn, the table is 3' x 3', with North being up. Another VERY busy table, but I rolled for terrain, and the literal name of what I rolled up is "rough." So, here is my interpretation of 'rough.' Lots of trees, a few knolls, a few crop fields, a couple streams (can be forded by infantry, but not vehicles), and orchard at top center.
The French battlegroup: The CO and his group in a Land Rover driven by Cpl Methot. Two HMMWVs, one with .50 cal (Cpl Navarre) and one with Mk19 (Cpl Desjardin). two "AMX-25s" (AKA, LAVs in French service, wink, wink), crewed by Lt Marcoud and Sgt Petit, respectively, and two AMX-10s, crewed by Lt Davault and Sgt Bernier. Four squads of infantry: Lt Bisson, Lt Harpin, Sgt Oran, and Sgt Cheauvront. There is also one Panhard available, crewed by Lt Patrie.
This is somewhat of an ad-hoc grouping as Capt LaPieux's Sous-Groupement suffered heavy casualties only a few days ago, and many of the Group's vehicles are still being repaired. As it is, the Panhard and two AMX-10s in action were only just finished being repaired.
The Sirellist force, AKA the "Bad Guys." The rebels have a squad of paramilitaries manning the SAM site, and throw together a mobile reaction force to challenge the French, in two platoons. The first has a T-55, two BTR-70s, and two infantry squads, while the second platoon has a T-72, 2 BMP-2s, and two infantry squads. All 'regular' infantry squads have RPGs.
Starting positions: the SAM site, with paramilitary squad, at top left (NW), the Sirellist 2nd Plt (T-72/BMPs) at top right (NE), and the 1st Plt (T-55/BTRs) at bottom right (SE). The French start in the bottom left corner (SW). The objective is to destroy the rebel SAM site, and the plan is simple: the force will be drawn into two forces, one (the Strike Force, with the CO leading) will charge up the road and over the bridge to destroy the SAM site, while the other (the Covering Force) will be left back to 'hold the door open,' which the entire Group will use to ex-filtrate the area, back through its portal in the Southwest.
The SAM site, with a launcher, radar, supplies/munitions, two trucks, and a paramilitary squad.
The enemy 2nd Platoon, in the Northeast.
The enemy 1st Platoon, in the Southeast.
The French column on the march: the Strike Force, led by Cpl Navarre's .50 cal HMMWV, Lt Patrie's Panhard, the CO's Land Rover (driven by Cpl Methot), Lt Marcoud's AMX-25 (hereafter referred to as 'LAV,' for simplicity's sake), and Lt Davault's AMX-10. The Covering Force, with Sgt Oran's team on foot, Sgt Bernier's AMX-10, Cpl Desjardin's Mk19 HMMWV, and Sgt Petit's LAV.
Let's get ready to rumble!!!
The game starts with Sgt Oran leading his squad into solid blocking positions, and Sgt Bernier's AMX-10 took up position to their right (off camera to bottom).
In the top right (NE), the whole enemy 1st Platoon moves up, both BMPs disgorging their infantry.
Because of the extremely closed terrain (which negates the usefulness of much of the armor), the 1st Plt basically had two choices: 1) rush south down the road, team up with 2nd Plt, then move west to force the French blocking position and cut off the Striking Force. Generally speaking, concentration of force/effort is a good thing, but the fact is that, in such closed terrain, it's often just not possible. In my estimation, it didn't matter if the bad guys had 100 tanks, there simply wasn't room for them to operate, and even if the bad guys combined their platoons in the southeast, they'd still have to move west up the only road available, straight into the teeth of the French Covering Force.
So that left option 2: 1st Plt (in the SE) tries to force the blocking position, whilst the 1st Plt stays in the north, which led to another decision. Should 1st Plt move quickly to meet the French Strike Force, or should the 1st Plt lay back, allow the French Strike Force to reach its objective, then strike, attempting to isolate and eliminate them, knowing that in either case the T-72 and BMPs were not destined to be of much use. I figured the bad guys weren't all that hip to allowing the French to destroy their SAM site, i.e., the SAM site wasn't some sort of bait to lure the French into a trap, that the narrative made more sense that the bad guys had dispatched their regulars (with armor) into a less than favorable situation as they were desperate to keep the French off their SAM site, the existence of which they thought was unknown to the French.

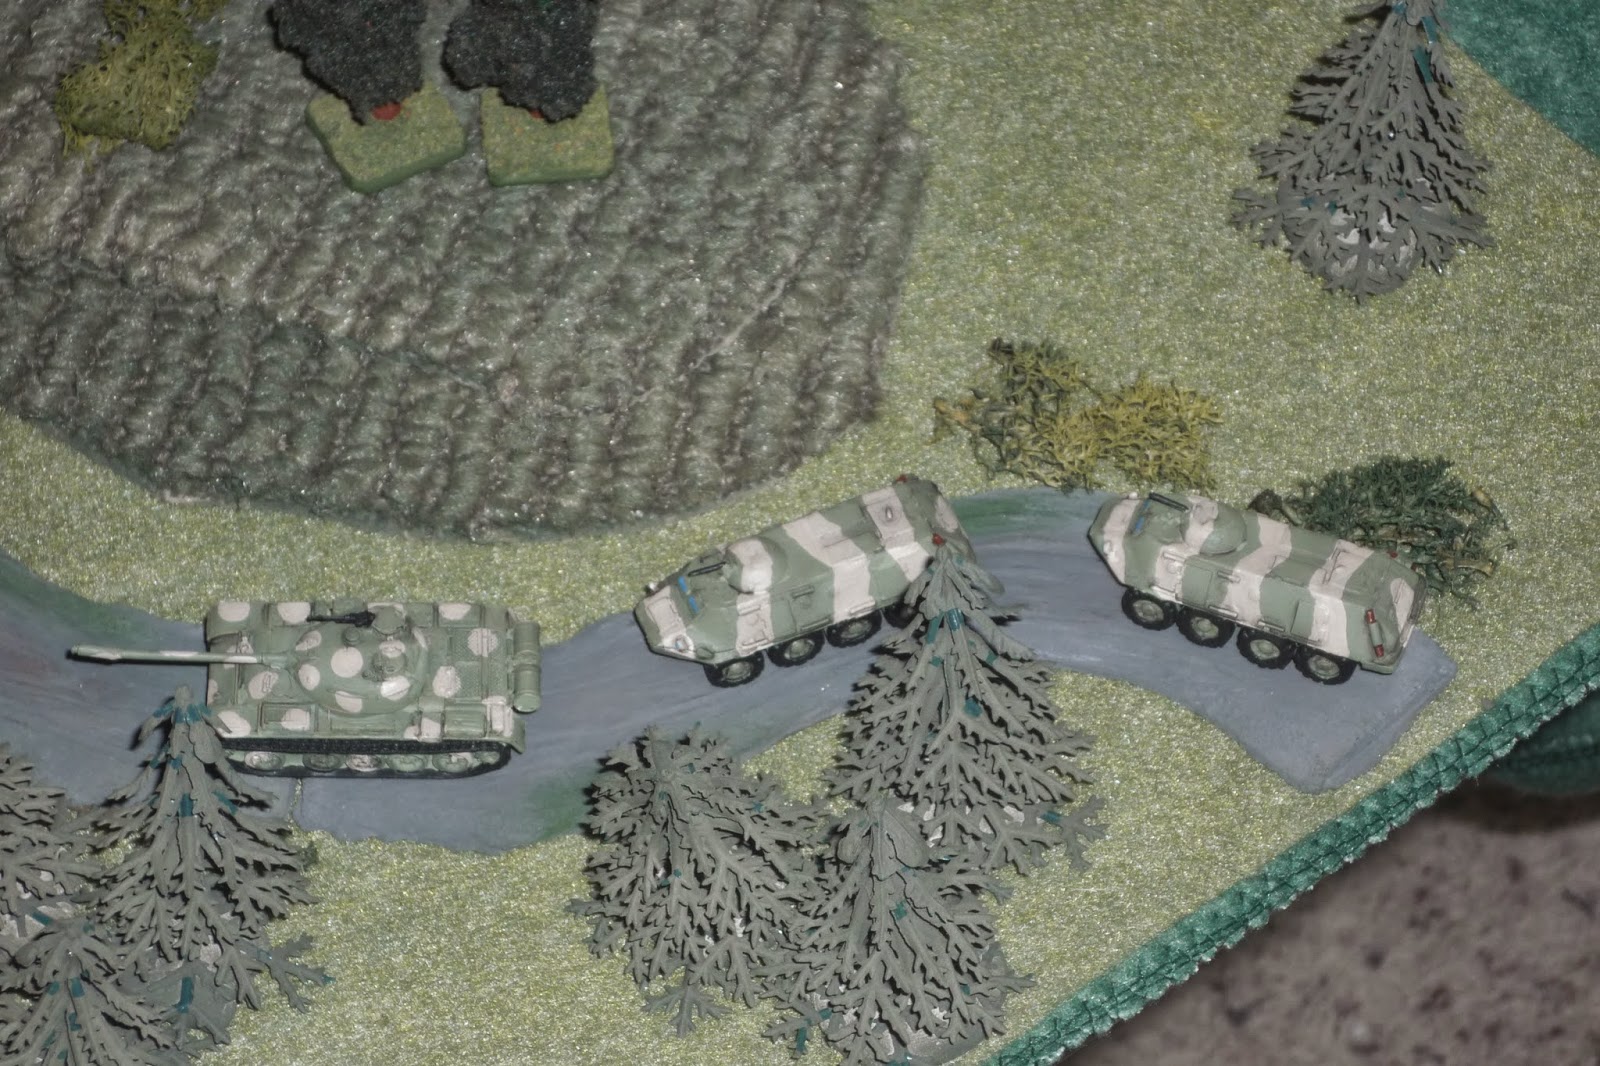
In the SE, the Sirellists were unaware of the exact positions of the French, and in their haste to save the SAM site, the T-55 of 2nd Plt (top center) rushed north then turned west, looking to catch the French unawares. The tank commander only had a second to scream "off the road" when he spied the flash of the launch from Sgt Oran's Eryx ATGM (bottom center), but it was too late, and the T-55 erupted in flame and secondary explosions. Cpl Desjardin moved his HMMWV left (off camera at bottom left).
Back with 1st Bad Guy Plt in the northeast (bottom left), the plan was for the Sirellist tank and APCs to take up positions to overwatch the bridge, while their infantry moved up to block the French advance on the SAM site (just off camera at top right). One infantry squad moved all the way to the road in the walled orchard (top left), while the other infantry squad headed for the walled farm at top right, but didn't make it as far (far right).
Sgt Petit, commanding the LAV in the Covering Force in the southwest, kicked out Lt Harpin's squad, the positioned his vehicle at the walled farm (center left). Then Lt Harpin moved his men forward into the treeline (bottom right, with Sgt Bernier's AMX at bottom left, and Sgt Oran's team in the walled farm at center).
Cpl Navarre shot his HMMWV straight north, up the road (top), spotting the enemy infantry in the walled orchard (center right). Lt Patrie then charged his Panhard up to the orchard, practically sticking the muzzle of his 90mm gun straight into the enemy's position. Patrie fired, not causing any casualties, but suppressing them (red bead). Lt Marcoud brought his LAV up (far left), dropping off Lt Bisson's squad off, while Lt Davault brought his AMX up (bottom).
Lt Davault fired his 25mm chain gun at the enemy troops in the orchard. Again, no casualties, but they were already suppressed, and this burst of rounds caused them to fall back (top right). Sgt Cheauvront's team then exited the AMX (bottom center).
Far left is the SAM site, with Cpl Navarre's HMMWV at far right. The enemy infantry, starting at top right, sprinted across the road into the walled farm at center, next to bridge. Meanwhile, the paramilitaries at the SAM site fired on Cpl Navarre's vehicle, and actually disabled the .50 cal.
Lt Marcoud then charged his LAV all the way up to the river, and pumped 25mm rounds into the infantry in the walled farm, pinning them, while Lt Bisson double-timed his men through the field and up to the river (bottom center), firing at the paramilitaries, who were suppressed and had to fall back (top left, with red bead).
The Sirellists feel things starting to slip away, and so decide it's time to force the issue in the southeast. It starts with both BTRs moving up and debussing their infantry squads (walled farm holding Sgt Oran's team at top left, Lt Harpin's squad at far left).
But real quick back to the northwest at the SAM site, where Captain LaPieux ordered Cpl Methot to advance the Land Rover to the river. Lt Bisson rushes his squad across the river, flanking the pinned rebel infantry.
And the Captain and his entourage debuss and splash into the river.
Back to the southeast, where the bad guys are getting pretty froggy... Both infantry squads move up the hill, and one is able to pour very effective fire down on Lt Harpin's squad, causing two casualties and suppressing them.
Another red card comes out, and this is where I seriously considered cheating. I mean, it would have made sense for the bad guys to move up one of their BTRs, right? But I didn't, I stuck with the bad guy infantry. Okay, I cheated a little bit, but it didn't work: the bad guys rolled up two activations. I decided to use the first one to have the bad guys fire on Lt Harpin's squad again, knowing it may cause casualties, but hoping it would force Harpin's squad to fall back. But, as my luck always goes, the bad guys' fire was ineffective, so they did what I always like to do: they charged down the hill into close combat with Lt Harpin's stricken squad...
Lt Harpin's squad was eliminated, the bad guys suppressed...
And then, the other bad guy squad came sprinting down the hill, screaming like banshees! They reached the woods next to their suppressed comrades in the treeline. At that point I was able to activate Sgt Bernier's AMX, but I only got one action point: okay, fight or flight? I suppose I should have used the action to have the AMX flee to a safer position, but I didn't. Berthier opened up on the enemy, getting an amazing three casualties! But the bad guys were able to rally...
And the two survivors mounted Sgt Berthier's vehicle, prying open the hatches and dropping grenades inside, destroying the vehicle and eliminating the crew. I shudder to think what would have happened if another red card or two came out, and the rebels were able to bring up their BTRs...
But I was lucky, and a black card came out. Enraged, Sgt Petit (LAV at far left) slewed his turret right and poured 25mm rounds into Sgt Berthier's AMX (bottom left), killing one enemy and suppressing the other (red bead). He then slewed the turret back to the left and engaged the other rebel squad in the treeline (the ones that overran Lt Harpin's squad, center), killing one and causing them to run for their lives (bottom right).
Back in the northwest, near the SAM site, Captain LaPieux gets the HQ section, then orders them (far left) and Lt Bisson's squad (top) to close assault the pinned rebel squad.
The bad guy squad was eliminated (bottom right), though the HQ section and Lt Bisson's squad both suffered a casualty. I want to quickly close with the suppressed paramilitaries at top, before they have a chance to rally, but both Lt Bisson's squad and the HQ element exhaust themselves...
Again, I want to force the issue, so I get a bit hasty, and try rushing Cpl Navarre's HMMWV up the road (north is to bottom right corner, with Lt Bisson's squad, HQ element, and SAM site just off camera to right) across the bridge. But the enemy 1st Platoon's armor is finally able to make itself useful: the T-72 opens up and blasts Cpl Navarre's HMMWV to hell.
So Sgt Cheauvront moves his team into the orchard (bottom left), intent on getting to grips with the suppressed enemy squad (top center), then get his ATGM into action against the enemy armor that just destroyed Cpl Navarre's HMMWV (top right).
And Sgt Cheauvront is able to charge his men into close combat, in which I fight two rounds with some of the worst dice-rolling you've ever seen. My incompetence with the dice-rolling costs me dearly: Cheuvront's squad wins, but loses two men and is pinned, while the enemy loses three men and the two survivors surrender. This may not sound all that bad, but charging into close combat with a full-strength squad in good order, against an understrength squad that was suppressed, really should have been a walk over. I expected to come out of it with no casualties, maybe a pin... Sgt Cheauvront's squad is exhausted...
Lt Davault, in his AMX, leads Cpl Methot's Land Rover up the road towards the bridge, though they don't dare move up there as the enemy armor is still in overwatch of the bridge (Sgt Cheauvront's men are at top right, with Cpl Navarre's burning HMMWV on the bridge).
Sgt Oran's squad exhausted itself, while Sgt Petit (center) dismounted his LAV and moved to Sgt Bernier's burning AMX, capturing the cowering rebel rifleman. Cpl Desjardin maneuvered his HMMWV onto the road, across the ford, up north next to Lt Patrie's Panhard near the walled orchard.
And that was the end of Turn 1. The Covering Force (bottom left) has lost an AMX and an infantry squad, but they've destroyed a tank and eliminated an infantry squad, and the two BTRs opposite them are unwilling to move on the Covering Force without infantry support, and the only squad left is suppressed. Once that squad is able to get itself back into fighting shape, expect the bad guys to put some (more) pressure on the Covering Force.
In the north, the Strike Force has taken a few casualties and lost a HMMWV, but otherwise is progressing well towards the objective, having mostly eliminated all enemy infantry in vicinity of the SAM site. Captain LaPieux would really like to get something done about the enemy armor to the east, but overall they are not in a position to influence the fight, so long as the French stay off the bridge. Capt LaPieux does intend on trying to neutralize the armor; he doesn't need the bridge to accomplish his mission, but it would make life much easier (and quicker).

And with that, Sgt Cheauvront acknowledges and follows his Captain's orders. He rallies the remains of his squad in the walled orchard, moves up to the wall, and promptly fires the Eryx ATGM at the enemy T-72, BAM! Scratch one T-72. Before the enemy could react, Cheauvront's team fired again, damaging one of the BMPs, whose crew decided discretion was the better part of valor. The remaining BMP (top right) returns fire with its 30mm gun, to no effect, and so Cheauvront's men fire a third time, slightly damaging the BMP.
On the other side of the road (at the SAM site), Lt Bisson's men hop the wall and move on the cowering paramilitaries, who are only too happy to hand over their weapons and be taken into custody.
Then Bisson's squad moves west and begins rigging the whole affair with demolitions. Not pictured, the remaining BMP activates again and pins Sgt Cheauvront's men in the walled orchard.
With 2/3 of the enemy's northern armor taken care of, Lt Dassault drives his vehicle onto the bridge and pushed Cpl Navarre's burning HMMWV clear. Cpl Methot's Land Rover follows Dassault, and Doc begins loading the HQ and Lt Bisson's casualties.
Not pictured, but in other notable news, the bad guy infantry in the south try to rally themselves but fail, and are exhausted, which means the two BTRs there will sit tight, not wishing to confront the French Covering Force without infantry support.
Lt Patrie is perplexed in his Panhard (yuk, yuk); he wants to eliminate the remaining BMP, but the only way to get at a clear line of fire is from the bridge. "I know what I must do; Driver, forward, and halt on the bridge. Gunner, load armor-piercing, prepare to engage enemy armor, 3 o'clock, center vehicle, range 100 meters!" The bang of the 90mm gun was immediately followed by the crash of the shell into the BMP. Not a kill shot, simply caused some engine damage, but after witnessing their compatriots die or run off, the BMP's crew was not going to hang around to eat another 90mm round.
Meanwhile in the south, Cpl Desjardin reversed course and headed south down the road, and joined Sgt Petit's LAV. They both moved up to Lt Harpin's squad, dismounted, and began treating and loading the wounded and dead. Sgt Oran's team (off camera to right in the walled farm) stood watch.
Lt Patrie's Panhard (bottom center), having silenced the last of the enemy's armor in north, reversed off the bridge (top left) and took up station at the southern end of the walled orchard, while the HQ element loaded into the Land Rover and headed south (right behind Panhard). Lt Marcoud moved his LAV into the orchard and began loading up Sgt Cheauvront's casualties.
Cpl Desjardin remounted his HMMWV and moved back, taking up watch on the west side of the walled farm (holding Sgt Oran's troops), while Sgt Petit remained on foot, guiding his LAV into position to begin rigging Sgt Bernier's AMX for tow.
Lt Patrie's Panhard, and the HQ Land Rover continued south, now at the walled farm.
While Lt Davault dismounted, removed the casualties from Cpl Navarre's burning HMMWV, and dropped two thermite grenades into the HMMWV, destroying its weapons and comm gear.
That's the end of Turn 2, and Turn 3 started with the bad guy infantry in the south managing to rally, so stand by for some excitement with them and the two BTRs. If the rally had not been successful, this would have been a simple walk-off...
So, with explosives set at the SAM site, Lt Bisson's men rush to Lt Davault's AMX and load up.
Davault's AMX crosses the bridge (off camera t left) and hauls butt all the way to the southern ford, while Sgt Cheauvront's men (in the orchard at left) fall back to Lt Marcoud's LAV and load up.
Now, on to our final act! It starts with the bad guy infantry charging up and over the hill (at top right), ending up in the woodline (center right) where Lt Harpin's squad had been wiped out by these same guys. Then the first BTR pops up on the lower part of the hill (top center, vehicle on right), and Sgt Oran's squad (center, in walled farm) quickly pops a rocket into it, killing all aboard. The other BTR activates and pulls alongside its burning partner, firing at Sgt Oran's men, dropping one and pinning the squad.
Cpl Desjardin (HMMWV at bottom center) swings his Mk19 right and pumps a string of 40mm grenades into the treeline, causing two casualties and suppressing the enemy squad (red bead). Then the enemy BTR activates again, and again uses its 14.5mm HMG on Sgt Oran's troops, but they're already using their shirt buttons to dig deeper into the earth's surface, and they experience no further ill effect.
Then the BTR acts again, and this time his aim is true, causing two more casualties amongst Sgt Oran's squad, and causing the survivors to fall back (survivors at left, behind wall with red bead, the three casualty figures at right show their previous position).
Cpl Desjardin (HMMWV at center) reloads, and fires another burst of grenades into the enemy infantry (bottom right), eliminating them. Then Lt Patrie's Panhard (center right) moves up and fires a 90mm round into the last BTR, blowing it up. Capt LaPieux (center left, at Land Rover), dismounts with his HQ element and begins helping Sgt Oran police up their casualties in the walled farm, while Lt Davault's AMX continues south (bottom left center), and Lt Marcoud's LAV (top left) catches up to the column.
The remaining men on foot mount up, and with all men and vehicles accounted for, the French column sets off to return to base.

And the explosives set at the SAM site do their job. Mission accomplished once again, but once again at a price. The Legionaires once again gave good account of themselves, and Capt LaPieux reflected this in his debrief with Maj Louis-Louis. "Very good, nice work Captain. Is that all?" "Well, yes, Sir, I believe so." "You believe so? Come now, what is it, Pepe?" "I'm concerned, Sir. While not as well armed, led, or organized as we, these Sirellists are proving quite tenacious. For example, that charge by their light armor this afternoon; they had no chance of preventing us returning home, much less accomplishing our mission, yet at us they came, guns blazing. And I'm concerned at their level of popular support." "Is that so? The President's cousin (the French President's cousin is the President of Estonia) assures us the Sirellists are but a small minority of the former Soviet military, and their supporters amongst the local populace are an even smaller percentage." "Yes, Major, of course. But in our past two engagements, the enemy was not initially there, but then they were. I mentioned they were not properly organized, but that's because, in both cases, they were hastily thrown together as a reaction to our thrusts." "Your point, Captain?" "Well, my point would be that someone is providing them information regarding our movements. Our operational security remains top notch, and so it would seem someone with insider access must be communicating with our foes." "Indeed. We must be on our guard for treachery."
Losses:
Sirellists: 27 casualties, 8 captured, two tanks, and two BTRs (the two BMPs were damaged, but, as the rebels own the field, they should be able to recover and repair them).
French: Lt Harpin's squad was eliminated, Lt Bisson lost 1, Sgt Oran lost 3, Sgt Cheauvront lost 2, Sgt Bernier's AMX-10P crew was lost, as was Cpl Navarre's HMMWV crew, for a total of 14 casualties. One HMMWV was destroyed beyond repair (indeed, it was blown in place), though Sgt Bernier's AMX-10P was towed back to base for repair.
I need to go and update the campaign roster (which will have been done prior to you reading this), as we've lost a few leaders, and I need to account for the decorations for valor. Speaking of that, while the Legionaires accounted themselves well, sometimes in some desperate fighting, and they performed heroically, none accounted themselves above and beyond to the point of individual recognition. Lt Patrie's Panhard seemed to me to come the closest, certainly distinguishing itself by continuously placing the vehicle and crew in danger to good result (the bad guy infantry in the walled orchard, moving into the exposed position on the bridge to destroy the BMP, and moving into the exposed position in the road to destroy the last BTR).
Another fun fight, a little on the long side (Fight 2 as 4 hours, and this one was 3 hours!). Additionally, I made two mistakes in the creation of my scenario:
1) I had too many vehicles and not enough infantry on both sides, particularly given the close terrain. In my head I actually pictured a lot of close-in fighting, cat-and-mouse escapades in the many treelines, fields, knolls, and walls. But I screwed up the force composition, which meant the fights would necessarily be restricted to the roads. Which is not at all unrealistic in modern fighting, just not what I'd dreamed up.
2) I screwed up in terrain placement. This is directly related to problem #1, in that I had too many vehicles and not enough infantry. Given the fact of too many vehicles, the mistake I made was in placing too much terrain in the northeast, closing off the bad guy armor's ability to influence the battle. There simply was no avenue for them to move west, minus heading south to link up with the other platoon, then pressing west into the Covering Force's roadblock. So, that was my screw up, not understood until the game started and there was really nowhere for the T-72 and BMPs to go...
Nevertheless, it was still fun, and I look forward to my next opportunity for the Legion to cover itself in glory. In my last post I mentioned using this burgeoning issue as the seed for a larger campaign, that is, 'civil war' in the Baltic states of Estonia, Lithuania, Latvia, and Poland, amongst pro-Western supporters of liberal government, and pro-Russian "Sirellists," who wish to return to Soviet-style government and economics. What's going to happen is that I intend on playing 7-10 of these fights of the Legion in Estonia, and then the French will leave and I'll move them to another hotspot, like the Balkans, the Middle East, or Africa. This campaign will end either with the French killing Colonel Sirel, or the French trying to kill Colonel Sirel but failing and losing in dramatic fashion, enough to force the French to leave the country.
In either case, the stage is set for the Baltic State 'Civil War': either Sirel has been martyred, or he has been lionized. Stay tuned. We've got the holiday coming up this week, always a busy time, but I shan't neglect my wargaming responsibilities, no matter how much the wife hates me. I intend on getting some painting done, then getting Legion games in while I'm off from work on Friday, Saturday, and Sunday. I also want to get back to my 6mm stuff...
V/R,
Jack


Definitely a challenging table to fight on, particularly for a vehicle heavy force.
ReplyDeleteThe last few pictures look like a vehicle brawl :-)
Was this the heaviest losses for the legion so far?
Cool game, nice layout, nice toys :)
ReplyDeleteAl - Thanks man, glad you liked it, more to come. I'm taking suggestions for the Legion's next flashfire to go put out (my plan is to play a series of 5-10 game operations in diffferent locations).
ReplyDeleteIvan - Yeah, the table was a bit too constricted for the force structure I threw on the table... I still had a great time, but I will be more careful about table/force set up. Hey, it's your fault actually! I was just following the battle generator that YOU wrote ;)
And yeah, this was the roughest fight so far, though there were plenty the fight before, too. Why, are you looking for a roster spot? See, you'd be on the other side; I should have called them Sorensonists ;)
V/R,
Jack