All,
It is 4 March 1952, and the forces of Hakuna and Matata are once again clashing at the eastern border, along the Mashandane River. Hakuna won the earlier battle, then both sides recoiled to regroup and reorganize. But now it is 1030 local time, and two forces of equal size are racing towards each other, looking to breakthrough the frontier and push deep into enemy territory.
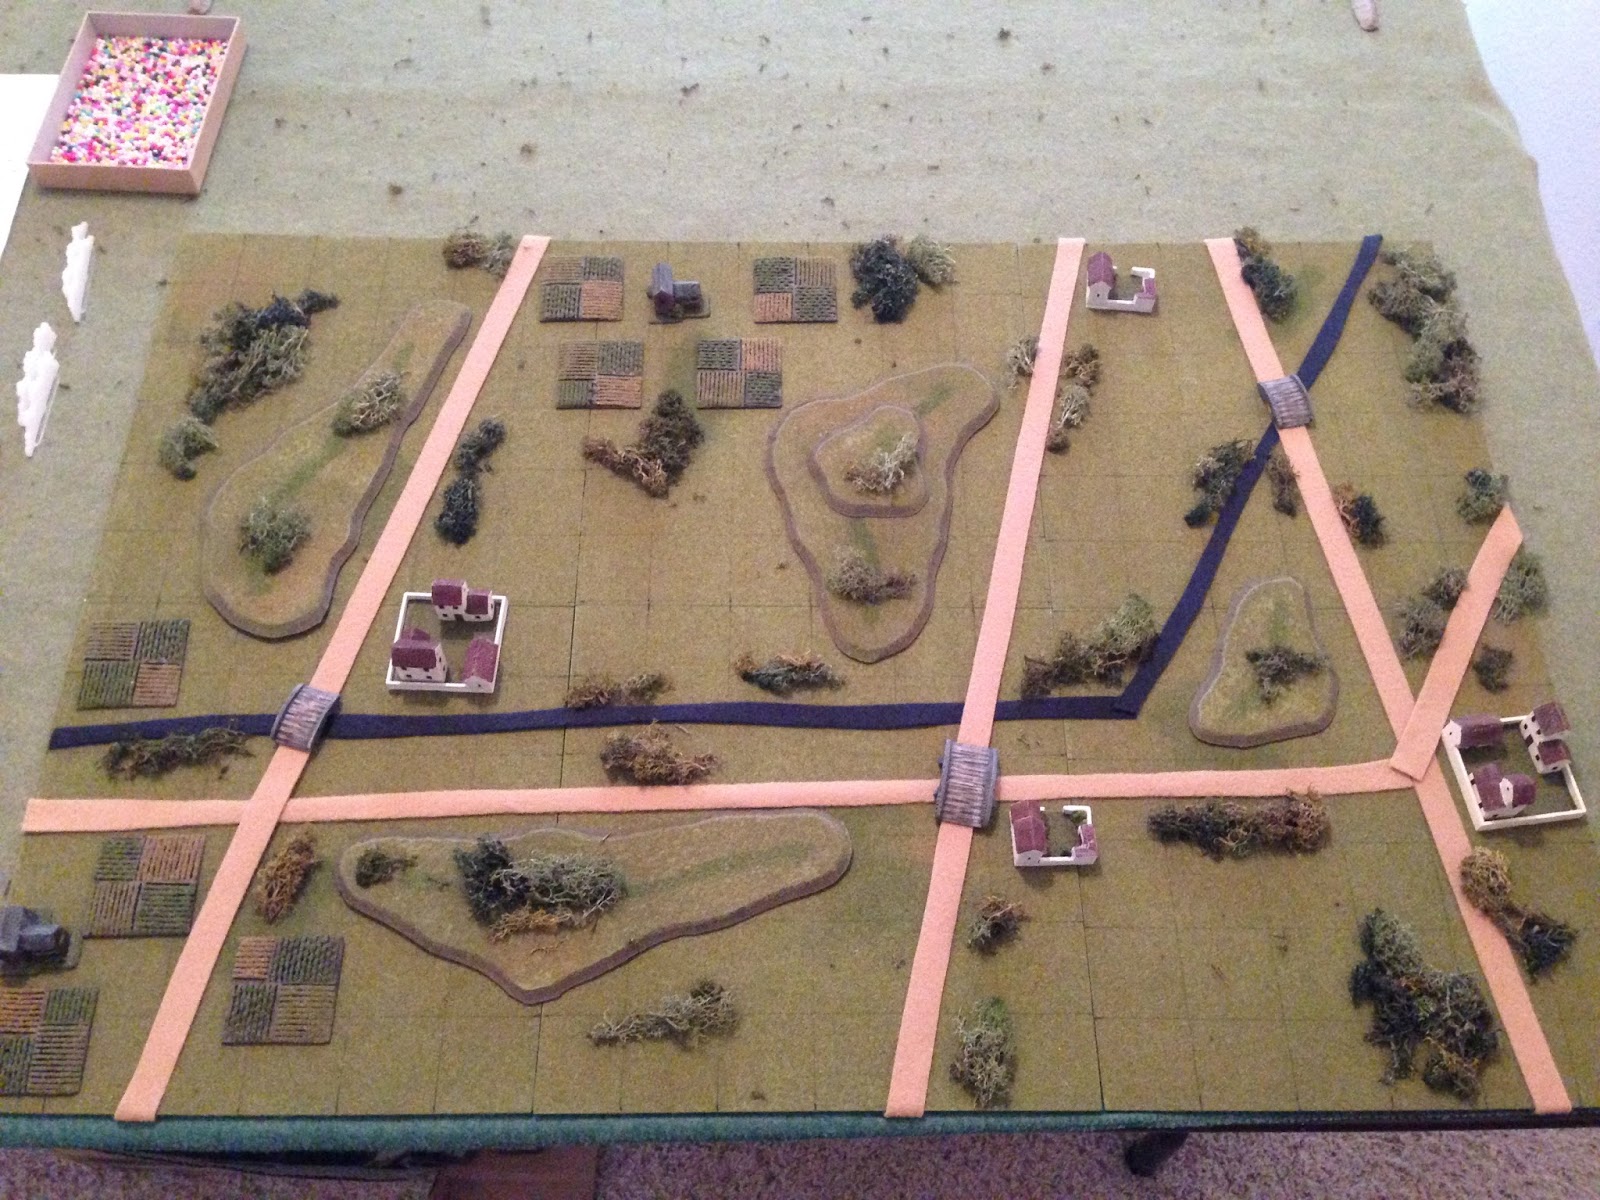
Overview of map, north is right. Hakuna will enter from the west (top) and Matata from the east (bottom). You can see several hardball roads run through this section of the border frontier, with three bridges over the Mashandane River (don't ask me why the center bridge is at the crossroads instead of over the @#$% river...). Lots of open ground channelized by sharp ridges and patches of jungle.
The opposing forces, with Matata on the left and Hakuna on the right. You can see two Baltimore bombers on the Hakuna side, the benefit of winning the earlier dogfight.
Hakuna forces:
CO: Brigadier Okoye, Tiger Brigade Commander
Captain Tbuli's B Company, 7th Tank Battalion (12 Fireflies)
Captain Hele's G Company, 23rd Mechanized Infantry Battalion (Four Halftracks and Infantry)
One battery of 155mm towed artillery
Two Baltimore bombers from the 521st Ground Attack Squadron, piloted by:
Blue 1: Lt Ogala
Blue 2: Lt Bogu
Matata Forces:
CO: Brigadier Adewale, Umpule Brigade Commander
Captain Aganya's C Company, 21st Tank Battalion (12 T-34/85s)
Captain Turuti's G Company, 43rd Mechanized Infantry Battalion (12 Trucks and Infantry)
One platoon of Captain Ocho's 17th Anti-Tank Company, led by him personally (3 SU-100s)
One AAA Section (1 40mm Bofors and prime mover)
The table is set, looking from behind the Hakuna line. From left to right we have: 1st Mechanized Infantry Platoon (Mech Plt), 1st Tank Plt, 2nd Tank Plt, the CO, 3rd Tank Plt, 2nd Mech Plt, Arty Battery, and 4th Tank Plt.
The Matata line, from left to right: 1st Mech Plt, 2nd Mech Plt, 3rd Mech Plt, 1st Tank Plt, the CO, 2nd Tank Plt, 3rd Tank Plt, 4th Tank Plt, the AA unit, and the Anti-Tank Plt. The boy believes in concentration of force.
The boy wins initiative and so Matata goes first.
The forces of Matata push forward.
And Hakuna (top) responds.
I'm not sure why, but for some reason I had us roll for initiative after each turn. It did mix things up quite a bit, but I didn't like it and will stick with a normal IGO-UGO from now on.
Hakuna's 3rd Tank Plt moves up (on hill at center right).
They (top right) are countered by Matata's 1st Tank Plt pushing onto the southern bridge (bottom left).
On their far left, Hakuna's 1st Mech Plt moves up the road (top center).
And while they push over the northern bridge (top center left), they are supported by 1st Tank Plt (center) pushing towards the central bridge (bottom right, protected by the Matata Anti-Tank Plt nearby).
Hakuna's 2nd Mech Plt creeps forward (top center), looking to stay obscured then get into the urban area at right, near the Matata 1st Tank Plt (bottom right). 1st Mech Plt and the arty battery are at far left.
The arty battery (far left) sets up, while 1st Mech Plt moves atop the hill (center).,,
And kicks their dismounts out.
Just south of them, 4th Tank Plt pushes ahead (bottom center).
The Hakuna arty (top left) fires on the Matata 1st Tank Plt (bottom right), but they haven't pre-registered and the rounds drop in the Mashandane River...
And here comes the Hakuna air...
The Matata Bofors (bottom left) punches 40mm rounds out...
But the daring Hakuna pilots push through. Though I can't say they weren't affected, as they only managed to pin the enemy Anti-Tank Plt...
Who quickly moved north (right, from explosion at bottom left), to clear the impact area and counter Hakuna's 1st Mech Plt (top left).
Matata's 2nd Tank Plt (barely visible in the trees at bottom right) moves into a treeline atop a hill, spots Hakuna's 2nd Mech Plt (top center), and opens fire with their 85mm guns.
Destroying an infantry platoon still in their halftracks...
Emboldened by his right flank being sewn up (you can see the burning halftracks at top center), the Boy General pushes his 1st Tank Plt off the bridge, forward and up the hill. 3rd Mech Plt lies in ambush and opens fire with their bazookas...
But the Matata tankers press home their attack...
And eliminate another platoon of Hakuna infantry.
Looking to reinforce success, the boy pushes the Matata 3rd Mech Plt (bottom left) forward (their 1st Tank Plt is at top left). But they are spotted just short of the bridge by Fireflies of Hakuna's 3rd Tank Plt (top right), who open fire...
Driving the mechanized infantry back (red bead, from explosion).
Matata's 4th Tank Plt moves up on the hill in their center (bottom center) and fires on Hakuna's 3rd Tank Plt (top center)...
Forcing them to fall back (red bead, from explosion) next to 2nd Tank Plt (blue bead).
Matata pushes their 3rd Tank Plt up between the 2nd and 4th Tank Platoons (center right).
And then Matata's 2nd Mech Plt pushes up the road towards the southern bridge (center left).
On Hakuna's far left, their 1st (and only remaining) Mech Plt pushes ahead (top center), opposite the Matata AT Plt (pinned at bottom right).
And their infantry infiltrate the urban area, on Matata soil!
The Hakuna arty (top left) is feeling a bit vulnerable; they've got the Matata 1st Tank Plt nearby (bottom right), with Matata infantry on the way (off camera to bottom right), and only 4th Tank Plt anywhere close to being able to help (far left). The arty fires at the enemy tank platoon, but again they miss!
In the center, the Hakuna CO moves over to 3rd Mech Plt to rally them (red bead)...
But they fail and fall back (red bead, from bottom left)!!! They then try to self rally, but they fail this and run off the map!!! That's back to back 6s on one D6; I need that when I'm shooting, not rallying!
Things are getting a bit desperate on the Hakuna right, so 4th Tank Plt charges headlong into the enemy 1st Tank Platoon's flank (center right)...
And dispatches them!
But the Matata 2nd Tank Plt (top right) sees them (far left) and react fires...
Knocking them out!!!
All Hakuna has left on their right flank is the arty; if Matata can push their infantry through there they should be able to eliminate the arty (kill or drive off) and either turn Hakuna's flank or force them to withdraw (in the face of Matata armor on their left).
"Pilot to bombardier, pilot to bombardier..."
The Bofors pounds out 40mm tracers...
Blue 2 is hit!!!
And burns in, killing the entire crew!
You've got to be kidding me...
But Blue 1 presses home its attack.
Causing heavy casualties on one Matata tank platoon (white bead), and driving back another (red bead).
Looking to seize the initiative, Hakuna's 1st Tank Plt pushes up to the central bridge and fires on the disordered Matata 3rd Tank Plt, but misses them. You can't really see them, but the Matata 2nd Tank Plt is in the bushes just left of the tank platoon with the white bead.
Though their neighbor, 2nd Tank Plt, was forced to fall back (red bead on tanks at far left, from top center).
As bad as things are looking for Hakuna's left flank, Matata has their AT Plt pinned, three tank platoons in bad shape, and one tank platoon knocked out. Things are rough all over.
Hakuna's 2nd Tank Plt (top center) follows their 1st Tank Plt up the road, and fires again on Matata's 3rd Tank Plt (bottom left), missing.
Matata's CO moves over (bottom left) to rally his AT Plt, but he doesn't quite make it. The AT Plt fires their 100mm guns on Hakuna's 1st Mech Inf Plt; the walls are thick, but the platoon is still pinned by the heavy HE fire.
Matata's 4th Tank Plt (red bead at far right) tries to self rally, but fails and runs off the map!!! The Mech Plt at bottom left successfully self rallies.
Looking to pull victory from the jaws of defeat, the Boy General pushes two Mech Platoons up the southern bridge (left and top left).
But on their far left, the Hakuna 1st Mech Infantry platoon dashes across the highway and into close combat with the SU-100s of the Matata Anti-Tank Platoon. Brigadier Adewale (bottom left) eyes the situation; do I charge in to assist my men, or fall back?
He charges in of course.
And is eliminated when the Hakuna 1st Mech Plt wipes out the Matata forces (far right). 1st Mech Plt moves up (center left), near the wreckage of Blue 2 (bottom left).
Hakuna's 1st Tank Plt charges up the hill and fires into the flank of Matata's 3rd Tank Platoon...
And misses everything!!!
Yeah, I rolled 3K 2S for being at point blank range and firing into the flank. Still missed...
Blue 1, Hakuna's remaining attack aircraft (top left), roars in to tear into the truck-borne Matata infantry (far left and bottom left), but the Bofors (bottom right) again roars and drives the damn airplane off!!!
Our AAA fire has been particularly effective these two fights, and that firing only 1K 1S each turn.
Feeling a little better, but not much now that they are the only Hakuna unit on the right flank, the arty battery fires on Matata infantry moving up the road in their trucks.
Forcing them to fall back (red bead at bottom left, from explosion at top center).
Threat averted, at least for the time being.
And then Hakuna's 2nd Tank Plt moves up to the central bridge (top right) and fires over the shoulder of 1st Tank Platoon, at Matata's 3rd Tank Plt (white bead at left)...
Knocking them out.
With their commanding officer dead, one tank platoon run-offt (a little 'O Brother Where Art Thou' for ya), and two tank platoons and the AT Plt knocked out, Colonel Amukumara (acting brigade commander, commander of the 21st Tank Battalion) orders a withdrawal.
"But Sir, we are on our home soil!" "I know you idiot, but we'll have to stop them elsewhere, we're spent and I'll not stand here and watch our brave soldiers be mowed down to no good purpose!"
Smoke lands to obscure the withdrawal...
While the remnants of the Matata force form up and fall back to the east. All three Mech Inf Platoons survived, but only one of the five armored platoons. After two fights the 21st Tank Battalion has ceased to exist. And for the act of saving these few troops, Field Marshal Zanda (commander of the Matata Army) rewarded Colonel Amukumara by summarily executing him for incompetence and cowardice in the face of the enemy. He was also heard to mutter something about wishing Brigadier Adewale was still alive so he could be shot as well...
Well, two fights, two victories. Once again I can claim only luck. The boy had me, my right flank was a shambles and my air and arty was doing nothing, but I got some lucky firing dice, just enough to hunker some of his troops over there and keep them stalled while I pushed on the my left flank. Then I got really lucky when he shot down one bomber, but the other went in and got good results, putting heavy casualties on one tank platoon and driving another back, which kind of broke his back.
With regards to the war, please remember we're counting tank losses. Not sure how far we'll go; I'd toyed with the idea of the loser of the war being the first to lose 100 tanks, but I'll probably settle for first to 50. The boy lost 9 more tanks, and I lost three, so the standings are:
Hakuna: 5 tanks lost
Matata: 18 tanks lost
All in all, some very quick and fun fights, and we look forward to more!
V/R,
Jack


Looks like Matata could do with a bit of a morale boosting propaganda campaign? Great AAR!
ReplyDeleteYeah, they're having a rough go of it early on. We shall see if Hakuna can carry out its blitzkrieg and make Matata sue for peace, of if Matata can regain its balance.
DeleteV/R,
Jack
Another great AAR Jack! Where are your buildings from?
ReplyDeleteThanks man! The buildings are something I picked up a few years ago from 'Gunner,' who runs "La Petite Armee," selling 10mm Napoleonic starter sets.
DeleteV/R,
Jack
Loving the work mate! You and the lad should be proud of the effort put into these models and the reports.
ReplyDeleteI am doing a more modern setting for my confrontation on my own blog "Down under wargames" but my follow-on was going to be something similar to this - so for now I'll quite happily be cheering on... erm... well... whoever wins! ;)
I'd like to reference your stuff on my site if you wish?
Nat,
DeleteHey, thanks, I appreciate it! I'd love to check out your blog, do you have a link? And by all means, no problem with sharing stuff from my blogs.
No games again this weekend though, too busy with birthday parties...
V/R,
Jack
Great stuff Jack. I love a bit of T-34 vs Firefly action!
ReplyDeleteThanks Bish, it's been a lot of fun.
DeleteV/R,
Jack