All,
Alright, it's time for the next episode of Royals in Helmand! In the last mission, Corp and the boys saved the village of Tashur from the evil clutches of the Raven and his Taliban henchmen. It's now 7 May 2011, six days since the last fight. After a couple down days and several patrols with no contact, trouble is brewing again.
This mission is pretty similar to the last (as I was playtesting I didn't really put a lot of thought into the scenarios, just lined them up and fought it out). Corp and his men are out on foot patrol when a local farmer approached to inform them a Taliban cell was up ahead in the village of Lisham. Corp brought the boys together and formed a plan of action then moved on the village, intent on evicting the unwelcome guests from the village.
Overview, north is up. The Royals will enter from bottom right, attacking into the village of Lisham. There are rocky outcroppings in the southwest and northeast, and a river running roughly west to east. The river is fordable along its length, though with a movement penalty. There are several fields and trees present, and stone walls throughout the village. These are low walls, maybe four feet high, not the customary eight or nine foot walls often seen in Afghanistan. A severely potholed hardball road runs through the village.
Looking west to east.
Looking north to south.
Looking east to west.
The opposing forces, with Brits on top and Taliban on bottom. I rolled up the Brits from 5MIN and the Taliban using blinds from Platoon Forward, and lo and behold, we have an even-up fight. The Taliban have an RPG, two RPKs (magazine fed light machine gun based on the AK), and five AK-series riflemen.
The Brits, from top left: Gimlet (SA80), Knocker (Minimi), Sparks (SA80), Corp (leader, SA80), then at bottom left: Pvt "Ginger" Holmes (SA80), Pvt "True" Bemish (SA80), Pvt "Nobby" Hayes (LSW), and Jonesy (SA80 w/UGL).
The Royals aggressively move on the village at the double time. At bottom left are True and Jonesy, on the bridge is Nobby, and moving up the road from bottom to top we have Sparks, Knocker, Corp, Ginger, and once again Gimlet is on point.
Looking at the Royals from right (east) to left (west).
And the bad guys magically appear (the blinds are revealed). There are eight Tangos; who wants to play 'where's Waldo'? There is one at bottom left on back side of hill, one atop building at far left, one behind the wall to his right, two just above him on either side of the wall, then one to the right of them behind another wall, one at top center right between the building and the top right hill, and one atop the top right hill.
The Taliban appear to be quite prepared for this fight...
Another look at the setup, from east to west.
The Brits press ahead, and the Taliban grimly await their fate...
The Royals' luck holds again (literally, as in I'm doing opposed D6 rolls to see who will activate first); despite moving rather quickly, Gimlet (bottom center) notices movement ahead. He drops to a knee and fires a burst at the Tango atop the building (top center), knocking him down.
A Tango RPK (top left) returns fire...
But Gimlet runs between the rain drops, pressing ahead to the NE hill (center right; he is not aware of the Tangos over there yet), while Ginger fires on a nearby Tango (behind wall at top center, with RPK gunner to his left). Ginger's rounds knock the target down and pin the RPK gunner.
Ginger sprints up next to Gimlet (far right, from bottom right), but he draws some unwanted attention. The enemy RPG gunner fires his rifle...
Forcing Ginger to fall back (behind pickup truck, from top center. That's Corp at bottom left).
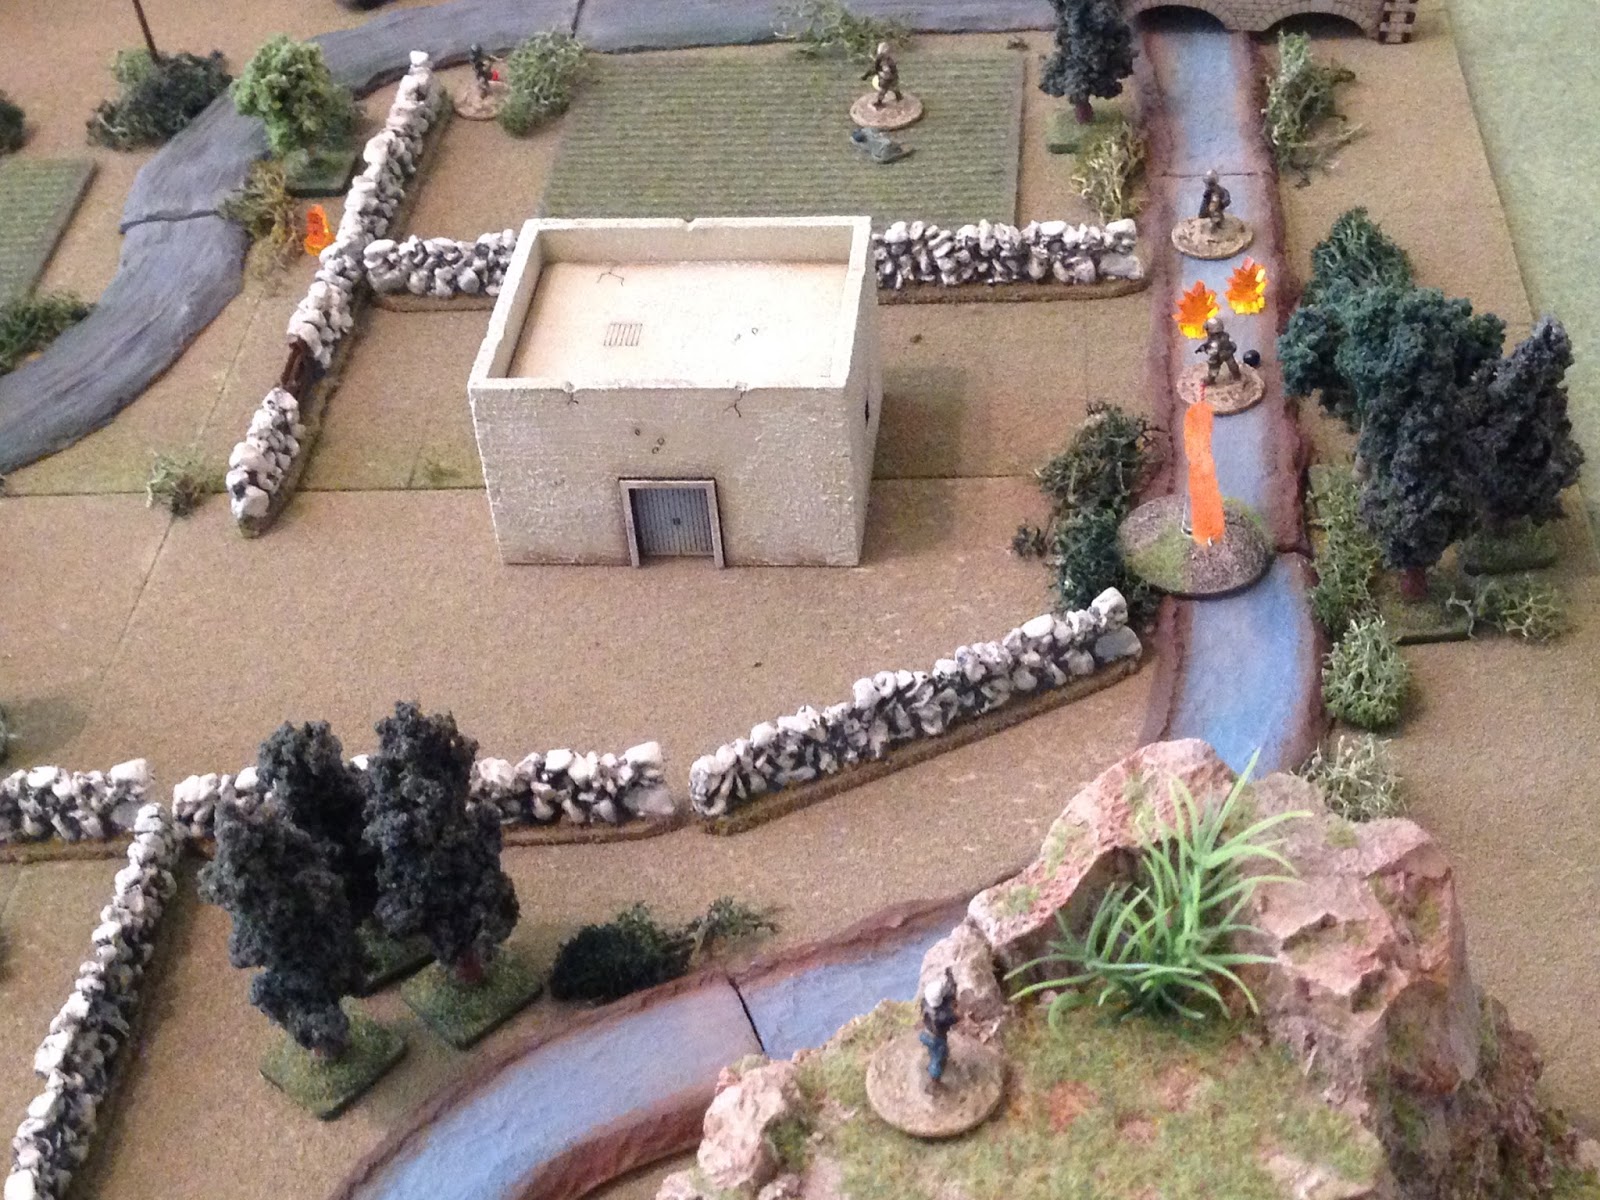
Sparks moves up on the left (bottom right), but a Tango spots him moving across the field and opens fire...
Putting him out of the fight (left) and pinning Nobby (yellow bead on bridge at right).
Knocker stands up and begins firing his Minimi at the Tango that hit Sparks (far left), pinning him as he moves to Ginger (far right). Ginger clears his head and is back in the fight. Corp is at center on the road, eyeing the wall ahead of him...
Corp sprints up to said wall (bottom center right) and fires on the Tango RPG gunner, knocking him down (top left).
True moves left and jumps in the river (left), while Nobby sprints to his downed buddy Sparks (center right, with Corp above him). Jonesy (bottom center) gets in the fight: he launches a 40mm grenade at the two Tangos at top center (just left of the building up there).
And the frag is right on target, dropping the RPG gunner and a rifleman!
Jonesy moves up and jumps in the stream next to True, with Nobby helping Sparks at center right. Nobby can't locate a visible wound, and Sparks is breathing but unconscious.
The Tango boss (yellow bead) sprints up the stairs and onto the roof, looking to get up there to check on his downed subordinate (he came from bottom right). The Royals are apparently so surprised by the ballsiness of the move that no one gets a shot off (he rolled a scurry).
On the far right, another RPK gunner (top left) steps up from his hiding place near the hill and fires on Corp (bottom right)...
Driving Corp back (red bead at center top, from explosion at center left) and pinning Jonesy (bottom right).
True (bottom center, with Jonesy to his right) takes a terrible shot in return fire on the RPK gunner (top center), but lucks out and knocks him down!
Knocker (bottom right) spots a Tango moving up on the crest of the NE hill (top center) and snaps off several rounds, pinning the terrorist.
But on the far left a Tango climbs atop the southwest hill (bottom left). With all that's going on, Gimlet (top right, at base of NE hill, just below explosion there) doesn't see him..
Looking west to east, we see the Tango atop the SW hill (bottom center) in the perfect spot to fire down on True and Jonesy in the river. The bad guy takes advantage of this fact and opens fire...
True goes down, out of the fight, as Jonesy looks on.
Nobby (bottom center) sees True go down (left, in river); he pulls back from Ginger, shoulders his rifle, and returns fire, knocking the Tango down.
As Nobby (right) rattles off rounds at the SW hill, Jonesy moves left and pulls True out of the water, leaning him up against the bank. Looks like he's hit, but not too bad. Jonesy performs first aid.
Knocker (bottom right) swings his Minimi right and sends some 5.56 up the NE hill, knocking the Tango there down...
Before sprinting left (left, from Ginger at right) to check on Corp...
But Corp's not feeling it and falls back again (red bead at bottom right, from far left).
Gimlet, at the base of the NE hill, heard the Tango go down from Knocker's gunfire, but he wants to finish him off so he tosses a grenade (blue bead) up top...
But it hit on top (left) and rolled down the hill, exploding harmlessly.
Gimlet then sprinted up to the wall at center, between two knocked down Talibs.
And then Ginger (bottom right, with Knocker at wall at center and Nobby and Sparks at far left) moved up and fired at the rooftop (top right), but he missed.
Corp (right) finally gets himself back in the fight.
The Tango on the rooftop (yellow bead at bottom left) returns fire on Ginger (the white bead on the rooftop is knocked down)...
Ginger goes down in a hail of bullets (top right), and something really weird happened. One of the AK rounds struck a pop-up flare on Ginger's vest, setting off a red stare cluster, scaring the hell out of Knocker (red bead at center) and Corp (red bead at bottom left) and convincing them to fall back.
Gimlet (bottom right, near knocked down terrorist) returns fire on the Tango on the rooftop (top center)...
Forcing him to fall back (red bead at bottom center). He jumps down off the roof, and decides hell with it, and just keeps running.
Gimlet moves up and secures the right flank, noting all three Taliban there are dead. As silence fell over the battlefield, the team pushed forward into Lisham. Ultimately there were four enemy KIA and one Talib was captured, badly wounded.
But these three escaped...
Jonesy and Nobby drag True and Sparks to the wall, which is serving as a temporary clearing station, where they are joined by Corp.
Who then oversaw the MEDEVAC of the two wounded Marines. Once Corp and the rest of the section got back to base they checked in on their guys; Sparks is okay, just received a concussion, and True took a round through the upper arm, he'll be out of action about a week.
Another great fight, a lot of fun. I'm really enjoying the rules mods, and now I'm really enjoying the story of this group of guys. I've got one more fight to post, wait 'til you see this!
V/R,
Jack


Nice touch to get the chopper in there in the end, even if it was just to pose for the camera :)
ReplyDeleteAdds a nice conclusion to a stiff fight.
Ivan,
DeleteYeah, you know I always like a little Hollywood. Wait 'til you see the next one!
V/R,
Jack
Great game report.
ReplyDeleteCheers,
Pete.
Thanks Pete, I appreciate it!
DeleteV/R,
Jack