All,
This is the second part of Scenario 4, Team Whiskey's desperate rear-guard action to cover the withdrawal of 11th Armored Cavalry Regiment. To refresh your memory, in Turn 1 the Soviets came on the table with a large armored force (Soviet Mech 1 of 6 BMPs and infantry, Soviet Tank 1 of 6 T-72s, Soviet Mech 2 of 6 BMPs and infantry, and Soviet Tank 2 of 6 T-72s) travelling at speed down the road. I small US infantry detachment was dug-in in and around the village of Bad Stulz, and let rip with five TOW launchers, causing heavy casualties. In Turn 2, the Soviets were able to reform, begin pushing forward, causing quite a few casualties among the severely outnumbered US troops. But, just when things looked really dark, a platoon of M1 Abrams came on the board to even the odds a bit.
Back to the action, picking up at the start of Turn 3.
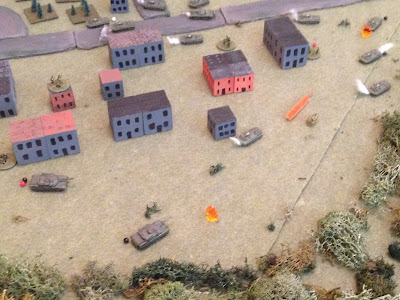
Looking from the southwest (bottom left) corner to northeast (top right), the US 81mm mortar platoon (bottom left) opens fire on the infantry of Soviet Mech 2 on the eastern end of Bad Stulz, with the US tank platoon at bottom center, the US infantry force commander, Captain Sighe, just above them with a TOW and rifle team, an unspotted MG team just left of the orange tracer (center), two TOWs in the field, just short of the trees at top left, and another TOW team straight down from them in the treeline.
Looking south to north, the mortars fall, causing heavy casualties on one enemy rifle team (center left, white bead). The Soviet CO moves over to rally a pinned BMP (yellow bead at top center right). This succeeds, then he tries to rally the hunkered T-72 (red bead just to their left)
But the T-72 fails and falls back again (top right, red bead, from top center yellow bead). The enemy CO moves the pinned rifle team at left (yellow bead), which is good. The enemy rifle team that is 'men down' (white bead at center right) successfully self-rallies.
And then the rifle teams of Soviet Mech 1 move up (top center right), but can't see anything (don't spot the US MG at bottom center, can't see the TOW teams at top left because of the trees).
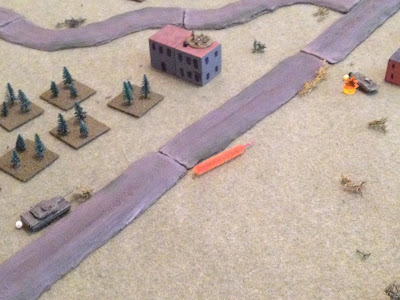
Looking east to west from behind Soviet lines, Soviet Tank 2 sees the center clogged and moves right (bottom center), right up to the US smokescreen (the two US TOW teams in the field are just off camera to right), with another TOW at top right in the treeline there.
At center right, the Soviet XO moves up to a hunkered BMP (red bead, with hunkering T-72 that their CO tried to rally but failed at top center), and rallies them.
Enemy rifles of Soviet Mech 2 move up on the southern side of Bad Stulz (looking south to north), with one moving to rally the 'men down' team (white bead), which was successful.
The team that just rallied moves up into the building at center right, where they somehow manage to spot the US MG at bottom left. The Soviet rifle team fires, to no effect. That's a US rifle team that recently rallied just below the orange tracer, and a TOW team that needs to reload at bottom right, with rifles of Soviet Mech 1 spread across top center-left.
Looking west to east at the northern sector, two TOWs of the 1st TOW Section (TOW1) finally make it into cover, while their third team (bottom right) reloads and is set to engage tanks of Soviet Tank 2 (top center, just behind the smokescreen) should they push to the left (north) and try to come down (west) the gap at center.
On the south side of the ville (looking south to north), Captain Sighe (bottom left) self rallies his command section and vehicle, while the last US rifle team moves up and fires on an enemy rifle team, taking them out!
If you recall from part 1 of this scenario, at the very end of the report a Soviet rifle team went berserk in the treeline at center right and knocked out two US rifle teams and an MG team. The remaining US MG team (bottom left) opens up on the Soviet 'Hero of the Rodina' team, putting heavy casualties on them (white bead).
Looking north to south, Soviet Tank 1 is down to two T-72s, and one is hunkering. The 'good' tank falls back to help them rally (bottom center-left, red bead)...
Nice and shaky... Well, the rally attempt fails, so the T-72 falls back again (bottom left, from top right). The skittish T-72 then self-rallies.
Back in southern Bad Stulz, the remaining team from TOW2 (bottom right) reloads their launcher.
Looking southwest to northeast at the south side of the ville, Captain Lemmey, the US Tank Company Commander, moves three M1 Abrams (bottom center left, with Captain Sighe at far left and TOW2 just above them) forward, where two Soviet BMPs (top right) react fire with their guns.
The Abrams shake off the small caliber shells, settle in, then return fire
One BMP is immobilized and the crew abandons ship, while another BMP is turned into a bonfire, which pins a third BMP (yellow bead) and causes a nearby rifle team to fall back and hunker (red bead, they were in the building. The BMP at bottom right was previously knocked out).
Looking south to north at the eastern end of the ville, a Soviet Mech 2 BMP moves forward to rally the pinned vehicle (yellow bead), and they're good.
The just-rallied BMP then moves forward cautiously (center right), using the buildings for cover, then pops out and fires his gun at an M1 (bottom left).
Causing the US tank to fall back (far left, red and black bead, from far right two explosions).
Looking west to east, two BMPs of Soviet Mech 1 (top right) move up. When the lead BMP clears the wreckage, Lt Roberts instructs the gunner of his tank (bottom left) to fire.
The BMP is hit, but is still functional, and the crew stays in the fight, just needing a minute to clear their ringing heads (need to be rallied).
And that's how Turn 3 ended. Moving on.
Turn 4 starts with the Soviets pushing the issue. Looking east to west at the northern sector of the table, Soviet Tank 2 (bottom center and center left) moves up through the US smokescreen (bottom left), looking to clear the treeline and shoot the gap at center, pushing into the US rear (top of photo).
At far right, in the treeline, you can just see two little blue beads, which mark the unloaded status of two TOW1 anti-tank missile teams. The enemy tanks are now well inside the minimum engagement range of their missiles, so that kind of sucks. What doesn't suck is the fact their third team is sitting in the treeline at top center, unspotted and ready to fire.
But I've got a bit of a gamble here: I can have the TOW at top center fire on the enemy, but with less dice than normal due to react firing. Or I can have him wait until he can activate and shoot with full dice. But before that happens, the enemy tanks will have a chance to spot him, and if they're successful they will surely have three tanks fire on him.
I decide to have him wait, and the Soviets are unable to spot any of the US TOW teams.
At far left, Captain Sighe tries to rally the hunkering M1 there, but only gets him up to pinned (yellow bead)... Meanwhile, Captain Lemmey (bottom center) has his tank fire at a BMP (top right).
Capt Lemmey's round knocks out the BMP, while the pinned M1 tries to self rally, but stays pinned...
Capt Lemmey then pushes his tank forward (bottom right, with the BMP he just KO'ed right above him), but another BMP (top right) sees him and reacts, firing with its gun (don't forget there's a third M1 at center left, right of the yellow beaded M1).
Capt Lemmey's M1 is forced to fall back and hunker (far left, red and black beads, from explosion at center). His last M1 moves up (bottom center) and fires, knocking out the enemy BMP.
Soviet Mech 2 is now fresh out of BMPs, and down to only two rifle teams, one of which is hunkered (top center, and red bead at top center-right).
Looking west to east at the north side of Bad Stulz, Soviet Mech 1's infantry (minus the 'Hero' team that is 'men down' with the white bead) move up (three in treeline, one at top right, US rifle team at bottom right). The US MG team in the north (bottom left) react fires, but doesn't hit a damn thing...
Looking south to north: the MG's (far left) miss allows the Soviet infantry to rally the 'Hero,' then open up on the MG. But they miss too!
And then the Soviet Commanding Officer (top right) moves up to the BMP that Lt Roberts' tank (bottom left) hit and damaged. The enemy CO rallies the BMP crew, and they promptly send a missile Roberts' way.
The missile hits Lt Roberts' tank (far right), immobilizing it. But the weapons systems are still operational, and the crew stays with the vehicle! However, Lt Roberts' partner gets a bit frightened and falls back (far left, red bead).
The BMP that just just fired moves up (far left, blue and black beads), while his partner BMP trails him forward (center). But the last US rifle team busts out their last LAW and fire!
Hit but not penetrated, the BMP falls back (top right, red and black beads, from explosion at center left). The US rifle team is at bottom center left, with the blue bead signalling they are out of LAWs.
The Soviet Executive Officer (XO) moves up (top right), where they rally a hunkered rifle team, then fire their 30mm gun at the US tank at bottom center, but the shots go wide, landing in the trees at bottom.
So the M1 (bottom left) returns fire...
But he misses too!!!
And then one of Soviet Mech 2's rifle teams moves up and fires an RPG at the tank that just missed.
But he misses too! The M1 returns fire with its coax, mowing the Soviet riflemen down!
On the Soviet side, the two remaining T-72s of Soviet Tank 1 reform and move forward cautiously (bottom left, with Tank 2 at top right, Mech 2 at top left, and Mech 1 at top center).
Looking southwest to northeast, the US mortars (bottom left) get going again, firing on the Soviet Mech 1 infantry in the northern treeline (top right).
Looking northwest to southeast: the mortars hit (top center), getting 'men down' on the recently rallied Soviet 'Hero' team and pinning another. And then the rear TOW of TOW1 (bottom right, the other two are at far left, still needing to reload, and re-position as well since the enemy tanks are inside their minimum range) lets rip with a missile at a T-72 of Soviet Tank 2 (top center left).
The target is knocked out (center right), and another tank is forced to fall back and hunker (red bead at top left, with mortar strike at top center).
The Soviets can't acquire the TOW team that fired (actually, the Soviet tanks had all already activated and so couldn't fire effectively), so the team falls back into cover (bottom left, with blue bead to show they need to reload, from purple bead at center).
Meanwhile, the other two teams of TOW1, on the US far left, decide to push into the bush to avoid being spotted by the Soviet tanks (top right). The two teams are barely visible in the forest at far left, having moved from the two black beads at bottom center. The two teams are going to move east (up) to get into position for flank shots on the Soviet tanks as they move west (down).
Looking west to east from behind the ville, TOW2 pops up (bottom right) onto the roof of a building, quickly sets up, then launches a missile at the rear platoon of Soviet Tank 2 (top left). This means TOW2 won't be able to fall back, so they will be exposed enemy fire (enemy BMP and infantry at center left, more infantry off camera at top right).
Another T-72 goes up in flames (the hunkering tank is from the previous TOW shot).
Thus ends Turn 4. Wow, it's been crazy, and I still don't know how this is going to turn out. Both sides have taken horrendous losses, but are still standing toe-to toe like gladiators.
Turn 5 starts with the Soviet XO (top right) firing his gun at the M1 south of the village (bottom left), but the Soviet XO again misses! This was a mistake; it was much more important for the Soviet XO to move off camera to top to rally some troops to get them back in the fight; if he'd have knocked out the M1 he's a hero for doing that and then moving to rally, but now the M1 will get to return fire.
Like so, knocking out the Soviet XO.
With the Soviet XO knocked out at explosion at far right, the enemy CO falls back to rally the hunkered BMP (center, red bead), and it succeeds.
Looking south to north at the west end of Bad Stulz, the two remaining BMPs of Soviet Mech 1 push right up main street. One pulls around behind the pinned M1 (bottom right, yellow bead) and fires into his flank, while the other moves straight and fires on Lt Roberts' M1 (far left).
The Soviet BMP sprays rounds at point blank range, knocking out the pinned M1 and Captain Sighe's M577. His Command Team bails out, but is hunkered.
The other BMP's (top right) rounds have no effect on Roberts' tank (bottom left), and they return fire with their main gun
Causing the target to fall back (to right, red bead, from explosion at top left), and pinning the BMP (far left, yellow bead) that just knocked out the Abrams and M577. The US rifle and TOW team are in the center (blue beads), with Capt Sighe's team at bottom center (red bead) and Capt Lemmey's hunkered tank at bottom right.
With Capt Lemmey's tank at bottom left and the Soviet BMP that just fell back at top left, a Soviet rifle team of Mech 2 moves up and fires an RPG at the US M1 at bottom right.
Knocking the US tank out (far right) and forcing Capt Lemmey's tank to fall back (red bead at center, next to Capt Sighe's command team).
But Captains Sighe and Lemmey (bottom left) are quickly able to rally (with US rifle team at center left, hunkering BMP at top center, and Soviet rifle team that just RPG'ed the M1 at top right).
The US rifle team moves up and close assaults the hunkering BMP...
The close combat roll: but the US has positive modifiers for attacking, and the BMP has negative modifiers for being hunkered.
Well, I apologize, this sucks: I apparently forgot to take a photo of what happened next. The US rifle team, having bested the BMP, then moved into close combat with the Soviet rifle team that used the RPG to knock out the US tank. The Soviet team didn't get to react fire as they were facing the opposite direction, but the close combat roll was pretty damn close because the Soviets weren't pinned/hunkered/men down. The US rifle team again won the close combat.
And then they moved up and took cover in a building (the BMP they knocked out is at far left, and the enemy infantry beatdown occurred in the building at bottom center).
The Soviet Mech 2 formation has now been totally destroyed, With no enemy nearby, the US rifle team goes back to being hidden (you can see enemy infantry of Mech 2 and the enemy CO at top center, but their attention is elsewhere).
Looking south to north at the ville, TOW2 (blue bead) reloads. The US rifle team is just off camera to right, with Captains Sighe and Lemmey just below the TOW team, a pinned enemy BMP at far left, Soviet infantry in the trees at top left, and Soviet tanks at top center. TOW2 is now ready to fire again, and also goes back to being hidden.
The US mortars (bottom left) repeat their last fire mission, hitting the north treeline (top right) again.
And this time the ring'em up: the far right rifle is knocked out, while the pinned team (left, yellow bead) goes 'men down.' The entire Soviet force now has only three rifle teams left (one is off camera to top right), and two are 'men down.'
TOW1, with one team in the trees at far left (blue bead) and two teams in the trees at top left reload. Bad news for the Soviets that all four US ant-tank teams are ready to rock'n roll.
There's a hunkered M1 at bottom left, and Lt Roberts' immobilized M1 at center (white bead). Capt Lemmey's M1 is off camera to right (with the two knocked out M1s).
Then Lt Roberts' tank creamed the pinned BMP. The Soviet force is now totally without BMPs (they still have their CO's BTR-50, if that makes you feel better).
Looking south to north at the center of the table, Captain Lemmey moves his M1 forward (bottom center). They don't have a clear shot, but they can see movement, and so Soviet Tank 1 (top right) calls out on their net "all call signs, enemy tanks in the south!" (he doesn't know Lemmey's two other tanks are knocked out)
The Soviet CO quickly takes stock of the situation: my XO is dead, Tank 1 has lost 2/3, Tank 2 has lost 1/3, the BMPs of Mech 1 and 2 are gone, and so is my infantry. He lifts his R/T and gives the order to fall back as the first rounds of supporting 120mm mortars begin raining down to cover the withdrawal.
Seeing the Soviets begin to fall back, and with mortar rounds getting closer and closer, Captain Sighe gives the order for the US force to fall back, having accomplished their mission of blunting the enemy's advance in this sector long enough for Team Whiskey's main body to re-form and fall back. The only additional bad news at this point is that there wasn't time to recover Lt Roberts' immobilized tank, so it was blown in place.
Casualties:
US
1 x Command Vehicle (M-577)
3 x Rifle Team
1 x TOW Team
4 x Machine Gun Team
3 x M1 Abrams
Soviet
1 x Command Team
6 x T-72
13 x BMP
9 x Rifle Team
So the US accomplished its primary mission and won the victory points battle with a slight edge. Another positive is that Sergeant Stone, of India Company's 1st Mech Platoon, won the Silver Star for valor for leading the counterattack that stabilized the line in Bad Stulz by destroying an enemy BMP and knocking out an enemy rifle team, and 1st Lt Roberts won the Bronze Star with 'V' for staying in his immobilized vehicle to blunt the enemy thrust through Bad Stulz. He also received the Purple Heart for being lightly wounded during the fight.
So, wow, what a fight! I was so sure I'd screwed up with the TOWs and that I'd never get them back into action in time; in the event, I didn't need to, all I had to do was get them ready. And destroy the enemy center position, which I hung onto by my finger nails. Of maybe a finger nail (one rifle team, one MG team, and one TOW team left there). Hell, I was down to two functioning tanks, one of which I couldn't get rallied back into the fight. The narrow corridor of advance certainly hurt the Soviets, but hey, that's why Team Whiskey's rear-guard chose that location, so no excuses there. And every time I run into close terrain (the treeline and village in the center), that's where the Mech Infantry are going, and the tanks are going around, so that does make the Soviets a bit predictable, but that's doctrine. And for anyone thinking the Soviet Mech Infantry should have by-passed the village/treeline in the center, there simply wasn't room, and that's not battle rill for reaction to a close ambush front. A very near-run thing, and a whole lot of fun, but I was only able to get one game in this weekend.
More to come, I can't wait to get to the next fight. Four games in, and each one has been an absolute blast.
In the big picture, Team Whiskey re-formed and fell back with the rest of 11th ACR to its next defensive line near the major city of Frankfurt. The 11th ACR (hell, all of NATO probably) has taken hellacious casualties, and the Regiment Commander is in the process of re-organizing his force (consolidating Troops** that have taken too many casualties) when something terrible happens... Stay tuned!
**Am I screwing this up? I've been calling Team Whiskey "4th Troop," though it is battalion strength. But now it's seeming to me that cavalry units that are battalion-level should be Squadrons, not Troops. But I'm also using the term "Team," but I don't mean Company Team, I mean Battalion Team, if there is such a thing. I mean, I know you can cross-attach different companies to make battalion-level teams, I just don't know if they would then be called a 'Team.' I know I've heard the Army use the term "Battalion Task Force," so is that what I should be using? Certainly Team Whiskey sounds better than Battalion Task Force Whiskey. I hate the Army ;)
The Marine Corps is so much simpler: platoons, companies, and battalions. A company or battalion with supporting tanks is not a "Team" or "Battalion Task Force," it's a company (+) or battalion (+).
V/R,
Jack


Another great fight and the narrative is great. The big fights are like a novel, while the small tables are like short stories.
ReplyDeleteThanks Shaun, glad you like them. When it's all done I'll compile them all into one post then publish them as a graphic novel ;)
DeleteV/R,
Jack