All,
It's 0700 on 4 August 1986, and Team Whiskey, as part of the beat up 11th Armored Cavalry Regiment, is in full retreat. But the Soviet 8th Guards Army, which had taken an operational pause and been counterattacked yesterday by 11th ACR, never halted its reconnaissance assets, and the Soviet recon assets quickly noted 11th ACR's withdrawal from its forward defensive positions in preparation for a speedy withdrawal to its next line of defense. The 8th Guards Army quickly switched over to the attack, flinging its armored formations forward in pursuit of the fleeing NATO forces.
In this, 11th ACR was quite fortunate. The Soviets, in their haste to turn an orderly withdrawal into a route, and without good prior route reconnaissance into unfamiliar terrain, had gaps appear between their advance guard and forward detachments. With aerial reconnaissance and surveillance alerting them to the Soviet armored thrusts, Lt Col Lacy quickly issued orders. Captain Sighe, formerly the the Battalion S-6 (Communications) but now running India Company's 1st Mechanized Infantry Platoon, already had his platoon dug-in in the West German village of Bad Stulz as Team Whiskey's rear guard.
Lt Col Lacy, Team Whiskey's Commanding Officer, quickly dispatched TOWs, machine guns, and the 81mm mortars of Weapons Company, as well as 1st Lt Roberts' 3rd Tank Platoon, which Charlie Company's Commanding Officer is accompanying. Due to current unit locations, Weapons Company will reach Captain Sighe's India Mech Co, 1st Platoon before Lt Roberts' tank platoon.
So, Captain Sighe's 1st Platoon, with Weapons Company MGs, TOWs, and mortars in direct support, is lying in wait, with a tank platoon on the way, as a Soviet armored column comes flying down the road, oblivious (due to the loss of contact with their reconnaissance) that US troops have filtered into the gap and are preparing to ambush them.
I only got one game in this weekend, and once again I've got a busy schedule at work, kids' schoolwork, and baseball, so I'm forced to again release my batrep in two parts.
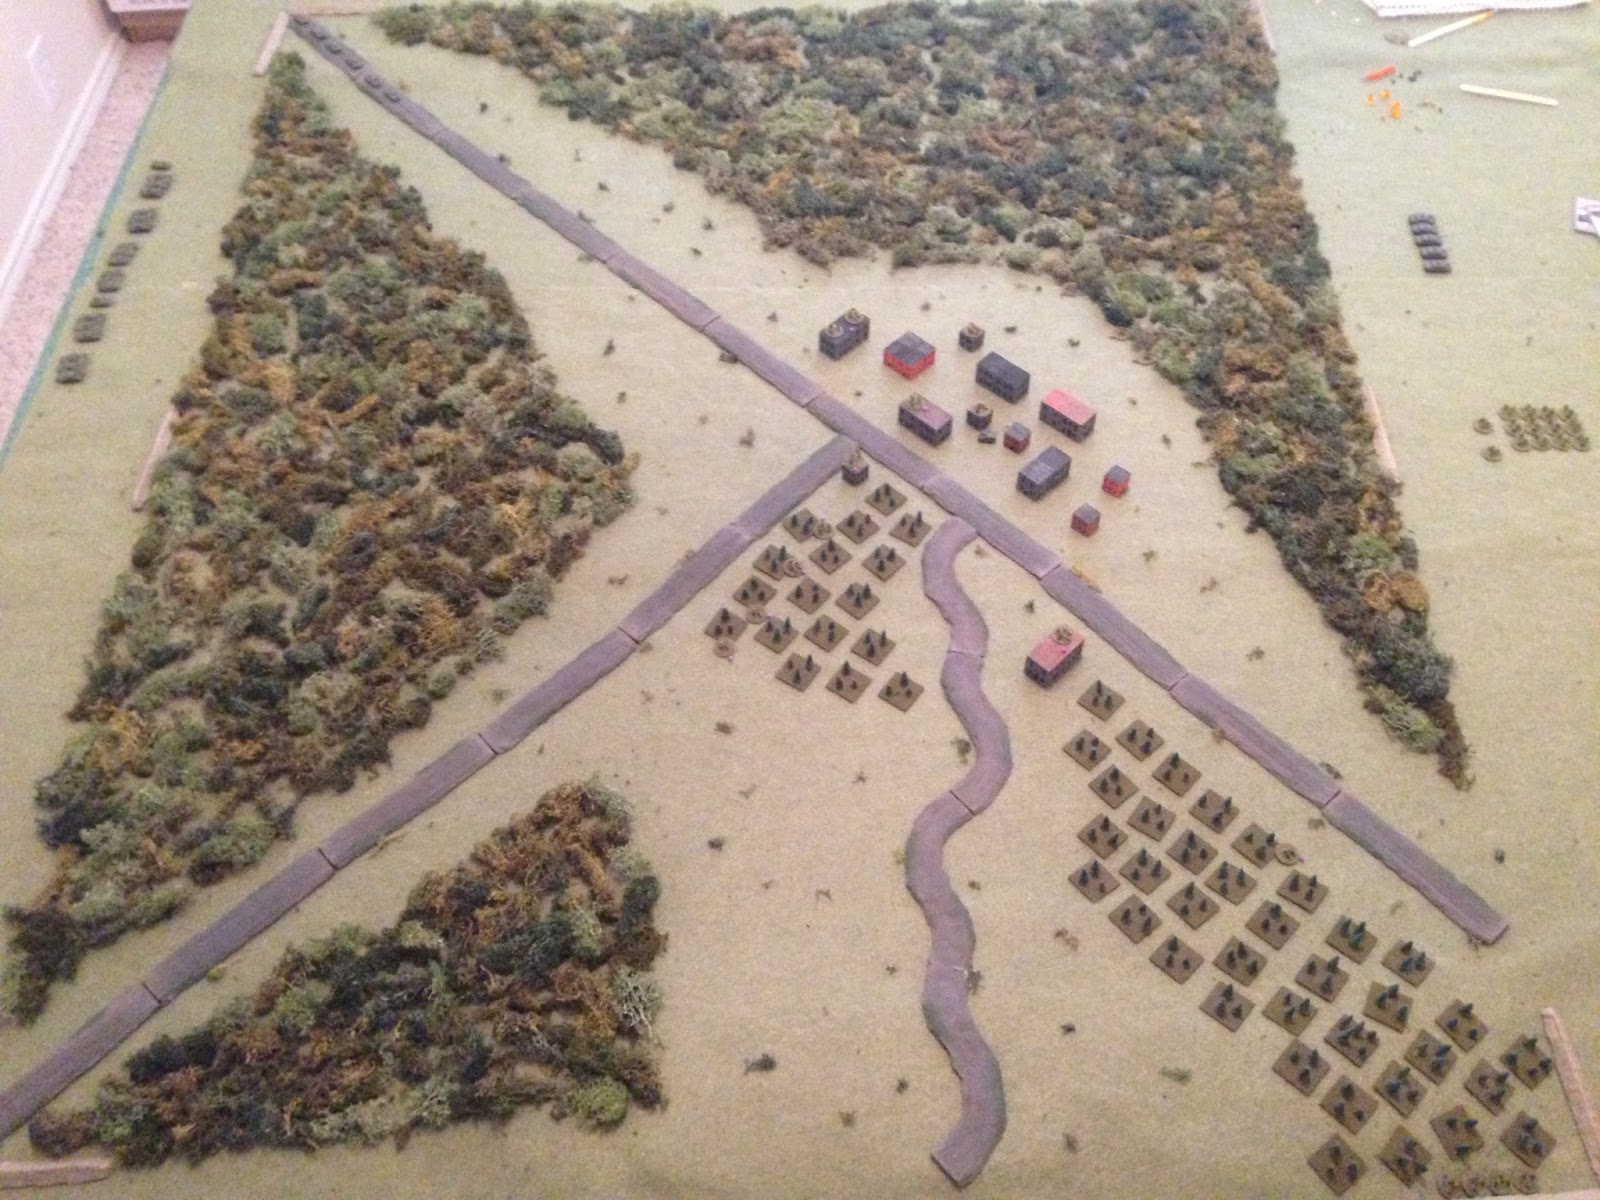
The opposing forces, with US on the right and Soviets on the left. As you can see, the Soviets have quite a bit more troops than Team Whiskey. Neither side has air or arty in this engagement.
The US force, with one Command Stand (Captain Sighe), four rifle teams, five TOWs, five MGs, a mortar platoon, and five M1 Abrams (with the Company Commander, Captain Lemmey, and platoon commander 1st Lt Roberts).
The Soviet force, with two Command Stands (a Commanding Officer and an Executive Officer, in a BTR-50 and BMP-2, respectively), four platoons of tanks, and four platoons of BMPs with infantry.
The table, looking south to north, with the US baseline on left (west) and Soviet on right (east), with the US basically spread around the crossroads and the Soviets entering via the road at top right.
The table, looking west to east from behind the US baseline. US forces are mainly around the crossroads and village, with their mortars at bottom right.
Looking north to south at the southern half of Bad Stulz: two US rifle teams, two machine guns, and Captain Sighe (in an M-577) in the village, and an MG and two TOW teams in the treeline at top center/top center right.
Looking north to south at the northern half (tenth?) of Bad Stulz: at far left there is a rifle team in the top left building, a rifle team, an MG, and two TOW teams in the treeline, an MG in the building at top center, and a TOW team in the treeline at top right, looking straight (east) up the road.
In the southwest corner (bottom right, looking west to east towards Bad Stulz, off camera to top) are the US 81mm mortars, with the TOW team looking down the road at top center.
The US plan is for the TOWs (two in the southern treeline, two in the northern treeline, and one in the rear) to open the engagement against the Soviet armored column, and then for the US infantry to pretty much die in place, tying the Soviets up in the village/treelines while the TOWs displace and reload to hit the Soviets again, then pray the tanks get there in time. The Soviets, basically on a road march, comfortable due to the fact their recon missed these US positions, don't really have a plan, they'll just have to react on the fly (that is to say, execute standard battle drill for a "close ambush - front").
The three TOWs in the north are 1st TOW Section (TOW1), while the two TOWs in the south are TOW2.
The Soviets are broken up into four elements, in order of march: Mech 1 (six BMPs), Tank 1 (six T-72s, followed by the enemy CO), Mech 2 (six BMPs followed by the enemy XO), and Tank 2 (six T-72s).
In the northeast corner, Soviet Mech 1 comes on the table.
Mech 1 moves up as Tank 1 comes on the board.
Mech 1 and Tank 1 move up as Mech 2 comes on the board, with a US rifle and MG team visible at bottom left in a building. So far the US luck holds, no one is spotted.
Mech 1 enters Bad Stulz, with Tank 1, Mech 2, and Tank 2 in trail. All Soviet forces are now on the board, albeit with their infantry loaded up into the BMPs.
The lead BMP commander in Mech 1 (bottom left) casually glances left to see a US M-577 Command Vehicle (center right) sitting there. The Soviet Sergeant screams "contact!" into his radio at the same Captain Sighe, who's vehicle just got spotted, screams "fire!" into his.
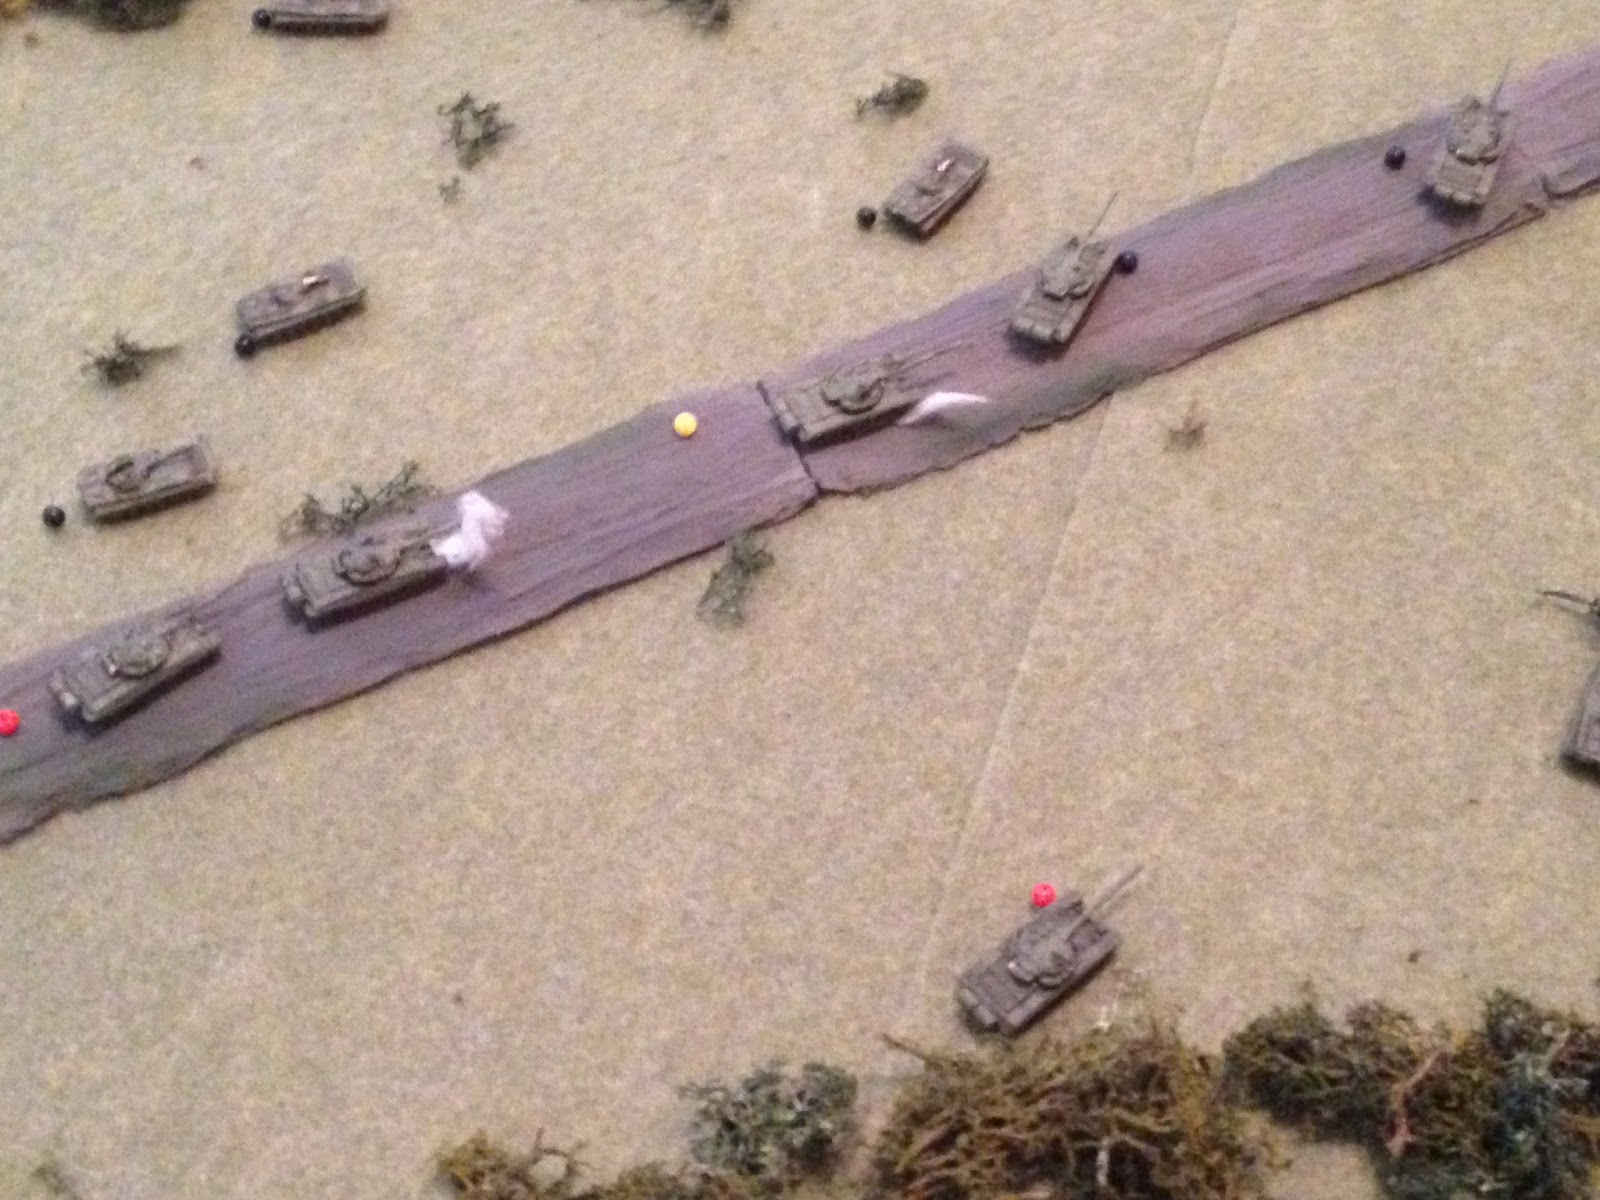
TOW1, just north of the Bad Stulz crossroads, are first to react, firing their anti-tank guided missiles.
The shots are money: at right, a T-72 is knocked out, while the tank in front of him is pinned and the BMP behind him falls back and hunkers (top right). At far left, a BMP is smoked (taking the rifle team with it), while the BMP behind it is immobilized. The crew and rifle team bail out.
The Soviets are unable to acquire the TOW teams, so they are able to fall back unmolested, out of sight (bottom center from the purple beads, with Soviets off camera to top left. There's a US MG team just visible at top right, with a US rifle team just off camera to top right).
Please note, when I say the Soviets are unable to acquire the TOW teams, that doesn't mean the Soviets didn't see and react to the TOW launches. This simply means they were unable to deliver accurate, effective fire on the TOW teams, which allowed them to fire their missiles, guide them into their targets, then fall back without suffering casualties or negative morale results.
Looking southwest to northeast from behind Bad Stulz, the rear (third) TOW team of TOW1 (bottom left) launches its missile at the lead Soviet BMP.
The lead BMP (center right) is toast (with its rifle team), while the BMP behind it falls back and hunkers (far left), and its rifle team dismounts. At center, in the buildings, you can see two US rifle teams, with a rifle team and MG team in the building at top center, and another MG in the building at top right. The purple beads mean the unit is still hidden.
Damn, Shaky Jake again... In any case, the Soviets are really in a bad position to acquire the TOW that just fired, and they don't. The rear TOW team is able to fall back (top left, from purple bead at bottom center right). The blue beads on the TOW teams mean they've fired and need to spend a turn to reload before the can fire again. So, while the TOW shots are very deadly, they lose a lot of time because, at best, they need one turn to displace (the way I'm playing the rules is that if you stay in the same spot you're the enemy gets a substantial bonus when firing on you), another to reload, and then they can fire again.
In the ville, Soviet Mech 1 activates, with its BMPs pushing forward in search of cover to avoid US TOWs and to drop off their infantry. Additionally, the Soviet CO moves up to help a BMP rally (top center, red bead).
But they have no idea of all the US troops in close proximity. They're about to.
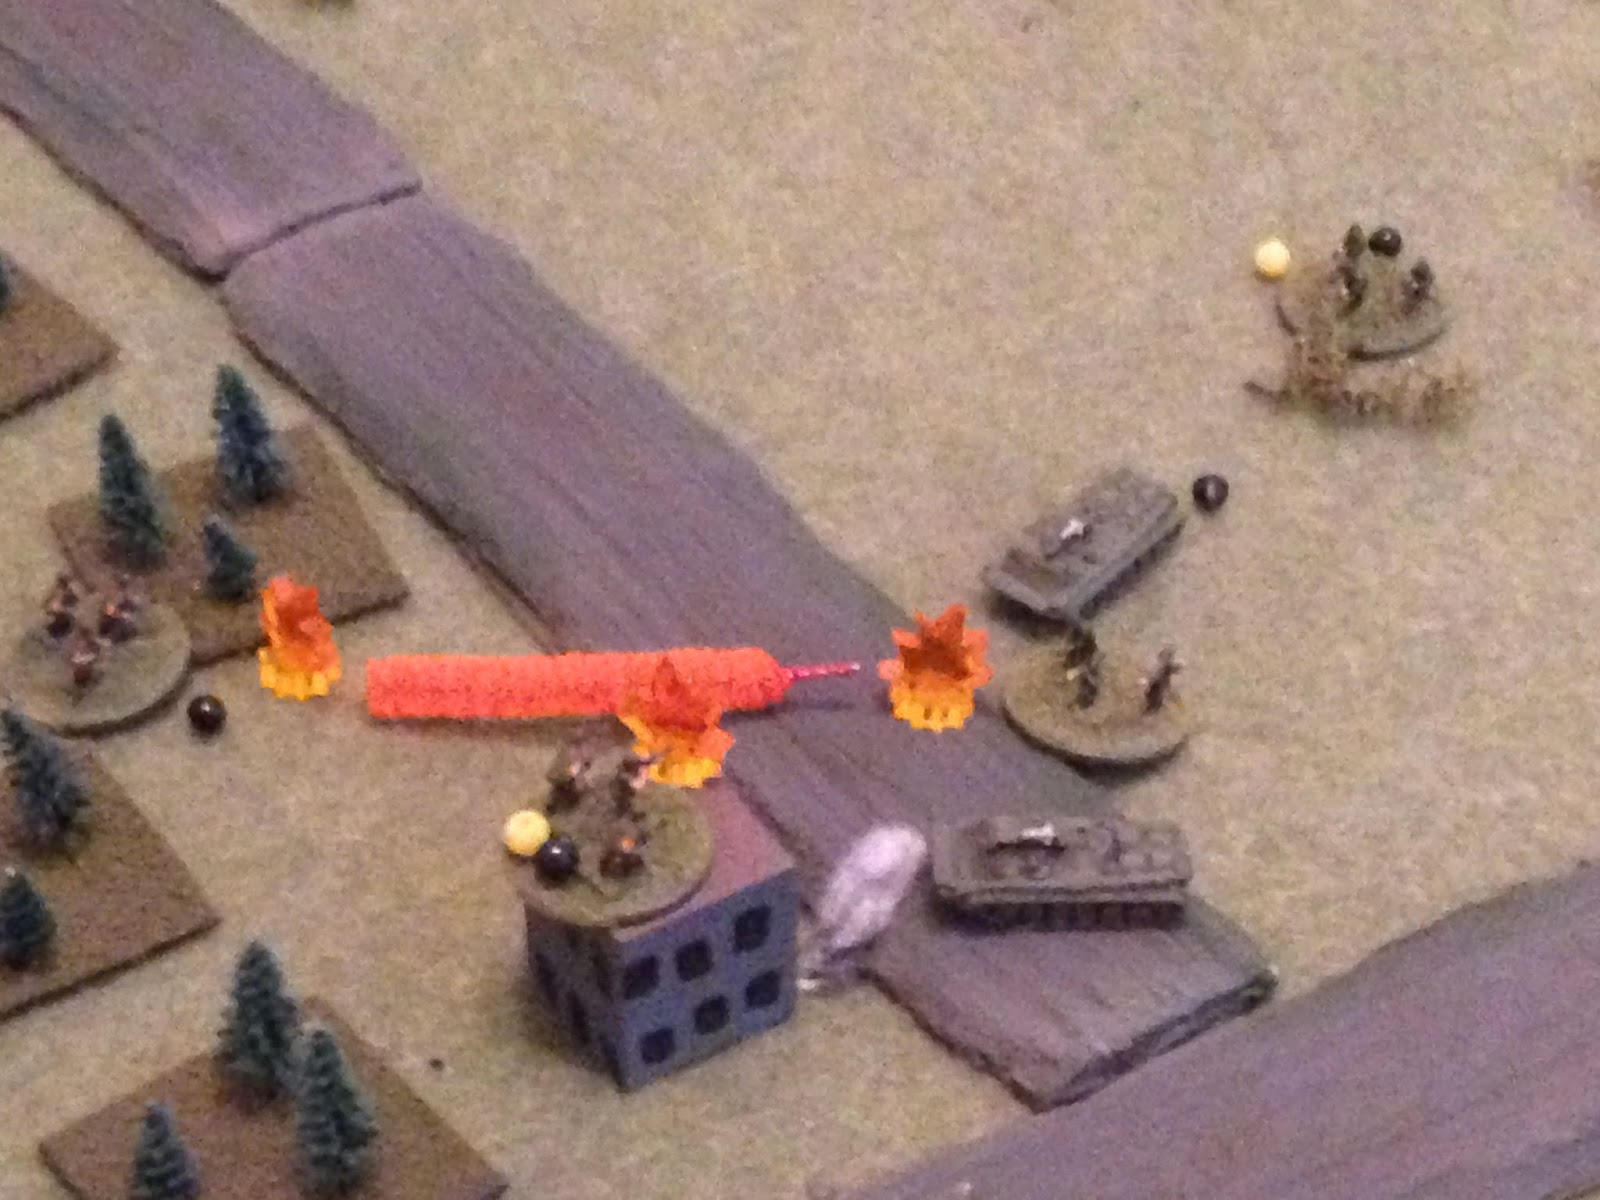
Okay, the pic looks a little crazy, but the short story is, all the US rifle teams fire LAWs at the BMPs that just moved up.
The BMP at far left is the one just knocked out by the rear TOW. The BMP at center - below crossroads) is immobilized and the crew and rifle team get out, the BMP (and rifle team) on the road just north of the crossroads is knocked out, but the BMP between it and their CO is completely missed. There was a BMP at the explosion at center right; he was missed, but fell back and hunkered at top right.
The Soviet CO (center right, next to infantry team there) fails to rally the BMP, and it falls back again (top right), while the BMP that was totally missed (center left) returns fire at the US rifle team.
The BMP simply sprayed the treeline, and they got 'men down' on the offending rifle team (top center), as well as an unspotted US MG team (bottom left)!
Additionally (looking south to north), the lead T-72 of Soviet Tank 1 (center right) returns fire on a US rifle team (bottom left, white bead) that fired a LAW, putting heavy casualties on them (but, luckily, not affecting the MG team right next to them).
Looking south to northeast, TOW2 gets in on the action, launching two missiles at Soviet Tank 1.
Looking from the opposite direction, you can see the first tank was able to shuck and jive to make the TOW miss, but still had to fall back and hunker (bottom center, red bead, from the explosion in the center on the road). The second target (explosion at left), however, is a smoking hole in the ground.
But calamity strikes: the T-72 at center left (between the two targeted tanks) is able to acquire the two US anti-tank teams (at top center right), and he fires a 125mm HE round.
One TOW team suffers heavy casualties (white bead), while the other is pinned (yellow bead). This really throws things off...
Looking west to east at the ville (Capt Sighe is at bottom left), the US MG team in the lead building (top center left) opens fire on the Soviet rifle team below it pinning them (only...), while the hidden MG team in the treeline exposes itself to move to the TOW2 (bottom right). The team leader tries to rally the first TOW team, but they've taken too many casualties and simply melt away.
While the Soviets start to get their stuff together: looking east to west, Soviet Mech 2 gets off the road to the left (south) to bypass Soviet Tank 1 (on the road, shot to pieces). The XO moves over and rallies a vehicle (far left, red bead), then that vehicle joins his partners in moving up and firing on US positions. Two BMPs fire on the building (top center) holding a US rifle and MG team, while another fires on TOW2 and the MG team trying to rally them (top center left).
From the opposite direction, with the BMPs of Soviet Mech 2 off camera to top center. In the front building (top center), the US rifle team is eliminated, while the MG team is 'men down.' At bottom center, the MG team trying to rally TOW2 is pinned.
More Soviets getting their stuff together: looking east-northeast to west-southwest, Soviet Tank 2 gets off the road to the right (north, bottom right) to bypass Tank 1 (on the road shot to pieces). They move up in echelon of two platoons, with the lead platoon firing on the move at US positions at the crossroads (top right).
But apparently firing on the move at infantry in the heavy cover of stone buildings is not a good idea as neither US team is hit.
Soviet Tank 1 activates, but two of its tanks can't do anything as they've already react fired. They have a pinned tank that tries to self-rally, but fails, falling back (red bead at far left, from yellow bead at center), while they have a hunkering tank (red bead at bottom center) that successfully self rallies. Their last two tanks have already been knocked out (smoke on the road).
Just north of the crossroads, the hidden MG with heavy casualties self rallies (top left). The 81mm mortar platoon, without suitable targets, sits tight this turn.
Riflemen of the Soviet Mech 1 move up and fire on US rifles that are already 'men down' (top left), to no effect (here I must admit that I don't know why that happened, i.e., why I had them fire at a rifle team that is already 'men down,' as opposed to the totally unaffected rifle team in the building right next to them; there's nothing in my notes, and I'm only realizing it now as I type, so I think I just screwed up...). The Soviet rifle team, pinned at center (yellow bead), tries to self rally.
But they fail and fall back from bottom center to top center.
While one of their rifle teams that bailed out of an immobilized BMP (bottom left) sprints ahead (top right), trying to catch up to his buddies (off camera to top right).
That's the end of Turn 1.
Turn 2 starts with the Soviet CO (BTR-50 at center, next to two rifle teams) successfully rallying the hunkering rifle team next to him (red bead at center). Then the CO falls back to rally the BMP at top right. The BMP at center right tries to self rally.
But he only gets them up to pin (the CO's BTR-50 is at bottom right, the BMP has traded in its red bead for a yellow one). The BMP that tried to self-rally fails and falls back (center left, from red bead at far right).
But the 'good' BMPs of Soviet Mech 1 push steadfastly into the ville (top center), one of them firing on the US rifle team in the building there, while the pinned BMP at bottom left fires at a US rifle team across the street.
From the opposite direction, the US rifle team in the north (top center left) takes heavy casualties in the building (white bead, with another 'men down' US rifle team at top left), while the US rifle team in the south is forced to fall back out of the building (red bead at bottom center), next to Captain Sighe.
Off camera to top right, the pinned BMP kicks out its infantry.
Captain Sighe tries to rally the US rifle team next to him...
But they fail and run (far left, red bead, from top left), so the Captain mounts his track and head over to TOW2 to rally them (bottom right). The rally works and TOW2 is in fighting shape, though still needing to displace then reload.
The US infantry north of the town act: the previously unspotted MG team (top left) opens fire on infantry of Soviet Mech 1 (top right), who he knows are about to charge his beleaguered accompanying rifle teams (white beads at center, center left), while those two rifle teams try to self rally.
The MG team only manages to pin (yellow bead) one of the Soviet infantry teams, but both US rifle teams get back in fighting shape.
In the south, TOW2 sprints to cover (far left, from the track at bottom center, with pinned MG team at top right). I hope I didn't make a mistake moving TOW2 into the ville, probably should have moved them off camera to bottom left. We'll see...
While I'm pretty damned sure I made a mistake in the north with TOW1. This pic is looking northwest to southeast, with the ville at top right. The original plan was for the two TOWs of TOW1 in the east (the purple beads at center right) to fall straight back (off camera to right), then reload and set up. But then I started second guessing myself: what if the Soviets just push up the middle? TOW1 will be caught out with no line of fire, and by the time they get one Soviet vehicles will be inside their minimum range, if the TOWs aren't smoked by Soviet infantry coming through the trees/ville first.
I know, I'll have the two TOWs sprint north (left), where they can set up to engage Soviets coming 'round the north (gap in trees at top center), or fire into the flank of Soviets pushing up the middle (gap in trees off camera to right). A great plan potentially, but the TOWs sprinted and didn't make it to cover. So, now they are not only exposed to any Soviets that come through the north gap, they are going to need to use another turn to move into position, then one more to reload, before they can get back in the fight...

Looking west to east, the rear TOW (center, at edge of treeline) moves into his new firing location, unspotted, covering the north gap (top center; don't be confused by 'north gap;' we're looking east, so 'north' refers to the fact the gap is north of the crossroads. The two TOWs that just sprinted are at top left. If they get into position, and do so in time, they can engage to the north gap, and/or fire into the flank of Soviets coming up the middle (towards the gray building at center right). We'll see...
But the Soviets ain't waiting around to see what happens: we're looking east to west at Soviet Mech 2, who pushed hard ahead at the ville, guns blazing, even spotting a previously unacquired MG team (center left).
Looking from the opposite perspective, from right to left (follow the explosions): the MG team in the bottom right suffers not, the MG team in the building is eliminated, the other MG in the other building (top center) doesn't change (still 'men down'), and the rifle team in the building at far left is pinned (yellow bead).
Soviet Mech 2 kicks out its infantry (top, next to each BMP that just moved up and shot). Now would be the perfect time for a US activation so I can ring my 81mm mortars up and whack these @#$%ers...
But another Soviet card comes out, and since I'm playing solo and I know what I'm thinking, the Soviets activate Mech 2's infantry to move them up to take ground, while at the same time dispersing them so they're not a juicy mortar target ;)
Two teams go left (top left), firing on the US MG up there, while one pushed up the road (center, just left of the road) and fires at a pinned US rifle team (far right, yellow bead), whilst another Soviet rifle team says 'hell with it' and charges the 'men down' US MG team in the building at center left (white bead).
From the opposite perspective, looking at the pinned MG team in the south, with Captain Sighe's command vehicle at bottom left, the US MG team react fires, pinning one Soviet rifle team (top right, yellow bead).
But the other Soviet rifle team (top right) fires and knocks out the US MG team (they were at the explosion at far right). The US CO is forced to fall back and hunker (far left, red bead, from bottom center).
Back in the ville, the Soviet rifle fire has no effect (the team at center), but the charging team wins the close assault (far right), knocking out the US MG team in the building.
Another damn Soviet card, and the infantry of Soviet Mech 1 go to work. One rifle team that was stuck in the rear sprints forward (center left), while another moves up and fires (center right), and the pinned team (yellow bead at top center right) fires.
Looking south to north at the north side of the crossroads, the fire from the two Soviet rifle teams has no effect (coming from the pinned team, yellow bead at top right, and another team off camera to top right) on the US troops. But the Soviets are going for broke, so they have one of their rifle teams charge the pinned US team in the building at bottom center (yellow bead). Another US team (top left, with an MG team just off camera to top left) react fires...
But misses, and the Soviets get into close combat with the pinned team (bottom right).
They win (ergo, the empty building at bottom right), then push ahead to a US rifle team that's not even pinned (you really want your close combat teams to be 'hunkered' or 'men down,' but at least pinned!). The US team again react fires...
Again they miss, and again the Soviet rifle team moves into close combat...
And again they win in close combat. They then charge the US machine gun team, who react fires...
But misses!!! And the Soviets have now moved into a third close combat...
The Soviet rifle team puts the US MG team out of the fight, then takes cover behind some trees.
You gotta be @#$%ing kidding me!!! I've done that several times, but I've never had it done to me! I s'pose turnabout is fair play, but in my defense, at least I was doing it to pinned/hunkered/men down teams that were lined up like bowling pins. He did it to a pinned teams, and two in good shape, dodging react fire three @#$%ing times!!! Quite a run. Now I'm really nervous about TOW1 being caught out in the field in the open before they can move into cover; they're off camera to top left, and nobody can see them right now, but if this team moves to the top left a little bit, they'll be able to spot them for sure.

And so the US mortars (bottom right, looking west to east) finally get a call. We need to cover the two teams in the open from TOW1 (just right of the trees at far left), so the 81s drop smoke (top center left) to screen them. The Soviet rifle team that just got finished bustin' out the whoopin' stick is in the trees just top left of the orange tracer at center left). He may still be able to move over and spot the TOWs running away, but at least the BMPs and T-72s (off camera to top center) won't be able to see them.
In the south, all the US has left is Captain Sighe (bottom left), who's hunkering, a TOW team (bottom center) that needs two more whole turns to get into action (one to reload, one to get into firing position), and a hunkering rifle team (center left). Well, the hunkering rifle team manages to self rally, so things are looking better already...
Looking east to west, Soviet Tank 2 (bottom right, with Tank 1 on the road, Mech 1 spread across the center/right, and Mech 2 at top left) sees the smoke (top right), and pushes forward cautiously. They have nothing to shoot at since that damn Soviet rifle team went and cleared out half the US line...
Looking southeast to northwest, the Soviet XO moves up and rallies a T-72 belonging to Tank 1 (center, red bead).
And then Tank 1 moves slowly up the road (four tanks at top left, with BMPs of Mech 1 to their right and BMPs of Mech 2 to their left).
And then Captain Lemmey arrives with the M1 Abrams of Lt Roberts' platoon (bottom left, with tanks of Soviet Tank 1 just visible at top right).
The tanks rapidly deploy, maneuvering into firing positions, then cutting loose with their main guns, targeting two T-72s, a BMP, and a rifle team (all noted by explosions at top center to top right).
From the opposite perspective, an Abrams busts a T-72 wide open (top center), Lt Roberts charbroils a BMP (center left), which causes a T-72 to fall back (bottom center, red bead), Captain Lemmey smokes a T-72 (center left), and another Abrams manages to put both rifle teams at top left out of action.
So, just when things were looking dark, here comes the cavalry. But I don't know if it will be enough. So far, the US has lost 3 of 4 rifle teams, 1 TOW team, and 4 of 5 MG teams, while the Soviets have lost 4 of 12 tanks, 6 of 12 BMPs, and 5 of 12 rifle teams. While the US is in good stead with the arrival of the Abrams, don't forget the Soviet rifle teams have RPGs, and their BMPs each have a single ATGM shot (it can actually be reloaded, but they're not going to take the time to do that in the middle of a fight), as well as their cannon, which can kill an Abrams at very short range.
The big deal is my not getting the TOWs in place; that's looming large in my mind, and I hope it doesn't cost me the fight. Stay with me, the conclusion is coming as soon as possible, and the fight is knock-down, drag-out once again.
V/R,
Jack


Another intense game! I look forward to the conclusion.
ReplyDeleteMybe you've commented on this in previous posts, but how do you allot the activation cards, one per unit?
Chris,
DeleteYeah man, I've had a string of great games, very fortunate. Regarding cards, I go with an arbitrary split based on what I think makes sense. In this game, the Soviets had a card for Mech 1, Mech 1 Infantry, Mech 2, Mech 2 Infantry, Tank 1, and Tank 2. The US had cards for North Inf, South Inf, TOW1, TOW2, mortars, and tanks.
V/R,
Jack
I should have figured this out by now, but what do the solid orange markers that look like missiles with short, orange trails represent?
ReplyDeleteFrogfan,
DeleteI just use it as a 'tracer' to show the reader who's shooting, and what they're shooting at. Same concept as the missiles, just for small arms, MGs, mortars, and main gun rounds, so it's easier for the reader to pick it out of the photo.
V/R,
Jack