All,
Well, this wasn't the original plan, but I had so much fun (and a little unresolved business with regards to tightening up the rules), that I decided to have another go with the Legionnaires in Perplakistan.
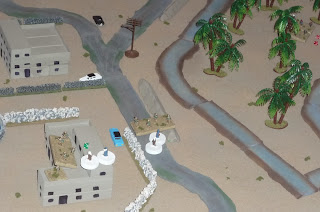
Here's the table. I rearranged some terrain, got rid of the hideous wadi I used last time, but the rest of the terrain rules hold the same. The village in the center, Kabalouey, is currently being terrorized by the Army of DUMDUM insurgents. Colonel Louis-Louis has made the decision that Major Lapieux's Legion task force will move on the ville, brush the insurgents back, and evacuate the villagers to a safe haven. The on-table insurgents are starting on blinds, with continuous reinforcements throughout the game, arriving at one of three 'hotspots' (black chips): one on right (the east hotspot, next to the east canal), one at the top (the north hotspot, behind the north hill), and one on the left (the west hotspot, in the grove at left above the west canal).

Each white chip is an insurgent blind, with three real ones and three dummies. There are four buildings,clockwise from bottom right: 1, 2, 4, and 3, each holding a civilian family. The French must enter the building, secure the civilians, then lead them to evacuation.
East side, showing the eastern end of the ville, the east hotspot, and (left to right) southeast hill and east hill.
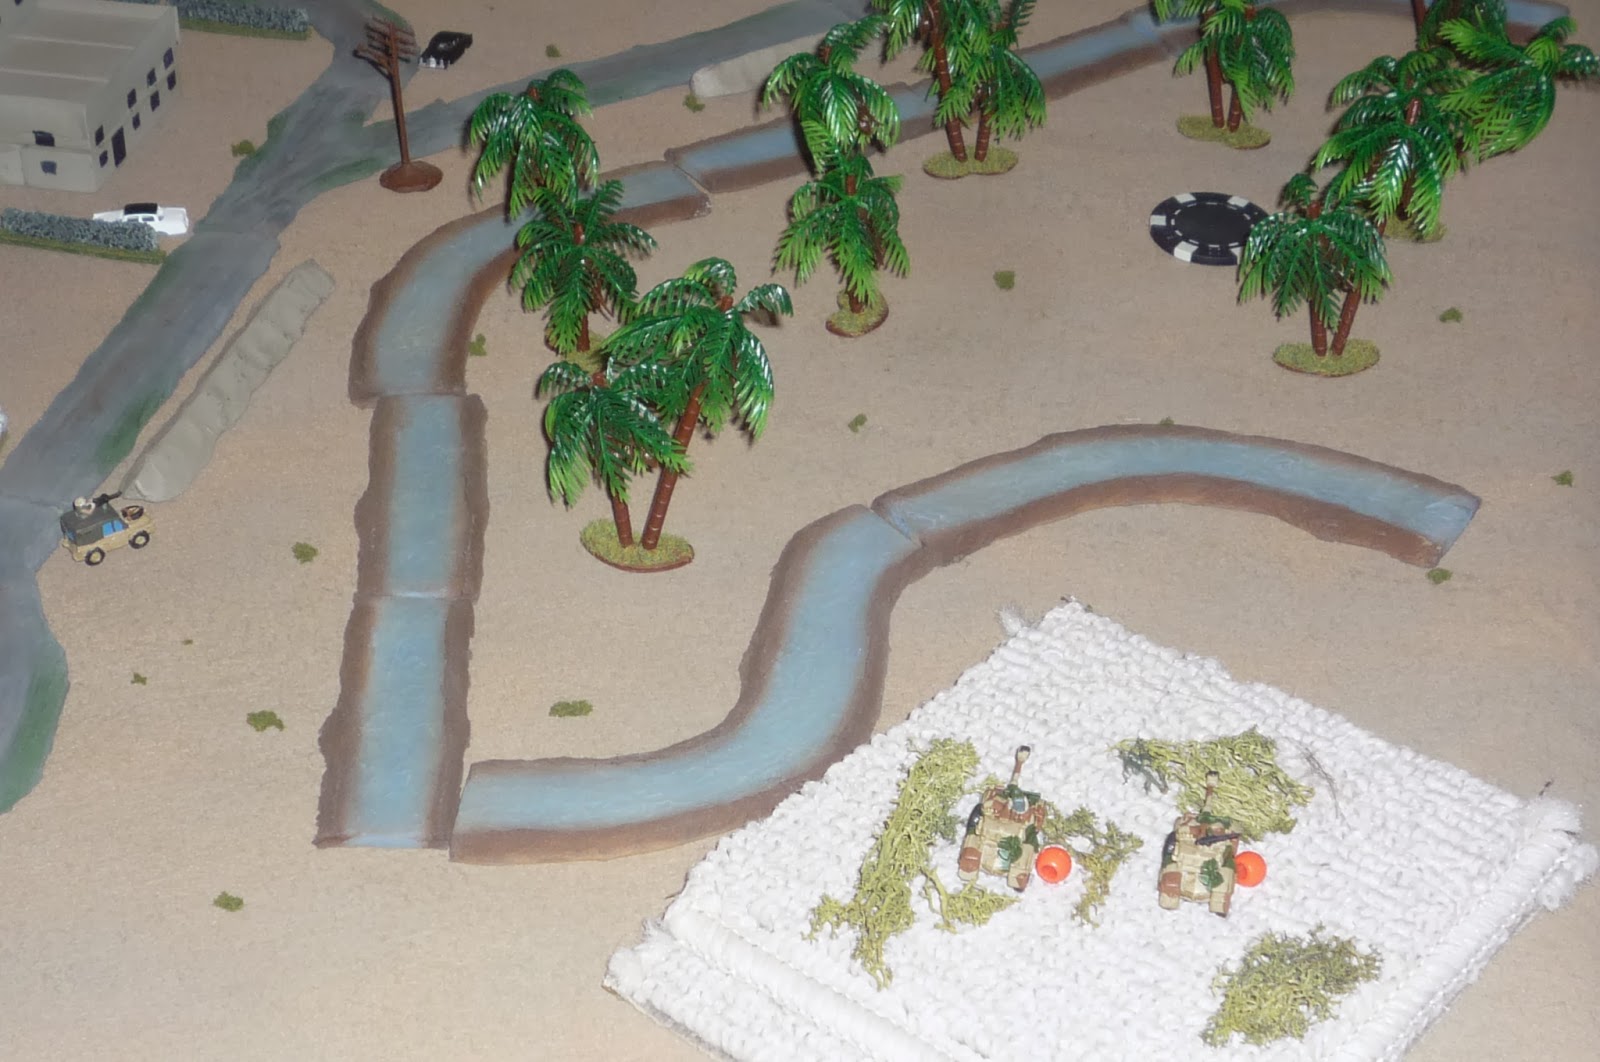
The west side, showing the west hotspot (north of the west canal), and the west end of the building. Vehicles cannot traverse the canals, only men on foot, and at a penalty.
The north, insurgent end of the table, showing the north end of town and the north hotspot.

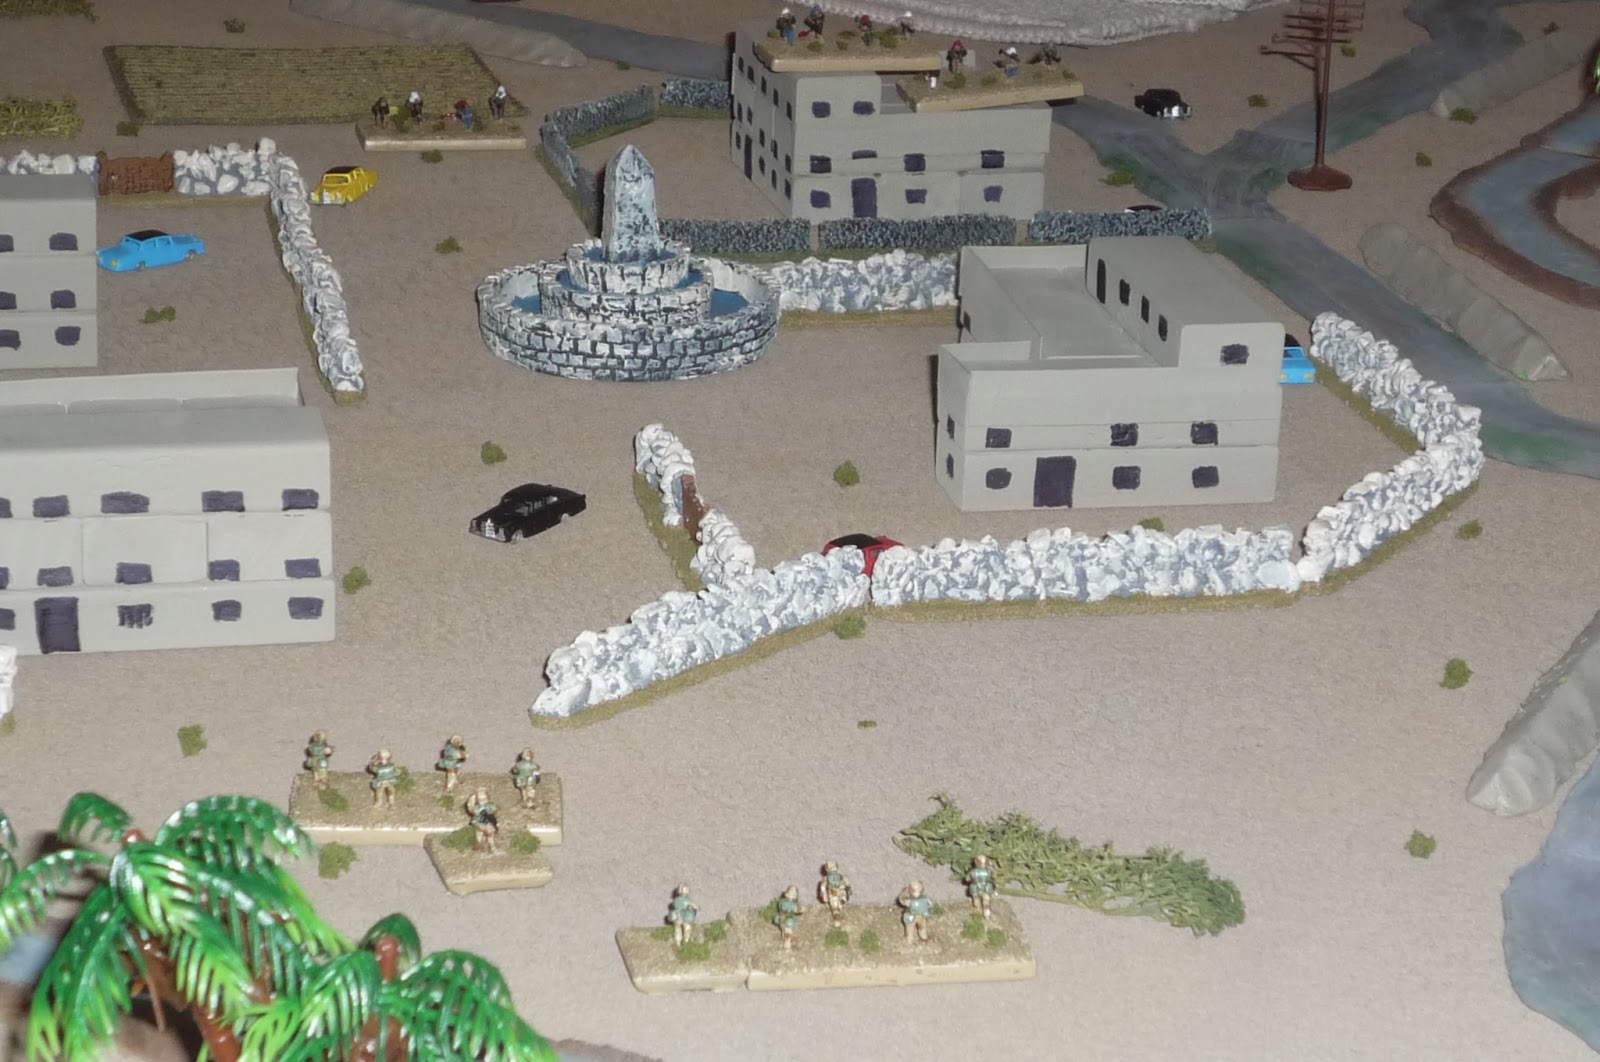
The French Foreign Legion Task Force: top left is the "Western Force," consisting of a leader, MG team, and rifle teams 5 and 6. The Western Force is charged with moving into the west canal grove and taking up positions to isolate the west hotspot from the village (yes, intel was good enough that the task force can anticipate where enemy reinforcements will arrive from). Top center is S3 (Land Rover with Mk19), V3 (Panhard), and the Milan team. They will move to SE hill and take up positions deliver fire into the village as necessary and interdict north hotspot forces when possible. To their right is V1 and V2 (both Panhards), charged with moving to east hill and taking up positions to isolate the east hotspot from the village. Below them is H1, carrying a leader and teams 1 and 2. H1 will advance to building 1 (lower right) and discharge (via fastrope) it's passengers, who will secure the civilians. H2 is carrying a leader and teams 3 and 4, and carry its passengers to building 2 (lower left), and they will secure the civilians. Both teams 2 and 4 carry explosives to blow a hole in the wall at the southern edge of the village in order speed up and provide cover to the evacuation. The last element (bottom left), consists of S1 and S2 (both soft back Land rovers), one carrying the SAM team (who was left home last mission). S1 and S2 will move to the breach in the southern wall, while the SAM team debarks to escort civilians back to the evac point (the goal is to not have the rifle teams doing this, as they will be the firepower in the village). Once all civilians are evacuated via vehicle to the Landing Zone at the SE corner of the table the helos will be used to evac the civilians and parts of the task force. The remainder of the task force will rendezvous at the LZ (also the Marshaling and Control Point, or MACO), where the remaining infantry will load into vehicles and drive back to base (off the southern edge of the map). As before, any eliminated French team's must be MEDEVACes, either by helo or vehicle.

The game starts with the Western Force moving up from the table edge. They manage to get over the canal.
V1 and V2 haul towards east hill, spotting bad guys near the east canal (top left). I wanted to get them up on the hill and get a shot at the insurgents, but the dice failed me. This would be common today.
S3 and V3 managed to get tot the top of the hill before failing command rolls. Another insurgent team was spotted (top left). The insurgents in the ville took a shot at S3 but missed.
H2 swooped in on bldg 2, and the leader with teams 3 (on bldg) and 4 (bottom left) fast-roped down. Tm3 and 4 both lit into the nearby insurgents, getting 3 hits, before Tm4 used its explosives to blow a hole in the southern wall. H2 departs.

H1 then moves to bldg 1; I'm very nervous here as there are bad guys to the right (just off camera) who still haven't used their opportunity fire and weren't pinned by V's 1-3 or S3... The leader and Tms 1 and 2 are able to fast-rope down, but H1 blows its roll and is just sitting there like a big balloon. Then Tm2 goes nuts: they fire at the insurgents on the east canal road, 1 hit 1 save. I thought 'crap!' but they passed again, putting 2 hits on the bad guys and pinning them. Then I rolled boxcars (two actions!), so Tm2 finished off the insurgents on the right then moved forward (that's them at top center, with Tm1 and Ldr on bldg 1). Then Tm1 eliminated the insurgents in the ville, but another insurgent team popped up (top left) and put an RPG right into H1. Now I'm thinking, "this is Super 61, we're going down," but the round merely managed to kill a door gunner and destroy his weapon (and 'pin' the aircraft). The bad guys got another shot in but missed. Tm1 returned fire, hitting nothing, and the bad guys fired back with two rounds of fire, getting 3 hits (rifle teams take 5 hits) and pinning Tm1.

But then Tm3 (in bldg 2, bottom right) stepped up and took out the insurgent team (4 hits!). I was expecting it to be much harder to get a foothold in the village. I had envisioned moving up the west (bottom of photo) side, with guys in bldg 1 (top right) and on SE hill (off camera, top right) laying fire onto bldgs 3 (top left) and 4 (bottom left). But we're advancing so fast I think S3 and V3 on SE hill are no longer in a good spot. Enemy reinforcements arrive, with 2 rifle teams in the east, 3 rifle teams and the Recoiless Rifle Technical in the north, and two rifle teams and the HMG Technical in the west.

The Western Force starts it off again, getting into position at the west canal. They're looking at a wealth of targets on the west hotspot (2 rifle teams and the HMG Technical), so they have it: the MG team opens up on the Technical, immobilizing and pinning it, before their second round of firing blew it up. Both Tm 5 and 6 fired and missed, then failed their roll. The two insurgent teams returned fire, getting a hit on Tm6.
On the far right, V1 and V2 ascend east hill, then pop the two insurgent teams on the east hotspot, getting a hit on each. Then, both insurgent teams loosed RPGs at V1 and V2, hitting both, and both received damaged engines. It was funny how symmetrical that fight was...
In ville, H1 unpins and gets the heck out of there. Tm1 (on bldg 1) managed to unpin, but then failed. Tm2 moved into bldg 4, secured the civilians, then escorted them out... into the street!!! I don't know what I was thinking; this certainly got away from the plan. At top right you can see two insurgent teams (that just shot it out with V1 and V2); neither are pinned, and when they're time comes up they could very well swing left (west) and put a hurtin' on Tm2 in the street. Also, off-camera to the north, are three more insurgent teams and the RR Technical, who also would love to catch Tm2 in the street. My plan was to keep my rifle teams in the buildings to maximize their cover and give them good fields of fire, but everything was going so well I thought, 'why wait for the bad guys to come for us, just back out of here.' Tm1 and Tm3 also secured their civilians, in bldg 1 and bldg 2, respectively.

S1 and S2 both came up the road, then failed (bottom left). S3 drops the Milan team on SE hill then moves up to Tm2 (top right), looked to fire up the bad guys at the east hotspot, but failed. V3 stayed on SE hill and put two hits on one of the teams at the east hotspot.
Tm4 moved up into bldg 4 (bottom right) and secured the civvies (that's the west hotspot at top right), was going to fall back (left) behind the building to get out of LOS of the enemy, but failed. Tm3 (bottom left, on bldg 2), fired at the insurgents on the west hotspot, getting two rounds of fire and two hits on each.
Back at the east canal, bot insurgent teams took shots at Vs 1 and 2, with two rounds of fire, but all they managed was to bounce an RPG off V1. The return fire put a hit on each insurgent team, and pinned one of them (the yellow bead). Meanwhile, S3 (Mk19 Land rover, top left) managed to get Tm2's civvies loaded, and Tm2 moved left behind cover (just to right of Tm1 in bldg 1).
V3, S1, and S2 all moved left, and the SAM tm popped out to start escorting civvies (that's bldg 2 in the foreground, bldg 4 in the background).
At the west canal, the bad guys got in three rounds of fire, getting two hits on Tm5, and pinning them. Tm5 managed to unpin while the MG and Tm6 returned fire, getting two hits on one and one on the other insurgent team.
In the north, all three insurgent teams and the RR Technical moved up, but only one of them managed to pass a second roll; he fired at Tm4 and missed.
Tm4 fired (hit nothing) and fell back out of bldg 4 (top left). Tm1 did this also bottom right). Tm3 (bldg 2, bottom left) opens up on one of the north insurgent teams and gets three hits, but they roll three saves!!! @#$%! Enemy reinforcements come on, but only get 1 team on the north hotspot.
V1 and V2 get in three rounds of fire on the two insurgent teams at the east hotspot, and eliminate both. S3 (pictured above, at left), carrying civvies, falls back towards the LZ.

V3 (center), fires at the RR Technical, and misses, but passes its roll and blows it to hell. V3 passes again and puts a hit on one of the north insurgent teams, who fires back, but the RPG misses. Tm3 (bldg 2, bottom left) has a go, and gets two hits and pins a north insurgent team. Tm1 falls back and gets its civvies into S1, and the SAM tm brings the civvies down from bldg2 and gets them loaded into S2. S1 and 2 both head towards the LZ. Two of the north insurgent teams move up, take a shot at Tm1 (center, wedged between bldg 2 and wall). Another tactical error on my part; I needed to protect Tm1 as it already had 3 hits, and I'd been masking it with terrain or friendly teams, but I didn't this time, and now the bad guys caught them in the open. But somehow the insurgents missed! Tm2 (at fountain) moved left (to that position), fired right, got three hits on an insurgent team, got another roll, eliminated the insurgent team. Tm4 fell back towards the LZ (bottom right).

The insurgent situation in the north.
In the west, Tm5 eliminated one insurgent team, then the MG and Tm6 eliminated the other.
The first insurgent team couldn't unpin, while the second exchanged fire with Tm3 (bldg 2, bottom left), getting no hits but receiving one. The other insurgent team fired at Tm2 (at fountain), hitting nothing, while Tm2 put 3 hits on them and pinned them. V3 moved left, and the SAM tm loaded the last civvies in there, while Tm4 moved back to the canal. Enemy reinforcements: 2 teams in the north, one in the west.
On the far right, V1 and V2 (both damaged) began slowly falling back, and the Milan team bolted down SE hill and hopped in V1.
S1, 2, and 3, and V3 all make it to the LZ, but none pass enough rolls to unload their civvies.
Tm4 moved east into the field and went on overwatch (white bead), while the SAM tm and Tm1 fell back towards the LZ.
The center insurgent team failed to unpin, while the top left one unpinned, and the other three sprinted east to try to get a shot at the fleeing French.
Tm2 comes down out of bldg 2, fires and falls back, followed by Tm3 firing (one hit) and falling back. I had to bend the rules a little bit to pull off this maneuver (you're supposed to finish with one element before activating another), but I really wanted to do the falling back by bounds, so I did it. I didn't cheat, that is, they had to pass their rolls, but not how it's supposed to happen, strictly speaking. Another benefit of playing solo: no one to object to your interpretation of the rules!
The Western Force opened up on the solitary insurgent team that popped up there, putting them out of their misery, then falling back towards the LZ, where H1 was waiting.
Insurgent teams try to unpin, one does, one doesn't. Two teams move into bldg 3 (top right), but fail to shoot. An insurgent team moves up into center, fires at Tm3, misses, and is eliminated by Tm3 with return fire. The last insurgent team double times (boxcars) up the east side, but Tm4 was on overwatch and puts four hits on them! Enemy reinforcements: 2 teams in the east.
All civvies embark on H1, which manages to get up and away, precious cargo secured! Now to get the task force out. To aid with this, H2 hits the LZ. The Western Force manages to cross the canal, but fails, so doesn't get to the helo, SAM tm and Tm1 keep moving towards the LZ. V1 and V2 slowly nurse their damaged vehicles towards the rendezvous point (LZ) as well.

The bad guys in the street manage to unpin, while one of the insurgent teams in bldg 3 takes a shot at V1, but miss. Tm4 then eliminates the bad guys in the street. Tm2 and 3 continue their fighting withdrawal, taking turns to fire at the insurgents in bldg 3 and fall back, with each team getting a hit, though Tm3 takes one in the return fire, while the pinned insurgent team in bldg 3 manages to unpin. Off camera to the right, the two insurgent teams on the east hotspot move up to the canal, then fail their roll to get across, which pretty much ensures they'll be too late to the party. One of the insurgent teams in bldg 3 targets V1 with an RPG (again), but this time scores a hit, knocking out the main guns targeting system/optics (-1 'to hit' for rest of game), though V1 and 2 are more interested in getting to the rendezvous and head towards the LZ.

Insurgents in bldg 3 get a hit on Tm3, which continues to leapfrog with Tm2, firing and falling back, with each team scoring a hit, and Tm2 pinning one of the insurgent teams (top is Tm3, middle is Tm2, bottom left is Tm4). The last insurgent team (top center, ground level) sprints forward, then tries to get off a terrible shot at Tm3, but fails its roll. Enemy reinforcements come on, 1 team each at the west, north, and east hotspots, though they won't be able to get in the game.

V1 and V2 join S1, S2, and V3 at the rendezvous point (that's V1 with two red beads, engine damage and optics damage, V2 with one, engine damage). Western Force, SAM tm, and Tm1 all load into H2, which takes off and heads for home. Tm3, pretty beat up (3 hits), manages to sprint all the way to V3 and loads up. Tm2 and Tm4 make it to the rendezvous, but fail the roll to load up.
The bad guys aren't in a position to do anything, so the remaining teams load up, and Major Lapieux orders the column south towards base, game over, mission accomplished.
Another fun one, and went faster than yesterday's game with the alterations I made to the fire combat mechanism, which I thought worked well for casualties but seemed to make it a bit hard to pin a team. In the past two games I've had five RPGs strike the Panhards, and one RPG strike a helo, and nothing has been destroyed, and the Technicals have been very easily brushed aside, so I can't fault anyone reading who thinks the AT rules are out of whack, but I'm telling you they're not. First, the Technicals are nothing but normal pickup trucks with weapons mounted, so I think them going down pretty easily is just fine. The only problem I have with the Technicals' performance in the two games is that they haven't really been able to get into action. I think in the future I need to have them moving to cover, pop out, shoot, then get back into cover. Regarding the Panhards and helo getting hit, it's just been very bad die rolls for the bad guys, as opposed to a problem with the mechanism. The hit effect rolls have consistently been 1s, 2s, and 3s, which, as you see, doesn't do a lot (I've had three engine damage, one main gun KO, and one optics/targeting system KO on the Panhards, and one door gunner killed in the helo). So, I'm sticking with the AT rules, need to make it a bit easier to pin a unit I think. The activation system worked pretty well I think, and gives a smooth, clean game. Actually, I need to figure out a way to get the leaders more involved in the game (right now they're just sort of decorative, mostly).
So, that's two games in two days, and I'm looking to get another in tomorrow morning. My plan was to do a FFL in the desert (check, x2 actually), but also do a modern Special Operations raid (which I still want to do), and an All Americans in Sicily (which I also want to do), but this FFL stuff has been so fun I want to keep doing it, and I believe that's what I'm going to do tomorrow. I already have a scenario in mind: General Poupous wasn't happy with Colonel Louis-Louis' decision to evacuate the villagers, believes it sends the wrong message about French strength and resolve in the region, and so he orders Colonel Louis-Louis to reinstate the villagers in the former homes. Once again, Major Lapieux's Legion Task Force gets the call.
But there's a twist: itt's no secret that neighboring Tumoria, a rogue-state/communist/socialist/Marxist/ Lenninist/autocratic dictatorship is backing the AoDD, and so they have provided some older, Warsaw Pact-era armor, which will surely catch the Legionnaires by surprise! Stay tuned, and thanks for reading. As a side note, to check my sanity, is anyone finding these FFL batreps of interest?
V/R,
Jack


No comments:
Post a Comment