All,
German Assault on the 1 May Collective Farm
It's 1800 on 11 July 1943 in western Russia, where the German I Battalion, 195th Infantry Regiment of the
78th Sturm Division, is on the attack, looking to evict the Soviet 1023rd Rifle Regiment, augmented by the remnants of the 1019th Rifle Regiment, themselves refugees from the defeat at Shirokoye Bulotev. The goal of the fight is possession of the 1 May Collective Farm; the Soviets are defending prepared positions while the Germans are conducting hasty attack supported by Corps artillery (rockets) and armor.
I am playing this game because I have the good fortune of being buddies with Steve of the "Sound Officer's Call" blog (https://soundofficerscall.blogspot.com/2019/10/firestorm-ponyri-station-campaign-first.html), and he is running a "Firestorm Ponyri" campaign. He is playing some games with his local buddies, but was unable to play all of the games himself; rather than simply 'dice off' for results of campaign fights they were unable to play on the table top, Steve asked if anyone in the blogosphere wanted to help, so here I am.
It's been a little bit of an issue that I literally just sold off a bunch of German late war gear, so I'm a bit understrength, but Steve is working with me to make sure the fights I get match up with the forces I have. Please enjoy the last installment of my support to Steve's campaign at Kursk.
Overview, north is up. The 1 May Collective Farm is the series of buildings at bottom left, while "Yuri's Hovel" is at top right. Other than that it's all cultivated farmlands, uncultivated grassland, and stands of trees bisected by a southwest-northeast running road with several branches coming off it. Highly significant to the military terrain on the battlefield are the stands of trees that line almost every single road on the map; the various hedges you see spread across the table (mostly lining the cultivated crop fields) do not block line of sight, but the stands of trees absolutely do, so the battlefield isn't nearly as open as it may appear at first glance.
Once again I'm using the Too Fat Lardie's excellent "I Ain't Been Shot Mum" rules, which I find work great for solo play. I'm playing on a 6' x 4' mat (from The Wargames Company) using 10mm troops that are a mix of Pendraken, Minifigs UK, and Takara. The buildings, trees, and hedges are from Crescent Root Studios, the fields are from Hotz Mats, and the beautiful roads are from Fat Frank in the UK.
Orders of battle:
German
Commanding Officer
2 x Rifle Company
-Each with three Platoon Commanders and nine rifle squads
1 x Schwere Company
-MG Platoon (PC and 3 x MG-42
-Mortar Platoon (PC and 4 x 8.0cm tube)
-Infantry Gun Platoon (PC and 2 x 7.5cm howitzer)
-Truck Platoon (2 x Opel truck)
1 x Panzer Company
-2 x Panzer Platoon (3 x Pz Mk IIIJ w/long 5.0cm gun)
-1 x ersatz Panzer Platoon (2 x Stug III w/long 7.5cm gun, 1 x Marder w/76.2mm gun)
1 x Armored Carrier Platoon (3 x Sdkfz 251 halftrack)
1 x Rocket Artillery Battery (2 x Nebelwerfer)
*The Germans are rated as average capability and average morale; yes, they are very experienced and grasp the importance of this attack, but they have suffered heavy losses and are worn out from six straight days of ferocious fighting.
Soviet
Commanding Officer
1 x Rifle Company (three Platoon Commanders, three 50mm mortars, and nine rifle squads)
1 x MG Company (PC, 2 x SG-43, and 3 x Maxim 7.62mm MG)
1 x "Tank Killer" Company consisting of:
-1 x Anti-Tank Rifle (ATR) Platoon (PC and 4 x PTRD ATR)
-1 x Field Gun Platoon (3 x 76.2mm 'crash-boom' guns)
-1 x Anti-Tank Gun (ATG) Platoon (PC and 4 x Zis-3 57mm ATGs)
1 x Mortar Platoon (PC and 3 x 82mm mortars)
*The Soviet Rifle Company is comprised of the scraps of two beat-to-hell Rifle Regiments that mostly weren't particularly well-trained or experienced and are pretty much shattered at this point, but they've been stiffened by the additional automatic weapons of an understrength Machine Gun Company and a specialized "Tank Killer" company. The Tank Killers are an elite force comprised of savvy veterans with very high morale. They are specially trained to avoid target indicators by dispersing their guns and digging them in in open areas, almost flush with the ground, where they allow the Germans to advance to point blank range. They use their field guns to separate the panzers from their supporting infantry, their ATRs to harass tank commanders and force them to button up, and their long-barreled 57mm guns to engage the enemy's flanks.
I don't know if any of that is true, but it sounded good, and it's how I used them in this fight ;)
There's another wrinkle, which I'll cover below.
Overview again, this time with troops. The German start line (which is quite crowded) is at top right, around Yuri's Hovel, while the Soviets are dug-in from top left to bottom left to bottom right, defending the 1 May Collective Farm (bottom left).
Defensive layout: All Soviet units except the 82mm Mortar Platoon begin the game dug-in and camouflaged. The Soviets are, once again, utilizing a 'hedgehog' defense of mutually supporting strongpoints, of which there are three. At top left is Strongpoint Nadia; at center left is Strongpoint Mila; and at bottom right is Strongpoint Sasha. Each strongpoint consists of the following:
Platoon Commander
50mm Mortar
3 x Rifle Squads
Maxim 7.62mm MG
76.2mm Field Gun
So you've got a beat up, worn out rifle platoon bolstered by a machine gun and the 76.2mm field gun. I thought long and hard about whether to split to break up the Field Gun Platoon and one of the MG Platoons, but in the overall scheme of things, each strongpoint has close defense provided by its three rifle squads, and each strongpoint has a significant long-range capability consisting of the MG, light mortar, and field gun. I believe the long-range capability and the elan and training of the tank killers provides the low-grade infantry a real boost in confidence, such that breaking up an MG platoon and the Field Gun Platoon was warranted.
The 82mm Mortar Platoon is at far left bottom, in a field. The 'other' MG Platoon (PC and 2 x MGs) is at bottom center left. The Anti-Tank Gun Platoon is split: the PC and two guns is at far left top (the "West ATG" position), and the other two guns are at bottom center right (the "South ATG" position). The Soviet CO is at bottom center, between the MG Plt and the South ATG position. The ATR Plt is dug-in at center, just below the road, the purpose of which is two-fold: first, engage German armor coming down the road, and second, keep between any German infantry and the ATGs below them.
My only regret with the Soviet deployment is that I wish I could have even further dispersed the four Zis-3 ATGs (in order to counter German supporting fires sure to be levied against them); I would have but I didn't have enough sandbagged emplacements, so I had to double up each set of ATGs!
Offensive scheme of maneuver:
Okay, this is ugly and not terribly creative, for four reasons:
1. The Germans are attacking off the hop, conducting a hasty attack straight off the march, immediately following an attack earlier today. They've barely had time to untangle and reorganize their units following the earlier attack, and no time to rest or replenish.
2. The Germans are in a very big hurry as supplies, men, and equipment are all worn out and Intelligence reports strong Soviet forces enroute to reinforce the 1 May Collective Farm garrison.
3. The Germans had no time to conduct reconnaissance of the battlefield, so they have no idea the strength or disposition of the enemy facing them.
4. In order to get to the Collective Farm, the German infantry have a tremendous amount of ground to cover on foot. Moving cross-country would be almost as exposed, and would be even slower than heading straight down the middle via the road.
So this is literally 'hey diddle diddle, straight up the middle,' in a hurry to take and consolidate on the Farm before the Soviet reinforcements arrive. The German CO was at the head of the column coming into the area; he called a halt at Yuri's Hovel, sent for his senior leaders (some companies are now being led by Sergeants), and climbed atop the roof to get a look at the situation. He can't see anything in terms of Soviet troops or activity, but a simple appreciation of the terrain makes a few things clear:
-the Soviets are sure to be thick in the Collective Farm and its adjacent wooded areas; he'll sic the the Nebelwerfers (which Corps has placed in direct support) on them.
-the wooded area to the northwest (in the vicinity of Strongpoint Nadia) is sure to contain a bushel of the Red devils. He can ignore them/use direct-fire support to keep them at bay.
-the wooded area to the south (at bottom right, in vicinity of Strongpoint Sasha) is also sure to hold hordes of the Bolsheviks. They're too close, they'll have to be deal with.
So, the German Colonel climbed down and quickly sketched out the plan of attack to his subordinates:
-Direct fire-supports (MG Plt and IG Plt) will emplace in/around Yuri's Hovel with the mission of protecting the Kampgruppe's right flank and isolating the objective (keep any Soviet forces north of the Farm away from the Farm).
(target acquisition and quick, accurate engagement will be king, might be a bit much to ask of worn out troops)
-1st and 2nd Platoons of 2nd Company will assault the southeast wood (SP Sasha). This assault will not be supported; their mission is to tie down the defenders without becoming decisively engaged.
(god luck with that!)
-The Ersatz Panzer Platoon (hereafter referred to as the "Stug Platoon") will lead the entire 1st Company, in platoon order, down the road, straight into the objective. Speed is of the essence!
(emphasis on speed can get real expensive real quick!)
-The indirect-fire supports (Mortar Platoon and Nebelwerfer Battery) need to get in where they fit in, i.e., find some space out of LOS to likely enemy positions and set up. They are tasked directly to the Kampgruppe commander.
(terrible idea, a leader's job is to lead, a commander's job is to command, a forward observer's job is to forward observe. There's a reason the duties are split!)
-1st and 2nd Panzer Platoons, and 3rd Platoon, 2nd Company (mounted in the halftracks) are the Kampgruppe's reserve (begin game off table to east).
**So, what did he miss? Well, he's incorrect in his assumption that the Collective Farm is a bulwark of the defense; you see, the elite Soviet 'Tank Killers' are trained to look for target indicators (such as a cluster of buildings and clumps of trees) and stay the hell away, knowing the Germans will target them with copious amounts of artillery and mortars. This means Nebelwerfer rockets will soon be falling on unoccupied ground, and the KG's assumption, along with his inability to conduct a real reconnaissance, means he completely missed SP Mila, which his Stug Plt and 1st Company will be waltzing straight down the road to. And he has completely missed the flanking deployment of the deadly Soviet Zis-3s.

The German start line: 1st Company has just finished their cigarettes and gotten on their feet, forming up on the road, looking to push off. To their left, the CO looks on as 1st Platoon, 2nd Co (far left) and 2nd Plt, 2nd Co (above them) are preparing to step off for SP Sasha (off camera to left). The IG and MG Platoons are set up on the west side of Yuri's Hovel (top right), with the Stug Platoon just below them. Below that you can see the Schwere Company trucks and the two Nebelwerfers (yeah, I decided to place them on table, just for fun. At bottom center left is the German Mortar Platoon.
The German off-table reserves:
1st and 2nd Panzer Platoons and 3rd Plt, 2nd Co, in the halftracks.
The northeast corner, looking at Strongpoint Nadia (bottom left, with PC, 3 rifle squads, 50mm mortar, MG team, and 76.2mm field gun, which is the composition of all three strongpoints). The West ATG position is at far right (top is east, where the Germans are). The Soviet 1st Platoon is at SP Nadia.
The "Tank Killer" CO tried to talk the Soviet Rifle Company commander out of putting his strongpoints in the trees, knowing the Germans would figure that's where they were, but oh well. You can see what I was talking about with the ATG positions earlier: the sandbagged emplacement at far right contains two guns. I wanted to split them up, but I don't have any more sandbagged emplacements!
The Soviet center, looking from west to east at Strongpoint Mila (top center left), with the 82mm Mortar Platoon at bottom center left. The unoccupied Collective Farm is at right. The Soviet 2nd Platoon is at SP Mila.
The Soviet right, showing the deployment of the Soviet MG Platoon (bottom left, with the Soviet CO next to them), the ATR Platoon (top center), and the Sout ATG position (bottom right).
The southeast corner of the table, with the South ATG position (far left) and ATR position (top left) we just saw, but now showing Strongpoint Sasha (bottom right), with elements of the German 2nd Company just visible at top right. The Soviet 3rd Platoon is at SP Sasha.
Time to fight!
The German Nebelwerfers sight in and let loose their rockets...
The rockets arch in, heading towards the Collective Farm...
But they're a bit short, landing between the Collective Farm and the MG Platoon's position (far right, with Strongpoint Mila at top left).
Fresh craters near the Collective Farm; doesn't really matter I suppose, the farm is devoid of Soviet troops in any case. The Soviet 2nd Platoon Commander, at SP Mila (top right), lets out a whistle of relief; "glad I listened to that hopped up Tank-Killer guy!"
The German 1st Plt, 1st Co (bottom left) slowly steps off down the road, crossing the Line of Departure, as the German Infantry Gun (IG) Platoon Commander (bottom right) saves his commander's bacon, a little bit. The CO had directed him to begin pounding the treeline to the northwest (top right, which is actually SP Nadia), but he's been glassing the area and spotted some Russkies, the ones at SP Mila (top center left, with the Collective Farm at top left)! He orders his guns to crank over on target; "Feuer!" The two 7.5cm guns bark...
And they rough up the Russians at SP Mila! The 76.2mm Field Gun is knocked out, the MG team and a rifle squad are suppressed, and another rifle squad an the 50mm mortar team are pinned!
The Soviet troops at SP Nadia (bottom left) return fire on Yuri's Hovel (top left), not hitting anything, but confirming to the fascist vipers where their defensive positions in the northwest are...
While in the southeast, the Soviet troops in SP Sasha (bottom right) open fire, too, but this is nothing like the knuckleheads at SP Nadia. You see, these Russians have actually caught the German 1st Plt, 2nd Co (top right) in the open, having not even gotten off their start line!
The 76.2mm Field Gun, the 50mm light mortar, and the Maxim MG pound the German landser mercilessly, killing the platoon commander, knocking out 1st Squad, and suppressing the other two, as the 2nd Plt and German CO look on in horror!
"Do not become decisively engaged," eh? The German 2nd Company's attack on Strongpoint Sasha gets off to an auspicious start, setting in motion a string of events that will not prove helpful to them accomplishing their mission of taking the Collective Farm...
The German MG Plt (bottom right, with IG Plt at left, Stug Plt at bottom center) opens fire on SP Nadia (top right, with SP Mila at top center left)...
Pinning the Soviets down.
The next off-key event for the Germans: instead of using his mortars to support his attack on the Collective Farm, the German CO panics and uses his mortars to lay smoke on SP Sasha, in support of 2nd Company's flailing attack, but the smoke is off target and doesn't do all that much to help out the assaulting German infantry.
The German 2nd Plt, 2nd Co pushes ahead (top right, from center, where the CO is sitting)...
And since they (right) are not masked by smoke, they begin firing on the Soviets in SP Sasha (top left), though it has little effect on the dug-in Communists.
The German 1st Company is moving in fits and starts, experiencing a traffic jam on the road, as the lead Stug, the Platoon Commander's vehicle, pushes ahead (far left, from top center).
He can't really see too much, so he (bottom left) begins tossing HE rounds into the northeast woods (SP Nadia, top right), where he actually manages to suppress several Soviet units.
The Soviet Mortar Platoon's (bottom left) commander is looking down the road at this gaggle of Germans screwing around (1st Company, top right) and he can't believe his eyes; he calls for a single spotting round. "Hang. Fire!"
The 82mm round hits dead in the middle of the German 1st Platoon, 1st Company, suppressing the whole damn mess!
The Soviet MG team at SP Mila (bottom right) opens fire on the German IG Platoon (top left), pinning one of the gun crews.
But the German gunners (bottom center) stand their ground and return fire, suppressing the Reds in SP Mila (top center).
The two remaining squads of the German 1st Plt, 2nd Co (left, from bottom center), their Platoon Commander dead, get their stuff together and, covered by the smoke (top left), get moving towards SP Sasha. Their 2nd Platoon comrades are visible at right.
The German Stug Platooon gets on the road (finally, center, from far right) and gets moving.
But the Soviet ATR platoon commander (bottom left) orders his men to open fire!
And they kill the German Stug Platoon commander! His body falls out of the hatch and onto the ground beside the vehicle, the crew panicked!
The German MG Plt (bottom right) continues pouring fire into SP Nadia (top right)...
And their fire actually breaks the 'elite' tank killer crew, which runs off the table!
*I will allow the Soviets to re-man the gun by sacrificing a rifle squad, but they've got to activate to move guys over, either on the platoon card or the platoon commander's card, and they'll be eligible to fire the activation after that.
The Soviet mortars (bottom right) again fire on the German 1st Company (top left)...
And 1st Platoon is savaged.
On the German left, the remains of 1st Plt, 2nd Co (bottom left) looks on as their 2nd Plt (right, with Soviet ATGs at top right) moves up, looking to break into SP Sasha (top left).
The lead squad and Plt Cmdr do not spot the Soviet ATGs, so they continue firing on the defenders of SP Sasha, to no effect.
But the Soviet MG Platoon (bottom left, with their CO next to them, the ATR Plt at top left, and two ATGs at far right) engage the German 2nd Platoon, 2nd Company (top center)...
2nd and 3rd Squads are gunned down (top left), leaving the Platoon Commander and 1st Squad exposed and cut off (bottom right)!
*The two platoons of that were to tie down SP Sasha but 'not become decisively engaged' are now down to one commander and three rifle squads. I'm not a mathematician, but that seems like about 50% of the attacking force gone. As I mentioned previously, both sides understand the gravity of the situation, the desperation of their respective attack/defense, so they are going all out.
Back on the road, Stug #2 and the Marder are unable to get the platoon commander's vehicle to rally, so they push past the stalled out vehicle (top left).
Where they (bottom right) begin tossing HE shells into the Soviet MG Platoon's position (top left).
They're supposed to be pushing up the road 'with all speed,' supported by the 1st Company's infantry.
Who are being pounded by Soviet mortars. The German CO plunges himself into the inferno, looking to get his men moving (including the Stug, top left), but nothing is working!
Back on the left, the German PC and 1st Squad, all that remains of 2nd Plt, 2nd Co, push up on SP Sasha, firing as they go. They are on the verge of breaking into the Soviet position, though return fire forces them to halt at a nearby hedge.
The Soviet MG Platoon (bottom center), having already ravaged 2nd Plt, 2nd Co, turns its guns on 1st Plt, 1st Co (top center), firing over the heads of the dug-in ATR Platoon...
The German Platoon Commander and another squad are knocked out on the road!
As SP Nadia's MG team, Field gun, and light mortar (bottom left) fire on Yuri's Hovel (top center left)...
Knocking out one infantry gun and pinning the other!
The German CO, seeing both his 1st and 2nd Company's being shot to pieces, commits his reserve! The platoon commanders for 1st and 2nd Panzer Platoons come on (center left), as does 3rd Plt, 2nd Co, in the halftracks!
But the situation is confused, with mortar, machine gun, and anti-tank rifle fire zipping and popping and bursting everywhere, cut off German soldiers huddled up or wandering about, dead and dying strewn about hither and yon. The radio crackles, but the Halftrack Platoon Commander can't understand if the CO is also talking to the Mortar Platoon, the Nebelwerfer Battery, both Panzer Platoons, and him, so he can't figure out if he's supposed to support 1st or 2nd Company's attack...
But things aren't peachy on the Soviet side, either. The Reds at SP Mila are pretty beat up, and, under heavy fire from German infantry guns, machine guns, and the Stugs, they are unable to rally back into the fight.
The German CO gets 1st Company moving again, though they're still pretty bunched up, and they haven't even passed Yuri's Hovel yet...
The other two tanks of 1st Panzer Platoon comes on (far left)...
And their Plt Cmdr pushes his vehicle (bottom right) up, in support of 2nd Company's attack. he can't see much, but fires between the remains of 1st Platoon (bottom center) and the remains of 2nd Platoon (top center), suppressing some of the Soviet infantry in SP Sasha (top left).
The Soviet ATR Plt fires on the German Stug Platoon, to no effect.
As the German 1st Company continues pushing southwest on/near the road.
On the road, the German CO orders the commander of 2nd Plt, 1st Co, to take a squad forward (far left, from right) to aid the Stug Plt (top left) by dealing with the Soviet anti-tank riflemen nearby...
They get into position (bottom right) and open fire (top left), suppressing two of the ATR teams.
But then the Soviet Mortar Platoon commander calls for another spotting round, and drops it right in their shorts!
*The German inability, blunted here by the Soviet mortars, to use infantry to clear the ATR position and locate the South ATG position, was absolutely a critical point in the fight.
The German Mortar Platoon (bottom right), having not received orders from the CO (far right), decides to get into the game by supporting 2nd Company's assault on SP Sasha (top left). The rounds are little off target, not causing any real casualties, but helping to keep the Commies pinned down.
So far the Soviet ATGs of the "Tank Killer" Company have remained silent; they are superbly camouflaged (and thus far unspotted by the Germans) and are patiently allowing the German panzers to stick their heads into the noose, but the Soviet CO can't stand it anymore! He departs the MG Platoon's position (bottom left) and hauls ass over to the South ATG position (top right): "What the hell are you waiting for, comrades, open fire, open fire!" "But comrade, there are more enemy tanks out of sight. We can hear them, but they are not yet in our kill zone!" "To hell with your kill one, open fire, now!"
The Tank Killer ATGs (bottom left) reluctantly, but dutifully, sight in on the German 1st Panzer Platoon commander's vehicle (top center right) and open fire...
BAM!!! Scratch one panzer platoon commander...
And then disaster strikes for the Germans: the Soviet Mortar Platoon commander (bottom left) is still watching the road, and he's almost giddy. If you think a big group of Germans were clowning around on the road before (top right), wait until you see this mess! He orders his teams to get to work, fire for effect...
And it's vicious! 82mm HE rounds pound the crap out of 1st Company, knocking out three squads and suppressing the rest!!!
Which is immediately followed by the defenders of SP Sasha opening fire on the PC and 1st Squad of 2nd Plt, 2nd Company...
Wiping them out (bottom right) as the remains of the assault force (top right), look on, through the smoke of the burning panzer platoon commander's vehicle. Two platoons have been reduced to two squads.
But vengeance is swift as the Nebelwerfer's unleash their rockets.
*Two things: first, you've probably noticed that I'm not typing, nor showing photos for, every little thing that happens. I've been skipping over a lot of events/pictures, not wanting to bore you with rallying actions, or shooting that didn't accomplish anything. So with that, you're getting a somewhat incomplete version of the story: the German direct-fire support weapons (infantry guns and machine guns) have activated very frequently (as have the Soviet machine guns, regularly getting their Platoon card and the MG Bonus card), and they've done okay in terms of pinning or suppressing a couple units, but not a lot, and not knocking hardly anything out. The German mortars haven't been activating hardly at all, whereas the Soviet mortars are absolutely pummeling the German 1st Company. I actually took 205 photos and uploaded them, but I'm cutting a lot out to try and keep this manageable.
The German Nebelwerfers fired to begin the game, then it took them a couple turns to reload, and now they're getting to fire again, finally. Quite incredibly, they would never again be reloaded, so this was all the Germans were able to squeeze out of their Nebelwerfers.
Second, recall that the Nebelwerfers were responding to taskings directly from the Kampfgruppe Commander, so they are pretty much without direction as he's been busy trying to keep his floundering assault force moving. I figure they realize how bad things are going and, rather than sit around and do nothing, they take their lead from the nearby Mortar Platoon which, in their own absence of orders, fired on the nearest visible target, SP Sasha.
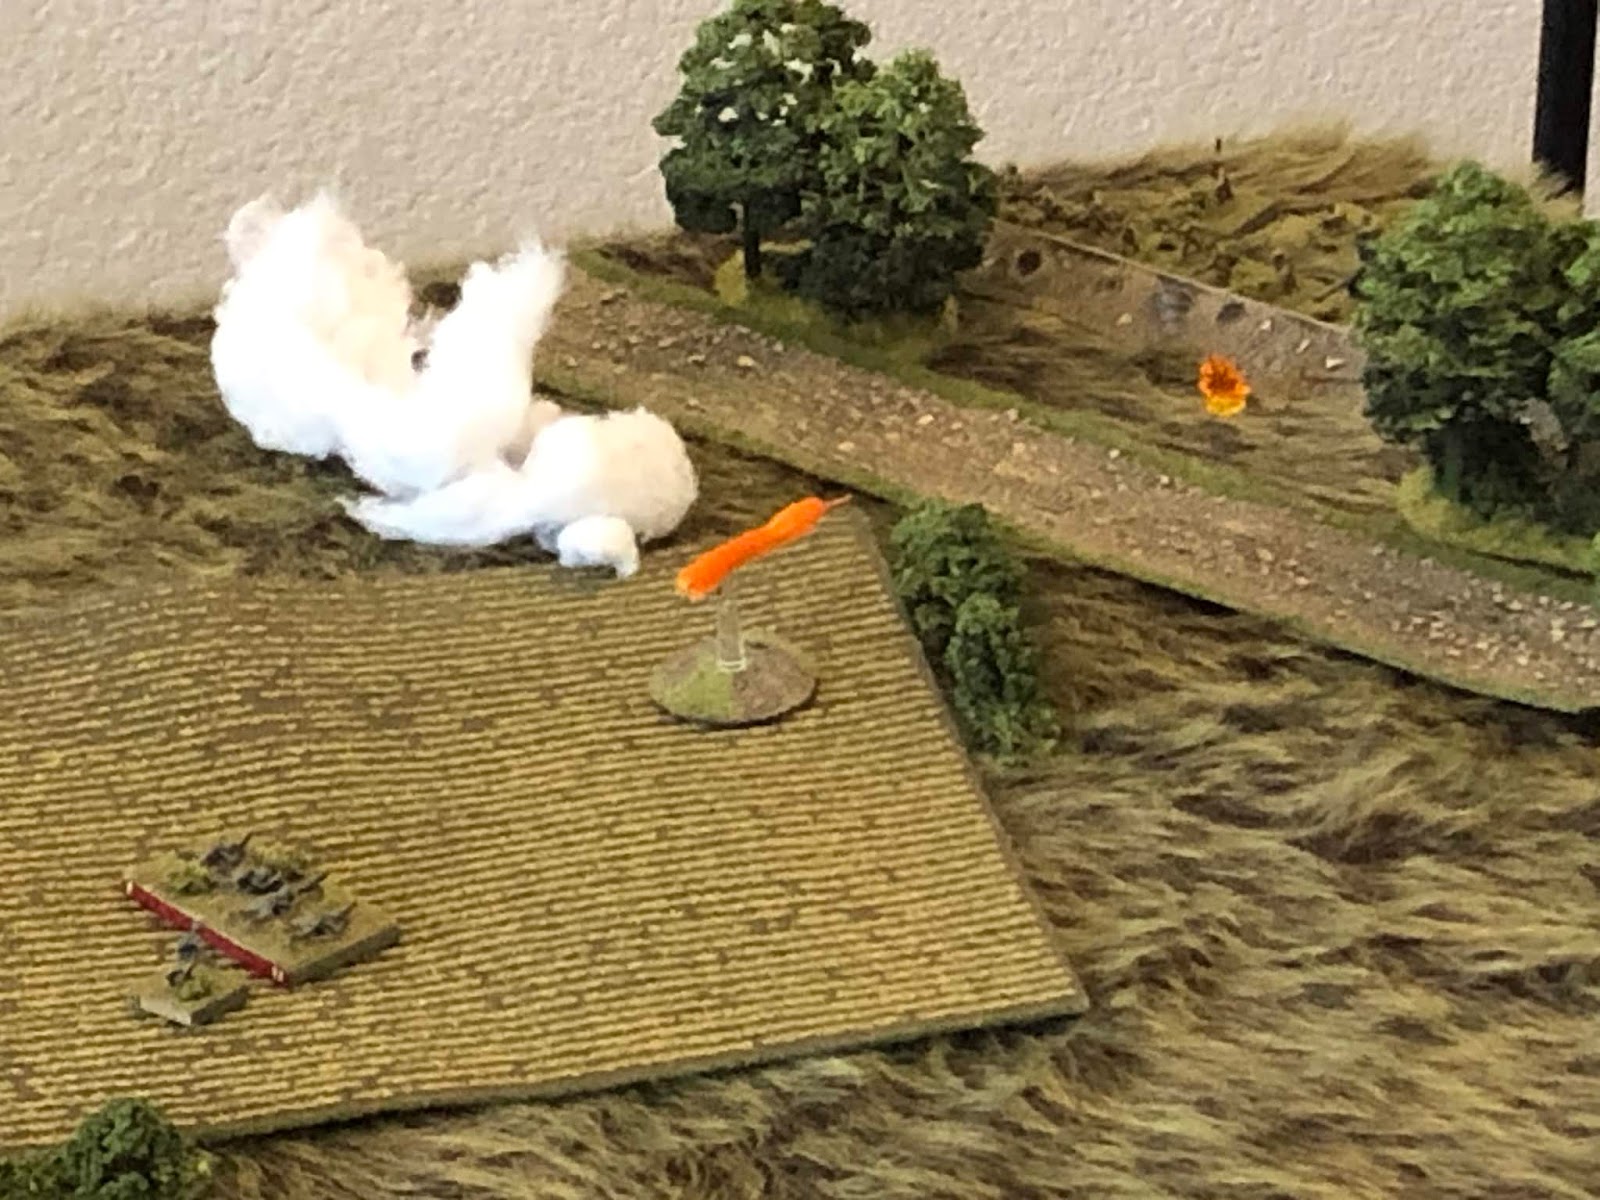
The rockets rain down on SP Sasha...
They hit the right side of the strongpoint...
And it's devastating: the Platoon Commander, the Field Gun, the light mortar, and two rifle squads disappear in a flash of blood, guts, an spittin' ass, leaving only a pinned rifle squad and a suppressed MG team!
The Soviet South ATG position (top left) has now been spotted by the Germans (because the Soviet CO ordered them to knock out the German 1st Pz Plt Cmdr, left bottom), so the German mortars (bottom right) engage them...
But the rounds are off target!
The other two tanks of 2nd Pz Plt finally arrive (center, from off camera to right).
And their Platoon Commander pushes his tank forward (bottom right), where he halts and fires on the South ATG position (top left),...
But he misses them (far right), too, as the Soviet MG Platoon (bottom left) opens fire on the remains of the 2nd Company's assault elements (top center right), suppressing both remaining rifle squads.
*The Soviets only have a pinned rifle squad and a suppressed MG team left in SP Sasha (off camera to right top), so if the Germans could just get those two squads in there and evict the Russkies, they could roll up the Soviet flank on this side, but they've got no leaders to rally them, the mortars have been worthless, and so the only fire support available are the panzers, which means snugging them up to the ATGs of the South ATG position.
Trying bravely to alleviate the pressure on the left, the 2nd Pz Plt Commander continues pushing his tank straight at the South ATG position, firing as he goes with his cannon and MGs...
And he manages to suppress both gun crews!
Further right, the Stug Plt Commander's vehicle still can't rally (far right), but the other two vehicles pick up the slack, pushing straight at the Soviet ATR platoon, firing HE from their main guns, but they can't see anything until they're practically on top of the Soviet position, by which time they can't get their guns to depress far enough to engage!
The German CO (bottom left) tries to rally the main body of 1st Company, and he finally gets them back to something resembling a fighting force.
So he moves up, working as he goes, but he still can't get the Stug PC's vehicle crew to rally, though he does manage to get the 2nd Plt, 1st Co, commander and their squad back in the fight.
But the Soviet mortars (bottom left) continue to drop rounds on 1st Company (top right)...
And they are immediately suppressed again!
The German Infantry Guns (bottom right, with 1st Company getting pounded at bottom left) continues to fire on SP Mila (top center left)...
Knocking out a Soviet rifle squad and the Field Gun (again), which had been re-manned by a rifle squad.
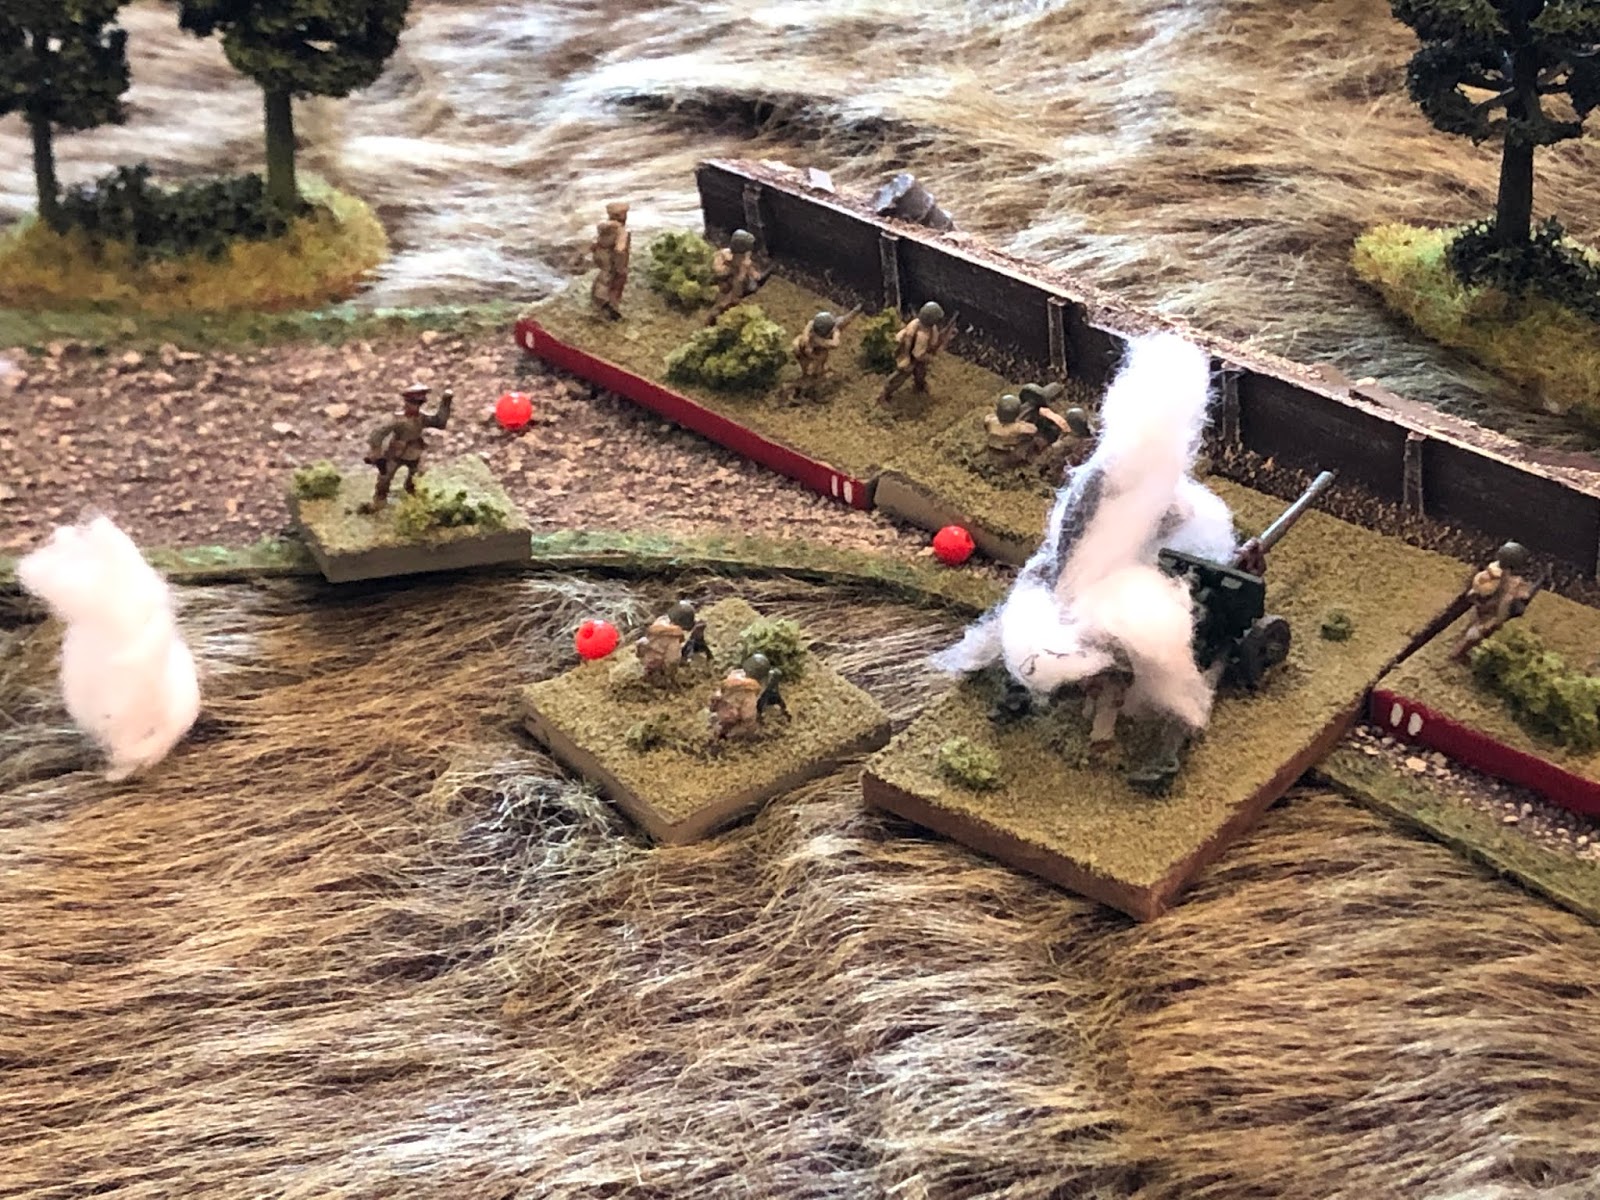
And at this point the Soviet West ATG position (bottom center, between SP Nadia -off camera to left - and SP Mila -top right-) decides to engage. The elite Soviet gunners sight in on Stug #2 (top center, between the trees)...
And open it right up!
And they are immediately followed by their comrades from the ATR Platoon engaging the Marder...
Which knocks out the thinly armored, open-topped vehicle!!!
On the German left, the remaining two tanks of 1st Pz Plt push up, on either side of their burning Platoon Commander's vehicle (left, from bottom right).
They try to rally the remains of the 2nd Company assault force (bottom left) but fail, and V2 (bottom center, on left) opens fire on SP Sasha (top left), keeping the Soviet defenders pinned down.
And V3 (far right) fires on the Soviet South ATG position (top left)...
The position is buffeted by high explosive shellbursts and MG rounds (top right), causing both sets of 'elite' crews to abandon their guns, running right past their shocked CO! "We told you we shouldn't have opened fire yet, comrade!"
**Sorry Steve, I was treating them as elite, I swear, but they still ran, nothing I can do. They must be 'Army' elite ;)
And as the ATG gunners are running (far right bottom), the Soviet MG Platoon (bottom left) continues firing on the remnants of the German 2nd Company's assault force (top right), keeping them suppressed.
The Soviet Mortar Platoon Commander again drops a single round directly on top the platoon commander and 1st Squad from the German 2nd Plt, 1st Company, suppressing them both again. You know, the ones that were supposed to move up and take care of the Soviet anti-tank rifles that just knocked out the Marder and absorbed all of Stug #2's attention so that it could be knocked out by the West ATG position. While the PC's Stug (top right) just watched.
*When the mortar platoon commander's card comes out I let him fire a single tube, and when the mortar platoon's card comes out I let all three tubes fire. I don't know if you realize it or not, but as devastating as the mortar platoon has been as a whole, every time the platoon commander calls for a single round, he puts it right in someone's pocket, deadly accurate. Just for fun, I've been using D100, and he's rolled in the 90s three times this game.
On the Soviet right, the CO tries to rally his running gun crews...
But they reply "no, thank you," and head for the shelter of the trees next to their MG Platoon's position.
The German MG Platoon (bottom right) and IG Platoon (well, the one remaining gun, bottom left) continue to fire on SP Nadia (top right, with SP Mila at top left)...
And they knock out a rifle squad. But that's it for this game; the whole game, all they've done is kill the gun crew, which the Soviets replaced with a rifle squad, and then knocked out a rifle squad. Not much bang for the buck, so to speak...
The German halftracks continue to wait for further orders (bottom right, having not moved for several turns now) as the German 2nd Pz Platoon moves up (top left).
V2 and V3 lay into the Soviet ATR Platoon with their MGs and main guns.
Suppressing two teams (right) and forcing the other two to run (bottom left)!
The Platoon Commander steers his panzer to the right (bottom left)...
Where he knocks out the two running ATR teams, which convinces the Platoon Commander and the other two teams to surrender...
But their Nazis, so the other two panzers (top right) gun them down (bottom left)...
As their Platoon Commander steers back to the left, running into the Soviet Commander!
Eliminating the Red command element...
Before coming back right, running down the two panicked ATG crews!
And grinding them under his tracks!
The German Platoon Commander pushes into the Soviet MG Platoon's position...
But the gunners grab pistols, knives, and grenades, clamber atop the steel beast, and put an end to its rampage!!!
Back on the road, the commander of 3rd Platoon attempts to rally the German 1st Company, which is still under Soviet mortar fire. He succeeds, but can't get them moving.
And the German 3rd Platoon, 2nd Company, pushes ahead in its halftracks (left, from center bottom).
*Things could be looking up for the Germans. The remnants of 1st Company are rallied and could conceivabley get moving, though probably not good for anything other than drawing fire at this point. Same goes for 2nd Company, though it's enough to tie down the shattered Soviet elements in SP Sasha. But the Germans have four tanks and a Stug left, their mortars (and their unreliable Nebelwerfers), and a rifle platoon in halftracks, so if they can just have their MGs and Infantry Guns keep SP Mila occupied, they could literally slip through the cracks and grabe the Collective Farm, and the Soviets have no reserve, so I don't see how they'd be able to evict the Germans.
On the German left, the two remaining tanks of 1st Panzer Platoon try to rally the two remaining squads of 1st Plt, 2nd Company, but they're unable to get them up and moving.
So the tanks push ahead, pouring main gun and machine gun fire into SP Sasha at point blank range.
But the Soviet rifle squad and MG team simply hunker down to weather the fire.
But the German infantry are beginning to falter: the Soviet Mortar Platoon commander (bottom left) once again calls for one tube to drop a round on the German-held crossroads (top right)...
The single 82mm HE round couldn't be more accurate if it tried! The round slams into the earth, throwing up a shower of dirt and fragments, which suppressed the German CO (far left) and forces the platoon commander and squad from 2nd Plt, 1st Company, to fall back (top right, from white puff at left, with the rest of 1st Company still under fire at top left)!!!
In the south, the Soviet MG Platoon re-occupies its defensive emplacements, having knocked out the German 2nd Pz Plt commander's tank.
With the German 1st Pz Plt pouring fire into SP Sasha (right bottom), the 1st Pz Plt pushes west (far left, from center, where the halftracks are located).
They halt and engage the Soviet MG Plt (top center left), pinning the two teams.
But the West ATG position (bottom center), not harried and harassed by the Soviet CO, has remained patient, and now that patience has paid off. Both Zis-3 ATG's fire, sending 57mm armor-piercing rounds out at the flanks of the German 2nd Pz Platoon's tanks (top center right)...
BAM! One of the Panzer IIIs goes up in flames as the other's commander tries to figure out where the hell that came from! One of the Stugs and the Marder burn in the background.
Luckily for the Germans, the IG Plt commander (bottom center) spotted the Soviet anti-tank position (top center) and orders his one remaining gun to engage, which suppresses one of the Soviet gun crews.
On the Soviet far right, SP Sasha's lone rifle squad and MG team are still hanging on, despite the German 1st Pz Plt (center) pounding on them. The Soviet infantry pop and engage the remnants of the German assault force (top right)...
And send them scurrying away (far right, from far left)!!!
And Soviet mortars continue to thrash the German 1st Company, suppressing them again.
Having seen the German infantry off, the Soviet defenders of SP Sasha turn their machine gun and small arms on the encroaching German tanks, to no effect.
The Soviet mortars (bottom left) continue to pound the crossroads (top right)...
And the German 1st Company has had enough, they quit the field (top right, from left)!!!
The German CO (right, at the crossroads, with the halftracks below him and the last tank of 2nd Pz Plt at bottom left) is despondent, and still pinned down by the Soviet mortars, but he's heartened when the German Stug Plt commander's vehicle finally gets back in the fight! The plucky crew pushes the assault gun straight up the road (far left, from the CO's position).
Where they halt and begin pounding SP Mila, knocking out a Soviet rifle squad and suppressing another.
And the German IG Plt (bottom center) and MG Plt (bottom right) continue laying into the Soviet West ATG position (top center)...
Suppressing one gun and knocking the other out!
*Given the fact they are well dug-in, I've been surprised how easily the Germans have knocked out the Soviet ATGs, once they've been spotted.
But freed up by the German 1st Company being routed, the Soviet mortars (bottom left) now shift their focus to the German direct-fire support weapons (top right)...
HE rounds fall and burst around Yuri's Hovel, suppressing two MG teams and pinning the last, as well as the remaining Infantry Gun.
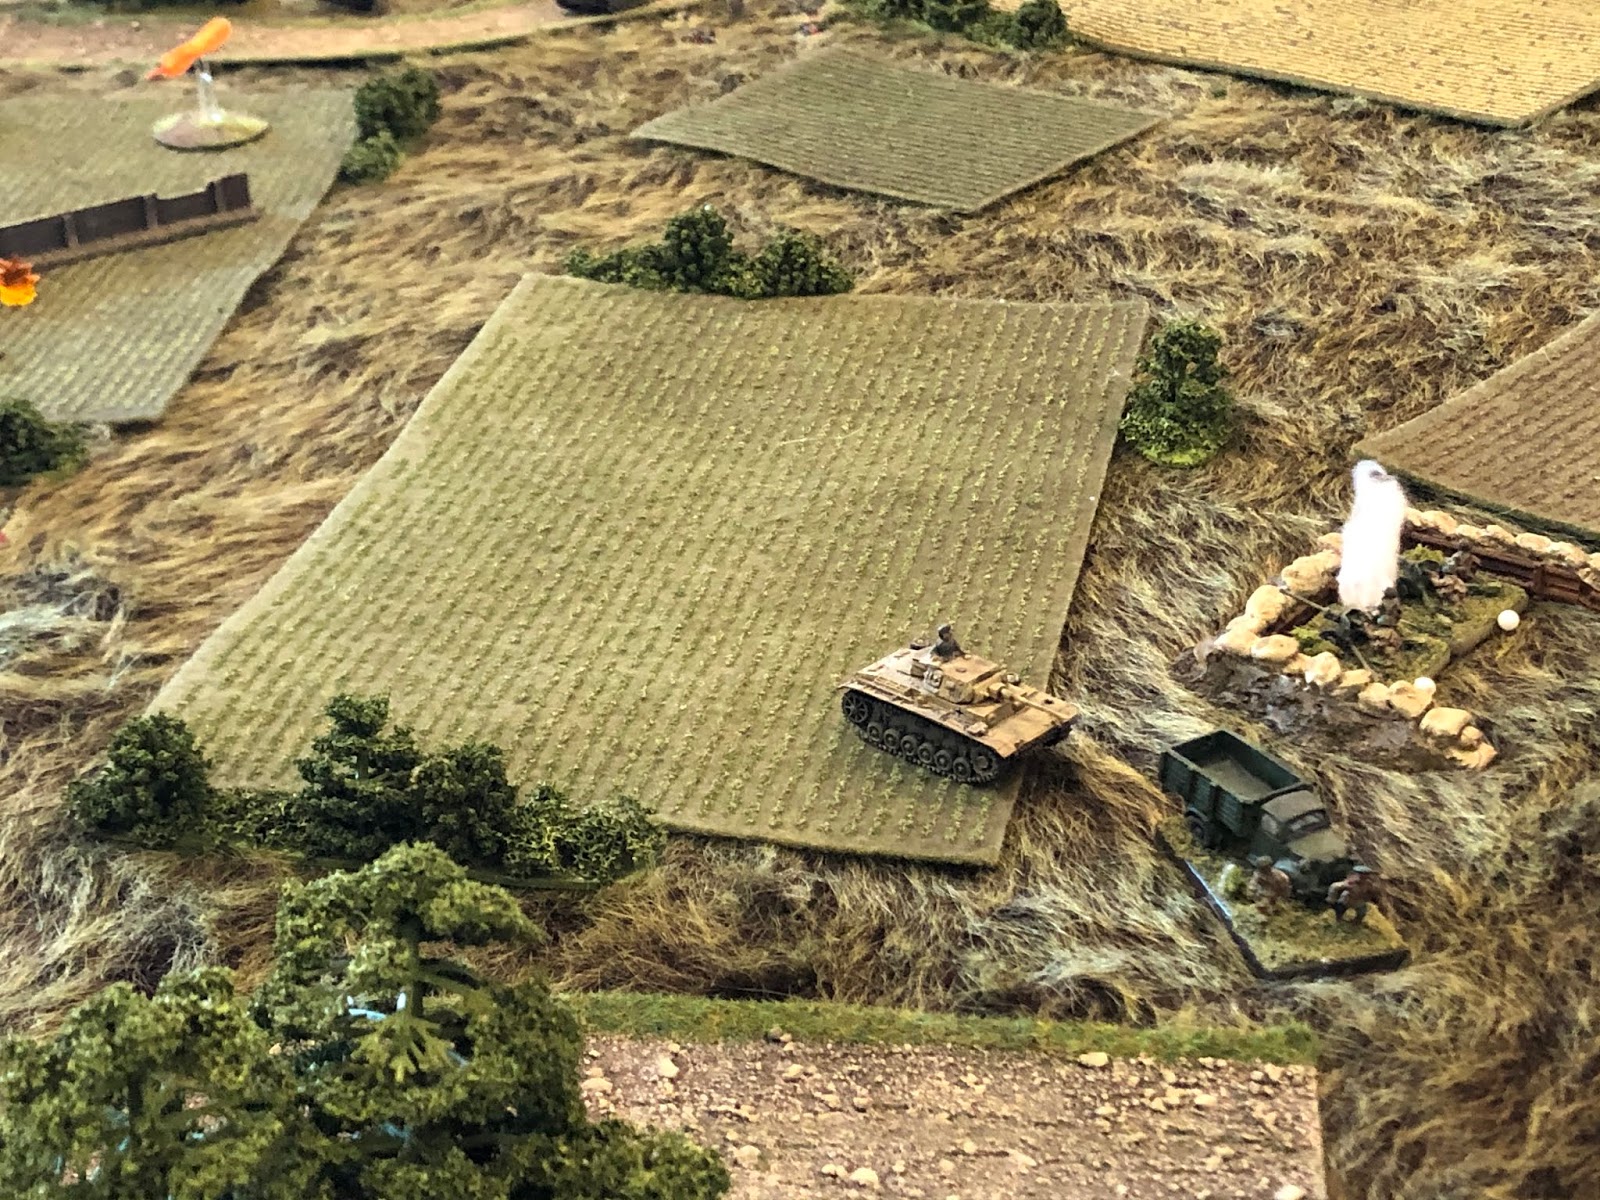
The German infantry reserve continues to push west, the armored halftracks pulling past the last Panzer III of 2nd Pz Plt (center, from far right).
*The walls are coming down around the Germans, but if those halftracks can get to the Collective Farm and kick out their infantry, I don't know what the Soviets could do.
The Soviet MG Platoon opens fire on the German halftracks, to no avail.
As the Soviet rifle squad and MG team in SP Sasha continues firing harmlessly on the two tanks of the German 1st Pz Plt...
But wait, this time the fire wasn't harmless! This time the fire shook both crews up and forced them to button up!
The Soviet MG team (far right) continues hammering away as their rifle squad pushes up (left, from far right)...
The Soviet troops storm the first panzer...
And knock it out!
Before charging the second!
Knocking it out, too!!!
And that's it, the Germans have given all they had to give. As the German forces to the west begin to pull out...
The German armor that had pushed further east realize the gig is up; they dismount, destroy their vehicles, and wait to be captured by the Soviets.
As the rest of the German force runs for their lives!
Wow, I still can't believe it, the Germans just couldn't get it done. 2nd Company got shot to pieces before it could even decide to not get decisively engaged, and 1st Company got mortared to death before it could make use of the road. The Germans committed their reserve rather early, but the mechanized infantry just sort of floundered about as the armor got shot to pieces by anti-tank weapons that the German infantry never got the opportunity to locate. And while the Soviet mortars did yeoman's work, the German heavy weapons (MG Plt, IG Plt, Mortar Plt, and Neblewerfers) were next to worthless, so from that standpoint, the Soviet hedgehog defense worked wonders in just keeping the German supporting fires occupied while their mortars and machine guns handled the German infantry.
I haven't been doing this, but I figured I'd share the loss figures:
German
4 tanks, 1 assault gun, 1 tank destroyer knocked out
1 tank, 1 assault gun, and three halftracks destroyed to keep from falling into enemy hands
10 rifle squads (out of 18) knocked out and 3 captured
Soviet
3 Zis-3 ATGs knocked out
2 76.2mm Field Guns knocked out
1 50mm mortar team knocked out
4 anti-tank rifle teams knocked out
6 (of 9) rifle squads knocked out
Man, that was a slog, very tough fight, with an every dwindling chance the Germans would be victorious, but still a possibility of snaking out a victory, right up to the very end. If only they could have gotten those halftracks moving just a little sooner; should have used their CO to get them moving, rather than continuing to use him to try and get 1st Company and the Stug Platoon (stalled out after the Soviet ATR Platoon whacked their Platoon Commander) moving. C'est la guerre...
Well, I hope you enjoyed them; it was my pleasure to be a part of Steve's campaign, and to share it with you. But now it is on to some other projects: gotta finish up the Battle of Midway, then back to Kampgruppe Klink for some action in Greece. Stay tuned!
V/R,
Jack


Wow! Your battle reports could be converted into a book or movie. Really first rate stuff that I will return to again. Excellent stuff.
ReplyDeleteJonathan,
DeleteThank you so much, I truly appreciate your enthusiasm, it's great to hear you enjoy my batreps, helps me keep up the motivation to keep typing and posting these things up.
V/R,
Jack
Jack this was incredible! A photo-finish for the campaign. Honors all around for those Soviet troopers, especially the PTRD platoon. The Germans couldnt gather up the momentum. Was that due to the card pulls? Your narrative was spot-on. I hope my campaign wrap up can do it justice:)
ReplyDelete"Army elite" lol.
Steve,
DeleteThanks man, my pleasure to help out with the campaign, thanks for having me, hopefully I did it justice.
Man, those Reds were some rough bastids to dig out, just would not break. In terms of momentum, the only unit I'll say that really affected was the German mech reserve (3rd Plt, 2nd Co, in the halftracks). The German armor was lack of unity of effort owing to improper reconnaissance not identifying Soviet positions early on, and the German infantry attacks (particularly 1st Company) were really just victims of taking a haymaker straight out the gate that they just couldn't overcome. They got roughed up, then spent the rest of the fight in a cycle of rally-get suppressed-rally-get suppressed-rally-get suppressed, without ever really being able to 'get off the x.'
2nd Company committed two platoons to going after SP Sasha, but they got thrashed by the Soviet MG Plt right away. They sort of recovered, pushed all the way up to the lip of the Soviet position, but lack of supporting fires saw the Reds toss them right back out, and by the time the tanks (2nd Panzer Plt) was committed, it was really too late, the two rifle platoons had already lost four of six squads and both platoon commanders.
Looking forward to the rest of the fights, good luck!
V/R,
Jack
wow read your comments above. The fact that the rules you are using allow you that level of tactical flexibility, decision making, and punishment for mistakes make them surely a keeper! I dont think you'd ever need another set of WWII rules :) Sounds like an AAR from the National Training Center, as read by the O/Cs!
DeleteSteve,
DeleteYou're too kind, you give me too much credit. For what it's worth, I'm certainly in my element at battalion-level and lower, but I don't have a clear picture above that, so we'll see how that works out with our upcoming WWIII campaign.
V/R,
Jack
Thanks, Andy.
ReplyDeleteV/R,
Jack
Hello Jack. Great reports as usual, and lovely tables !!
ReplyDeleteHello my old friend, it's great to hear from you! I hope all is well, and I miss your battle reports. Thanks for the comments, I'm glad you liked the games.
DeleteV/R,
Jack
Hello Jack
ReplyDeleteI am up to date with my gaming posts so have caught up on the last three these games. This one was huge. I really felt for the Germans. They kept having a good chance and then - bop! A single tube lands. And I don't think I have seen so many tanks have been taken out by infantry close assault in one game.
And I hope you know that you used my children's names for some of those strongpoints...A good thing the strongpoints did what they were supposed to.
Now you can get back to playing 3 to 4 games in the time it took you to play this one!
Hey buddy, I see you've been tearing it up lately, and I'm glad to have you back in the groove. Regarding the Germans getting so many tanks taken out in close combat, it's easy to explain: have a poor plan of attack, get forced to improvise, end up with your armor pushed way too close enemy infantry without supporting infantry, and reap the consequences of your poor tactical decision-making ;)
DeleteYour children's names? You're a Russian!!!??? ;) I'm sure they're lovely, and so I suppose that is why the Soviets were able to fight tooth and nail and hold out.
Yeah, definitely going to take a break from these epic, time-consuming struggles. I've got a really interesting concept for the KG Klink fights in Greece, I'm betting you'll like it!
V/R,
Jack
My wife is of Russian decent (her parents came int Australia here after the war, she was born in Oz. I come from a long line of English folk.
DeleteLooking forward to the Klink games - one of my favourite campaigns of yours.
Well, I certainly knew there was something 'off' about you! Having a wife of Russian descent it not it, I'll have to keep looking, but there's something definitely off about you! ;)
DeleteThings are off to a slow start on the KG Klink front; as usual, I think I'm going to have a bunch of time to get into gaming, but this whole 'Christmas with the family thing' is eating up all my time, I haven't gotten anything done yet!!!
V/R,
Jack
This comment has been removed by a blog administrator.
ReplyDeleteAn epic struggle sir!
ReplyDeleteFantastic report and very exciting.
Great wrapping up for a great sequence of games.
Duc,
DeleteThanks man, glad you liked it. Very much looking forward to yours!
V/R,
Jack
Excellent battle report. Just found it!
ReplyDeleteRegards, Chris.
Great, and welcome, glad you enjoyed it, Chris!
DeleteV/R,
Jack