All,
German Assault on Bunkerwald
It's 1630 on 5 July 1943 in western Russia, where the I Battalion, Panzer Grenadier Regiment 101, 292nd Infanterie Division is carrying out an assault on Soviet defensive positions in the "Bunkerwald," held by elements of the 1st Battalion, 676th Rifle Regiment, 15th Rifle Division. This is part of the German offensive to eliminate the Kursk salient, specifically on the northern shoulder of the bulge, as German forces push towards Ponyri.
I am playing this game because I have the good fortune of being buddies with Steve of the "Sound Officer's Call" blog (https://soundofficerscall.blogspot.com/2019/10/firestorm-ponyri-station-campaign-first.html), and he is running a "Firestorm Ponyri" campaign. He is playing some games with his local buddies, but was unable to play all of the games himself; rather than simply 'dice off' for results of campaign fights they were unable to play on the table top, Steve asked if anyone in the blogosphere wanted to help, so here I am.
It's been a little bit of an issue that I literally just sold off a bunch of German late war gear, so I'm a bit understrength, but Steve is working with me to make sure the fights I get match up with the forces I have. This is the first fight I've played, and I hope it wasn't too much a pain for him, I certainly want to keep going! First, I love to play games; second, it's been way too long since I've played any Eastern Front games (maybe eight years or so?); and lastly, I'm a solo gamer that still craves some comradery, so whenever I can help another wargamer out, I'm always quick to jump at it.

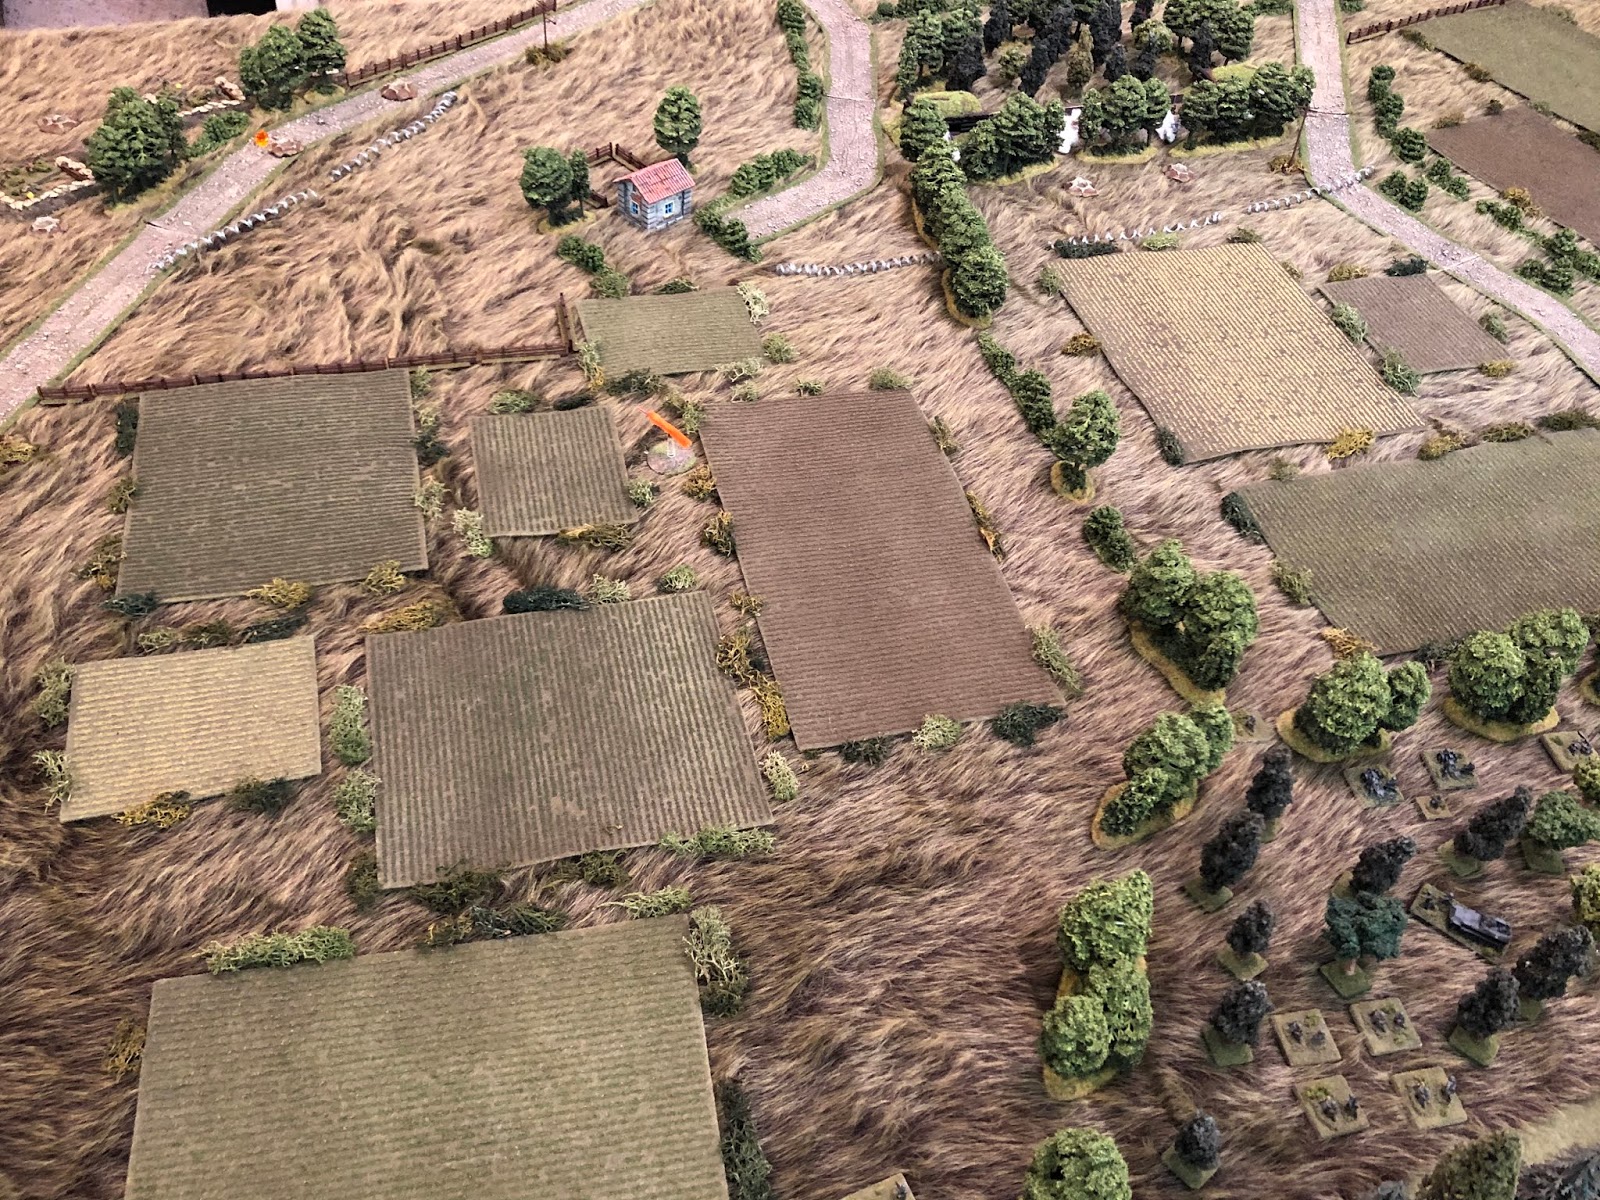
A rather unassuming swath of land in western Russia, part of the Kursk salient. At top center is a forest known by the Germans as "Schwarzwald," while at center is "Bunkerwald," and there is an unnamed patch of wood at far left. There are three dirt tracks in a generally north-south direction, mostly towards the three human structures: the State Farm (bottom left), the District Seat (bottom center), and Alexei's House (center right). The rest is untended grassland pocked with cultivated fields; there are some wooden fences on the southern half of the table, as well as scrub around a lot of the fields, that neither blocks LOS or provides cover (just for looks), while there are some hedges strewn throughout the table that don't provide cover or block LOS, but do serve to 'disrupt' LOS a bit (making shots through a bit more difficult).
The orders of battle:
Germans
Battalion Commander
1st Company (three rifle platoons of three rifle squads)
2nd Company (three rifle platoons of three rifle squads)
3rd Company (three rifle platoons of three rifle squads)
Schwere Company (MG platoon of four MG-42s, mortar platoon of four 8.0cm tubes, infantry gun platoon of two 7.5cm guns, and an anti-tank platoon of two PaK-38 5.0cm guns)
Assault Gun Platoon (reduced, only two vehicles)
Battery of 10.5cm Artillery (off table)
Battery of Nebelwerfers (off table)
Soviet
Company Commander
Rifle Company (three rifle platoons of three rifle squads)
Anti-Tank Rifle Platoon (3 x PTRS-41s)
Anti-Tank Platoon (3 x 45mm ATGs)
Infantry Gun Platoon (2 x 76mm guns)
MG Platoon (3 x Maxim .30-cal MGs)
Mortar Platoon (3 x 82mm mortars)
Combat Engineer Platoon (three flamethrower squads)
Assault Gun Platoon (3 x Su-76s)
I'm playing in 10mm (figures, vehicles, and gear a mix of Pendraken and Minifigs UK) based at one stand=one squad, weapon, or vehicle. I'm playing this game using Too Fat Lardies' "I Ain't Been Shot Mum" rules, simplified a bit in terms of combat, morale, and movement.
And here we go, with troops added. The objective for the game is possession of "Bunkerwald" (the path of forest at center bottom); the Germans want it and the Soviets currently have it. The fight will go until one side breaks, winner determined by ownership of the objective. The German baseline is in the north (top) and the Soviets at bottom (south).
Scheme of maneuver:
German - The Germans have infiltrated the bulk of their Schwere Company into the Scwartzwald (patch of woods at top center), where they have emplaced their machine gun, mortar, and Infantry Gun (IG) Platoons. Because of the pace of operations they have not had the opportunity to conduct a thorough reconnaissance, so they are proceeding with a generic 'double envelopment' assault. To that end, 1st Company is crossing the line of departure in the northeast (top right), with a lot of open ground to cover, while 2nd Company is using a shallow gully in the north-northwest (top center left) that runs north to south to infiltrate as close to the objective as possible. The Germans are aware of enemy forces in Bunkerwald and in a stand of trees in the southeast (bottom right), so supporting fires will be used to reduce/suppress those positions. The Germans are holding 3rd Company and their ATG Platoon in reserve (off table).
Soviet - The Soviets are manning static defenses with a mobile reserve to counterattack any German breakthroughs. To that end, the Soviets are manning three fortified and (semi-) mutually supporting positions: Strongpoint Irina (in woods at far left), Strongpoint Anna (Bunkerwald), and Strongpoint Ilsa (in the southeast/bottom right). To that end, the Soviet commander has task organized his rifle company, MG platoon, ATR platoon, and ATG platoon into combined arms forces at each defensive 'hedgehog.' So each strongpoint consists of three rifle squads, one .30-cal MG, one ATR, and one 45mm ATG. The infantry gun platoon is emplaced in the southwest (bottom left), while the mortar platoon is emplaced behind the State Farm, with its platoon commander acting as forward observer on the second floor of the State Farm building. The Soviets have their assault gun and combat engineer platoons in reserve (off table, with the engineers planning to ride into battle on the Su-76s).

The Schwarzwald, containing the German heavy weapons, at center, with 1st Company in skirmish formation at top right, and 2nd Company, in column, moving down the gully at top left. Across the bottom you can see Soviet wire obstacles protecting the objective.
The German 2nd Company, in platoon order (1st leading, then 2nd and 3rd Platoons). Each rifle company has one Panzerschreck team (probably a mistake; I know the PzSchreck entered service in 1943, not sure if was early enough for the summer offensive at Kursk). Their plan is to rush down the gully, getting as close to the objective as possible (and which is supposed to be suppressed by supporting fires), then pop out. The only hitch to this is the Germans are unaware of Strongpoint Irina, in the west.
Looking west to east at the German positions in the Schwarzwald: 80mm mortar platoon at top left, IG platoon at top center, the CO just left of them, and the MG platoon at bottom right.
The German 1st Company on line as it crosses the line of departure. From left to right, 1st Platoon, 2nd Platoon, and 3rd Platoon.
*I suppose here I will make a comment on the rules and my setup: I'm not sure why, but I really sold the Germans short during this fight by only giving them Platoon Commanders (PCs), but not Company Commanders (of which they could have had three for the rifle companies). When I was setting up I just kinda blew it off as, 'well, they've got plenty of troops, plenty of supporting weapons, plenty of leaders, they don't need'em.' Well, in the attack, across open ground in particular, you can never have enough leaders...
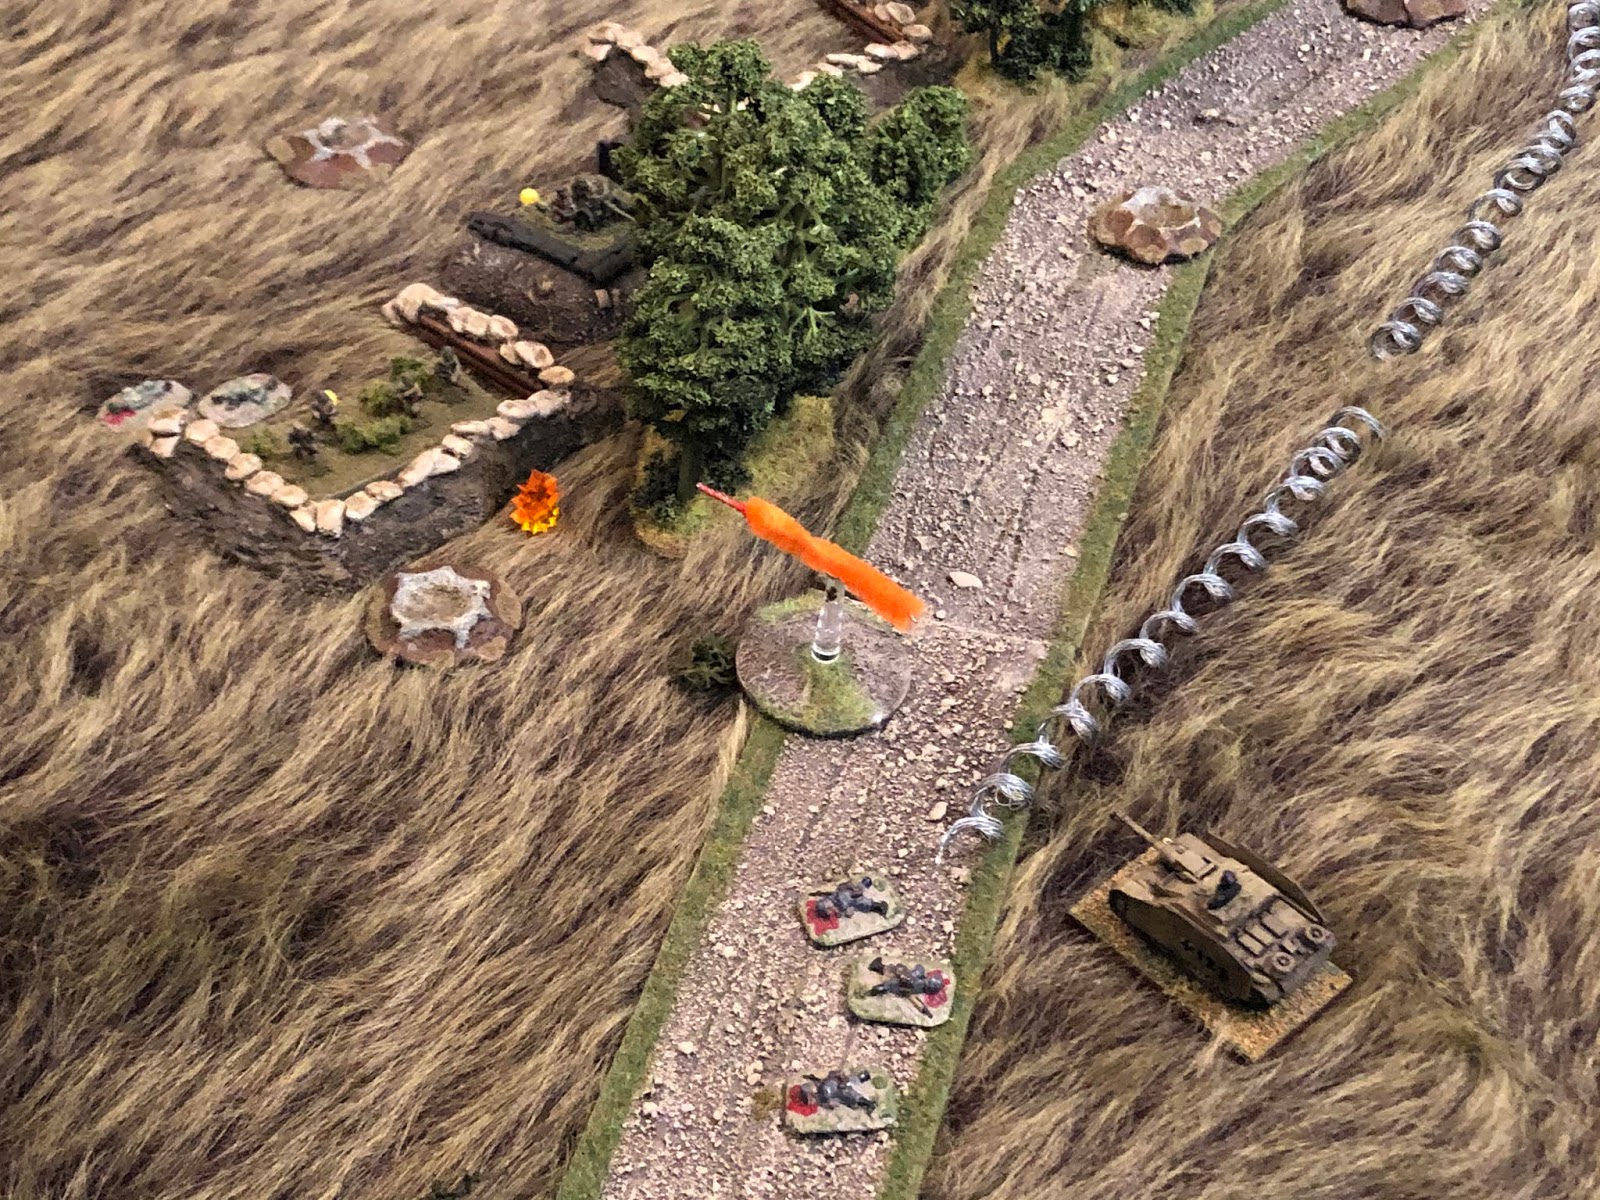
Looking north to south at Strongpoint Irina, which has two wire obstacles, a concrete bunker, and a trenchline.
The Soviet 1st Platoon occupies Irina, with their MG and ATG in the bunker. The three rifle squads and the ATR are in the trench.
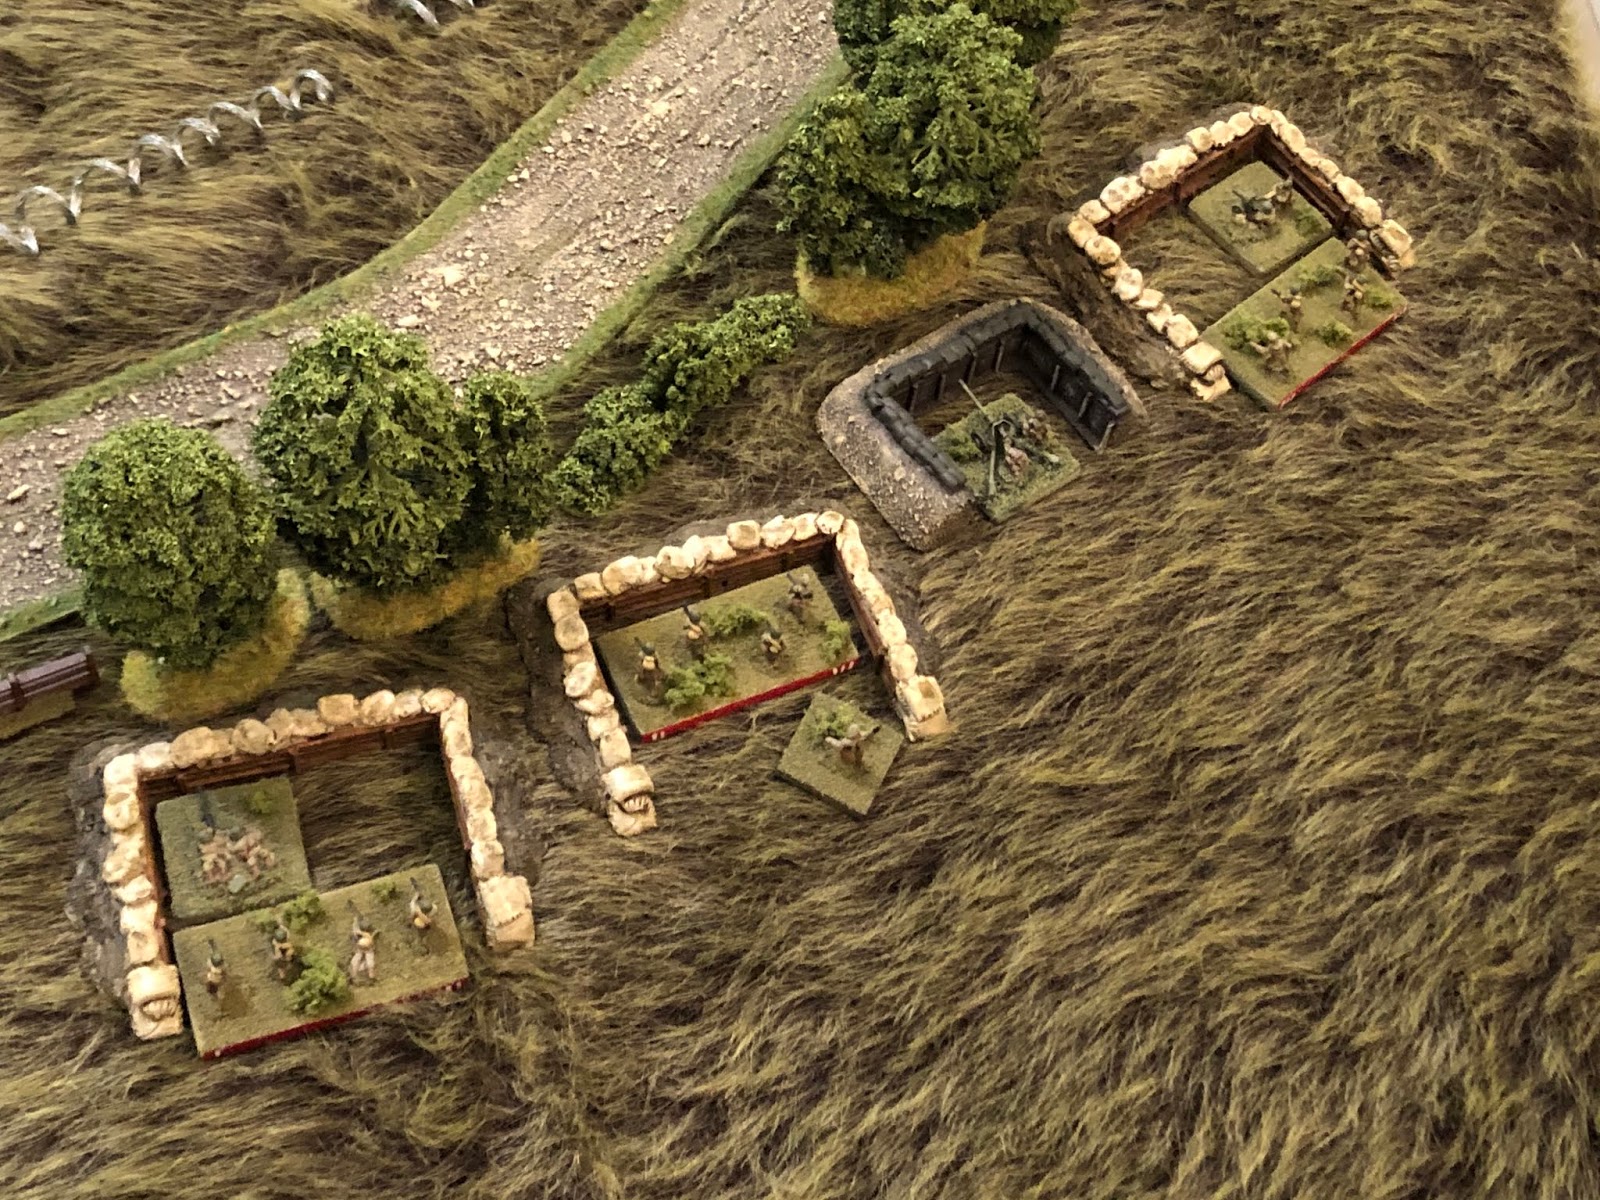
Looking south to north at Strongpoint Anna, with three wire entanglements, a trench, and two wooden bunkers.
In Anna's west bunker are the ATR and MG team, while in the east bunker is the 45mm ATG, with the three rifle squads in the trenchline. Strongpoint Anna is nestled in the objective, "Bunkerwald."
While in the southeast we have Strongpoint Ilsa, which has open-topped, sandbagged positions. The position at bottom left has the ATR and one rifle squad, the next has the PC and a rifle squad, the next has the 45mm ATG, and the last has the MG team and the last rifle squad. They also have two wire entanglements.
Back behind the State Farm is the Soviet mortar platoon.
With their PC on the second deck.
The Soviet CO is camped out behind Strongpoint Anna, next to the District Seat.
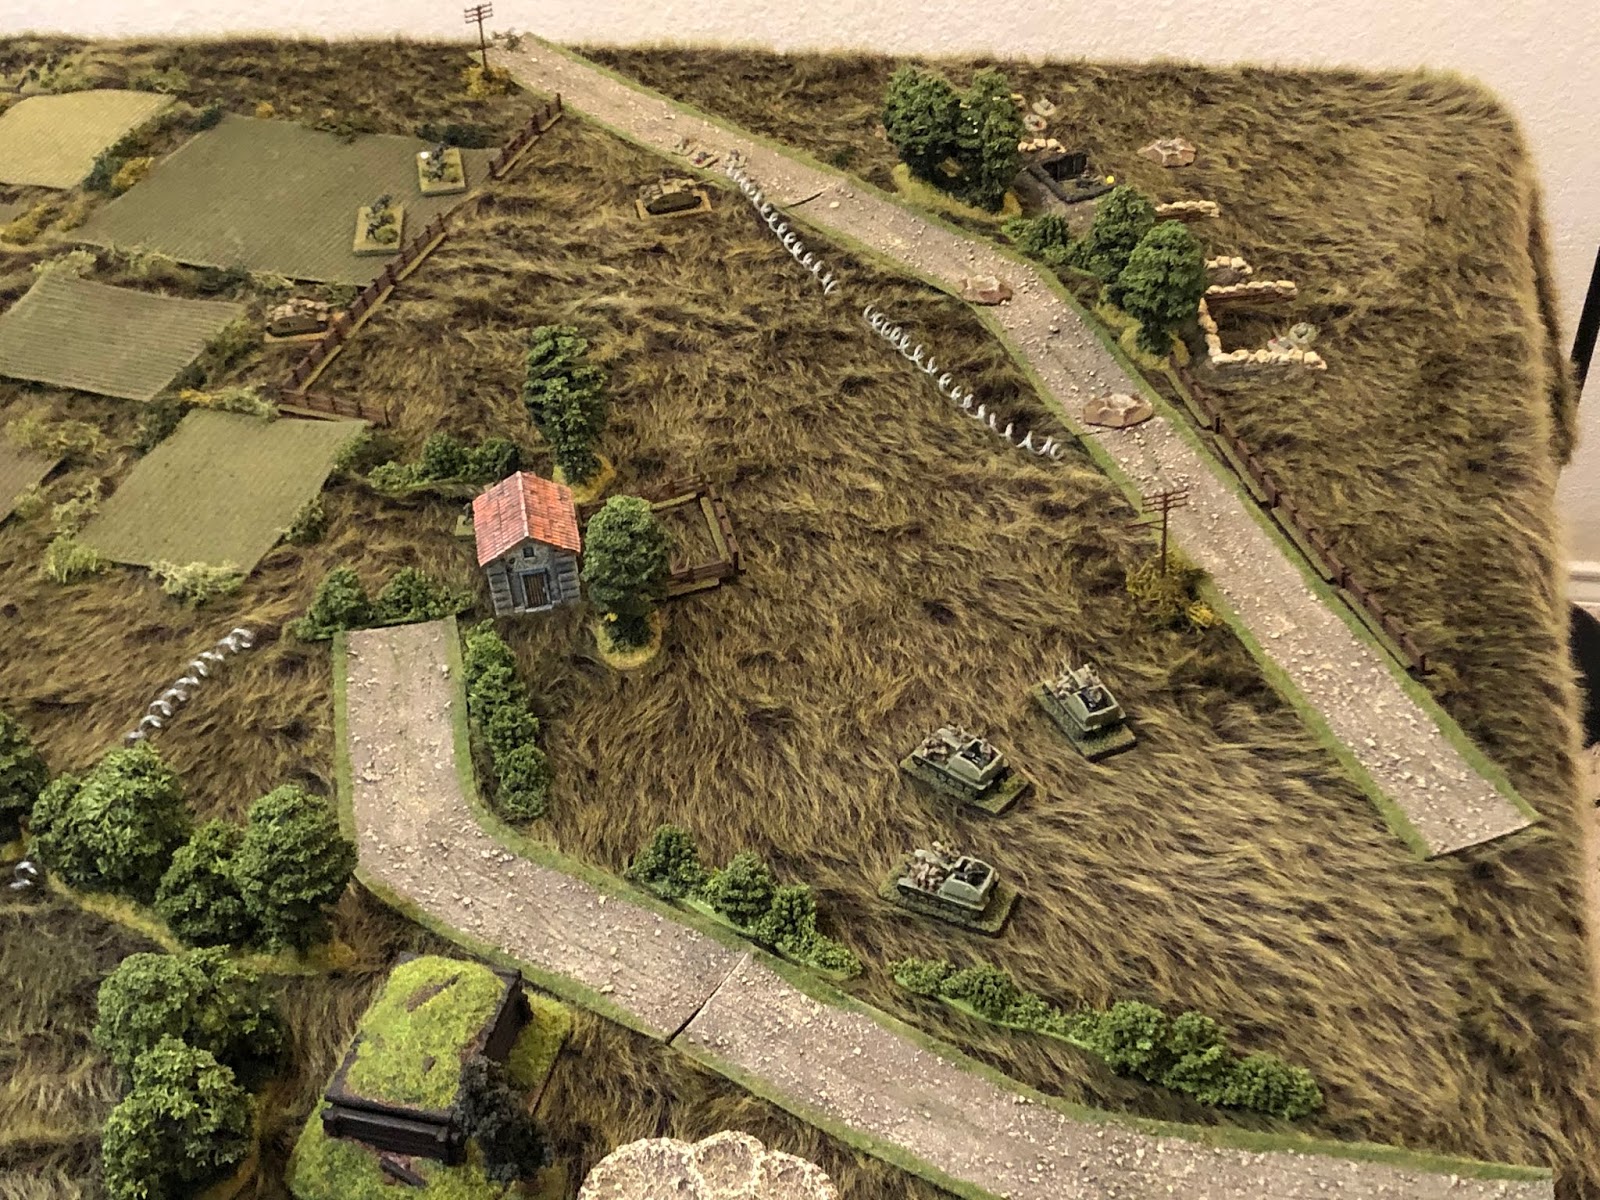
Looking at Alexei's House, between Anna (bottom left) and Ilsa (top right).
Oh, and the Germans have off table fire support: 150mm guns (those are actually 105mm, sorry), and Nebelwerfers. The Stugs...
Well, the Stugs were rushed to the table just for this, and will be seeing their first action today! The Stugs are part of the initial force, though they are starting off table as I'm going to dice for which side they enter on, once their card comes up.
Not too bad for a rush job, right?
The German reserve. Well, part of it... The Germans have their ATG platoon (two PaK-38s, with Prime Movers) and a rifle company (3rd Company) in reserve. Turns out I was incorrect about having a full battalion's worth of infantry available (I do, but I'd repainted and rebased them, so they don't match), I only have ten platoons' worth of infantry, not twelve! No matter, these guys are in reserve, and I'm sure by the time I need (if I need?) to commit them, I'll have plenty of replacements...
The Soviet reserve: three Su-76s and a platoon of Combat Engineers.
It's time to fight!
The battle begins with German artillery pounding the objective, Strongpoint Anna! 150mm HE shells, some quick fuse, some airburst, and some delayed fuse (to take care of bunkers) detonate, causing all sorts of headaches for the Russkies, but no real casualties, just pinning the PC and his MG team.
While in the southeast, the Nebelwerfers slam into the earth occupied by Strongpoint Ilsa. This barrage causes significantly more damage, owing to the open topped positions: the ATR team suffers casualties and is 'men down,' two rifle squads are suppressed, and the PC and MG team are pinned.
The German IG Platoon PC orders one gun to fire, to get the range.
He actually hits the West Bunker, pinning the ATR team.
And then both guns get in on the action, firing at the cyclic rate, putting a rifle squad 'men down,' pinning two more, and suppressing the ATG crew.
The German Mortar Plt PC (bottom right) orders a single tube to lay on Strongpoint Ilsa (top left, with Anna at top right)...
And then the entire platoon goes to work, knocking out a rifle squad and pinning the ATG crew at Ilsa.
But then the Germans are in for a bit of surprise, becoming aware of Strongpoint Irina when her MG team (in the bunker, bottom left) opens fire. The 1st Platoon PC had spotted the German 2nd Company (top center) moving down the gully and ordered them to fire, though no one it hit.
In the center at Anna, the Soviet 2nd Platoon sets about trying to rally itself back into fighting shape. The PC and ATR team is good (in West Bunker, top left), but two rifle squads stay pinned, and the ATG crew panics and falls back (red bead at bottom center right), out of the East Bunker!
Anna's MG team (in the West Bunker, bottom left) opens fire, enfilading the German 2nd Company (top right) coming down the gully, but it's not as good a shot as you think, they're line of fire is a bit obscured and they're still pinned, though they manage to put some casualties on the German lead squad.
On the German left flank, the 1st Company's 2nd Platoon gets moving.
And the PC leads one of his squads a bit further up, where they open fire on one of Strongpoint Ilsa's bunkers, keeping the Soviet MG team there pinned (he was already pinned, got another pinned result).
*I swear I shuffled these cards well, but that's three times we got the platoon and their PC back to back.
And the Stugs come on, pulling up next to 2nd Platoon's lead squad (center, from far right).
The Stugs come to a halt, seeking target identification from 2nd Platoon's PC. They get locked on...
And open fire on Ilsa, 75mm HE rounds streaking forward and exploding...
A rifle squad and the ATG crew are suppressed (red beads at left), but a rifle squad that was already suppressed breaks and runs (top right)!
Again German artillery comes crashing onto the objective, Strongpoint Anna.
The ATG crew (white bead at far right) had already fallen back out of the East Bunker, so they take some casualties and are 'men down,' while an already suppressed rifle squad is forced to fall back from the trench (bottom left).
Over on the German right, with the German 1st Platoon held up by an MG crossfire (from Irina, off camera to bottom right, and Anna, off camera to top right), the 2nd Platoon commander takes his boys up on the road, looking to keep up the attack (center, from left).
The Soviet 2nd Platoon in Strongpoint Anna (bottom right) sets about rallying itself, as it's MG team in the West Bunker engages the German 2nd Platoon (2nd Company, top left), on the road, knocking out one German rifle squad and suppressing another!
While back on the German left, 3rd Platoon, 1st Company, moves up, even with their 2nd Platoo (right, from bottom right).
With supporting infantry moving up, the Stugs push ahead (far left, from center).
Where they (bottom center) continue tossing shells into Strongpoint Ilsa...
The already suppressed ATG position is hit again, forcing their crew to fall back!
The German MG Platoon, in the Schwarzwald (bottom right), pours fire into Strongpoint Anna (top left), suppressing the Soviet MG and ATR teams, as the German 2nd Company works on rallying its beat up squads.
The German 1st Platoon, 2nd Company PC leads one of his squads up (far right, from bottom center, with 2nd Platoon above them on the road)...
Where they pour some ineffective fire into the West Bunker.
Back on the left, the German 2nd Platoon moves up, trying to keep up with the Stugs.
And they (bottom right) put small arms fire into Strongpoint Ilsa, to no effect.
Back on the German right, the 3rd Platoon, 2nd Company PC grabs his 1st Squad and moves right (center, from far left)...
Where they (bottom left, with 1st Platoon at top left) engage Strongpoint Irina (top right), to no effect.
While on the German left, the 2nd Platoon Commander continues to push the pace, leading a squad forward (far left, from bottom right), while continuing to toss harmless small arms fire at the bunkers of Strongpoint Ilsa (off camera to top left).
But the Russkies in Strongpoint Irina are still in the fight: the 45mm ATG (in the bunker) fires on the German 3rd Platoon (off camera to left top), while the MG team (also in the bunker) fires on the German 2nd Platoon (top center left), and the riflemen (in the trench) fire on 1st Platoon (just visible behind hedges at top center). The German 3rd Platoon is missed, 2nd suffers a squad suppressed, and 1st has a squad take casualties.
On the German left, the 1st Company's 1st Platoon leader grabs a squad and pushes them forward (left, from bottom right, with 2nd Platoon above them and 3rd Platoon at top right).
With supporting fire from 1st Platoon (off camera to bottom right) zipping by at Strongpoint Ilsa (off camera to top left), the 2nd Platoon leader pushes his lead squad up to the wooden fence (far left).
They continue firing, ineffectively.
Looking east to west at the north half of the board, the German 2nd Company, supposed to be infiltrating via the gully (center top, on/near the road), is in trouble, primarily from Strongpoint Irina (top left), so the Germans get some mortars (bottom right) going, suppressing a rifle team.
With mortar fire popping overhead, the German 2nd Platoon (2nd Company) continues pushing up the road (center, from far left, with 1st Platoon below them).
They (bottom center) fire into Strongpoint Anna, but don't hit anything.
And as 2nd Platoon is moving up (right of the tracer), the MG Platoon (bottom right) pours fire into Anna (top left)...
Forcing the Soviet MG Team to fall back out of the West Bunker (far right, next to a rifle squad that has also fallen back, from far left).
Back on the German left, the 1st Platoon moves up (two squads at bottom center, one at far left, with Stugs at top left, 2nd Platoon at center, and 3rd Platoon at top right). They continue firing on Ilsa, keeping the enemy's heads down.
While on the German right, the 2nd Platoon PC (2nd Company) grabs a squad and pushes up, near the enemy wire (center, from bottom left), firing as they go.
The German Stug PC moves up on the left, next to 2nd Platoon's (1st Company) lead element, and opens fire, knocking out the Soviet MG team with a 75mm HE round!
But on the German right, Strongpoint Irina continues to be a thorn in their side, taking the German 2nd Company under fire, knocking out a 3rd Platoon rifle squad and a 2nd Platoon rifle squad, and suppressing the PzSchreck team and 2nd Platoon PC!
The 2nd Company's attack in the center is faltering!
While on the left, 1st Company is making progress, but there's just so much ground to cover. 3rd Platoon moves up (top right, from far right, with 2nd Platoon in center, except its PC and 1st Squad, at top left, with 1st Platoon at left and bottom left).
1st Company keeps up the pressure, pushing 3rd Platoon (far right with the Stugs at center/left and elements of 2nd Platoon at far left) ahead and keeping up the fire on Strongpoint Ilsa (top left).
Which causes the ATR team and the ATG gun crew to run, leaving only one suppressed rifle squad and their valiant leader!
The German 2nd Platoon PC pushes his squad forward (onto road at left), looking to get into Ilsa's first bunker.
As German artillery again slams into Strongpoint Anna, suppressing a rifle squad in the trench and pinning everyone rallying at bottom left! Both bunkers at Anna are currently vacant.
As the German infantry guns (bottom right) begin firing on Strongpoint Irina (top left, with 2nd Company pinned down along the road, at center), though they can't yet find the range.
Back at Strongpoint Irina, the last rifle squad moves right, taking over Bunker #1 (top right, from bottom left)...
Then opening fire at point blank range on the 2nd Platoon's PC and 1st Squad...
Whom they've caught in the open! The German rifle squad is knocked out of the fight, while their PC is suppressed!
The German PC takes over manning the 45mm anti-tank gun at Strongpoint Ilsa.
*I assume the 'PC' is more than just one man, more like three or four, including a Platoon Sergeant, and a couple runners, something like that.
The German battalion commander finally gets into the fight, moving up to support his faltering 2nd Company, where he immediately sets to rallying the troops.
*Because I know what the Soviet plan is (I'm a solo gamer, after all), I roll to see which side he rolls to. Wrong side...
On the German left, despite the 2nd Platoon's lead elements being chewed up, the Stugs push ahead, their PC all the way up to the enemy wire guarding Strongpoint Ilsa, where they continue pumping 75mm HE rounds into the enemy positions. They pin the last Soviet rifle squad and suppress the PC manning the anti-tank gun.
The German mortar platoon (bottom right) pounds Strongpoint Irina (top left). Well, not exactly pounding them, they only pinned a single rifle squad.
On the German right, the 2nd Company's 3rd Platoon PC moves his 2nd Squad up to where his 1st Squad was wiped out (bottom left, with the CO, 1st, and 2nd Platoons visible at top left), then fires on Irina (top right), suppressing a rifle squad.
The German 2nd Company's 2nd Platoon falls back (top left) to join the remnants of his beat up platoon, from where one of his other squads had been knocked out (far right, with 1st Platoon at bottom center). He's got one rifle squad and the company's PzSchreck team with him, and they're still in the fight!
On the German left, their 3rd Platoon PC leads a squad forward, almost reaching Alexei's House (top left).
Once there they fire on Ilsa's ATG position, but they can't knock them out or push them back.
And while 3rd Platoon is firing (top right), the other two squads of 2nd Platoon push ahead (center, from right).
But then their PC, suppressed in the middle of the road (bottom right), is gunned down by fire from Ilsa!
*I'm playing IABSM, but using some 5Core elements, so Kill and Shock Dice, with 5Core morale. When a leader wants to self rally I let him use 2D6 and select the better result, but if he fails both dice he's KO!
And then more fire comes out of Ilsa as the Soviet rifle squad (yellow bead at bottom right) fires on 2nd Platoon (top center) and puts one of the German squads 'men down!' The Soviet PC (bottom left, manning the ATG), rallies himself back into the fight.
The German 3rd Platoon moves up, with two squads (right) nearing the Stugs and one and the PC reaching Alexei's House (top left). They keep firing on Ilsa, but to no effect.
The German infantry gun platoon (bottom right) continues to pound Strongpoint Irina (top left)...
Pinning the ATR team in the trench (top center, with two rifle squads in the trench suppressed and pinned) and pushing a rifle squad back, out of the trench (bottom right).
Sorry to do this, but we are through three turns into the game and so far the bottom left corner of the table has become my staging area for dice and markers, since neither the Soviet Infantry Gun Platoon (bottom left) or Mortar Team (far right) gotten to activate yet, with four cards in the deck (both have platoon cards and PC cards).
On the German left, the Stugs platoon commander pounds the enemy rifle team into submission, but that damn ATG, though pinned (yellow bead at top center) is still manned by the Soviet PC and in action.
In the center, the Soviet CO (bottom left) kicks some ass and gets the crew to move back into the East Bunker at Strongpoint Anna (far right), before moving left and rallying some more of the Anna defenders that had fallen back.
The German mortar platoon goes to work again...
And the Reds at Strongpoint Irina are not happy.
And then German artillery again falls on Strongpoint Anna, knocking a rifle squad out and causing casualties on another, while at bottom left, the rifle squad is pinned and the ATR team, the MG team, and the PC are all suppressed!
Do you like how I've been removing trees and replacing them with craters? Very atmospheric ;)
The German Battalion Commander has not given up on 2nd Company and has his heart set on getting them moved up and into Strongpoint Anna (off camera to top right). He leads the back half of 1st Platoon up to their front half (all around the CO's stand, with the remnants of 2nd Platoon at left).
The Soviet MG team in the bunker (bottom center) at Strongpoint Irina can't traverse the gun far enough right to engage the German 1st and 2nd Platoons (top right), so he opens fire on their 3rd Platoon (top left), suppressing a rifle squad.
But while that is happening, the German 1st Platoon PC grabs a squad and leads them up through the wire (center, from bottom left)...
Where they (bottom left) catch suppressed Soviet defenders milling about behind the bunkers of Strongpoint Anna (top right), knocking out the ATR team.
But just then the Soviet mortar platoon (bottom left) finally gets into the fight! Their tubes cranked almost perpendicular to the ground, they launch a flock of 82mm HE rounds at the German 2nd Company (top center)...
Suppressing two of 1st Platoon's rifle squads.
And then the Soviet infantry guns (bottom left) hop on in as well, firing on 1st Platoon's lead elements...
Suppressing 1st Squad and their PC, just as they were ready to push up and occupy the West Bunker!
And then the Soviet reserves arrive, the Su-76s (bottom center) and their Combat Engineer Platoon, between Strongpoints Anna (far left) and Ilsa (far right)!
"Let us get them now, comrades!" Pretty nifty with the tank riders, yes?
The Su-76s push forward, towards Alexei's House.
Vehicle 3 spots German infantry of 2nd Company's 3rd Platoon (top left) and opens fire, knocking one squad out and pinning the other!
Vehicle 2 fires on the German Stug PC's flank (top right), but totally misses!
So the Su-76 PC comes right and fires, slamming a round into the earth just beside the German armored fighting vehicle and suppressing its crew.
The Soviet PC at Strongpoint Irina (top left) sets about rallying the troops, and he's largely successful, but for one rifle squad that flees off the map, as the Soviet IG Platoon (bottom left) continues firing on the German 2nd Company (top right), though they don't accomplish much.
On the German left, the 1st Company's 1st Platoon continues to push up the far left flank (bottom left), every so slowly...
While on the right, with the Soviet Su-76s having arrived (top right), 2nd Company's 2nd Platoon PC takes the remnants of his platoon, and its PzSchreck, that way (center left, from bottom left).
While back on the Soviet right, the gallant young Lieutenant's command team manning the 45mm anti-tank gun (bottom right) is the last of the Soviet forces in Strongpoint Ilsa. He and his men load an armor piercing round and sight in on Stug #2 (top left); "Fire!"
KA-BOOM! The Stug's frontal armor is penetrated and the crew bails out!
Over at Strongpoint Anna, the Company commander and Platoon commandeer try to get their defense straightened out...
But just then a stray round kills the Soviet platoon commander (bottom left) and, without missing a beat, the last remaining rifle squad and the MG team make tracks to get out of dodge (top right), as the CO (center) looks on incredulously!
Just east of them, the Soviet Engineer PC and his 1st Squad dismount, looking to get up and re-man the East Bunker (top left) so that at least someone is occupying the objective!
But the German 3rd Platoon PC and his 1st Squad are watching from Alexei's House, and they move over (far right)...
And open fire at point blank range, putting the Soviet PC and the rifle squad 'men down,' and suppressing the Engineer 3rd Squad and pinning the crew of the vehicle their riding on (Su-76 at top center left)! Now, if the Germans can just move up and close assault them into oblivion!
The German IG Platoon (bottom left) begins firing on the Soviet Su-76s (top right), forcing the Red 3rd Squad to dismount their vehicle and fall back, suppressed.
While the German MGs (bottom right) fire on Strongpoint Irina (top center, with 2nd Company at left), suppressing an ATR team and pinning a rifle squad.
Back on the Soviet right, the Su-76 PC pushes his vehicle ahead and fires on the German Stug PC, but he completely misses!
So the Stug pivots and returns fire, but he completely misses, too!
*Probably sealed his fate there...
And then German Nebelwerfers rain down on Strongpoint Irina!
The bunker there (bottom left) is totally flattened, knocking out the MG team and the 45mm ATG, as well as suppressing everyone else!
*After the Nebelwerfer's initial stonk, they need a card to come out to reload, then can fire the next time their card comes out. So, from that standpoint, the 'regular' arty is much better as it gets to fire every time its card comes out.
And then the German MGs (bottom right) lay into Strongpoint Irina (top left, with 2nd Company at far left) again...
The knock out a rifle squad (center, in trench), and that's enough to convince the PC, ATR team, and last remaining rifle squad they have better places to be (bottom right)!
Strongpoint Irina is now unoccupied, joining Anna in that status, and Ilsa is only hanging on by its dashing young Lieutenant!
On the German far left, the 1st Company's 1st Platoon PC leads his 1st Squad up (bottom left, with 2nd Platoon squads beat up at right), where they open fire on the Soviet Lieutenant manning the ATG in Strongpoint Ilsa (top left). They keep him pinned, but no one can seem to knock that bastard out!
The Stug PC (top left) is just barely hanging in there, got three Su-76s (off camera to bottom left) to face all by his lonesome, when the Soviet Lieutenant (bottom right) makes his presence felt yet again: the 45mm ATG barks and the round slams into the side armor of the Stug, immobilizing it, though the crew stays in the vehicle.
*Yes, I know how limited the Stug's main gun field of fire will be.
The Germans call up their reserves (3rd Company and the PaK platoon), and designate Alexei's House as the TRP for all supporting fires. The Germans are pretty beat up, but still looking pretty grim for the Soviets; no one is occupying the objective. If the Soviet CO's card will come up, I'm going to have him fall back and turn his mortar platoon into an ad-hoc rifle platoon in order to go occupy Strongpoint Anna. If they can get in there, and get the Engineer Platoon in there as well, holding the objective, with their Su-76s prowling around, it may very well be that the Germans don't have the firepower and bodies necessary to dig them out again.
The German MG Platoon (bottom right) fires on the Soviet IG Platoon (top left), suppressing one of the guns.
And it happens: the Soviet CO falls back to the State Farm...
And turns the mortarmen into an ad-hoc platoon of infantry, albeit a weakened one with only two squads.
The Soviet IG Platoon PC (bottom left) rallies his crews and then sics them on the German 2nd Company's 2nd Platoon (top center), which was trying to move its PzSchreck team over to engage the Su-76s.
And it's vicious! The rounds pummel the unfortunate Landser, putting the PC 'men down' and suppressing both the last remaining rifle squad and the PzSchreck team! 1st Platoon is beat up at far left.
The German CO re-tasks his Mortar Platoon (bottom right) to knock out those damn guns (top left), and they fire but only manage to rough up their Platoon Commander ('men down'). The MG Platoon adds its fire to the mix, but only manages to pin one of the gun crews. These guys are damn nigh untouchable!
On the Soviet right, Su-76 #3 spots the German 3rd Platoon PC and rifle squad and fires, suppressing both of them with an HE round. Guess they're not going to get to close assault anyone into oblivion.
The Su-76 PC continues moving east, almost fender to fender now with the immobilized Stug PC. The Su-76's gun roars...
And the Stug is knocked out!
Su-76 #2 moves left, up to the East Bunker (far left)...
And opens fire on the 2nd Company's 1st Platoon's PC and 1st Squad (top left, with the German CO at top center and 2nd Platoon at top right), driving the rifle squad back and leaving the PC stranded.
On the German left, the reserves have begun arriving. 3rd Platoon, 3rd Squad arrives (at bottom right) and pushes forward (bottom center), up behind the 1st Company's 1st Platoon (bottom left), and then their 1st Platoon, 3rd Company arrives (far right) and moves up (right).
Their PC grabs a squad and pushes ahead, looking to help out (center right, from bottom right, approaching a 3rd Platoon, 1st Company, squad in distress.
On the German right, the CO moves over and rallies 2nd Platoon and screams at them to get their asses up there, into Strongpoint Anna, before the Soviets do!
And then German arty falls on and around Alexei's House...
But the only result is to force 1st Company's 3rd Platoon PC and his rifle squad to fall back, suppressed (far left, from house at center).
On the German right, the 2nd Company's 3rd Platoon PC has grabbed a squad and they are pushing hard (center, from bottom left) to get in and occupy Strongpoint Irina (far right) and threaten the Soviet infantry guns (top right).
The Soviet mortar platoon, having sorted itself out as an ad-hoc rifle platoon, leaves the State Farm and pushes north (center bottom) to get into Strongpoint Anna (far right).
The German IG Platoon (bottom right) continues pumping rounds at Alexei's House (top left), to no effect.
On the German far left, the 3rd Platoon PC shoos the bailed out Stug crew out of the way and gets his rifle squad into position, where they open fire on the Su-76 PC, suppressing the crew of the light-skinned, open-topped vehicle!
The German infantry guns (bottom right) pound the East Bunker (top center left), trying to keep Soviet troops out. They pin the 2nd Engineer Squad, which is still mounted on their Su-76 taxi.
With 3rd Platoon fire (bottom left) suppressing the Soviet Su-76 PC's vehicle (top left), the two remaining squads of the 1st Company's 2nd Platoon break cover (center left, from right), moving to close assault the enemy vehicle!
While on the German right, the 2nd Company's 2nd Platoon survivors move forward, up to the gap in the wire (left, from far left), so near to getting into Strongpoint Anna.
The Soviet 2nd Engineer Squad dismounts (top left), while their 3rd Squad rallies (bottom center). Their PC and 1st Squad are 'men down' and can't self-rally, they have to have a friendly unit come over to help them out (top center).
The Soviet Su-76 PC is suppressed with German infantry firing on them (top right) and more bearing down...
Suddenly a fire breaks out on the vehicle, so the crew bails out and books for it!
*He failed his rally roll with both dice, so KO.
The German Mortar Platoon (bottom right) begin pounding the East Bunker (top left), suppressing Su-76 #2 and putting the 2nd Engineer Squad 'men down.' Suddenly the Soviet reserves are in very bad shape.
On the German right, 3rd Platoon moves up, with one squad struggling to catch up (center), while the PC and the other squad is through the wire and up to Strongpoint Irina's trench (far right).
The Germa anti-tank gun platoon arrives (bottom right) and moves up (center, the vehicles towing guns), looking to get their PaK-38s into the fight against the Soviet Su-76s (top left).
In the Soviet center, the Mortar Platoon PC grabs one of his ersatz rifle squads (bottom left) and moves up (center), trying to get into the West Bunker (just above them) before the German 2nd Company's 2nd Platoon (top right) does.
*To be clear, this isn't some sort of 'race to the objective' to win the game, just figuring that whichever infantry is able to get into the bunkers will be pretty hard to dig out.
And on the Soviet right flank, that damned Lieutenant is still holding down the fort at the damned anti-tank gun position (bottom right) in Strongpoint Ilsa. He and his ersatz crew have spotted the German 1st Company's 2nd Platoon (top left) moving up on the Su-76s, so they load an HE round and fire.
The point blank HE fire knocks out one German squad (bottom left) and forces the other to fall back, suppressed (red bead at center)! The German 3rd Company's 1st Platoon is at top right and their 3rd Platoon is at top center left, with the ATG Platoon still limbered up, at top left.
The German 1st Company's 1st Platoon PC (bottom right) has had enough; he looks over at his tired rifle squad and informs them it is well past time to put an end to that @#$%ing Communist Lieutenant!
The German MG Platoon (bottom right) continues firing on the Soviet Infantry Gun Platoon (top left), pinning the other gun crew.
The German 1st Company's 1st Platoon PC and his rifle squad dash across the street, into Strongpoint Ilsa, firing on that damned Soviet Lieutenant!
He and his crew are pinned (yellow bead), and they pick up their weapons...
And charge the German PC and rifle squad!
But the young, dashing Lieutenant and his few remaining comrades finally succumb to the Germans!
Though he was pinned, reduced, and a small team, vs a rifle squad with PC in support, I gave them an even-up roll in close combat, not even close, 6-1. Guess his luck really had finally run out. In any case, the Germans now finally own Strongpoint Ilsa.
On the German right, 2nd Platoon, 3rd Company arrives (bottom left) and moves up the road at the double (center left, on road), coming in behind the beleaguered 2nd Company.
In the center, the German 1st Company's 3rd Platoon snakes through the wire and creeps up to the West Bunker (center right, from bottom left, with the Soviet Engineers at top right).
The German CO (center top) surveys the situation, finally reasonably confident of victory. He's got his 2nd Company near the objective (2nd Platoon at top right and 1st Platoon at center) or on Strongpoint Irina (3rd Platoon, off camera to bottom center), and 3rd Company's 2nd Platoon coming down the road behind them.
He orders the 2nd Platoon forward, into Strongpoint Anna (top right, from center)...
Where the Panzerschreck team immediately spots up and launches an 88mm rocket at Su-76 #2.
BAM!!! The Su-76 is knocked out and the nearby Engineers take some casualties.
But the last remaining Su-76 and Engineer squad quickly police them up, then fall back.
*So, despite a few casualties within each squad, all three Engineer Squads survived.
And in the west, the Soviet CO grabs his infantry gun crews and mortar-cum riflemen and withdraws, conceding 'Bunkerwald' to the Germans.
IABSM is always a treat, the friction it throws in the game can have you going mad, but I certainly enjoy it, especially for solo games, it makes the fight completely unpredictable. I'm sure it's not everyone's cup of tea; it can be so deliciously frustrating to have (for example) a PC and a squad sitting there, mere inches from a whole string of 'man down' and suppressed enemy forces, knowing that if you could just get them activated you'd surely charge, then knock out a whole string of troops. IF you could just get them to activate ;)
Regarding deployment, being omnipotent, I'm certain neither the plan of attack nor the plan for defense was the best, but I felt like they both gave the best opportunity for a great solo game. The 'hedgehog' approach to defense made a lot more sense than anything else I could come up with; it's historically relevant, and there was no way I was going to load everything up into Strongpoint Anna, knowing the German off-table arty assets in the fight. Conversely, knowing the Soviets were going with three strongpoints and didn't have any off-table arty, I could have just loaded up in the center and pushed the grunts forward, ignoring the flanks and daring the Reds to come out of their trenches and bunkers, but that hardly seemed sporting. Overall, I'm very happy with how the fight was planned and carried out, I thought the plans worked very well.
Man, what a fight! I hope you enjoyed it as much as I did. It's been a long time since I had that many troops on the table, felt good, though I can't say it want to do it all the time, so I'm looking at scaling at least some of my future fights in this campaign back to company-level. I can't wait to play some more next weekend. Awaiting my orders!
V/R,
Jack


Jack, superb account, you are in your element! Great looking table. It is a lovely idea what \Steve is doing and I am following all of the accounts. Also nice seeing the different rule sets being played. Thanks for the ton of work that went into this.
ReplyDeleteNorm,
DeleteThank you Sir, I appreciate it, and yeah, I'm having a great time. And yes, Steve is really on to something here, a great idea and we're executing, ready for my next set of fights.
V/R,
Jack
Cool!!!! Good game!!!
ReplyDeleteThanks man, glad you liked it!
DeleteV/R,
Jack
Superb fight sir! Great friction from the cards, and the bunkers are great looking.
ReplyDeleteI must look at IABSM again.
Darren, thanks! Yes, friction is the name of the game; IABSM gets a lot right, but for me the shooting and morale is a bit overdone. Not that it doesn't work, it just seems to me it could be simplified and reach the same end result, which is what I've done (for me, not to sound like I know any better than the authors, that is certainly not the case).
DeleteV/R,
Jack
Enjoyed reading your battle report
ReplyDeletehttps://www.10mm-wargaming.com/
https://www.10mm-wargaming.co.uk/
Take care
Andy
Thanks, Andy!
DeleteV/R,
Jack
Great report. Iabsm works well for solo play. And in this kind of game with one side pretty much immobile it is ideal. Mark
ReplyDeleteThank you Mark, and I totally agree, IABSM is fantastic for solo play. The only issue, and this is true of any solo game, is coming up with a scheme of maneuver and defense that doesn't allow a side to 'crack the code,' being that I already know what each sides' plans are ;)
DeleteV/R,
Jack
Wow Jack that was outstanding. A real nail biter. Probably put that Soviet LT in for an award (posthumously)! I'm also going to be tracking "some" campaign honors for the fight. First up were the German pioneers for waltzing onto last week's objective without firing a shot.
ReplyDeleteThis week, clearly your Lieutenant for holding the position against incredible odds and then charging the Fascist Vipers when he knew the end was near. Also Ken's 45mm Long Barrel AT guns for forcing 2 x Tiger crews over in Shirokoye to abandon their vehicles.
What a great post. Can't wait to see what next week brings!
Thanks Steve, glad it's up to snuff! ;) Yeah, that Soviet Lieutenant was quite incredible; I probably shouldn't have let him carry on single-handedly, but it was fun, and it matches accounts of the ferocity of fighting on the Eastern Front. Plus, as Stalin is rumored to have said, "it takes a brave man to not be a hero in the Soviet Army," or some such nonsense ;)
DeleteYeah, the 45mm ATG crew that banged off the Tigers until they hopped out and fled is definitely up for some accolades, very impressive!
I'm standing by, ready for the next slate of fights. Tell your in-house players that waiting all the way until Thursday night is unacceptable! ;)
V/R,
Jack
That's up to Comrade Ken and Herr General Alex. I need their turn 3 orders.
DeleteStand by and have your troops ready to march at a moment's notice!
Roger, standing by! And tell them to hurry up! ;)
DeleteI'm going to work on finishing painting my 3 Sdkfz 251s, Marder, Panther (yeah, I have a single Panther), and a couple armored cars, just in case.
V/R,
Jack
Super report and an awesome looking table. Well done!
ReplyDeleteThanks, Jonathan, I appreciate it!
DeleteV/R,
Jack