All,
Got my first Soviet-Afghan War game in today. It's April 1987, the war in Afghanistan is not going well for the Soviets, but they've put out a request for forces and it was answered throughout the Soviet Union, with point being to throw the fresh troops into a spring offensive for one last, all-out attempt to defeat the Mujahadeen. One of the many units to answer the call was the 99th Independent Mechanized Brigade from Ukraine. Not only the 99th from Ukraine, but it is a "Territorial" unit comprised of officers and men from the Odessa region of Ukraine. The 99th arrived at Bagram in March 1987 and began conducting local security patrols to get acclimated and accustomed to combat in Afghanistan. The Soviet commanders are in the process of ratcheting up the level of responsibility and opposition in preparation for the offensive scheduled for May 1987 to finally conquer the Panjshir Valley.
Battlegroup Aronofsky has been tasked with clearing the small village of Namiyan northeast of Bagram. Mujahadeen resistance is expected to be light, but they are expected to put up a fight. What they don't know is that the Mujahadeen has recently been infiltrating units into the villages near Bagram in preparatino for their own spring offensive.
Overview of the table, which is 3' x 2', with North being 'up.' Battlegroup Aronofsky will enter from the left (West), looking to clear the bottom in the bottom right (Southeast) corner. Top center is Hill 75, top right is Hill 80, bottom right is Hill 50. The two blue strips are canals, left is Canal 1, right is Canal 2. Battlegroup Aronofsky is not on the table yet, and the Mujahadeen are represent as blinds (which are actually singly based 10mm figures).
Closeup of my 'blinds,' as well as my not yet finished buildings and walls (sorry folks, I only had time to spray paint them gray).
Friendly forces: Battlegroup Aronofsky, led by Captain Aronofsky (single figure at top left), with Lt Oleynik's tank and a ZU-23 of Weapons Company mounted on a BMP chassis. Bottom right is Lt Sharpova's platoon (1st Platoon, 1st Mechanized Company) of a BMP and two rifle teams, top right is Lt Dyachenko's platoon (2nd Platoon, 1st Mechanized Company) of a BTR and two rifle teams.
Badger 2 is on standby should things get out of hand...
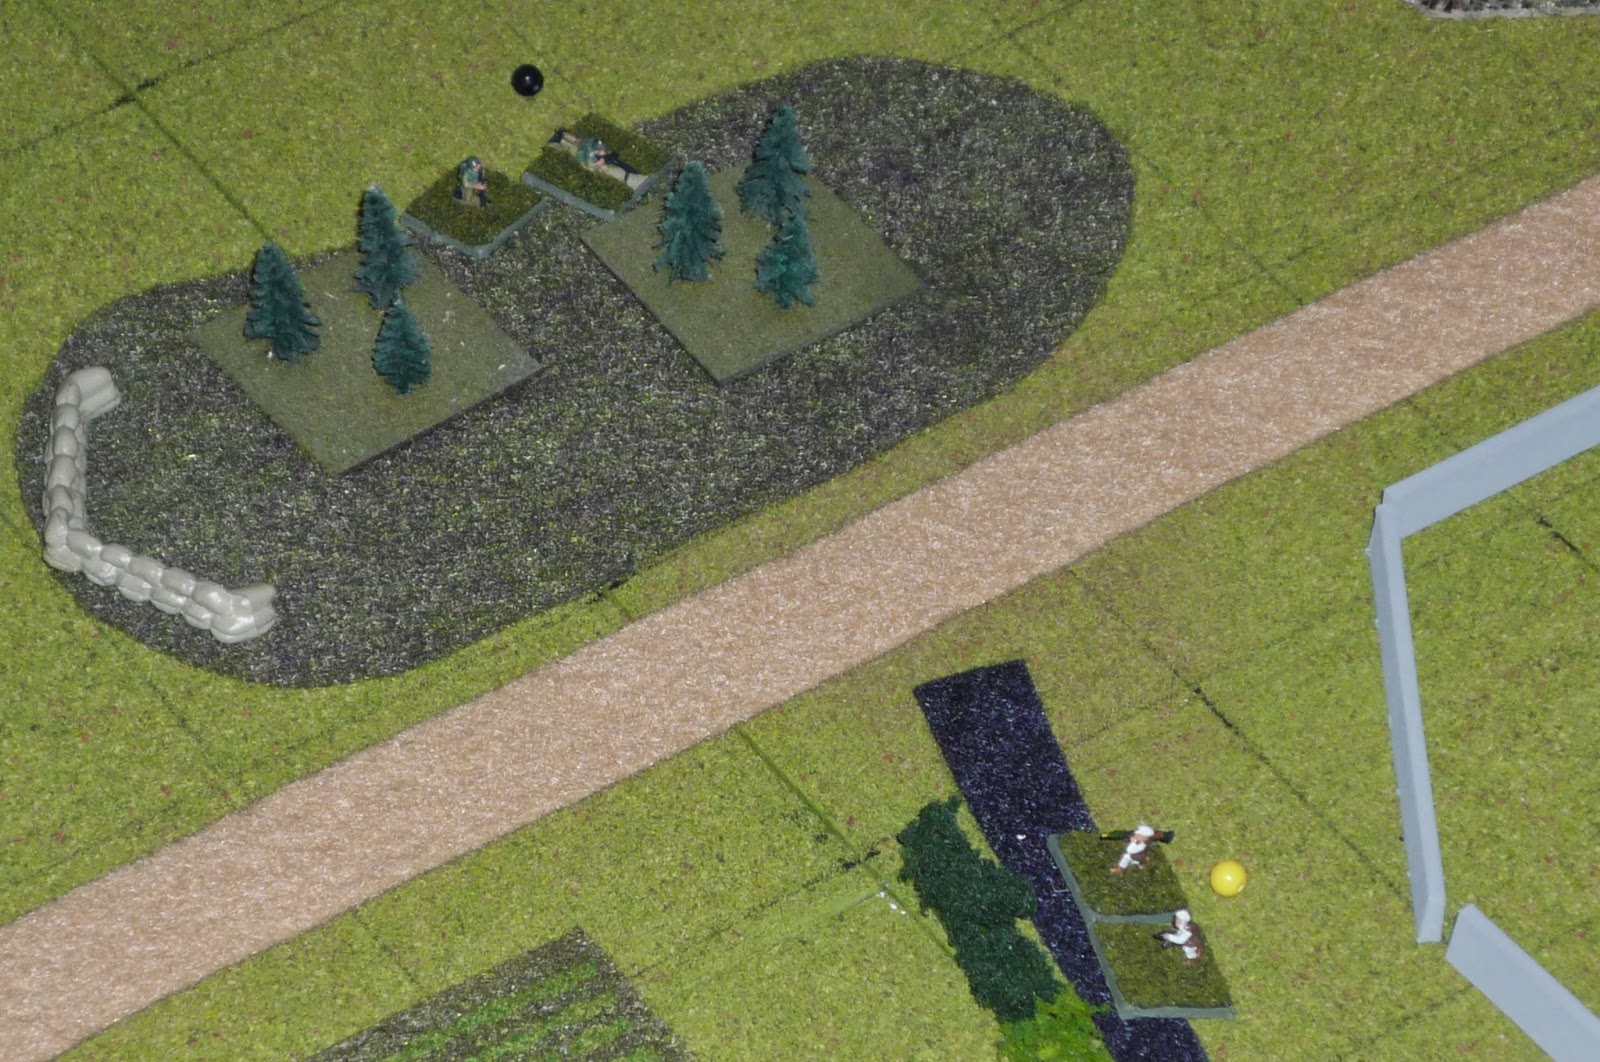
I rolled up the blinds and this is what the board looks like as the action starts: Lt Oleynik's tank leads the column, followed by Lt Sharpova's platoon (BMP and infantry), then Lt Dyachenko's platoon (BTR and infantry), with the ZU-23 BMP pulling up the rear. The Mujahadeen are as follows: a dug-in rifle team on Hill 75, a rifle team on Hill 80, the Mujahadeen commander and a quad 14.5mm HMG in a patch of woods (center right, just north of the highway), a dug-in rifle team at Canal 1, two rifle teams behind the village walls, and a dug-in Technical mounting a 14.5mm MG just West of them (there were 10 blinds, I rolled all of them up at the start, three were dummies).
The action starts with the Muj team dug-in at canal1 loosing an RPG in the direction of Lt Oleynik's T-55. The rocket hits, damaging the tank's running gear and limiting to half speed for the remainder of the fight.
Lt Sharapova's BMP immediately veers off road and takes a shot at the Muj position, to no avail. This draws fire from the Quad 14.5mm HMG, which damages the BMP's running gear, reducing this vehicle to half speed for the remainder of the fight (that's the purple bead). The BMP fires again, getting one man and pinning the Muj team, and another round of fire by the BMP gets another KIA. Sharpova's 1st Squad debusses, moves up to the brush, and fires, getting another kill and a second pin. The Muj return fire but score not hits, and another round of fire by 1st Squad drops the Muj team to one man.
1st Squad (center) then turned its attention to the Muj team on the southern edge of the village (top right), getting a kill and a pin.
Then Lt Oleynik moved his tank up (left center) near canal1 and fires at the Muj Technical (bottom right, next to the Muj team 1st Squad just engaged. You can see the Quad 14.5mm HMG at top right), one hit one save. The tank fires again, damaging the Technical, reducing it to half speed for the remainder of the game (yes, really, all three damaged vehicles so far are 1/2 speed). The Muj team on Hill 80 sprints forward next to the Quad 14.5mm HMG (top right) to get their RPG in range and the Muj team on the north end of the village moves up to do the same (center right). At this point Lt Sharpova led 2nd Squad out of the BMP...
And into close combat at canal1, where they eliminated the Muj team with no losses of their own.
Then the ZU-23 BMP moved up to the intersection (bottom left, with Lt Oleynik's T-55 just to its right) and engaged the Muj team on Hill 75, to no effect. Lt Dyachenko then ordered his BTR (carrying both his squads and Captain Aronofsky) right up to the base of Hill 75, where it: fired and missed, fire and got two KIA, fired again and got 1 KIA, and fired one more time, but 3 hits 3 saves!
Captain Aronofsky then leads 3rd Squad out of the BTR and into the face of the enemy, though their fire is ineffective (one hit one save). Feeling his oats, Aronofsky leads the squad into close combat, losing one man but eliminating the Muj team on Hill 75.
Following the CO's lead, Lt Dyachenko leads 4th Squad right out into the open, approaching the small wood containing the Muj commander, Quad 14.5mm HMG, and a rifle team. The dug-in Technical opens up on Dyachenko and his men with its 14.5mm HMG, but is scores 0 hits! 4th Squad manages three rounds of fire, eliminating the Quad 14.5mm HMG, then rolls boxcars (double 6's, which allows two actions)!!! The first is used on the Muj team in the wood, managing two kills and a pin, while the Muj return fire hits nothing!
Feeling as if nothing can go wrong, Lt Dyachenko leads 4th Squad into close combat with the Muj team and the Muj commander.
4th Squad makes quick work of the Muj team, leaving only their commander, though they do suffer two men down as well. While this is going on, the Muj second-in command moves left in preparation to rally the Muj team at the south end of the village. Then the Muj CO activates, and he's eliminated, but takes another of 4th Squad's men with him.
The Muj team at the north end of the village, which had just rushed up to canal2 to get its RPG in range of Lt Oleynik's tank, instead turns its focus on Lt Dyachenko and 4th Squad, now all alone in the woods. The Muj open up, dropping two more 4th Squad men, leaving only Lt Dyachenko and one man, and they move left out of LOS.
Quite fortunately, the BTR and the ZU-23 BMP both react to this and rain down hell on the Muj team at canal2, reducing their number by three and putting a pin on them.
But these are men of the Northern Alliance under Commander Massoud, and they're fanatical. They lick their wounds from the two armored vehicles and charge across the highway to get at Lt Dyachenko and his man!
The last 4th Squad man is eliminated, but Dyachenko is fighting for his life against the two Mujahadeen. Captain Aronofsky brings 3rd Squad atop Hill 75 (left center).
Then the Muj Technical (top center) opens up with its HMG on the BTR (left center), to no effect (1 hit 1 save), and is blasted into the stratosphere by Lt Oleynik's T-55 (just above the crossroads). The Muj 2IC rallies the Muj team at the south end of the village (just to the right of the burning Technical), who then fire at 2nd Squad (center right), to no effect, but 2nd Squad's return fire is equally ineffective.
The Muj at the south end of the village (far right) fire on 2nd Squad (top left) again, this time getting a kill, while 1st Squad (bottom left) crosses canal1 and the BMP moves left to get into firing position.
Back on the left, Lt Dyachenko was in dire straits, alone facing two Mujahadeen. But he sees 3rd Squad with Captain Aronofsky atop Hill 75 behind him, so he hits the deck and 3rd Squad mows down the two Muj fighters. Captain Aronofsky then leads 3rd Squad down the hill at the double, linking up with Lt Dyachenko in the wood.
3rd Squad reorganizes itself (top center) and delivers fire into the flank of the remaining Muj team at the south end of the village (bottom center), but score no hits and allows the enemy fighters to re-orient themselves and return fire, getting two kills and a pin, which Captain Aronofsky removes.

Lt Oleynik advances his tank (top left) and fires (bottom right): 1 hit, one save. He fires again: two hits, two saves... The ZU-23 BMP (center) then rushes ahead to get into point blank range and manages a kill and a pin. He fires again, getting another kill and a second pin. Lt Sharapova and 2nd Squad (left center) open up, getting a kill and causing the two remaining Mujahadeen to flee the field of battle. Battlegroup Aronofsky was successful in clearing the village, Urah! The Brigade Commander is recommending both Captain Aronofsky (leading the charge up Hill 75, saving Lt Dyachenko, and taking the wood SE of Hill 75 to flank the enemy position in the village) and Lt Dyachenko (despite losing the entire squad, he did initially clear the wood SE of Hill 75 of the Muj commander, Quad 14.5mm HMG, and a rifle team) for decorations. Urah! I don't know why I keep doing that.
Wow, okay, so that was fun. And quick. But let me tell you what led up to that. I set the table up and started playing with one set of rules at 1530. At 1730, after pretty much nothing happened, I took a break, reset the table, messed with the rules a bit, and went at it again. At 1830 I was really frustrated and ready to quit, but I figured NO, I owe you, my loyal readers, a report, and dammit that's what you're gonna get ;)
So I reset the table, drastically reduced the size of the forces, went back to my tried and true "Insurgent Commander" rules (Blitzkrieg Commander modified for skirmish gaming), and had a helluva game in exactly one hour! Now that's what I'm talking about. Oh, one more thing: usually (that is, until today, always) when playing Insurgent Commander I continuously introduce reinforcements for the bad guys at the end of every turn, but I didn't do that today as I was wore out. But it is my plan going forward, and it's also the reason I bought a Hind, in case stuff starts to get out of hand ;)
So the game was fun and quick, and the rules are good to go (though I am pondering the morale system as units almost always get eliminated vice driven off). The game was smooth and quick with so few friendly units, but that is going to cause me to have to do a
re-write of my Odessa 99th Brigade roster as the force I started with was way too big. Here's what I started with:
Commander: Captain Aronofsky
1st Plt/1st Tk Co., Lieutenant Oleynik (3 T-55)
1st Plt/1st Mech Co., Lieutenant Sharapova (2 BMP, 2 Rifle Teams)
2nd Plt/1st Mech Co, Lieutenant Dyachenko (2 BTR, 2 Rifle Teams)
1 MMG
1 ZU-23 (BMP)
And here's what I eventually got to:
1 CO
2 Lieutenants
1 T-55
1 BMP
1 BTR
1 ZU-23 BMP
4 Rifle Squads
I like playing with smaller forces, as OFM recently pointed out on TMP, it makes you more careful as it hurts a lot more when you lose one, and it makes the game go a lot faster. But it does seriously distort the force structure; I'm calling a BMP and two five-man teams a platoon; hell, I'm calling a five-man team a squad! I can live with that for the sake of quick games I suppose, I just need to figure out what it means in the overall scheme of things for my campaign. If it makes you feel better, think of the distortion as good, old-fashioned "bath-tubbing." One final note: I'm making all, or at least most, of this up, from the "Odessa Territorial Brigade" to the "last, all-out offensive in spring 1987." Some of it is real: Afghanistan is a real place, Massoud really commanded the Northern Alliance, but I'm really taking a lot of leeway for my gaming and just wanted everyone to know so they're not wondering if there really is a village of Namiyan or a Captain Aronofsky.
Stay tuned, I should have another report posted tomorrow. It's not the same campaign though, I'm play-testing some skirmish rules for a gentleman using singly based figures and individual activation. It should be a good time.
V/R,
Jack


So you table and figure sizes are shrinking while I am getting in games with 20mm and larger tables. It is interesting that you persevered with the rules when they were not working. I normally either change them midstream or just stop and think about them for awhile. But I guess you need to get game time in when you can!
ReplyDeleteShaun,
ReplyDeleteWell, I stuck with the rules for a bit, went downstairs, changed some things up, tried again, still didn't work. Then I just changed rules.
I'm glad to see you're getting games in again.
V/R,
Jack
Would it be possible to get a copy of your rules?
ReplyDeleteBKCII is my favorite ruleset and am looking for skirmish level variations.
Jack may not reply for a little while as he may be busy with a newborn. But he did post his rules somewhere...umm..December 2013 post titled Insurgent Commander. I am sure links don't work in comments, so you may need to cut and paste:
Deletehttp://blackhawkhet.blogspot.com/2013/12/insurgent-commander.html
Thank you. Strange, I did a search for that term and I couldn't find it.
DeleteJack - congrats on the newborn. I hope all is well. Btw, you write such great AARs.
Sorry, I've been out of pocket. Shaun, thanks for the assist.
ReplyDeleteV/R,
Jack
Hi jack, Just found your blog thru TMP and am reading many of your modern AAR's for ideas to use in my wargaming, especially for Lock N Load tactical games.
ReplyDeleteHello Drake, and welcome! I'm heartened to hear that TMP can still be a place to bring wargamers together, despite some of the non-wargaming nonsense that goes on over there.
DeleteI'm a big fan of Lock N Load games, actually bought the 'Wargamers Compendium,' but then sold it off. Definitely a mistake on my part as there's a lot of good info in there and clever mechanics, I just have too much going on right now to get into another world in terms of gaming and rules.
So read away to your heart's content, and let me know if you have any questions. And if you're looking for modern batreps, you'll find most of mine over on my Cuba Libre blog (https://cubalibrewargame.blogspot.com/).
V/R,
Jack