Sunday, January 28, 2018

Pendraken Cold War Order is Complete!

All,

I've been pushing as hard as I can on this, and my Cold War "Wolverines" project is complete.  Well, almost.  The 10mm Pendraken lead portion of this project, which comprises about 97.5% of the total, is now complete, with but a couple more items begging for attention.  Yesterday I showed you I had completed the infantry, and I worked quite a bit last night and today to get the vehicles knocked out.  I am happy to report, they are ready for the table!  Here are a few pics; these are just teaser pics, documenting my project status.  Soon I will post a bunch more pics, nice close-ups, like I normally do, just need to carve out a little time, and a little sun wouldn't hurt, too.  I should be able to totally complete this project in time to start the war next weekend, so stay tuned!

And here it is, the whole mess, for the last time: the completed metal portion of the Wolverines project, totally finished and ready to hit the table!  Far left is US vehicles, center is Soviet vehicles, top right is US infantry, and far right is Soviet infantry.

A closer look at the vehicles, US at left, Soviets at right.  Each side has a tank company, a mechanized infantry company, a recon platoon, a mortar platoon, a tank destroyer platoon, an AA gun, and a battalion commander.

So I painted a bunch of up all the details (tracks, numbers, insignia, MG barrels, crew figures) and put a wash on them, took about eight hours to do my sixty-three vehicles. 

Here's a closer look at the US vehicles; if you're wondering where my colored numbers schemes came from...

I patterned them off of photos I found online.

And here are the Soviets.  The three trucks at center bottom are for the AA gun and the heavy mortar platoon, respectively, both of which are sitting in the infantry box.

 A closer look at the Soviets, red flags waving.

And you're still wondering what I still have left to do to complete my Wolverines project...

Here is it.  I bought some pre-built F-100s, just need to put decals on them, and then I picked up a couple Su-22s that I have to put together and paint.  Yeah, Su-22s aren't correct for early/mid-60s, but I couldn't find any 1/144 scale Su-7s, so these will just have to do.

That's all for now.  I'll get close ups of all the gear posted ASAP, and I have a few modern skirmish fights to post over on my Cuba Libre blog.

V/R,
Jack

Friday, January 26, 2018

Infantry Complete, Vehicles On the Way

All,

Well, it's been quiet here on the blog the past couple days, but I've been slaving away on my Wolverines project.  Lots of painting, washing, and flocking over the past three days has seen my complete all the infantry bases (as well as the Soviet heavy mortar platoon and AA gun, which are not self-propelled).  I'm also making steady progress on the vehicles, though I noticed I may not have enough of my dark tone wash to do all the vehicles once the painting is completed, so I put in a quick order to The Warstore (went in for a box of the new Battlefront Team Yankee LAV-25s!).  Anyway, here's where we're at.

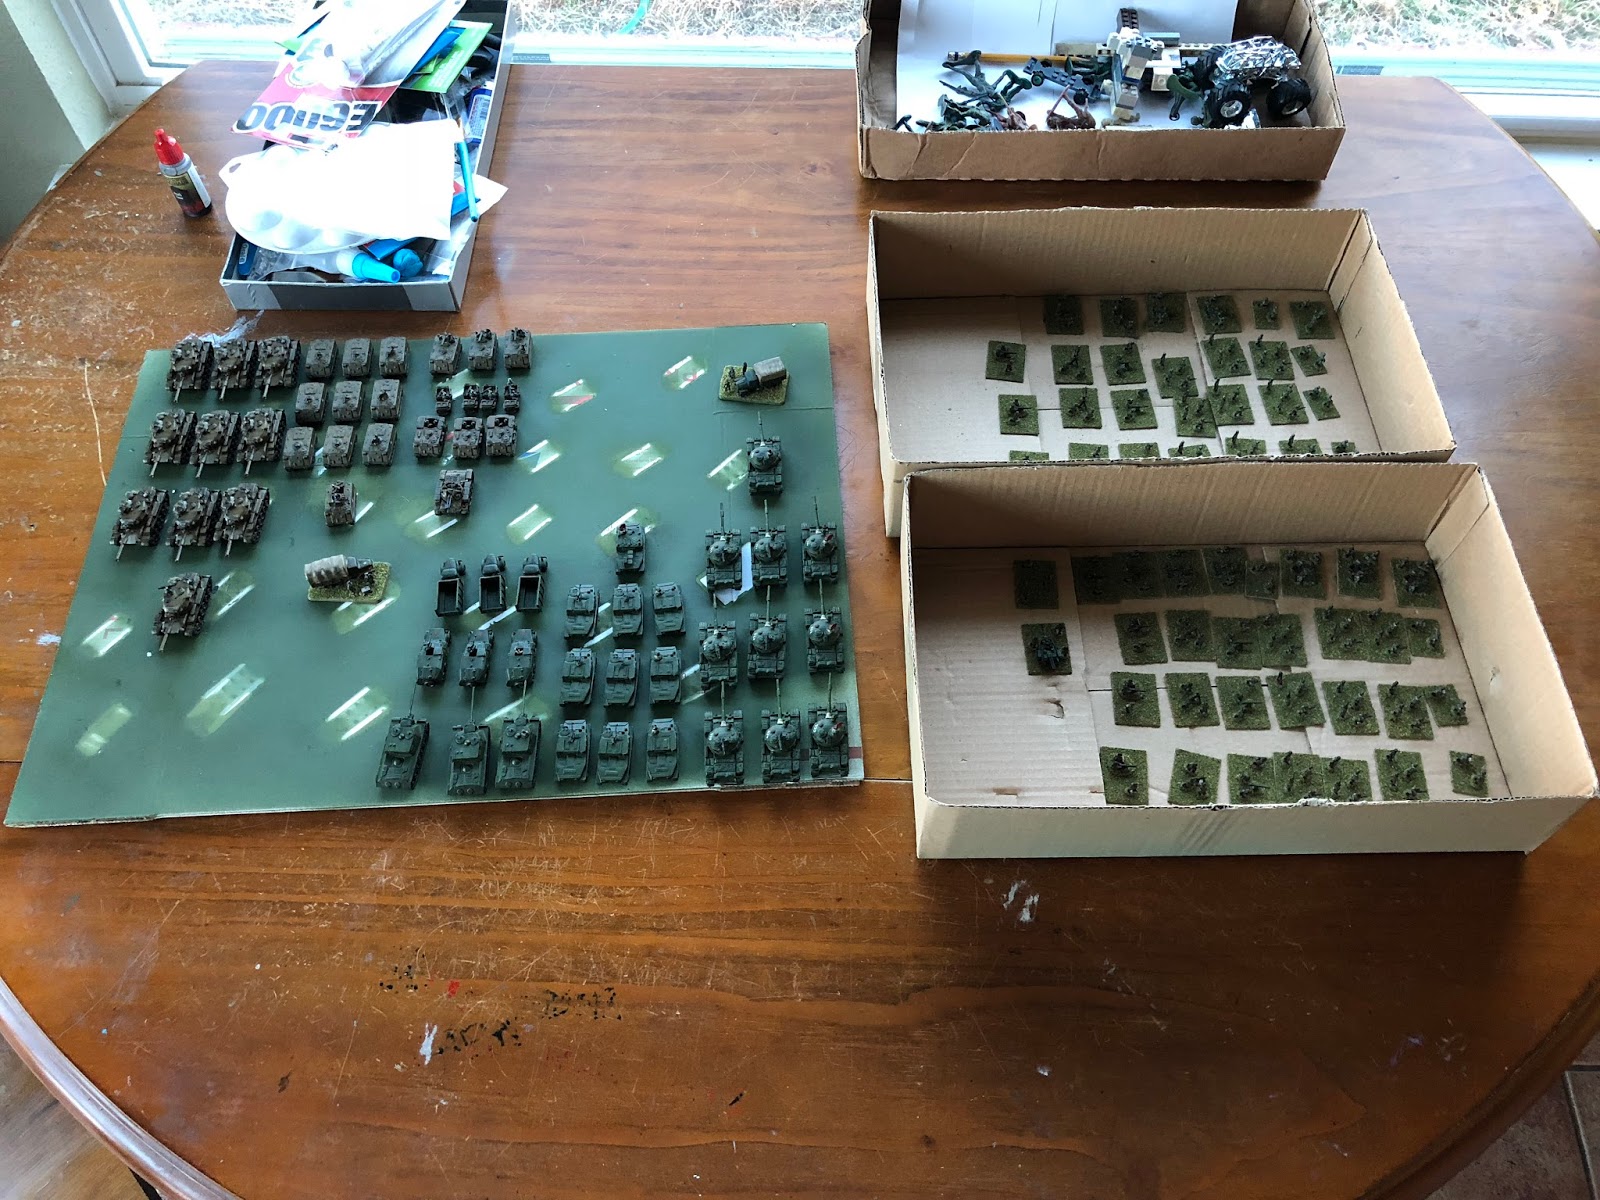
The whole mess: assorted hobby implements at top left and top center, a box of my boys' 54mm plastic army-men at top right, then the project.  All the vehicles are at left (olive drab is US, medium green is Soviet), Soviet infantry at right, and US infantry at bottom right.

The Soviets, completely cleaned, based, primed, painted, washed, and flocked.  The three even columns (running top to bottom) are the three mechanized infantry platoons, each comprised of a platoon commander, three rifle squads, an HMG, a recoiless rifle, and a medium mortar team.  At far right is their Recon Platoon of Plt Cmdr, two rifle squads, an HMG, and a recoiless rifle team.  The Soviets also have three 120mm mortars (bottom right) and an AA gun (top right, with the Company Commander just below it).

Don't worry, I will post better pics once the whole project is completed.

And the Americans, set up the same way, minus the three heavy mortars and the AA gun.

Making progress on the Soviet vehicles.  The red you see is four different vehicle commanders popped out of their hatch, holding signal flags.

And the US vehicles, showing some work done.

I'm getting close, I can feel it!  More to come soon, I hope!

V/R,
Jack

Tuesday, January 23, 2018

10mm Cold War Vehicles, Take 2

All,

Well, fresh off my Blue-Tack experiment, I've decided to go monochrome for the vehicles in my Wolverines project, Soviets going medium green and Americans olive drab.  I was able to pop out to the garage after work and get them spray coated, here are some pics.

The whole mess, Soviets at top left, Yanks at bottom right, each side consisting of a tank company, a mechanized company, a recon platoon, a mortar platoon, a tank destroyer platoon, an AA gun, and a Battalion commander.

A look at the American force, M-60s, M-113s, Jeeps, and an M-42 Duster.

A closeup of the head of the tank column, with Company Commander at far left and a Platoon Commander at center.

Same thing for the Mech column.

Heavy mortar platoon at left, recon platoon at center, and tank destroyer platoon at right.

The Duster at bottom center and the Battalion Commander at top left.

The Soviet horde, with T-62s, BTR-50s, ISU-152s, BTR-152s, and trucks for the heavy mortars and the AA gun.

The head of the tank column, Company Commander at far right, a Platoon Commander at center.

Same thing for the mechanized column.

Tank Destroyer Platoon at left, Recon Platoon at center, and the trucks for the AA gun and heavy mortars (both of which are on the painting table with the infantry right now) at right.

The Soviet Battalion Commander.

That's all for now, need to get to work on the grunts.

V/R,
Jack

Monday, January 22, 2018

My Blue-Tack Experiment

All,

Well, still depressed about the @#$%ing Patriots, but the world keeps on turning, and I continue moving ahead with my Wolverines project.  Now I'm on to working on camo for the vehicles, experimenting with Blue-Tack as a mask.  I went to Wal-mart and bought their version of Blue Tack (couldn't find actual Blue Tack anywhere, but reading on the internet told me the various brands are fairly interchangeable), brought it home, and got to work masking a couple of test tanks, one M-60A1 and one T-62.  I primed them yesterday and let them sit over night before messing with the Blue Tack.

Here are my two test subjects, the T-62 at left and the M-60 at right.  It took me about ten minutes to do this, five minutes for each tank.  As this was my first time doing it, maybe it's possible to get a little faster doing this, but I can't see you shaving off a significant amount of time.  Five minutes per vehicle to roll out the sausages and apply them sounds about right.  I have a little more than 60 vehicles to do, so that's roughly five hours of work just to get them ready.

Anther view of our brave test subjects.

And the reverse.  I laid them on, squished them in a bit, and let them sit for about thirty minutes, then headed out to the garage.

And sprayed them liberally.  I let them sit for a couple hours, then brought them back inside.

Another look.

And then I pulled the Blue Tack off.  And, to be honest, it was kind of a pain in my @#$%.  I reckon I spent another five minutes per tank pulling the Blue Tack off.  So, first up, the good: the good is that it works pretty well in terms of getting you some great, natural, soft lines in your camo.  I'm really very happy with that.

The bad: this is when I learned that the colors I used for both the US and Soviet tanks didn't have, in my opinion, enough of a contrast, and the Soviet colors are way too light for combat operations in most of North America.

Another look at 'the good,' in which I'm very happy with the blended, non-harsh demarcations between camouflage colors.  For 10mm, I definitely needed colors with more of a contrast.

Another look at the bad: these are the wrong colors to be mixing for camo, unless we're shooting for the Middle East.  Now for the ugly...

The ugly, Part I: see the blue?  Yeah, that's Blut Tack that I couldn't get out, even after five minutes of working it over with a toothpick and another ball of Blue Tack.

The ugly, Part II: don't know if you can see it that clearly in the photos, and both tanks had it, but look at center and center right.  If it looks like you see bare metal, it's because you do.  Taking off the Blue Tack removed paint to the point of showing bare metal.  Bare metal after I primed with two coats.

The ugly, Part III, already mentioned obliquely: five minutes to apply the mask, five minutes to remove the mask, for 60+ vehicles equals about ten hours of work, and that's not good.

Verdict: I don't have ten hours to devote to just doing camo for the vehicles.  I can't really deal with having small bits of Blue Tack on all my vehicles (I'm assuming I could eventually get all of it off if I was willing to spend even more time per vehicle).  I can't really deal with the Blue Tack pulling off the primer, leaving bare metal.  So, despite the fact that I love the soft lines for camo, I think I just got my mind changed for me.  Looks like my Cold War vehicles for Wolverines will be historically monochromatic after all!

It's funny, the colors I'm looking at using are both in the picture above (the M-60).  I believe I'm going to do all the US vehicles in that olive drab, and all the Soviet vehicles in the medium green.  Whaddaya think?

V/R,
Jack

Sunday, January 21, 2018

And They are Primed and Ready

All,

First, let me say that I'm utterly despondent after seeing the @#$%ing Patriots beat the Jaguars, and knowing they're going to another Super Bowl and are likely to win it.  In any case...  I was able to take advantage of the great weather this weekend and my Cold War Soviet invasion of the United States (I'm calling it my "Wolverines" project) is moving full speed ahead.  Last week I received the toys, got them cleaned, assembled, prepped, and primed.  Here's a quick few photos to document the progress.

Owing to the beautiful weather this weekend, I was able to take this...

And turn it into this.  Top left is US vehicles, center is Soviet vehicles, bottom center is US infantry, and bottom right is Soviet infantry.  Gotta love Walmart Krylon spray cans.  And forgive me, all that sunlight has washed out the colors a bit!  In any case, I've made the executive decision to, as I quite often do, throw together some cool paintjobs that aren't historically accurate.

I'm aiming for early 1960s, which means the US and Soviet vehicles should be plain green, distinguishable from each other only by a couple shade's difference, and all the grunts should be wearing green, too.  But here's what I'm going to do: You can see I sprayed the US vehicles a darker shade of green (Testor's can of medium green), and I'm doing this in preparation to do some ahistorical MERDC on the US vehicles.  The Soviet vehicles I've left Krylon green; I'm going to throw some Blue Tac on them they're going to be Krylon Green and Krylon Desert camouflage.  The US infantry are going to stay Krylon Green uniforms, but I'm going to paint camo helmet covers on them, and the Soviet infantry are going to have Krylon Khaki uniforms and I'll paint medium green helmets on them.

The US armor, sprayed medium green, gonna Blue Tac them and spray OD.  I keep talking up the Blue Tac like I'm an old pro; this is something else I've seen guy on the internet do but I've never done, this will be the first time.  Wish me luck!

The Soviet armor, again, the sun has totally washed out the color.  I apologize; in reality, it's a medium green color, if you read my painting posts and my batreps, you've seen it a million times.

The uniforms in this picture are that Krylon green.


 The US infantry.

And the Soviet infantry.

Now to get it all to the painting table.

V/R,
Jack

Saturday, January 20, 2018

The Crunchies are Based Up

All,

Well, Thursday I prepped the infantry for my Wolverines project, but I didn't base them because I was fresh outta bases.  I didn't get anything done Friday, except to place an order for more bases from Litko, but Saturday morning I was rooting around in all my hobby stuff, and what did I find?  That's right, a bunch of bases.  So this morning I based up all the infantry; and this interesting (to me, at least), as I've never done 10mm troops this way.

In the past I've glued the infantry to popsicle sticks, primed, painted, and washed them, then popped them off, glued them to bases, painted the bases, then flocked the bases.  but I've seen lots of guys (on the internet) that clean and prep their 10mm troops, then glue them straight to the bases, then prime, paint, and wash them right on the bases.  So I'm giving it a shot, see how it works out.  It should help me move even faster; on the popsicle sticks I tend to paint way too much detail and areas you'll never see on the gaming table.  I want to get these troops on the table ASAP, so I'm hoping this works.

Anyway, here are some pics.

The whole mess, Soviets on the left, Yanks on the right.  If you recall, each side has an infantry company consisting of CO, three platoon commanders, three rifle platoons of three squads (one stand equals one squad), and a weapons platoon consisting of three 82 or 81mm mortars (Sov/US), three recoiless rifles, and three heavy machine guns (Dshks/M-2s, though they kinda all look like M-2s, if you are catching the drift of me...).  In game terms, we will break up the Wpns Plt and parcel it out to each of the three rifle platoons, so each rifle platoon will have a PC, three rifle squads, a mortar, an HMG, and a recoiless rifle, with each armored personnel carrier carrying two stands.  Yeah, I shoulda sprung for four APCs per platoon, but I'm a cheapskate...

The Americans, showing the rifle company in the bulk of the picture, with each column being a reinforced rifle platoon.  Right to left: PC, three rifle squads, recoiless rifle, mortar, and HMG.  At top center/right is the Recon Platoon dismounts (two rifle stands, an HMG, and a recoiless rifle), and at top left is the battalion commander.

The Soviets, set up exactly the same way except: top left are three 120mm mortars (the American heavy mortars are self propelled), and at top center is the AA gun (the American AA gun is self propelled).

Closeup of the rifle company, with Company Commander at top right, the three platoon commanders right below him.  I thought I could put the PCs on pennies, but it was just a little too tight, so I took several of the regular bases here and split them in half, and used those half bases for the PCs.  The Company CO stand has three bodies, the PCs two, and the rifle squads/weapons teams three (except the HMG and recoiless rifle teams with Recon Plt, which both have four).

Close up of the Recon Platoon.  The US Rec Plt is in four jeeps, the Soviet Rec Plt is in three BTR-152s.

Looking at the back end of a rifle company, you can see the HMGs (left), medium mortars (center), and recoiless rifles (top right).

The Soviet AAA.


The Soviet 120mm mortars.
The battalion commanders, Soviet at left and US at right.

Alright, everything is prepped and ready to be spray primed, and did you notice that beautiful sunlight peering through the windows?  Yeah, it's been sub-freezing temps since Christmas, but the good Lord has smiled on me: I woke up to 60 degrees Fahrenheit, high of 70 today.  I believe some spray priming will be happening most ricky-tick.

V/R,
Jack