Thursday, June 30, 2016

Royals in Helmand, circa 2011

All,

I've been using Ivan Sorensen's rules "Five Men at Kursk" quite a bit lately for skirmish gaming (not to mention his Five Men in Normandy and 5Core Company Command); a great set of rules 'as is,' but I just can't help myself when it comes to tinkering with rules.  I've been looking at getting heavily into Vietnam-era and Modern wargaming, but I wanted something a little different.  Being me, I wasn't exactly sure what all that entailed, but I definitely wanted to make it a bit more violent in order to take into account the greater lethality of modern warfare, as well as to better differentiate between modern, Western, professional forces and various hostile militia/insurgents.  So, without thinking too much about setting and forces, and wanting really just to play a game to see if any of my ideas would work, I jotted down some ideas, grabbed the closest forces to hand, threw up a quick table, came up with a quick scenario, and got to it.

The next thing I knew I'd played three linked games and decided I should sort of retroactively come up with/turn this into another campaign.  Put simply, I was having a great time and didn't want it to end.  I hope you guys like this much as I do.  So a quick background, which is only semi-historical (i.e., I'm taking liberties with the units and all town/village and hostile personality names are fictitious).

The time is May 2011, and the Royal Marines' 45 Commando has deployed for another tour in Afghanistan, this time to Helmand province.  The area has been semi-quiet the past few months, but as we move from Spring into Summer the Taliban is becoming more active and the Royals are taking steps to counter these new enemy initiatives.  The campaign will follow a Royal Marine rifle section during their missions in Helmand; I'm not going to do up a proper roster.  Owing to the fact I'm rolling up forces for each side based on the scenario, it's not likely I'll ever have the entire section on the table at once, so you'll see various characters come and go, though I plan (as usual) on following a key, central group.

The scenario is this: a team from our Royal Marine rifle section is on a normal, foot mobile presence patrol, having left their base and moving east to west.  About an hour and a half into the patrol the radio crackles; approximately two kilometers to their north a local Taliban commander, designated "Raven," has taken a force into the hamlet of Tashur, apparently on a tax collection mission.  The Royals quickly huddle up, do a quick map study, formulate a plan of attack, and begin moving in that direction.  HQ radios that no air is currently up, but should be in support by the time the Royals make the village.

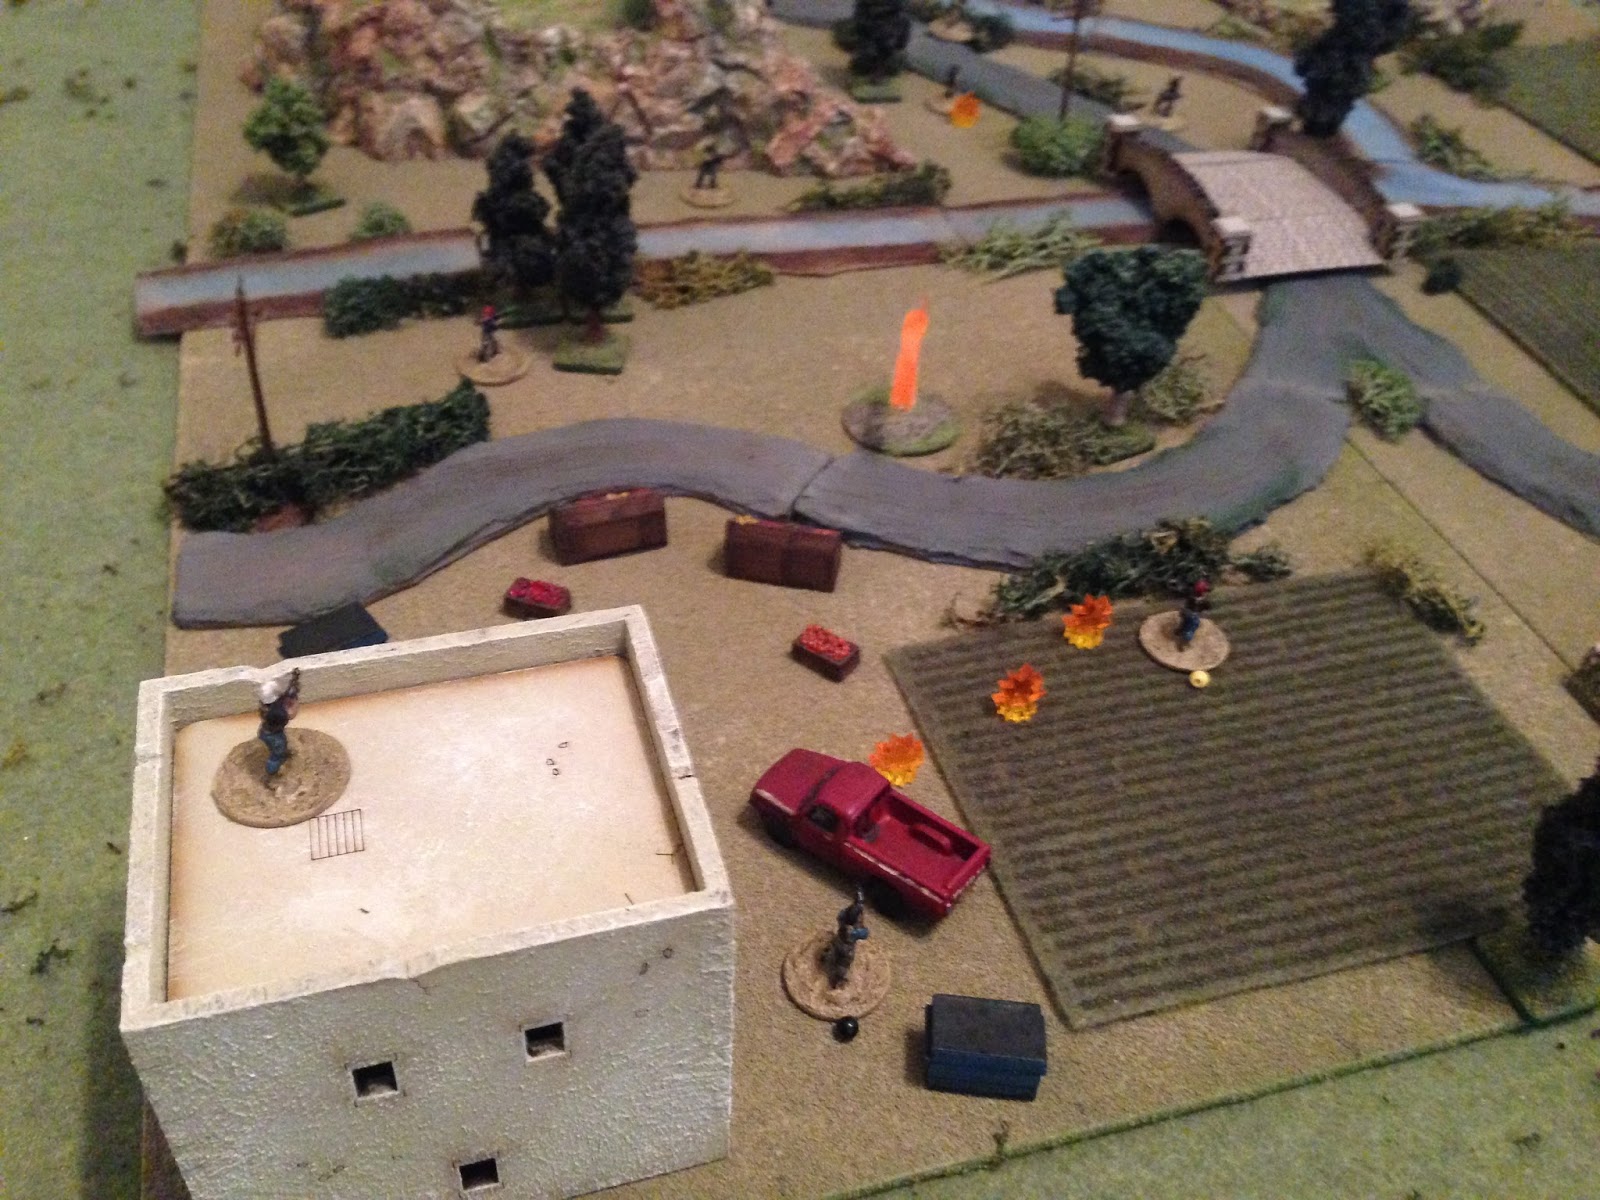
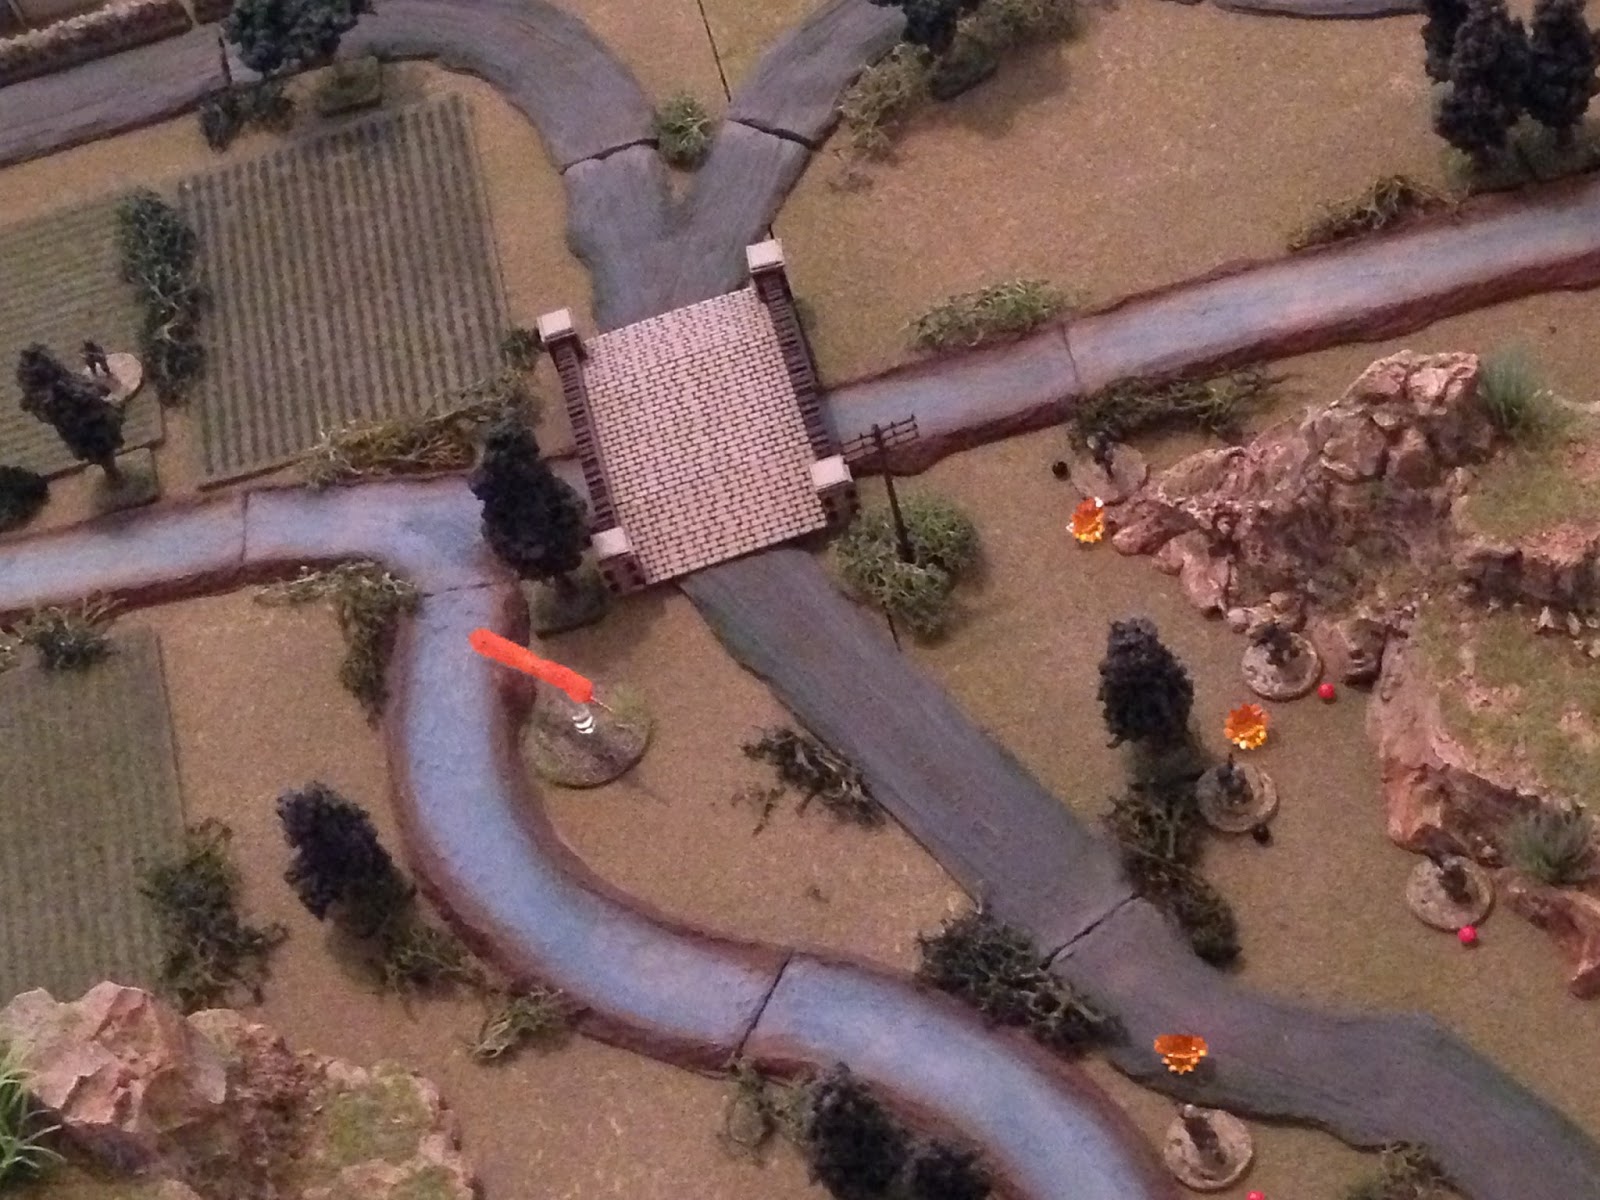
Overview, north is up.  The village of Tashur is at top, and the Royals will enter via the road at bottom center right.  There are two craggy outcroppings (bottom left and bottom right) which may offer good vantage points, though the one in the southwest (bottom left) is not reachable as the river is deep enough to be not fordable.  The road is hardball though heavily potholed, and there are a few fields and trees spread throughout.

Looking west to east.

Looking north to south.

Looking east to west.

The opposing forces, with British at top and Taliban at bottom (yes, I have some real Taliban that I need to get painted up; these are 15mm terrorists from Rebel Minis, while the Brits are from Flytrap Factory).  The Brits have five men, the Taliban seven.  I rolled these up based on the blinds system from Joe Legan's fantastic "Platoon Forward," though I rolled up the Brits from 5MaK (modified a bit for moderns, of course).

The Taliban have their leader, "Raven," an RPG, an RPK (magazine-fed light machine gun based off the AK), and four AK-series riflemen.

The Brits are, from left to right: Pvt "Gimlet" Grabowicz (SA80), LCpl "Sparks" Anderson (SA80), Pvt "Jonesy" Jones (SA80 w/UGL), LCpl "Knocker" Dawes (top center, Minimi), and Corporal "Corp" Choudhry.

Sorry for the crappy lighting...

The patrol enters and moves up.  The troops are in the following order of march: Gimlet, Knocker, Corp, Sparks, and Jonesy.  Gimlet is almost to the bridge, and no sign of trouble yet...

I place blinds on the table and this is how they shook out: you can see the seven Taliban spread across the top of the table (this is looking north to south, with Brits at top center).  There are Taliban atop both buildings, behind the red pickup truck (bottom left), at bottom center in the field, at far right on the road, at center left behind the tree, and just above him and to the right, behind the left-hand outcropping.

As the Royals move up, the Taliban spot them but are caught by surprise and dash into fighting positions.  Knocker (bottom center left, just left of the tree) spots them first.  He shouts out a warning and opens fire with his Minimi, pinning the Taliban rifleman in the field (center top).

The Tango behind the pickup truck returns fire, but misses.

Gimlet bravely dashes forward towards the bridge, and he doesn't become aware of the Tango behind the outcropping until he hears the report of the AK...

The 7.62mm x 39mm rounds whiz by too close for comfort, and Gimlet falls back, suppressed (red bead, from explosion at top left; Knocker is at right).

Corp (bottom center, between Gimlet on left and Knocker on right) fires on the Tango machine gunner (atop building at top center)...

Putting him out of the fight.

Corp then dashes up to Gimlet to rally him...

But Gimlet is still shaken and falls back again (red bead at bottom center, from Corp at top left).  Sparks is to Gimlet's right, and Jones is behind him.

Sparks (bottom center right) moves up next to Knocker and fires, knocking the Tango behind the tree at top center right down (just visible next to tree and explosion).

Jonesy begins climbing the right-hand hill (bottom right), but as his head pops above the crest he's spotted by the Tango leader, Raven (top right, atop building).  The terrorist fires, knocking Jonesy down.

The Tango at the red pickup truck fires on Knocker (top left)...

Forcing him to fall back (red bead at center, from explosion at top left).  Things aren't looking good; Sparks (just left of Knocker) and Corp (off camera to left) are good to go, but Gimlet and Knocker are suppressed and Jonesy is hunkered down.

Despite not having a great shot due to the outcropping, Sparks (bottom center) returns fire on the pickup truck and manages to pin the Tango there.

But then Raven (bottom right) fires on Corp (top left)...

Forcing him to fall back (red bead at top right center, from explosion at top left).

You can see the red beads piling up...

Then the Tango at the hill gets brave: he dashes forward to get a shot at the Brits suppressed on the other side.  But as he turns the corner Sparks sees him and snap fires...

But he misses!  But the Taliban foot soldier's aim is thrown off and he misses too!!!

Without a clear shot, the Tango RPG gunner sprints to the rear to clear his field of fire, as well as to help his hunkering comrade.  But he's misjudged the distance and doesn't quite make it.

In 5MiN/5MAK you roll a D6 to see how far they go, and he didn't do so well.

On the far left, an as-yet unseen Tango moves up (top left) and fires on Gimlet (bottom right), but misses.

Sparks quickly adjusts and fires another burst at the nearby Tango...

Putting him out of the fight (top left), then sprinting up the hill to Jonesy...

But as he gets up the hill, the Tango on the left (top left) spots him and opens fire.  With rounds impacting all around him, Sparks checks Jonesy and he's back in the fight.

Seeing Sparks and Jonesy (far right) under fire, Gimlet (bottom left) gets his stuff together and returns fire, knocking the Tango down.

Yes, I've changed things up regarding pin/hunker/man down.  That's one of the reasons why I was playtesting ;)

With a quick lull in the fight, Corp (left) and Knocker (bottom center) both get their wits back (successful self rally).

But the lull doesn't last long; Raven (bottom left) opens fire on Jonesy and Sparks...

This time Jonesy is really down, out of the fight.  Sparks returns fire, pinning Raven.

The Tango at the pickup truck fires lays down covering fire, and though he doesn't hit anything the RPG gunner is able to move to the hunkering Tango at center (white bead).

Gimlet (bottom center) returns fire on the pickup truck...

Putting that Tango out of the fight (just above the truck), though the RPG gunner checks on his buddy and he's back in the fight (left).

And then Sparks (bottom center right) gets up the hill into a good firing position and fires...

The Raven is no more...

Knocker joins Sparks atop the hill (far right), drawing fire from the Tangos at top left...

The rounds zip, bounce, and ricochet all around him, but Knocker rattles off a long burst...

Knocking the Tango rifleman down (white bead) and driving the RPG gunner back (red bead).

At that point, the last two remaining Taliban (these two), with their leader and comrades clearly dead, decide to hoof it for the hills.

With Knocker covering, Sparks heads down to check on Jonesy; turns out he's okay, just knocked out by a spent round (very lucky casualty roll).

Corp and Gimlet cross the bridge and press forward, ultimately counting five enemy KIA, including the Raven.  A successful mission.  Corp calls to Sparks for the radio, and just as he's about to key the mike to provide a SITREP, the radio crackles and HQ reports friendly air is on station...

Well, what a fight!  That was a tremendous amount of fun!  Quick, bloody, decisive, a bit heroic, it really felt right to me, like what I want out of these games.  As I said, I'm writing after the fact, but at the time I wanted to see if this really worked the way I thought and I ended up playing two more games.  And yes, I'm very happy with them, and will get the batreps out as quick as I can, and hopefully play some more this weekend (baseball is over, so no reason I know of that it won't happen.

A quick side note:

I had the pleasure of getting to mess about with the Royal Marines of 45 Commando back in April-May-June of 2001 when I was in Bagram, even got to walk around with them a bit on the aptly named Operation Snipe, in which absolutely ZERO contact with the enemy was made.  Not always a bad thing I guess.  I had a Zippo lighter with the USMC Eagle, Globe, and Anchor on it, and ended up trading it for a beret.  Pretty cool little memento.

V/R,
Jack

Saturday, June 25, 2016

The Last Fifty Yards, Second Attempt

All,

I tried this awhile ago with 10mm, now I'm giving it another shot in 15mm.  It's the summer of 1944, and we're going to follow a squad of Canadians and a squad of Germans that keep running into each other around Caen during the campaign in Normandy.  I plan on playing these out with my 6-year old boy using the original "Five Men in Normandy;" I suppose I'll let him choose whether he wants to be Germans or Canadians.  With the slower pace of 5MIN (vice 5MAK) and playing on a bit larger table (maybe 3' x 3') it should be a bit more realistic.  We'll add a vehicle in every now and again.  Here are the rosters:

Canadians
Squad Leader: Corporal Kelly - WIA, return 25 Jul 1944 (F1).
-Dropped out of college to get in the fight, looking for anyway out of his small town existence.  This will be his first action of the war.
Assistant Squad Leader: Lance Corporal Reed -WIA but immediately returned to duty (F1).
-Grew up on the farm, every bit the good comrade.  Yet to hear a shot fired in anger.
Light Machine Gunner: Lance Corporal Kelso - WIA, sent home and medically discharged (F1).
-Worked the plow, but ran into a bit of trouble with the neighbor's daughter and needed to skip town.  Was serving with a British unit when they were kicked off the continent back in '40.
Assistant Gunner: Private Odames - WIA, evacuated to England for the duration of the Normandy campaign (F1).
-Coming out of the coal mines, would do anything to stop the Hun here, away from his family.  Fought with the British in North Africa, was part of the disaster at Dieppe, and spent some time in Italy prior to transfer to this unit for Normandy.
Rifleman: Lance Corporal Bennet
-Been a soldier all he's life, fell in love with the brotherhood of shared hardship.  Found plenty of shared harship in Ortona, Italy.
Rifleman: Private Talley - WIA, return 24 Jul 1944 (F1).
-Coming from the apple, pear, and peach orchards, he's got a bad feeling he'll not see home again, too much time at the front in Italy.
Rifleman: Private McKellar
-Just finished school.  Not graduated, finished.  It's time to prove himself a man.  He's been training for two years now and is chomping at the bit.
Rifleman: Private Lofton
-An aspiring writer, wanting to show the real side of war, always looking for the next great adventure.  Spent some time with a South African unit, very exotic, but now it's time to get to the 'real' war.
Rifleman: Private Thomas
-Straight out of military school, raring to go.  The Jerry's got his brother at Dunkirk and it's time for payback.  Still wet behind the ears, but ready for action.
Rifleman: Private Levy
-A first-class widget maker at the local factory.  Tired of being pounded nightly by the Luftwaffe, he's eager for a fight of his own, and he's going to prove himself a tiger.  Surely he'll be a tiger after all this training.

Support
PIAT Gunner: Lance Corporal Jackson
-Local union boss.  Well, almost, give it time.  He's chasing the Victoria Cross, and figures hunting Jerry tanks is a good start.  Ready to get at the Jerries after nothing but training the past two years.
Assistant Gunner: Private Bentley
-Quite the local carpenter, he's up in arms for the glory of Canada!  Boot camp was fun, now let's get to it!

Germans
Squad Leader: Corporal Wyche
-Longing for his fields of potato and cabbage, he's not sure he'll live to see them again.  Two years on the Eastern Front will do that to you.
Assistant Squad Leader: Lance Corporal Krumrie
-Former train conductor, he left for the front to defend the Fatherland.  Of course the Wehrmacht put him to work as a military policeman, where he's spent the past two years, but now his chance for combat has finally arrived.
Light Machine Gunner: Lance Corporal Fulcher - WIA, return 7 Aug 1944 (F1).
-Just finished preparatory school, he's aware the war is not going well and he will do anything to protect his family.  Training seemed awfully short, but now the Amis have landed.
Assistant Gunner: Private Wilhelm - WIA, evacuated to Germany for duration of Normandy campaign (F1).
-In and out of trouble with the law, couldn't really hold down a job.  He figures the war is his chance to prove his worth, if he can just return a hero.  Despite time in North Africa and Italy he hasn't been able to accomplish it yet, but this campaign will surely be the ticket.
Rifleman: Lance Corporal Brucke - WIA, return 23 Jul 1944 (F1).
-Former shoer of horses, he'll fight to defend Gemany against the Communists and Imperialists.  Training was quick but intense, and now it's time for action.
Rifleman: Private Keile - WIA, return 2 Aug 1944 (F1).
-Used to drive a tractor, he aspires to something greater.  Once he wins the Iron Cross they will surely make him an officer.  Involved in a few fights in Italy, things didn't quite go as expected, but now that he's a 'veteran' he has high hopes.
Rifleman: Private Tomsen
-Accustomed to long days in the fields, he has traded his plow for a rifle to defend his country.  So far that's consisted of moving food, ammunition, and weapons to the front, but now he's been granted a transfer to the infantry it's his turn.
Rifleman: Private Busse
-Previously a traffic cop, he longs to shower himself in glory.  As a rear echelon troop on the East Front, so far all he's done is blow roads and bridges up and march to the rear, but now he'll be on the front lines!
Rifleman: Private Voote
-A youngster, straight from school.  He's not happy to be here, interested only in getting home to his darling wife, whom he married on graduation day.  Training is finished and now it is time for battle.
Rifleman: Private Braun
-An orphan, migrant agricultural worker, the state is the only family he's ever known, and he is prepared to sacrifice all for it.  He's been in it since the start, from Poland to France to Greece to the Soviet Union.

Support
PzFaust Gunner: Lance Corporal Hulman
-Previously a mason, he desperately wants to get home, but he's sure this war is going to swallow him up.  In his previous job in administration, he had to deal with regular bombing raids on his headquarters.  Can't imagine how life will be at the front.
Assistant Gunner: Private Heilarie
-Father a small-town bigwig of the Party, and he's looking to establish a background suitable to advancement there.  Enough with training, time to get out there and prove himself!

Friday, June 24, 2016

Fourth Napoleonic Game with One Hour Wargames

All,

Well, the British managed to turn the tables on the French, and now the Brits are pushing ahead and the French are doing their best to fall back on a hill they hope will anchor their defensive line.  The British are many and pushing hard, the French are few, dispersed, and without a direct route to the hill.  General Dadie is visibly shaken, while General Nickolls is licking his chops.

Overview, north is up.  The French will begin the game with all units below the river (lower third of table, running east to west).  The roads are simply decoration, conferring no movement bonus.  At dead center is a large swampy area that is impassable to all troops, as are the two woods on either side of the table.  The hill, Mont Bleu, is at the top of the table and is the victory objective for both sides.  The British will start with all forces off the table, but all units will enter the table via the southern (bottom) edge on Turn 1.

Fifteen turns to see who holds the hill; it may as well have been on Jupiter...

The opposing forces, with French at top and British at bottom.  The French have three infantry brigades (1st, 2nd, and 3rd Ligne, respectively) and a Horse Artillery Battery.  That's right, the French have but four units (and their General).  The British have three infantry brigades (the 1st and 2nd Brigades of Foot, and the 1st Dutch Infantry), a Dutch Foot Artillery Battery, a Royal Horse Artillery Battery, and a brigade of Light Cavalry (a regiment of Hussars and a regiment of Light Dragoons).

The initial set up: the French 1st Ligne is on the road at left, with the 2nd Ligne behind them.  At right is the French 3rd Ligne and the Horse Artillery Battery, along with General Dadie.  I am violating the principle of concentration of force, but at the same time, I've got to worry about a traffic jam as I've got to get my units over the bridges and to Mont Blue (top center).  Keep in mind, the only unit I have that can fire and move is the Horse Arty; the three infantry brigades can fire OR move.

And the fight begins with the Royal Horse Artillery Battery (RHA, bottom left) coming on the table between the two bridges and firing on the French guns, though casualties are light.

The Dutch Battery (bottom left) comes on next to the RHA, and the French 3rd Ligne (top right) fires a musket volley at the RHA, obtaining four hits.

The French guns speak (top center right), also firing on the RHA (bottom center left), but they're aim is terrible and they only get two hits (six total).

I was really hoping to go a long way towards knocking the RHA out in Turn 1...

The French Horse Arty then limbers up and falls back to the right-hand bridge.  The Allied infantry come on the table: 1st Foot at left, 2nd Foot and Dutch at right.  And with the 3rd Ligne (far right) engaged to its front by the 2nd Foot and Dutch...

The British Light Cavalry Brigades comes straight on the table at the charge, crashing into the 3rd Ligne's flank!  The casualties are horrendous (10 hits!).  General Dadie rallies them, but only three hits come off.

Looking from west to east, the French 1st Ligne (bottom center) fires on the British 1st Foot (bottom center right), putting several hits on them, as the 2nd Ligne falls back over the left-hand bridge (bottom left).  General Nickolls comes on the the table (top center right), and Turn 1 comes to a close.

Back on the right, the RHA (bottom left) fires a volley of canister into the the 3rd Ligne's already confused and decimated ranks, and they fold!  General Dadie is unharmed (other than still missing his left arm from fight number 3) and falls back.

Perfect!  Not only am I down to three units now, but the British Lt Cav (top right) are freed up to go after my artillery (top center)...

Back on the left (looking west to east, with left-hand bridge just off camera to left), the 1st Ligne (bottom left) fires on the British RHA (center), but manage only two more hits (eight total).  Nice shootin', fellas...

I've taken some big chances trying to finish off the RHA; I want to get rid of them as they are Horse Artillery which can move and fire each turn, which is not good for business if you're trying to run away from the enemy and unable to move and fire yourself.  So I've gone out of my way to knock them out, but my shooting dice have left much to be desired, and now I'm (already) in big trouble.

As expected, the Dutch Artillery (right) and the 1st Foot (center) unload canister and musket balls into the 1st Ligne at very close range, under the watchful eye of their General (bottom center).  It could have been worse: they score seven hits.

While back on the right, the British Lt Cav charge again, catching the French Horse Battery on the bridge.  The Lt Cav manage a respectable (for light cavalry) four hits, taking the total to seven.

Then the Dutch Infantry (bottom center right) fire on the French Horse Battery, getting four more hits (11 total).  Now, I screwed up; the cav should have backed off six inches when they didn't knock out the arty.

Personally, I would have had the infantry fire on the guns before I charged with the cav, but the boy wanted to get the cav into the guns before the guns had an opportunity to fire.

The French artillery fires off a half-ass volley of canister, scoring only four hits (keep in mind, canister gets D6 x2 hits)...

And then the French artillery falls back (top center left, with French General at center right, just above the British Light Cavalry).

I really want to kill the RHA (far right), but they are just out of range.  So the 2nd Ligne (top left, with 1st Ligne below them) fires on the Dutch battery (center), scoring six hits.

Just realized I screwed up again: I'd used 1st Ligne (far left) to fire on the RHA (far right) earlier in this, the 2nd turn.  But the rules for the scenario state all French units south of the bridges at the end of Turn 2 are automatically eliminated.  So, I got away with one there; it wouldn't matter...

The French General falls back to his Horse Artillery (top left) as the 2nd Foot (center right, between Lt Cav, Dutch Infantry, and RHA) move on the right-hand bridge.

Turn 3 starts with the Dutch Battery (bottom right, with 1st Foot at bottom left) blasting 1st Ligne (center left) into oblivion...  General Nickolls (bottom left) rallies the hits off 1st Foot.

And then the British General leads 1st Foot towards the left-hand bridge (bottom left, with 2nd Ligne staring across the bridge at them).  The French artillery (top left) again targets the British Royal Horse Artillery (center right), scoring... zero hits.

So, I can't shoot worth crap today, I'm down to only two units, and then I forgot to have my arty fall back to the hill, leaving them too close to the British Light Cavalry...

The British cavalry push ahead (top right, near my artillery at top center), while the 2nd Foot move to the right-hand bridge (far right).

General Dadie continues his gallop (top left) to link up and support the 2nd Ligne (bottom left), while the British arty (bottom right) fires on the French arty (top center), scoring a few more hits (12 total, on the brink of elimination).

The remaining French brigadier says hell with it, I'm not waiting on the General, and charges back onto the left-hand bridge and into melee with the British 1st Brigade of Foot, supported by their General.  The French do very well, scoring eight hits.

Turn 3 ends with the Dutch Infantry moving onto the road to the right-hand bridge, behind 2nd Foot (far right).

And Turn 4 begins with the British Light Cavalry running down the French artillery...

Down to one unit, the 2nd Ligne, and they are actually cut off from Mont Bleu.  The  hill is off camera to top center, while my infantry are off camera (a long way) to bottom left.

The British 1st Foot melee with the French 2nd Ligne, scoring five hits.

And then the British RHA gunners roll up (bottom right) and pour canister into the flank of 2nd Ligne (top left), shattering them (12 hits, using canister and flank bonus).

And that's how it ended, General Dadie (top right) atop Mont Bleu, surveying a battlefield entirely devoid of French combat units.

Ugh...  This one was so bad I almost didn't even post it.  But I did, gotta give the boy his due.  He took me to the woodshed and left me there, not even close.  He didn't even lose a single unit!!!  I don't blame the scenario; I just had 1) some bad luck with card activation combined with 2) some really poor firing dice combined with 3) a few poor command decisions.  He's having a great time, and I want retribution, though I'm not sure if it will happen this weekend.  We've got a tournament starting Thursday evening, so if things go well it will take up our entire weekend.  If we don't do so well, I'll have plenty of time for gaming.

More to come!  I've got a pretty cool looking WWII skirmish game to post yet.

V/R
Jack